Showing posts with label couching. Show all posts

Sunday, June 06, 2021

Snippet Exchange

Exchanging Snippets
In mid-February I exchanged the background of my snippet with Dorothy, another member of the Out of the Box (OOTB) Fibre textile group. We had until May 17th to finish embellishing our partner's snippet background and exchange them for the final reveal during our monthly virtual meeting.

Snippet background

A snippet is a small piece of something. You've probably heard of a snippet of music or video. If you Google "snippet roll" you will find that they are generally narrow lengths of embellished fabric that are often rolled around a piece of wood, such as a dowel or tube.

Dorothy's background
My background

Dorothy's background was made of purple fabric that she had hand-dyed, as well as a square of dyed cheesecloth. She has a lovely gradient of purples there. My background consisted of two strips of rather wild coloured fabrics that ranged from light blue to deep purple and fuchsia. I bought this fabric years ago when Ricky Tims came to Ottawa for a presentation.

Embellishing a snippet


The snippet that I was to embellish hung on my design wall for at least a month. When I finally started putting things to embellish it aside, it slowly came together. I filled a small basket with threads, yarn, buttons, hand-dyed scraps, lace etc. 

Fabric

The first piece of fabric that I stitched on was the long pinkish sliver on the left. I used Kimono silk thread to attach and sew when I didn't want the stitching to stand out. Otherwise I used my hand-dyed perle cotton as well as other embroidery thread.

First pieces of fabric
Adding various elements


Top of the snippet
One evening I stamped a couple of my hand-dyed fabrics. The swirl next to that first piece was stamped and then I just added random cross-stitches. On a piece of purple and blue fabric, I stamped on some birds. I added them at various places to add a little bit on cohesiveness. I embroidered around that first bird but since the result wasn't worth the effort, it was the first and last bird to be embroidered.

Here are the details of the completed snippet in three images. 

You can see that I added a lot of different fabrics. The colours that matched the background were easy to find while the contrasting pieces were more difficult. That's why I added that first pinkish piece - to remind myself to use contrast.

While colour is important, I also wanted to use contrasting textures in the fabric scraps. Here is a piece of voile from an old skirt that is attached to the first pink fabric and the printed swirl. 

Layering fabrics is a great way to add contrast and interest. At the bottom of this image is a layer of silk organza, a scrap of a dyed t-shirt and finally some dyed cotton velour.


Middle of the snippet
In the middle section, you can see a couple of other stamped birds that I didn't bother to outline with embroidery. Near the middle, Dorothy had used a purple cheese cloth so I added a piece of white silk organza to add some depth. 

I couldn't resist adding a small scrap of fabric with violets - it was just so perfect.

The fabric that starts in the middle and goes all of the way down the right side is the back of a skirt where tulle had been attached to the dark purple slip underneath. What you see is the sergered stitches. I thought that it might add interest to a piece at some point. 

Yarns and thread

Since I wanted to use many yarns in the piece, I started by couching some fuzzy dark purple yarn to create the top flower. 


Bottom of the snippet
I wanted to cover the stitching on the background piece, so I alternated between couching yarn and embroidery stitches.  

I also couched a piece of cheesecloth and added beads for interest. Many are small pieces of amethyst from my mother's broken necklace.

At the very bottom, you can see a white piece that is sort of lacy. It's a piece of FMQ on soluble fabric that I made a couple of years ago. I backed it with purple semi-transparent fabric.  

Buttons

I added a couple of fun purple buttons with white dots on them for a little bit of whimsy. There is also a beautiful hand-carved flower button near the bottom.

My Snippet

Here is the lovely snippet that I received from Dorothy.

My snippet made
by Dorothy
Dorothy used embroidery, appliqué, and beading. She added a few pieces of cheese cloth, some fun buttons (stars, an inch worm, bees, sewing machine, etc.) as well as ribbon that looks like a measuring tape. 

She made the swirls from foil that lines the inside of many food containers (I'm going to have to try that!) as well as two hand-made flowers.

I attached the snippet to those ice cream sticks that I roll up my hand-dyed thread on. It now hangs in my studio.

My new snippet roll.


My June OMG
June's One Monthly Goal (OMG)

I will be sandwiching my son's Version 2.0 quilt by the end of the month. Hopefully I will have gotten further along but at this point I'm being prudent by just putting the sandwich as the goal.

What I learned
  • The blank background was very intimidating but when I started to gather possible materials, it became less daunting.
  • I found it difficult at first to work on such a narrow background. 
  • When I found my groove, it was a real delight of slow stitching to put this together. 
  • I found it hard to part with the piece but I got such a vibrant, joyful piece back. 
  • Our snippets are so different. I can really see the influence of the workshops that I've taken from TextileArtist.org Stitch Club.
Related links
Linking parties
I'll be linking up to many fun linking parties, including Free Motion Mavericks which is being hosted by Muv. I will also be linking up to Patty's June's One Monthly Goal as well as other fun linking parties. Let's see what's going on out there! Oh Scrap!, Slow Sunday Stitching, Patchwork & Quilts, Peacock Party, Beauties Pageant, Off the Wall Friday, Monday Making, 15 Minutes to Stitch 2021


Monday, May 03, 2021

Week 5 of #AtoZchallenge2021Quilt (Art)

Last week was the end of the #AtoZchallenge2021Quilt (Art). It was a great finish, even if I was less organised as the month went on. I want to thank Frédérique of Quilting Patchwork Appliqué for a wonderful challenge. I really learned a lot and am so happy to have participated. Here's a look at the last week's post.

V is for Village

This project, Amalfi Coast Happy Village was one of my first art quilts, although I didn't realise it at the time. It was made during a workshop with the owner of a local quilt shop and based on Karen Eckmeier's book, Happy Villages. The image is loosely based on a postcard that I bought in the Amalfi Coast in Italy. 

Amalfi Coast Happy Village - my first art quilt

Putting Amalfi Coast Happy Village together 

Happy Villages by
Karen Eckmeier


W is for Weaving


This piece is called Ciboulette Stitches. It was created based on a workshop with Sue Stone through TextileArtist.org. Weaving was my first passion and it was great to incorporate it into my art. BTW ciboulette is chives in French. 

Ciboulette Stitches on a woven background

Lovely ciboulette flowers

The real thing in the garden


X is Xerothermic


Xerothermic is an adjective used to describe dry and hot climates. Isn't Google amazing? I actually learned a new word 😊! 

This piece is called South-West art quilt. It was begun at a workshop at my local quilt shop, Quilty Pleasures, in 2010. I had done what I could, but had no idea how to finish all of the grasses in the foreground. Finally it came to me – couching! So the piece was finished in 2015 as part of a UFO challenge. 

The quilt hangs in my daughter's room as a reminder of our wonderful vacations in the American South-West.
South-West Art Quilt

Couching was the solution that I
was looking for!
Lighting up the sky


Y is for Yellow


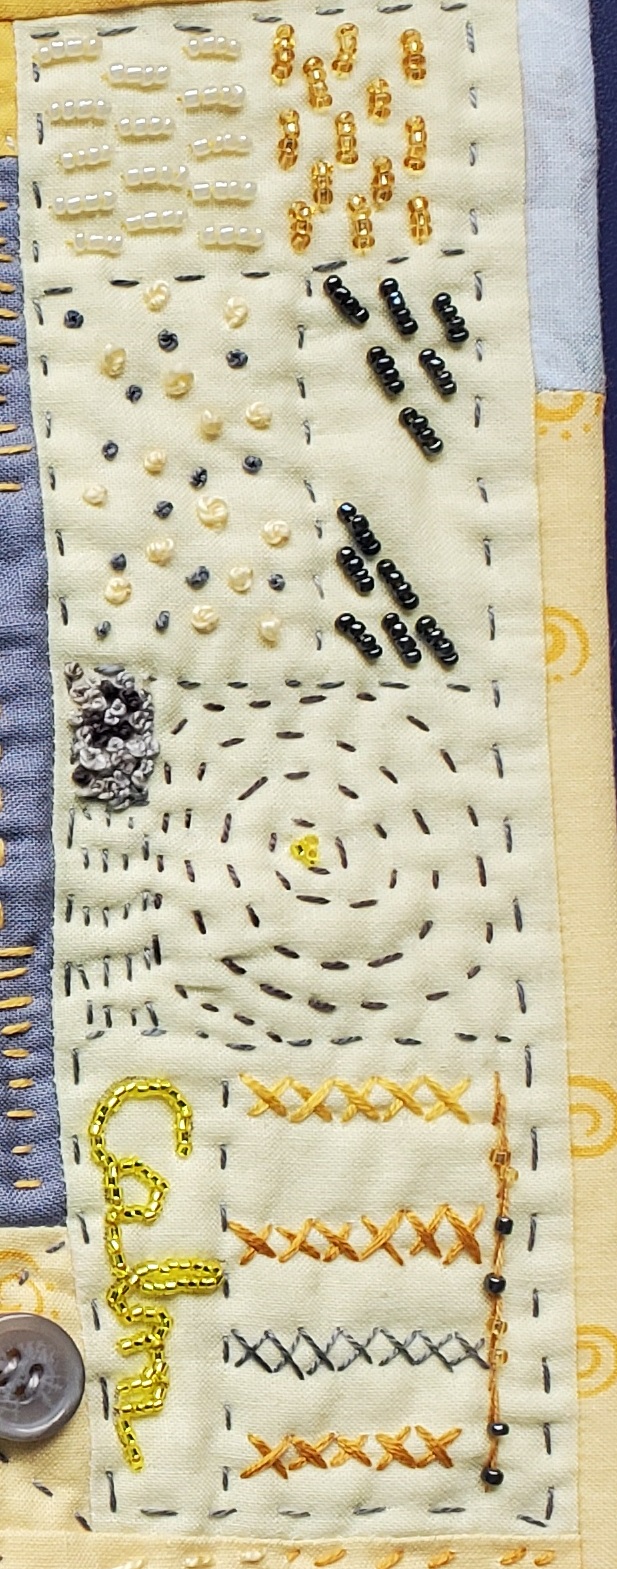
This piece is called “Keep Calm and Stitch”. I stitched and beaded the word “Calm” since it’s my word of the year - I didn't realise until then that my unconscious word of the year for 2020 was Frenzy. That's why I consciously chose Calm. 

This piece was made in January for the first challenge of the year of Project Quilting 2021. The theme was to use the Pantone colours of the year – Illuminating and Ultimate Gray. To avoid last year's Frenzy and to remain calm, this is the only one of the Project Quilting challenges that I did this year. I did enjoy it and hopefully it's something that I will continue to participate in, at least occasionally. 

“Keep Calm and Stitch” - for the Project Quilting 2021

Details: buttons, couching
and stitching


More slow stitching to remain calm 


Beading and various
embroidery stitches


Z is for Zigzag


This practice piece is zigzag crosses. It is a Sashiko stitch that I learned from Shannon & Jason Mullett-Bowlsby of Shibaguyz Designz in a virtual workshop. I also bought their book, Boro & Sashiko to keep on learning. Now that I know how to create the grids to stitch Sashiko, I really love it and hope to keep adding it to my art quilts. 

It's too bad that this last post wasn't an example of something in a real art quilt but the only other word that I might have used was zillion, as in a zillion beads in an art quilt. I am working on a project that feels like it has a zillion beads in it but when I looked at it, it didn't look like it even had tons of beads, let alone a zillion 😁.

Sashiko stitching zigzag crosses

What I learned
  • Although it required a lot of preparation, this was a great challenge.
  • I think what I underestimated the most was the time to prepare the posts since I didn't want to just put in what I had said on Instagram.
  • It was a great experience to see most of the art quilts that I have done over the years. Many of them have been created since belonging to the TextileArtist.org's Stitch Club, for which I am very thankful.
  • I know that I've learned so much as an artist about colour, composition and techniques, but I'm pretty impressed with some of my earlier works. Most are pretty good!
  • Now that this rush is over, I'm looking forward to reading some of the other participants' posts 😊
Related links
Linking parties
I will be linking up to many fun linking parties this week. You can still link up to Free Motion Mavericks until Tuesday evening. After that, make sure to visit Muv and link up thereMonday Making, Design Wall Monday, Oh Scrap!, Patchwork & Quilts


Saturday, April 03, 2021

Week 1 of #AtoZchallenge2021Quilt (Art)

The #AtoZchallenge2021Quilt started April 1 and I posted my first three letters on Instagram. If you didn't catch them, here is a recap.

A is for Art appliqué 

The piece is A White History of Art and the image that I used to illustrate Art Appliqué is the close-up of the representation of The White Girl by Whistler.

It was created for Art with Fabric Blog Hop, Fall 2018. It is based on a BBC series called History of Art in Three Colours. This piece is an interpretation of the White episode and the picture below portrays  The White Girl by Whistler.

Representation of a Symphony in White, No. 1:
The White Girl by Whistler

Here is an image of the entire piece. If you're interested in reading more about it, see Related links below.

A White History of Art

B is for Batik

The piece is called Peek-a-boo Red. It's totally hand-stitched with embroidery and beading. Peeking out from behind the curtain, you can see the batik hexies.

It's one of four mini art quilts that I create for the Summer Fibrations Art Show by the Out of the Box (OOTB) Artists Group which was held at the Mississippi Valley Textile Museum in Almonte Ontario in June - July 2019.

Peek-a-boo Red with Batik Hexies peeking out from the curtain

C is for Couching and Cording

The piece is called BIG Mandala to Help Heal the World. It was created for the Project Quilting Quarantine 2020. I made my own cording and then couched it down between the different parts of the Mandala. 

Hand-made cording that is couched down

BIG Mandala to help heal the world - PQQ 2020


What I learned

  • I am very impressed that I was really organised and ready to post all of these without too much effort. 
  • I don't generally like to post on Instagram because I have to write all of the information, including # tags on my phone. It's a really pain. It's not perfected yet but I wrote all three posts in a Word document and copied the wording for all three in an email. I was then able to go back to the email, copy the text and post it in Instagram.
  • I'm actually getting better on my phone, switching from one window to the other....that always made me nervous but I'm better at it now.
  • Posting from Instagram to the #AtoZchallenge2021Quilt linking party with Frédérique at Quilting, Patchwork, Appliqué using my phone was more of a challenge. I don't think that the problem is with InLinkz (who were very helpful) but with Instagram. Even now I'm wouldn't know that it was linked if not for going on the computer to check. 
  • It's definitely a learning process and I expect to be an expert by the end of April 😊 
  • I'm really glad that it's a really long weekend so that I'll have time to prepare for next week, and maybe even more!

Related links

Linking parties
I will be linking up to lots of fun linking parties. Be sure to check them out if you get a chance! Patchwork & QuiltsPut Your Foot DownOff the Wall FridaysCan I Get A Whoop Whoop?Peacock Party, Oh Scrap!, Monday Making, Design Wall Monday


Sunday, December 20, 2020

Christmas decorating fun

I love seeing our Christmas tree full of ornaments bought, inherited, received and made over the years. It's also the time when those Christmas runners, placemats and wall hangings get to come out and shine.

Adding to our Christmas decorations

Each year I try to make a little something for the tree or the house. I found the tutorial for the Christmas bell - the bell was supposed to be made of "sheer paper cloth" but I used organza backed with light stabilizer instead. The stabilizer gave the organza a crispness without removing the translucence. For the three-sided bell I used organza with dots and hearts on two of the sides and then embroidered the third side with a star. I hand-stitched the sides together and added the bell through it. If you're interested, the link to the tutorial is in Related links below.

Three sided Christmas bell
The embroidered side of
 the Christmas bell


I also made a snow frame. I started with a meditation stitched piece that I made last year, added an extra piece of fabric to make it wide enough and then added a couched snowman, snow and extra stars.

Snow frame with Christmas tree and snowman

For the Out of the Box Fibre Artist group, I made a Christmas postcard. It was dropped off on November 30 and should have arrived to it's new home by now.

The postcard was 4" x 6". The background is a fluffy fabric that I hand dyed in very light green. I used a pink cheese cloth to outline the tree and then couched some green chenille yarn. I used a Murano star bead for the top. Behind it I attached a small piece of yellow silk to add a little pop of colour. There are also many seed beads within the tree.

In the background, I used a white silk thread to embroider the snowflakes. I like the subtleness, like an impression of flakes. Instead of cardstock, I attached interfacing and then added a white backing.

Stylized Christmas tree postcard

Christmas postcard

Decorating the workplace

It's so different from previous years. This was my office in 2018. My colleague and I had a great time decorating with things that I had brought from home.

Adding colour to our 
workspace (2018)


Decorating the office plant (2018)


This is my present workplace - our dining room.

Working from home, in my dining room (2020)

It certainly is a lot cozier and the commute is very short 😊 I also love that Chevy is always near by!

What I learned
    Chevy in my studio.
  • I loved the idea of making the bell decorations but once I was done, although I liked it, I didn't feel the need to make more - which is a good thing because I still have way too many projects on the go!
  • The snow frame is on my window ledge in my studio. It's so lovely to look at while I'm writing this post. The couched yarn and backing makes it just a little too thick for the frame so I had to tape around it. Since it's for my office, I don't mind but I'll have to remember this if I ever make more as gifts.
  • I'm really not missing my physical workplace. It's so much easier to concentrate in my quiet dining room. You can see that I'm not trying to work in my studio - that would be a recipe for disaster...just too many distractions there 😊. 
  • Today I took pictures of my studio - it's pretty much finished. I'm hoping to write the post this week. Here's a teaser....
Related links

Linking parties

I'll be linking up to many fun linking parties, including with Muv for Free Motion Mavericks until Tuesday. On Thursday, please join me for the next Free Motion Mavericks. Your project doesn't have to be free-motion quilted to link up! Put Your Foot DownOff The Wall Friday Beauties Pageant, Peacock Party, Patchwork & Quilts, Oh Scrap!, Slow Sunday Stitching, 15 Minutes to Stitch 2020Monday Making

Thursday, June 25, 2020

Embroidering with plastic and Free Motion Mavericks

Hi. Welcome to week 286 of Free Motion Mavericks. Although I'm in the middle of setting up my new studio, I had planned on doing some free motion quilting (FMQ) today on the Pinwheels and Stars Baby Quilt - but I didn't find my supplies until it was too late - so you're going to see how last week, I embroidered using plastic bags 😊

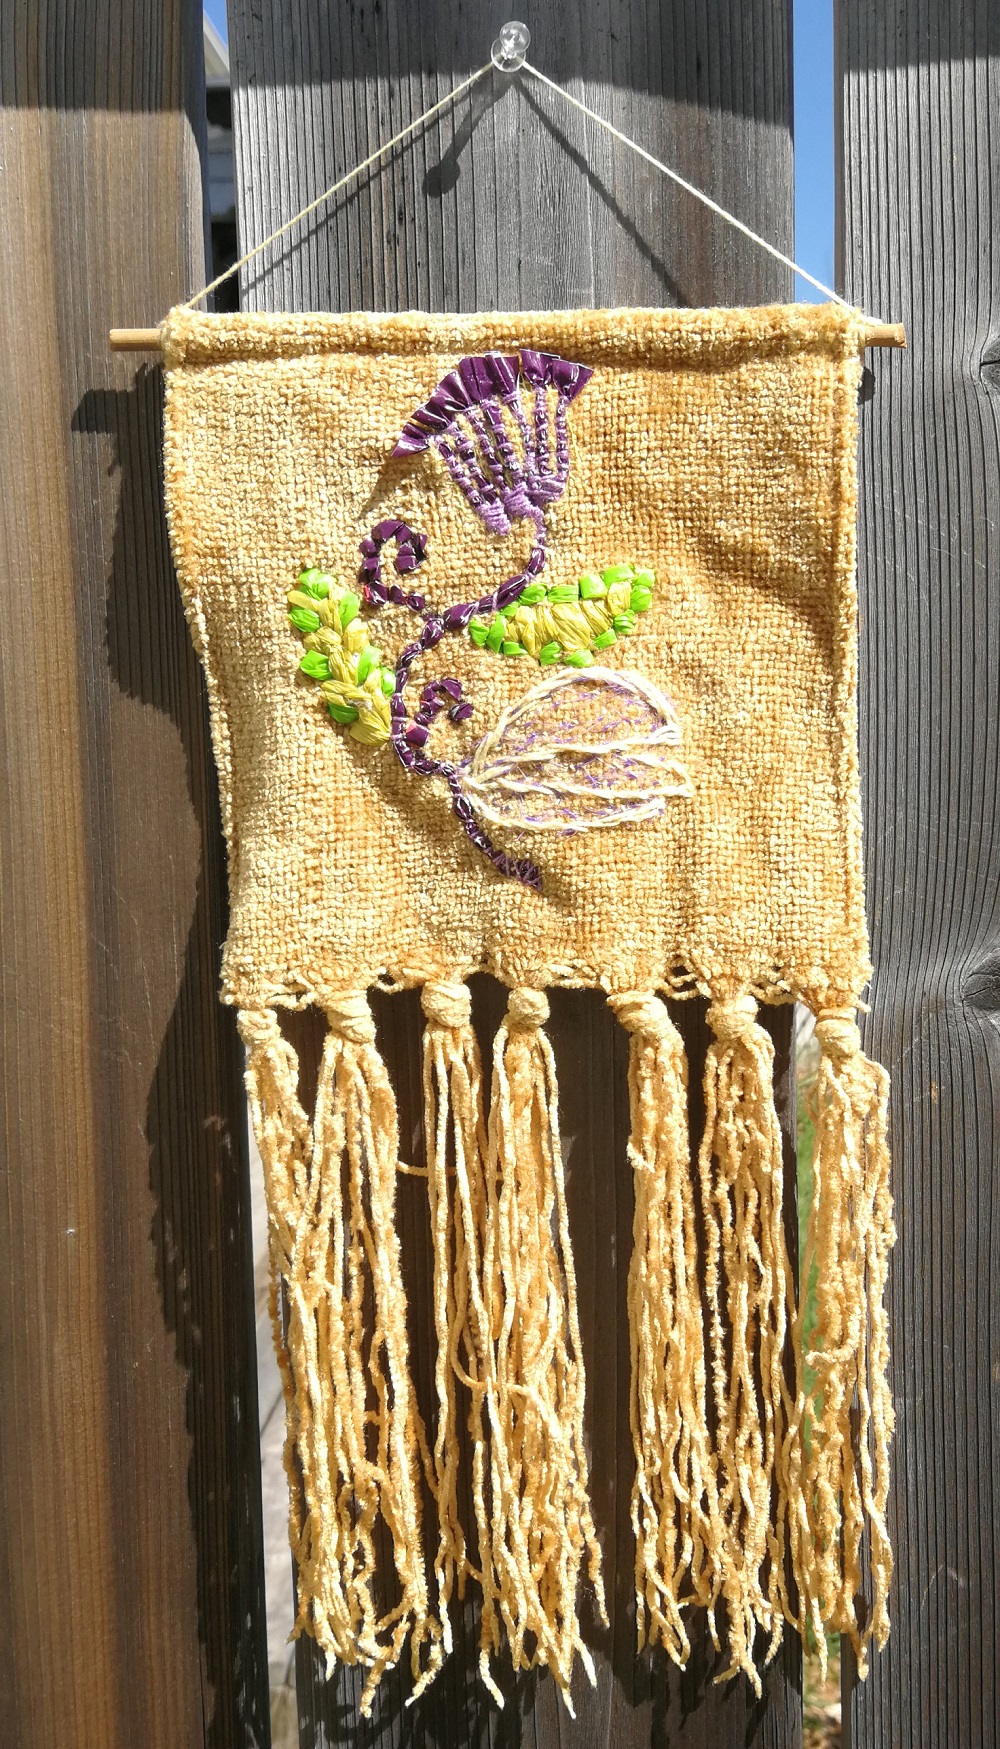
Sampler embroidered with plastic


Susie Vickery hosted the third workshop of Stitch Club 2020 at textileartist.org. Susie showed us how to make an embroidery sampler incorporating plastics. It was really fun. Here is my finished piece.

Embroidered piece with plastic strips
Sampler stitched with plastic strips

For my background I used a piece of an old chenille throw. I love the colour and texture and the weave was loose enough to easily stitch through, even with plastic strips. 

I found different coloured plastic bags and mesh. Until recently many grocery stores wouldn't let us bring our own re-useable bags, so I'm sorry to say that I've accumulated lots of plastic bags. I cut a few of them into roughly one inch strips.

I started by couching the purple strips. It was slow going because the plastic was only purple on one side. I then used a piece of yellow mesh behind the flower and then couched each line. I really liked the effect of fanning the plastic at the top.

Making the flower with couched plastic
Using couched purple plastic

It took me a couple of tries to get the leaf stitched. I finally embroidered a feather stitch with perle cotton and then stitching over it with the yellow plastic strip. I then added some green to fill it in. The other feather was outlined in a back stitch in green and then filled in with a satin stitch.

Close-up of the stitched design
Playing with different stitches using plastic strips,
 mesh and perle cotton

I stitched the three leaves over mesh and then added seed stitches with embroidery thread. I also wanted to try to stitch with the purple plastic so I added those curly bits.


Finished sampler stitched using plastic
Finished stitched sampler

What I learned
  • Although I don't want to spend the rest of my artistic life cutting up plastic bags (they leave a gritty film on your hands!), I really do want to continue experimenting with these types of products. 
  • I never thought that plastic strips could be used as thread to embroider but it gave a really different look to the stitches. Most of the plastics had a bit of a shiny finish to them. 
  • Now, not only am I stashing bits of mesh, string and ribbon, I'm also keeping interesting coloured plastic bags!
Related links
  • Susie Vickery is a wonderful artist who works in many mediums. Check out her Citizen Botanist - a puppet with the most incredible costumes! I encourage you to check out the animations and collections tabs on her website. 
Linking parties


Flower sampler embroidered with plastic
6" x 6" with 6"fringe
Materials: chenille fabric, strips cut from plastic bags, mesh, perle cotton and embroidery floss.
Techniques: embroidery stitches: couching, feather, seed, satin and back 


Free Motion Mavericks


It was a quiet week last time. Thanks to Denise and Dione for taking the time to link up. Since both projects are very cool, I thought that I would feature them both!

Here is Denise of For the Love of Geese's Red and White quilt. She was able to salvage her previously cut blocks using her AccuQuilt machine. Check out her free motion quilting!

Denise's Red and White quilt


Dione of Clever Chameleon has been doing some free motion appliqué on her Lunarcy quilt. Check out her Rabbit block!

Dione's Rabbit block from her Lunarcy quilt
Now it's your turn!

You are invited to the Inlinkz link party!

Click here to enter

Thursday, April 16, 2020

Free Motion Maverick and Community Stitch Challenge

Welcome to Free Motion Mavericks, week 276. I hope that this finds you and yours healthy and sane!

Community Stitch Challenge - Week 4

On Monday, the host of this week's challenge was Richard McVetis. His work exploring time and stitching is quite fascinating. Our challenge this week is to work with the couching stitch. I was quite happy because it's one of my favourites and it was great to see that it held much more potential than I would have thought!

He suggested that we use geometric shapes or shapes of things in our home to explore this versatile stitch. I don't draw much, but I can draw the shape of a book, since I've made so many of those foundation paper pieced book blocks. I like that it has specific sections that can be represented differently with thread.
Book image using various forms of couching embroidery
Couched book as well as the drawn shape
These are the assorted yarns that I used as background. Missing is some black embroidery thread that I used to outline the book. I used two strands to couch the other 6 strands. I've been collecting yarn for this type of work for years. I'm glad that I had a nice assortment to play with.
Book image with the yarns used for couched embroidery
Most of the yarn that I used for the couching background
 Couching the bright blue almost felt like weaving - which was my first textile love.

Book outline filled in with couched yarns
Couched book
I had so much fun making this. I drew my images at lunch time and then worked on it all evening. That's why there is no FMQ in my post...maybe next time 😊

Update on the Community Stitch Challenge - Week 2 Re-do

In my last post I mentioned that I was re-doing the Week 2 challenge. I'm now making progress on the piece. I found a lovely peasant skirt that I bought but never wore because it needed serious alterations and mending. I think that this is a better use of it! You can see it at the top of the piece.

Fabric collage used to make textile art piece
Adding a top layer from a skirt

Update on fabric collage to make textile art piece
I'm starting to like the progress
Since I want this piece to depict these strange times, I'm not rushing it since there are probably a few more weeks of things to add to this piece. I'm going to enjoy densely stitching it. The joy of making this piece is definitely about embracing the slow process.

Cute puggle sleeping on the couch
Chevy - expert at couching!

What I learned

  • I learned that couching is even more versatile than I thought. 
  • I had never outlined an image using a couching stitch. It's not as clean as using a regular embroidery stitch but I'm sure that it could be used effectively. I'll have to think about that.
  • Here's this morning's joke, courtesy of my bored children. It turns out that Chevy is a couching expert....since she sleeps on the couch most of the day!😉

Related links

Linking parties

I will be linking up to many great parties. Make sure to visit some and take the time to link up below!
Tuesday Colour & Inspiration, Monday Making, Midweek MakersNeedle & Thread Thursday, Put Your Foot Down, Off the Wall Friday, Finished or Not Finished Friday, Can I Get A Whoop Whoop?, Friday Foto Fun, Oh Scrap!, Slow Sunday Stitching,

Free Motion Mavericks

Thanks to everyone who linked up last time! What wonderful quilting and quilting events to keep us productive and sane. We are really lucky to be a part of this amazing community😊 If you didn't get the chance to congratulate Sandra of mmm! quilts on her latest published pattern, Stars Aligned, make sure to check it out and download the free Modern by the Yard magazine.

Stars Aligned quilt created by Sandra at mmm! quilts
Stars Aligned by Sandra of mmm! quilts
It's your turn.
You are invited to the Inlinkz link party!
Click here to enter