Sunday, March 27, 2022

A little yellow and floral runner

No matter how busy I get, I love to do something unexpected and fun. This week I made a runner for The Joyful Quilter's March TABLE SCRAPS Challenge. The themes were yellow/gold and floral. It was good to play with simple blocks and a thrill to free motion quilt (FMQ) it.

TABLE SCRAPS challenge

As you may know, I try not to get too involved in challenges because I have so much going on....but every once in a while, I let go of that guideline and go for it. Also, since I didn't tell anyone that I was linking up (I love when there is no sign up), there was no pressure if it didn't get done. 

A yellow runner to welcome the spring

I was going to use one of Cynthia Brunz's (of the Oh Scrap! party) Scrap Mixology Modules (I have modules 1 to 3). I thought that I was doing great until I realised that I had just sewn a bunch of strips together but with no neutral colours in between for 9 patch. So this is a variation of her Chaser block, from her Module 3 Scrap Mixology booklet. 

When I start sewing strips together, something comes over me and I have no time to read instructions - I just want to sew and then I have to make it up as I go along.😊 One day, I'll start by planning a little bit so that I can make her actual Chaser block.

Scrappy yellow floral runner 

I don't have any photos of the process, except for all of the blocks on my design wall. At first, I really didn't like what I was seeing. As I started re-arranging the blocks in some sort of order, I started warming up to it. 

Since I took a whole bunch of pictures, I may as well share them with you. I find that I can see patterns and problems better in a photo than in real life.

A bit of a mix on the design wall

Putting some order in the blocks

Slowly getting there!

Flipping the brown edges around

Final design with strong yellow strips meeting

Once I decided on a final design, I started sewing them together in rows. Of course I managed to sew the rows in the wrong order but the un-stitching wasn't too tedious and well worth it.

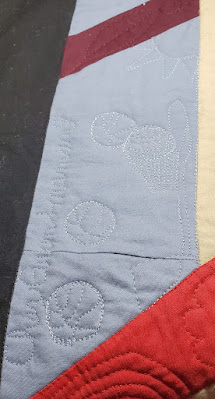
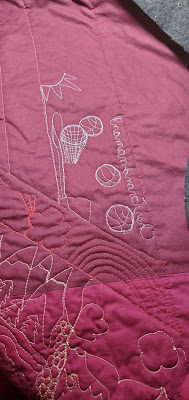
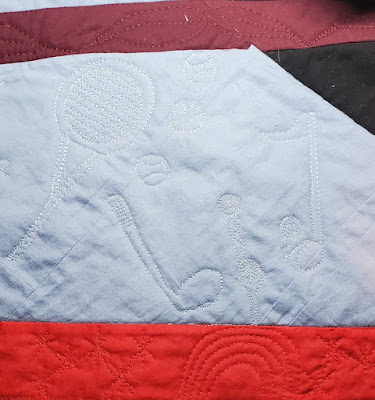
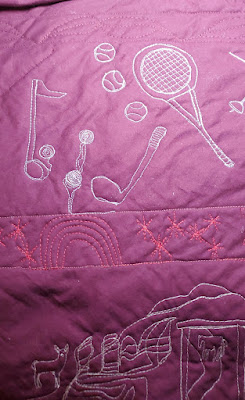
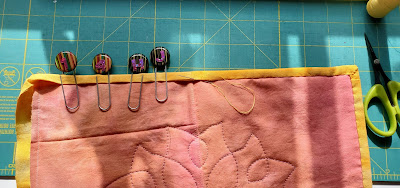
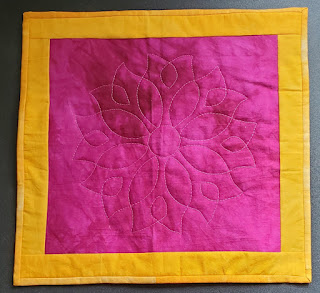
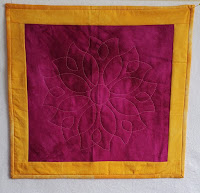
Since the runner was supposed to be mostly yellow, I used bright yellow thread to FMQ a simple variation of Angela Walter's Feather Meander. It's a variation because I don't do much echoing and also add leaves and sprigs here and there 😊 My design is more of a flower meander than a feather meander.
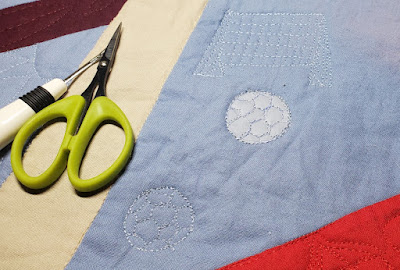
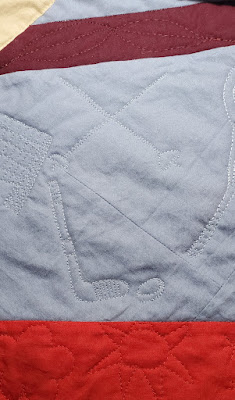
Details of the FMQ

I also have to show you the back since it's such a great piece of fabric that a friend, who was clearing up her mother's stash, gave me! The binding is also from that gifting 😊

Isn't that an amazing fabric of pineapple and tropical flowers?

What I learned

  • Sometimes I really need to slow down and actually think about what I'm going to do. I get in trouble when I just start sewing pieces of fabric together. It often comes out well in the end but it might be a little less stressful. 
  • I'm starting to realise that I like the problem solving that goes with not planning too much, so I may have to just embrace the stress of the problem solving!
  • It was so good to just sew and then quilt - no big expectations of artistic merit, just pure play (even if I got a little stressed about the layout!).
  • The yellow quilting thread and the binding does make the runner more yellow than it looked on the design wall.

Related links

Linking parties

I'll be linking up to many fun linking parties. Let's see what's going on out there! 2022 TABLE SCRAPS Challenge, Oh Scrap!, Patchwork & QuiltsDrEAMi! (Drop Everything and Make it!) with Sandra, Put your foot down, Peacock Party, Beauties Pageant, TGIFF. Monday Making, Design Wall MondayNeedle & Thread Thursday

Project details


Scrappy yellow floral runner
Made for the March 2022 TABLE SCRAPS Challenge
22¾" x 13½"
Material: cotton strips
Technique: piecing and free motion quilting (FMQ)


Thursday, March 24, 2022

A Finish on Free Motion Mavericks

Hi and welcome to week 374 of Free Motion Mavericks. Today I have a finish to show you as well as a tiny bit of FMQ on the Version 2.0 quilt.

"Bonjour la vie" is finished!

This piece is from a workshop taken with the Common Thread Quilt Guild (CTQG) in Ottawa. We had a virtual Fantastic Fusion workshop with Lisa Walton from Australia. I loved the workshop and I'm thrilled that this piece is now finished.

Bonjour la vie!

It was my February One Monthly Goal but I didn't quite make it. The free motion quilting (FMQ) was pretty much done by then but I didn't have the facing done to officially call it finished.

The colours of these batiks are so vibrant. My images aren't as vibrant as the real thing - I may have to invest in a photographing light or two. I'm including a few pictures taken with different lighting. There's no outside shot option right now as it's drizzling and cold out. The snow is at it's worse - mostly grey and dirty but it will all be gone by the end of the week. Youppi! 

Image taken when it was sunny outside

A detail shot of my favourite block.

It's hard to imagine but the colours of the block are even more vibrant than this photo! 

I also want to show you the back since it's almost as gorgeous (in another way) as the front! All of the different colours of Kimono silk thread vibrate from the back! I was going to use a fancier backing but after doing a mini just to see how the thread would do, it was pretty obvious that a busy fabric was wasted at the back of this piece. Again, I tried all kinds of lighting to show off the thread from the back, but nothing ready did it justice, so you'll just have to take my word for it! 😊

From the back - wonderful thread colours

Mini to practice with the silk thread

Back of the mini


Free Motion Quilting on Version 2.0

I expected to be able to spend yesterday afternoon FMQ Version 2.0 but I slept through it after I was put under for some dental surgery. Happy news, my teeth are as good as can be, bad news, no FMQ except for the little bit of extra quilting I did last time, after the post.

Biking as one of the sports

Bike from the back of the quilt


What I learned

  • The "Bonjour la vie" piece is going to a girlfriend who has just retired. Bonjour la vie means Hello life - how she greets every day as she wakes up. I love the way that she is open to what life brings her. I'm working on doing that too (but when I wake up, I just want to go back to sleep!)
  • This piece will be part of the virtual exhibition for Fibre Fling 2023, presented by Out of the Box Fibre Artists. I'll let you know when it happens so that you can all attend the free virtual show! 😊

Related links

Linking parties

I will be linking to some great parties - why not visit some of the links...and remember to link up your post also! Midweek Makers, Put your foot down, Needle & Thread Thursday, TGIFF, Off The Wall Friday, Finished or Not Finished Friday, Beauties Pageant, Peacock Party, Patchwork & QuiltsMonday Making

Project details


Bonjour la vie
Created in a Fantastic Fusion Workshop with Lisa Walton
Materials: transfer web backing, batik fabric, Kimono silk thread
Techniques: improv design and free motion quilting (FMQ) 


Free Motion Mavericks

We had some lovely quilts link-up last time. Karin at the Quilt Yarn, did some edge to edge quilting using a template that she copied onto Golden Threads paper while Gail used Silly Moon's Drop ruler to FMQ. Also, Denise used her embroidery machine to make this beauty! If you didn't see their posts, go have a look!

Karin using Golden Threads paper 


Gail using a Silly Moon ruler


Denise using her embroidery machine

It's now your turn to link up!

You are invited to the Inlinkz link party!

Click here to enter

Saturday, March 19, 2022

Final update on Traveller's Blanket

Hi! This is my last update on my Traveller's Blanket because the next time you see it, it will be done 😊 

Background stitching (quilting!)

It's been a long time in the making, but my Traveller's Blanket is nearly finished. Just a few more hours of stitching (or quilting). After that comes the difficult part - squaring it off, somehow binding it (or maybe a facing) and finally a sleeve to hang it up.

Traveller's Blanket - just a little more quilting 😊
Click on the image for a close up

This will be my second finished piece for an exhibition by Fibre 15 that will be held in June at the artPontiac Stone School Gallery in Shawville, Quebec. You'll be hearing more about it as I get my pieces ready!

Here are more details of the stitching.

The right side of the blanket was finished first

The middle of the blanket is mostly stitched

The left side of the blanket still needs stitching.

As  you can see, my stitching is rather organic. I hesitate to call it quilting, even if technically it is, because my stitches are not remotely even, or spaced or the same colour, so organic! 😊

Here are a few pictures of the stitching process. Mostly I echo stitched around the shapes but every once in a while I needed to shake it up! Since this block had lots of triangles, I used a chalk pencil to mark triangular stitching lines.

Marking stitching lines

Stitching a triangular pattern around the block

I radiated the stitching from this hexie.

Radiating stitches

What I learned

  • It's been a long process but I've loved most of it.
  • When I start changing my stitching pattern, it's because I'm bored! 
  • I love that the stitching is a big part of the piece by adding texture and colour without overwhelming it.
  • I'm nervous about blocking it because I know that my piece isn't square. I will probably have to re-stitch a bit of it, but I plan to mark it first and then undo the stitching so that they can be properly knotted. 
  • I will also have to strengthen some of my original stitching. A couple of the hexies are coming off, as well a the sea shells. Once I finish handling it so much, I'll check and secure all of these.
  • If all goes well, this piece will be finished by the end of March.😊 
  • In Related links below, I've added the links to my posts - from making the meditation blocks to working on the Traveller's Blanket.

Related links

Linking parties

I'll be linking up to many fun linking parties. I hope that you'll check these out. Remember that Muv is hosting Free Motion Mavericks this weekend, so go link up - I did! Put your foot down, Off The Wall Friday, Finished or Not Finished Friday, Peacock Party, Patchwork & Quilts, Slow Sunday Stitching, 15 Minutes to Stitch 2022, Monday Making, Design Wall Monday


Thursday, March 10, 2022

All kinds of sports on Free Motion Mavericks

Welcome to week 372 of Free Motion Mavericks. Since last time, I've been very busy doing free motion quilting (FMQ). You can see the results of this in my last two posts. Since FMQ is my favourite part of making a quilt, I have been enjoying myself 😊. 

Remembering childhood sports

I spent a few hours today FMQ on a larger blue stripe near the top. Further down you'll see the map of the quilting so far. This stripe originally included many sports that Stéphane liked. I'm keeping the same motifs for Version 2.0 and have practiced drawing 8 different sports so far. 

Basketball

In the first part of the blue stripe, I depicted basketball. When my son was young, my mother bought a full size basketball hoop for her yard so that the children could play. The hoop came to our home several years later and eventually moved across the lawn for our neighbours. 

Basketballs and hoop
Chez Grand-maman

Seen from the back


Soccer

The next sport is soccer, which he played when we moved here to Orleans. All of the sports that I FMQ today were drawn by hand except for the soccer balls. As much as I love hexies, I'm really not good at drawing them. I traced two images of a soccer ball from my computer screen and FMQ over them. 

FMQ over tracing paper to get a nice soccer ball

Soccer balls and net from the back of the quilt

Hockey and Fencing

Next came hockey and fencing. Stéphane tried a lot of sports, including a fencing course. 

Hockey and fencing

Tennis and Golf

The last two sports on the first half of the large blue stripe are tennis and golfing. I loved being able to add a golf hole to the club and ball since there is lots of space to fill.

Tennis racket and three balls as well as a golf club,
a ball on a tee and the hole with the flag

Golf and tennis as seen from the back

Map of the quilting


Here is the image of the original quilting. I've now finished the hearts, friendship, cards, weather, and feathers. The Canadian nature and sports are about half done.

What I learned
  • I love seeing all of the different quilted bits coming together. You can see some of the other rows in the bottom of the tennis and golf image. 
  • I'm really enjoy the FMQ now that the designs are not so difficult.
  • I'm not very good at drawing but I can generally draw simple outlines of things as long as I have an image to look at. I've been using clipart as those images and it's worked really well. 
  • I usually practice drawing an image a few times until it's good enough. If I can't get the hang of it, I'll just look for another picture, maybe from a different angle.
  • Did you see the FMQ writing in the basketball image? I'm following a course on Craftsy. I'll write a post soon!
  • I bought a circle template at an office supply store - it's easier to use than lids 😊 and was a great investment.
Related links

Linking parties


Free Motion Mavericks

Thanks for linking up last time. Michelle From Bolt to Beauty joined us with two lovely FMQ minis that she made using left-over blocks from her quilt, Love Boldly. She also sells that pattern if you're interested.

Block from Love Boldly by Michelle From Bolt to Beauty

It's now your turn!

You are invited to the Inlinkz link party!

Click here to enter

Friday, March 04, 2022

Tulip Medley for Project Quilting 13.5

I haven't had much time to join Project Quilting this year, but since this week's prompt is Rhythm & Repetition, I decided to take a couple of hours to make something. That's all I allowed myself because I know that I'm quite good at over-thinking and over-doing my projects. This was just a chance to play without expectations.

Rhythm & Repetition

In the Project Quilting 13.5 post, Trish included a couple of helpful links to articles on what rhythm and repetition looks like in art. I've included the links to these articles in Related links below. I was really tempted to do something with dots (they are so much fun to FMQ as pebbles!) in homage to Yayoi Kusama but I wouldn't want to do that quickly, so it'll be for another time.

Tulip Medley - Project Quilting 13.5

Stencils have been on my mind lately (for FMQ but also as tools for surface design) so I took out my lovely collection of stencils. As for the parameters of this quick project, I found an amazing pink hand-dyed fabric by Elaine Quehl and used bright yellow hand-dyed fabric for the borders. Whatever stencils I used would have to fit this textile frame. 

Since I couldn't be sure that any marking tool would come off properly, I opted to mark the back of the piece and FMQ it from the back. I've used this technique several times and as long as your thread tension is excellent, it works incredibly well. I stitched with the same Glide thread that I used for the Fantastic Fusion project, and knew it would be perfect. You can see the Frixion marks on the back of the project. I can ironing it off now that I've taken this photo.😊

Back of the piece marked with a Frixion pen

It was difficult to stop at just FMQ the outline of the design but I did want to keep it simple...and quick. Below you see my hack for keeping the binding down while it's being hand-sewn. Instead of very expensive clips, I use large paper clips. These have letters on them since I also used them for keeping bundles of fabric together when I piece. 

Using large paper clips to keep the fabric edge down

Here is a close up of the free motion quilted stencil. I even buried my threads!

Close up of the free motion quilting

Here are another photo with different lighting.

Tulip Medley


Project Quilting 13.3 Kitchen Influence

On January 30, 2022, Trish announced the third prompt of the season - Kitchen Influence. I've been wanted to make mug rugs but didn't have much time to make them or write a post about them. Since I've been linking up to the odd linking party through Instagram, that was the perfect solution. I posted in the last hour before it finished, but I made it! 😊 

I took out my favourite coffee fabrics and came up with two designs. On one side, in light blue-green, is Medium Roast on a beach, then Venetian Blend in a gondola and finally French Roast wearing a beret. I love these fabrics and bought them in two colours. The other side is on a pink background with Morning Roast on a lazy chair, a Columbian Roast dancing and another French Roast.

Blue coffee bean novelty fabric

Pink coffee bean novelty fabric


What I learned

  • It was difficult to stop myself from doing more free motion quilting or even adding beads or some trapunto to the piece. It's now done, but maybe one day I can keep playing with a version 2.0 
  • I wish that I had made 2 separate mug rugs with the coffee fabric because no matter how hard I try, I can never get both sides laid out the same. They are cute but the FMQ is a little wonky.

Related links

Linking parties

I'll be linking up to many fun linking parties. Why not check out what's going on out there....and of course check out Project Quilting 13.5, I will also be linking up to Free Motion Mavericks with Muv. Off the Wall Friday, TGIFF, Beauties Pageant, Put your foot down, Peacock Party


Project details


Tulip Medley
Created for Project Quilting 13.5
Materials: hand-dyed fabrics, Frixion pen, Glide thread
Techniques: Free Motion Quilting (FMQ)


Tuesday, March 01, 2022

Learning from old quilt books

Hi, welcome to the first day of the Blog Hop, "Dust off a Quilt Book". This event is hosted by Beaquilter. Thanks Bea for organising this fun blog hop, and for Frédérique for offering to make it a linking party!  

Trying out a new technique

It took me over a month to decide what book and what project to do - and even then, it didn't turn out as planned. I sure did learn a lot 😊. When I was in University, a few years ago (lol), I had a poster that said: "Experience is what you get, when you didn't get what you wanted" So, this project was an Experience! This post is about how I got there.

Update: As the piece was on my wall, it finally came to me what I could do to actually like it! Here is the final version. More below.

The Light Beyond 


Light (before the change)


The books

I really wanted to choose an OLD book and rummaged through my mother's quilting magazines and books. I knew that I didn't want to make anything traditional - so there were few options. I did find Missy Powell's Art Deco Quilt - a king size quilt that Missy made in 3 DAYS!

Art Deco Quilt made by Missy Powell
Quilt World August 1984
Front Cover - Missy Powell working on 
a traditional quilt


The Art of Manipulating Fabric by
Colette Wolff 


I had a difficult time understanding the instructions, so I found this technique in another relatively old book: The Art of Manipulating Fabric by Colette Wolff (1996). It's an excellent book and I found what I was looking for under Filled Reliefs - Stuffing - Connected Rolls. 


The fabrics and the plan


My artist friend, Elaine Quehl gave me a huge bag of her hand-dyed fabric scraps. As you can imagine, the day I got these I felt like a kid, playing, looking and touching all of this fine fabric. Elaine use to bring these fabrics to her classes for students to use, so there were bigger and smaller pieces. Yum! 😊

This is the colour palette that I chose when I started the project. The plan was to make rolls in some kind of gradation.

Original colour palette
Giving up after making 10 connected rolls


As you can see, I started with darker fabrics and was going to make my way to lighter ones when I decided that making connected rolls was not my idea of fun!!!


Alternate idea


So now what? Well, it sort of looked like a sky. Should I make a sun set or maybe some northern lights? I decided that the northern lights would be great on this background. At this point, I really should have started looking a photos of northern lights, but I didn't 😞. I started playing around with some fabric that I thought would look like the northern lights.

From this picture, you can see how the idea evolved. I started off with wisps of fabric, sewed them down and then, on the other side, covered them with my hand-dyed silk organza....one wisp at a time! The bottom two rolls in this image was part of my original plan, to go from the dark to the lighter colours. 

Not sea weed but lights 😞

When I got to covering the second set of wispy fabrics, I just covered the whole area with the organza. 

No longer looking like sea weed but
not really northern lights...

This is where I was when my son and his girlfriend, Sarah, came for supper Sunday evening. I told them about my project and asked them to see if they had any ideas. They both agreed that it didn't really look like northern lights. When I told her that one way or another I would finish it, and probably just cut it up later to make something else, Sarah suggested that I might want to cut it up now and re-arrange it. 

Before cutting it up, I cropped the photo into two and put it back together in PowerPoint (I don't have any fancy software, but it did the trick). I wasn't sure that it would work, but at this point, I had nothing to loose.

Re-arranging the puzzle


I played with it like a puzzle. This was what we had originally thought - not so great.

First try

Then I turned them upside down. I wasn't thrilled but this was the best that I could do. I did look at some images of the northern lights and this was starting to resemble them...a little bit.

Turning the pieces upside down

So that was my new technique experience! It's not at all what I envisioned but it's done. I added borders and attached it to a 14" x 11" canvas.

Previous version of "Light"

I am rarely really disappointed in a piece - but I really didn't like this one. As I was looking at it today (the day of the post being published), for some reason I got a flash of insight - "beyond the vail".  For me, that's how my intuition and my creativity works. I don't always listen...but this time I did, and I'm very happy with the final result.


The Light Beyond 

My curtain of sari silk strands are perfect for creating an aura of mystery to the lights behind it. I hope that you like this version better. I know that I do!


What I learned
  • This was an interesting experience! It would have helped a lot if I had looked at images of northern lights before starting to play with wisps of fabric.😊
  • It was a great exercise in problem solving. It wasn't a piece that I even liked but I am glad that I persevered. The irony is that I didn't plan enough for this project, but the other project that I was going to do, a sewing machine cover, was planned so much that I didn't feel like making it.
  • There is a lot to be learned about undertaking a project when I'm not in a good place - I couldn't make up my mind, and my decision making skills were far from optimal. 
  • It is amazing fabric and I am very grateful to Elaine for giving them to me. 
  • I'm so glad that my intuition came to me...and not too long after the posting of this blog post. I'm leaving you in a much happier state.

Related links

Linking parties & blog hop schedule
I'm linking up this post to Kathleen's Tips and Tutorials on the 22nd 

As well, here is the list and links to the blog hop participants:

Tuesday March 1st 
Quilting & Learning - What a Combo   (You are here!)


Project details


The Light Beyond
Attached to a 14" x 11" canvas
Materials: hand-dyed cotton and organza, sari silk yarn, Kimono Silk Thread, cotton batting
Techniques: Stuffed connected rolls, Free Motion Quilting (FMQ)