Wednesday, June 28, 2023

Final Rainbow Neighbourhood Quilt Top

Hi and welcome to week 437 of Free Motion Mavericks. Have you had a chance to do any free motion quilting (FMQ) this week? I played with fusible web, Bottom Line thread and zig-zag stitching, but no FMQ. I didn't quilt my Neighbourhood Houses, but I did add many (possibly too many) fun elements to the quilt. The rest of the effects will have to be done through FMQ.

Quilt Top Done ✔


Two weeks ago I thought that I was mostly done with the quilt top. I greatly underestimated the time that it took to add the finishing touches.

The Rainbow Neighbourhood quilt top is done 😊

First Row of Houses


The first row of houses all have blue skies, different green yards, including fences, benches, trees and bushes from a wonderful piece of fabric that I've had forever. You can see the fabric at the bottom of this section.

Row 1 - first house

Row 1 - second house

Row 1 - third house

Here is the fabric that I used. This is the only part that doesn't have huge holes 😁

Fabric that I used for the fences,
benches, bushes and trees

Second Row of Houses


The second row of houses starts with a house and then parks and a lake. I was able to include a lot of fun elements to the lake - from a turtle, fish, a girl fishing, a frog prince and a duck😊 

Row 2 - first house

Row 2 - lake and park

Row 2 - friends' house 

There will probably be a few more elements added to my friends' house but I don't have the ones I want. I'm sure that I'll come up with or find something before I finish the quilt.

Third Row of Houses


This third row of houses are set in a night scene. I kept the elements simple, especially in the yards, with one tree and some cute critters.

Row 3 - first house

Row 3 - second house

Row 3 - third house

What I learned
  • Two weeks ago when I had finished assembling the quilt top, I didn't realise how much more work I still had to do to add elements to all of the windows, yards and then the lake and parks. 
  • I also didn't realise how fiddly it was, and how difficult it was on my eyes. I didn't seem to see well enough when appliquéing. Finally I switched to a clear and more open foot which helped a lot. 
  • As I was zig-zag stitching the various elements to the quilt, it was very obvious that this needed to be done before the quilting. It was just easier to work with a quilt top than a whole quilt with batting! 
  • It will be easy after that to just accent these with the FMQ. This will also add an extra layer of stitching so that they all stay in place!
  • I started zig-zag stitching with regular thread but quickly decided to use something less visible. I have three cones of Bottom Line thread - so I used a little bit of black and then white thread. Eventually I just finished everything with the tan thread. It worked for all of the fabrics.
  • As I was working on the quilt top, I was thinking about the eventual quilting of it. Since the Bottom Line thread worked so well, I've ordered a couple more spools of it - one taupe, which works for almost everything and a blue for the sky.  
  • I had originally thought of adding features to the quilt with the FMQ, but at this time, I think that I'll only do that for the park and lake section. The quilting will need to unite all of these sections together. 
  • As for FMQ the yards, I was considering adding shadow trees (or the outline of trees) with the quilting - all in the Bottom Line thread. This will add some lovely texture.
  • I've really had a great time participating in Sandra's QAL. The houses were easy to make and adding the extra elements made it lots of fun. 
  • I had fun, now have a quilt top for my friends and learned a lot! I couldn't ask for anything else 😊

Related links

Linking parties
I'll be linking up again to Sandra of mmm quilts' linking party for her Rainbow Neighbourhood QAL parade. Sew & Tell, Midweek Makers, 


Free Motion Mavericks


Have you had a chance to check out Kelly Young's latest book, Perfectly Pieced Quilt Backs? Many of our favourite quilting bloggers are posting their quilt backs inspired by her book. 

Gail showed us 4 of her quilt backing. Two of those quilts are FMQ with  “Wild” or “Graffiti” quilting. The FMQ is so beautiful from the back!

Gail's finish based on the "islands" backing

Gail used "Cross Purposes" as her inspiration for this backing

I hope that you have a great week. It's now your turn to link up!

You are invited to the Inlinkz link party!

Click here to enter

Thursday, June 22, 2023

Daisy Beauty on Free Motion Mavericks

Welcome to week 436 of Free Motion Mavericks. Happy Solstice 😊 I actually have a finish with free motion quilting (FMQ) for you today. Yeah!

May's Table Scraps Challenge done ✔


It's a tad late, but it's done well and I love it 😍. May's Challenge colour was orange and the letters were F and L. The scrappy log cabin block was quickly finished and the gorgeous yellow daisy batik Flowers were attached...but something was missing. I hoped to add lace for my "L" but I wasn't happy with what I tried. 

Sometimes a project needs to percolate before it talks to me or I find that perfect thing that will make it sing.

Daisy Beauty - May's Table Scraps Challenge

This is where it sat for a while. I did post this image on Instagram and linked it up to the May Table Scraps Challenge link-up. 

 Where it sat - simmering

I tried a few pieces of lace but couldn't find anything I liked. Finally, looking for something else, I found this crochet lace - perfect! 

I found the lace - now what?

I didn't know how I wanted to finish it. Do I add stems and/or leaves? Finally today it came to me - FMQ daisies so that there is an impression of lots more daisies. I think of them as shadow daisies. 

I did add a second echo around the yellow daisies and then I started the shadow daisies. I only quilted the first one with yellow thread. I wanted the daisies to recede, so I used variegated threads in pink and yellow, and light and dark pink.

More daisies and a line of small leaves

First daisy with an echo


I moved the lace out of the way - at that point it was only attached at the binding - to FMQ a daisy underneath it.

Once the daisies were quilted, I added a continuous line of small leaves around everything, including the binding.

Here is the back - you can see the FMQ better from there.

FMQ as seen from the back

Daisy Beauty label

Since I had the fusible web handy, I made the label right away.


What I learned
  • You can see in the image where the project was percolating, that I had left an extra large backing. I was hoping to just turn the backing to finish the quilt, but when I trimmed it, I cut through it. So the piece has a regular binging.
  • I actually added the binding before the FMQ. On such a small piece, it really doesn't make a difference, and it's so nice to have a finished piece once it's quilted!
  • These hand-dyed fabric scraps come from my friend Elaine Quehl's extras. I absolutely love those orange-pinks and have used them quite a bit. I may have to dye some myself eventually!
  • We had a presentation at our last guild meeting by someone who has studied the judging of quilts. She gave us many tips. I was extra careful when I FMQ the curves - going slower than usual and it paid off - no eyelashes (that's when the back tension is off in a curve, because the quilter is going too fast!)
  • I also followed my own advice about bindings and it came out really well.
  • Before adding the label, I attached the lace with a few stitches. It doesn't show except in the back, when it's not covered by the label.
  • I don't want to be so finicky about my quilts that it won't be any fun to make them, but these small steps make for a better piece, and are really not any more work. I just have to remember them 😁
Related link
  • Tips for adding a binding - see What I learned: An Agenda Cover and Update on Free Motion Mavericks, January 05, 2023
  • Posts for this year's #Table Scraps Challenge 2023
Linking parties
This project was a squirrel - I made the deadline for DrEAMi! Yeah!

Free Motion Mavericks

Welcome and thanks to everyone who linked up 😊

Brenda from Songbird Designs has FMQ a beautiful flying geese quilt in the Island Batik Challenge. She used feathers, diagonal lines and block within a block in the middle of her stars! Click on the image on her page to get a close-up.

Come Fly Away With Me by Brenda of Songbird Designs

Donnalee had some left over fabric from a quilt kit and was able to make a lovely runner and a mini. So cute! Aren't small project fun to make?

mini wall hanging by Donnalee

Melva finished a Dresden quilt for a client last week. I love these pink and red fabrics.

A finished Dresden quilt for a client by Melva

Gail hosted TGIFF last week with her finished quilt. She used Graffiti and Wild quilting designs. This week we'll be seeing the back of her quilt since she made if following Kelly Young's “Perfectly Pieced Backs” book.

Gail's quilt with Graffiti and Wild quilting

Margo of MY Quilts and Crafts got terrific news - two quilts, 'Modern Time' and 'Inside Lines', were accepted in the International Quilt Festival Houston 2023. Congrats!

Margo's quilts, 'Modern Time' and 'Inside Lines' will be at the 
 International Quilt Festival Houston 2023

It's now your turn!

You are invited to the Inlinkz link party!

Click here to enter

Monday, June 19, 2023

Learning Whitework techniques

I'd like to share with you some lovely drawn thread work and pulled work embroidery techniques that I learned through TextileArtist.org's Stitch Club. I hope you're having a great week!

Whitework Embroidery


I've had an excellent session with Tracy A. Franklin this week on TextileArtist.org's Stitch Club. I've always admired the beauty of whitework but have always been too nervous to pursue it. In Tracy's workshop we learned drawn thread work and pulled work embroidery techniques. Very, very cool 😎

Whitework sampler completed

I started off by picking up some linen that seemed to have an open weave. When I asked, Tracy recommended that I not wash the fabric before working with it, to keep it crisp. That made lots of sense, even for a quilter 😊. However, when I started working on it, I quickly realised that it had a very fine weave - not as open as I thought! It took me a long time to get that first hem stitch done. 

First attempt at whitework on linen

The hem stitch is done once you've very carefully removed the threads from an area. Since the weave on the linen fabric was so fine, these first attempts were not very good. I'm happy to report that once I started working on a much looser weave, they started looking much better!

When I realised that I would never finish the sampler if I kept working on the linen, I looked in my stash for something with a looser weave. I found a roll of 4" plain weave jute in a pinkish-white, as well as 2½" rolls in green and tan. I used the 4" roll with beige sewing thread to oversew the edges of the fabric, then a #8 perle cotton for the other stitches.

Whitework sampler using a 4" jute

Here are the first stitches. At the bottom of the photo is a band of pulled thread, with hem stitched pairs of threads. As you can imagine, it's much easier to do when you can easily see how many threads you are hemming.

The top band is the same thing as the bottom one, except that alternate threads are hemmed or offset - so two threads from the bottom and then one thread from each pairs on the top. I love the zig-zag effect! 

Pulled thread bands with hem stitching

In this image, there are two bands inserted between the first two bands. The second band is a stem stitch. Since my perle cotton was fine (#8), it took 4 rows of stem stitch to fill in the pulled thread area. In her sampler, Tracy uses a thicker thread that fills in the area. She keeps one thread of fabric between rows of stem stitch.

The middle band is stem stich while the top band is a twisted bar.

The top band in the above photo starts off with a wider area of pulled threads. Once they have been secured with a hem stitch on both top and bottom, the thread pairs are twisted with a thread inserted in the twist. 

After the twisted bar, a couple of rows of weaving were added. You can hem stitch the pulled thread areas to give it a different effect, but in this section, I just inserted a piece of gift wrap ribbon at the top, woven with two threads under and over, while in the second row, I pulled one extra thread to get the satin ribbon to lay flat. 

Two rows of woven ribbon

Above the band with the hem stitch offset comes the various types of pulled thread techniques. In this case, you don't pull out thread, you just pull them together to form various patterns. After the offset hem stitched section, there are two plain weave threads. Above that there is a band of statin stitch pulled work. The first band is done with 4 threads, so is wider than the one above, done with 3 thread.

After that, I created satin stitch blocks. That's where you pull the thread for, lets say 4 threads, and then leave the next 4 alone and then go on to pull the next 4, etc. This technique really gives a nice effect, although it looks best if there are many rows of it.

Linen sampler so far

I'm still working on my linen sampler. It has gotten easier as I am now more comfortable making the hem stitch.

What I learned
  • I often watch the course videos for the Stitch Club on my phone, but this didn't work for this course - the images were just too small to see properly, especially at the beginning, when I didn't know what I was doing!
  • For my twisted bars, a thicker thread in the middle would have been more effective. 
  • The pulled thread techniques are usually done using a hoop but the section was too close to the top for that. I think that I managed the tension fairly well since this section seems less wonky than the rest 😊I liked the pulled thread techniques a lot and am looking forward to doing some on my linen sampler. I will be using a hoop to see if it helps, given the fine weave. 
  • For the plain hem stitching, as you may have notices, you are supposed to count each thread 😮. Easy when it's a very open weave but harder to do when it's finer. I did learn that if you have 3 or 4 thread doesn't really matter, as long as you grab the same amount when hem stitching the top. 
  • You can especially see from my linen sampler that the thread you use really does make a difference. So far I've used white perle cotton and a crochet cotton for the stem stitch. I am going to experiment with both heavier and finer threads to see the difference. I will also use beige thread since the white thread is whiter than the linen and stands out too much.
  • In the Further Development section Tracy suggested working with natural objects, such as grasses or even twigs. That sounds like a lot of fun!
  • I'm thinking of looking into some of my rug hooking supplies - they are very open weave fabrics to work with. Some might be appropriate for a fun, natural project!

Related links
  • Tracy A Franklin - website and Instagram (See the work she and her fellow stitches did for the coronation!)
  • Adding rug hooking to my artist's tool box, May 11, 2020
Linking parties
I'll be linking up to many fun linking parties. Why not see what's going on? Slow Sunday Stitching, 15 Minutes to Stitch 2023, Design Wall Monday, Sew & Tell, Patchwork & Quilts, Put your foot down

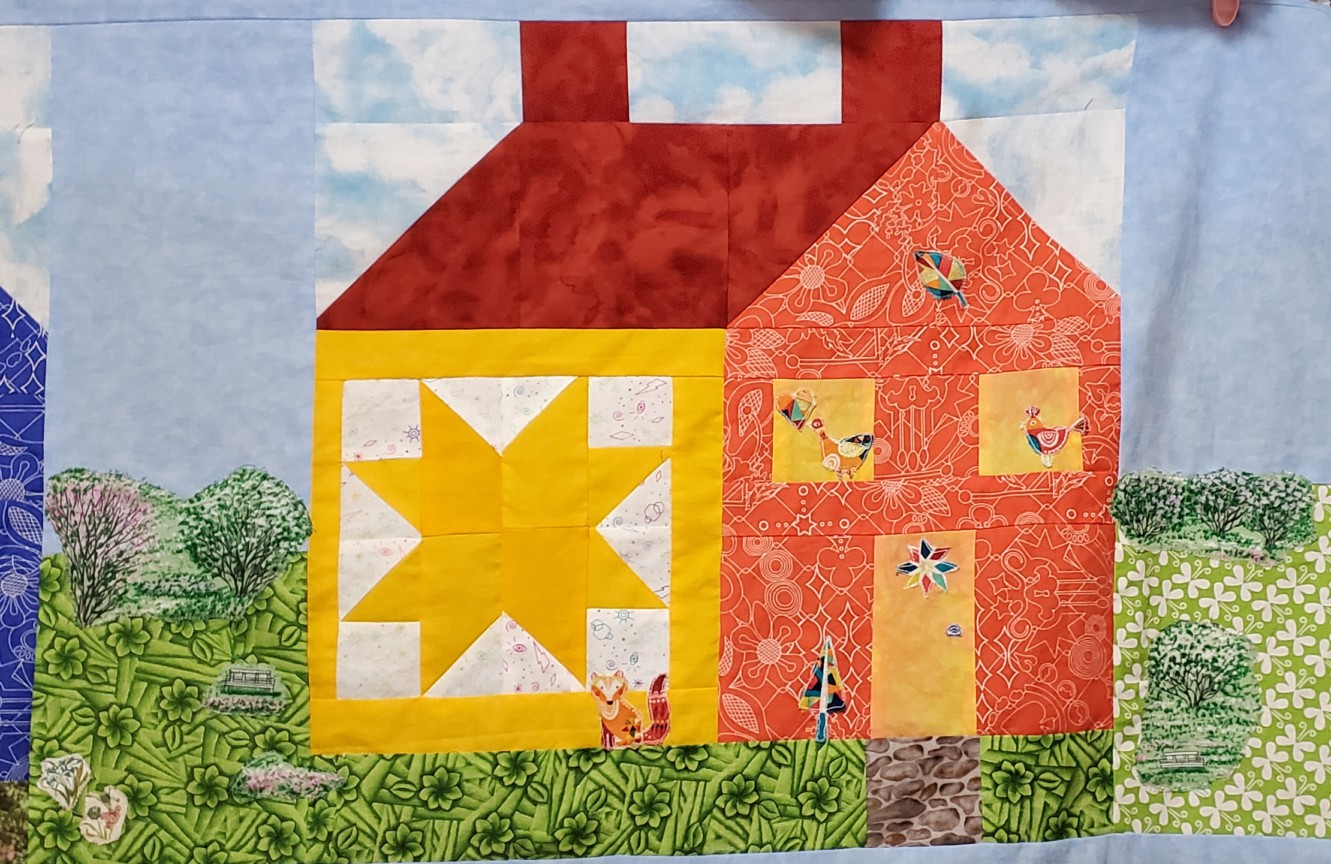
This is also posted on Sandra's DrEAMi! link up since I should be working on finishing my Neighbourhood Houses quilt!

Thursday, June 15, 2023

Rainbow Neighbourhood Flimsy mostly done!

Hi and welcome to week 435 of Free Motion Mavericks. I've put in many, many hours this week getting my Rainbow Neighbourhood Houses assembled into a community 😊 It's looking good, even if many details need to be added and stitched on.

Flimsy assembled and mostly finished!


Rainbow Neighbourhood Houses quilt top assembled!

I worked on the first row and then the third. It took me about half the time to finish the third row, since by then, I knew what I was doing 😊 You can't really tell from this photo (sorry, in the evening off the stairs railing), but each row is progressively wider! There are at least 3 inches between the width of the first and the third row. 

Row 1

Row 3

In the second row, I started by finishing my friends' home. I added a thin sliver of fabric on the other side of the door - it was bothering me too much! I used fusible webbing and stitched it down with a zigzag stitch. Once it's all quilted, it will look fine!

House with door fixed and a forest in the back

I wanted to make the trees, and since I had recently done two wonky stars, I used the same technique to make the 4 trees. A couple of them are straight but the other two are quite wonky. It looks a little weird in the open like that but I'll be adding critters and plants, so it'll look fine!

Making Wonky Trees


Here's a quick look at how I made the trees.

Wonky Tree

Start by folding your piece of fabric in two, so that you know where the top centre needs to meet. For this tree, I used a 3" x 3" square fabric, but it doesn't have to be square.

Fold your fabric to find the centre

Get a piece of background fabric - if you haven't done this before, make your background fabric the same size as your green fabric. Once you've done this a few times, you can use small pieces of fabric. 
Place your background fabric over your green fabric, facing each other, with your background covering the bottom corner going to the centre (see photo). Stitch.

Add your background fabric

Flip your background fabric over. It should go from the centre top to the bottom right side.
Flip your background fabric and press.

With the background fabric extended, turn the block face down and trim the background fabric around the original green block. 

Trim the background fabric

Take another piece of background fabric and cover the other bottom side to the centre. Sew it down.

Sew the second background piece down

Flip the background fabric and trim. You can also trim the excess green fabric behind the background fabric.
Next comes a stump for your tree. You'll need a piece of background fabric the same width as your tree. Cut it in half at the centre.

Cut the background fabric in half for the stump

Cut a piece of brown fabric for your stump. It needs to be the same height as your background fabric. The width should be a half inch wider than your stump to allow for your seams. Stitch the background fabric to both sides of the stump. Press.
Sew the stump to the tree tip. Press.

Add the stump to your background fabric

Only use this method if you don't mind having crooked trees....just like in nature. Otherwise, use Sandra's instructions.😁 Here are my wonky trees.

Wonky trees


Adding extra elements in the second row


In the quilt design from my last post, you may have noticed a lake between the two houses in the middle row. I have the outlines done but details will be added both through appliqué and in the quilting.

Lake area

Here's a close-up of the fabric - too cute!

Flower garden and then a path in the woods

Right now there is only a lake, but it will have a beach, fish and a dock. There will also be other critters and plants around the gardens. 

More flowers and a rock garden

As you can see, I'll be spending the next few days adding details to the quilt top and then FMQ (free motion quilting) it. 

I was able to get out between the rain, wind and smoke...here are some better pictures of my flimsy.

One flimsy ready to appliqué and FMQ

Gotta love those backyard fence pictures 😊


What I learned
  • I thought that I had tons of time to finish the flimsy, but that central part took a lot of time, mostly looking at my stash to see what fabrics I wanted to use. 
  • I'm looking forward to adding the fun stuff to the quilt. 
  • I will probably end up removing the excess fabric on the right side of the quilt - it will still be fine. I knew that I was accuracy challenged, but that's by a lot! 
  • I enjoyed making those wonky trees. They wouldn't get by the quilting police but it's all good fun!
  • The next part, stitching down the appliqués and adding elements, is fun but I always struggle with what needs to be appliquéd before quilting, and what can be done while quilting. If you have any advice, I would appreciate it!

Related links
Linking parties
I'll be linking up to many fun linking parties, including Sandra's Rainbow Neighbourhood Houses party. I'm looking forward to seeing everyone's flimsies! Design Wall Monday, Sew & Tell, Midweek Makers, Put Your Foot Down, Finished (or not) Friday, Off The Wall Friday, Beauties Pageant, Peacock Party

Free Motion Mavericks

Thanks to everyone who linked up 😊.

Melva finished her Rail Fence quilt and went to a lovely spot for pictures. 

Melva's lovely Rail Fence quilt

Gail had another finish for the Island Batik's June Challenge. Look at those great feathers among the 92 flying geese! You can get a great look at Gail's feathers from the back of her topper.

Flying geese Topper by Quilting Gail

It's now your turn.

You are invited to the Inlinkz link party!

Click here to enter