Thursday, February 23, 2023

SAHRR, a lap quilt and an extended Free Motion Mavericks party

Welcome to week 421 of Free Motion Mavericks. I have a lot to share and the linking party will be on for three weeks while I'm on a travelling adventure.

Square within a Square for SAHRR

This week's instructions for the Stay at Home Round Robbin (SAHRR) is a square within a square block, recommended by Emily at The Darling Dagwood. She will be appliquéing flowers in the middle square, but I wanted to keep it fast and easy. A quick search bought me to 10 Ways to Make a Square-in-a-square block (see Related links below). I followed Methods 1 & 2 to see if there was any difference in accuracy. 

Round 5 - square within a square

Row of Square within
a square
For the first method (Triangles on the Square), you cut your HST (half square triangles) and sew them on, opposite sides at a time to the middle square. For method 2 (Squares on the Square), you use a larger square, place smaller squares at each end and sew through them diagonally. You do the same thing for the other sides, et voilà!

It turns out that I'm accuracy challenged at both of these 😁. Since my blocks were not any better using method 2, I just used the first method to make a few more. 

I also introduced a couple more fabrics. Here are the blocks that I made with them. They don't have the same intensity of colour but they seem to play nice with the others. 

I used Gail's suggestion of adding fabric between the blocks to space them out. Thanks Gail (of Quilting Gail).

Square within
a square with new fabric


Square within
a square - the reverse


In the last round of flying geese, I had made extra ones to add to the quilt. I wasn't sure of the layout. At the bottom of the quilt, you can see that extra row.
An extra row of flying geese at the bottom of the quilt

Daisy Quilt

My daughter loves embroidering. This fall, I added a border around one of her embroideries and she hand-quilted it. She is now ready to hand-quilt her own quilt. After finding a pattern, she bought most of the fabric at Mad About Patchwork. After I cut the 4" blocks, she placed them and I pieced them. The sandwich is now based and she's ready to quilt her first lap quilt. 😊

Daisy Quilt ready to hand-quilt

The pattern is the centre part of the Pink Daisy Quilt in the Scrappy & Happy Quilts book by Kate Henderson. I love the fabrics that my daughter chose - she has a good eye for colour! We weren't sure about which yellow to use as a border, so I tried out both. The quilt is roughly 41" x 45". I think that it's really lovely.

Scrappy & Happy Quilts
by Kate Henderson

What I learned
  • I really don't know what I did wrong that both methods of making a square in a square block wasn't very accurate. I was out less than a ¼" but I was being so careful that they should have been accurate. Oh well, they did turn out fine - I just made my row a ¼" less wide. That's the great thing about designing your own blocks and quilts 😊
  • I wasn't sure about adding a couple more fabric to the SAHRR but I think that it's fine. I even found a scrap of that very pink fabric that I used to make one of the petals. I'm looking forward to adding that little scrap.
  • I also have a few blocks that I made that I haven't added to the quilt yet. At the very least they could go on the back.
  • I love my daughter's quilt. She has a much more sophisticated colour palette than me 😊 I'm drawn to "the wilder the better" lol! She very diplomatically told me that the SAHRR quilt wasn't one of her favourites. I admire her gentle honesty.
  • I'm really sorry that I won't be making the next two rounds of the SAHRR with everyone. I will try to read the posts online but won't get anything done for the next three weeks. If I'm able to link up to parties, please forgive me if I don't add the links to this post until I get back.

Related links

Linking parties

Free Motion Mavericks

As I mentioned, this linking party will be open for 3 weeks, until Tuesday, March 12th. Please feel free to link up as often as you like! 😊

Melva of Melva Loves Scraps tried out "dimple quilting" on an orphan block. Here it is!

Melva tried out "dimple quilting

The Joyful Quilter made a Duke's t-shirt quilt for the member of her friend's family that lost everything in a house fire. She semi-custom quilted it on her longarm. What a great gift for someone who will doubtlessly appreciate it. 

A Duke's t-shirt quilt by the Joyful Quilter


Quilting Gail made a puff quilt as part of Island Batik‘s February challenge. If you don't know about puff quilts, you may want to check out the challenge. Pretty incredible....and lots of work! You can read how she made it here. Well done Gail!

Gail's Puff Quilt with Island Batik fabric


You are invited to the Inlinkz link party!

Click here to enter

Tuesday, February 21, 2023

Off the Grid Sampler is finished

Welcome! I'm very happy to share this finish with you 😊 It's been a fun project but it's nice to see it finished so that I now have a few less projects on the go, or I can start another one! 😁

Finishing up "Off the Grid"


Since I kept track of all of my different stitches, I can tell you that there were 44 different area to stitch. In some of those areas, I even managed to use a combination of more than one stitch.

"Off the Grid" Sampler finished and mounted

I don't usually track all of this but a sampler that doesn't include a record of the stitches used is difficult to learn from. Sometimes I can tell which stitches I used, but at other time, I don't have a clue!

This is my sampler - I did miss two areas, between 23 and 24, and then on the other side of 23. 

A drawing of the sampler

These are the stitches that I used the most, in several places: 
In case you're interested, I linked the stitches above to Sharon Boggon's Pentangle Stitch Dictionary. 

Here are a few more images of stitches.

Raised band herringbone stitch, a row of chain stitch,
lots of French Knots, random fly and feather stitches,
and outlined satin stitch


from left, clockwise
Seed stitch, stem stitch, buttonhole stitch, double buttonhole
and battlement stitch, threaded running stitch (with transparent elastic),
threaded backstitch and couching stitch (at bottom)


I finished my sampler by mounting it on a canvas board.

Off the Grid Sampler

What I learned
  • As I typed out my notes about the stitches, I realised that they weren't very good - better than nothing but not consistent or detailed enough.
  • Using variegated thread for almost any stitch adds colour and interest.
  • My least successful stitches were in not very straight rows. 
  • In doing couching stitches, if you want them to show up, they need to be very contrasting and use more than one thread. 
  • I had given up on making the sampler pretty and used many more colours than I usually do. I'm not really sure why it works but it does look good. I did try to repeat the colours, so that may have helped.
  • I really like using the Mouliné étoile embroidery thread by DMC for French Knots. They are slightly fluffy and look great.
  • I love trying out different yarns for embroidery. Another fun yarn is Tencel Pearl. I've linked to the company, Trail Head Yarns, below.
  • I also discovered that you can buy linen at the yarn store for embroidery. I got 3 colours of the BC Garn Lino for Christmas. What beautiful linen and perfect for embroidery. Buying a skein of linen is economical considering how much linen it contains. It's going to last many years 😊

Related links
Linking parties
I'll be linking up this post to many fun linking parties. Let's see what's going on out there! Patchwork & Appliqué, Design Wall Monday, Sew & Tell, Midweek Makers, 

Project detail


Off the Grid sampler
Based on a workshop with Sue Stone, TextileArtist.org
Size: 8" x 6"
Material: Kona cotton, embroidery floss, metallic thread, Mouliné étoile, Tencel Pearl, perle cotton, transparent elastic, etc.
Techniques: embroidery (see post for stitches)

Sunday, February 19, 2023

Project QUILTING 14.4 – A Novel Project

Yes, I'm back - I can't believe it either, but how could I resist a challenge about books and novels? It just had to happen 😊

A project inspired by books I've read

I have a really, really hard time choosing my favourite books, authors, etc. It all depends on my mood and what's going on in my life at the time. I guess my reading list is like my quilting and art - all over the place 😁 So here's to all of the books that have let me dream, escape, laugh and grow!

Books in my life

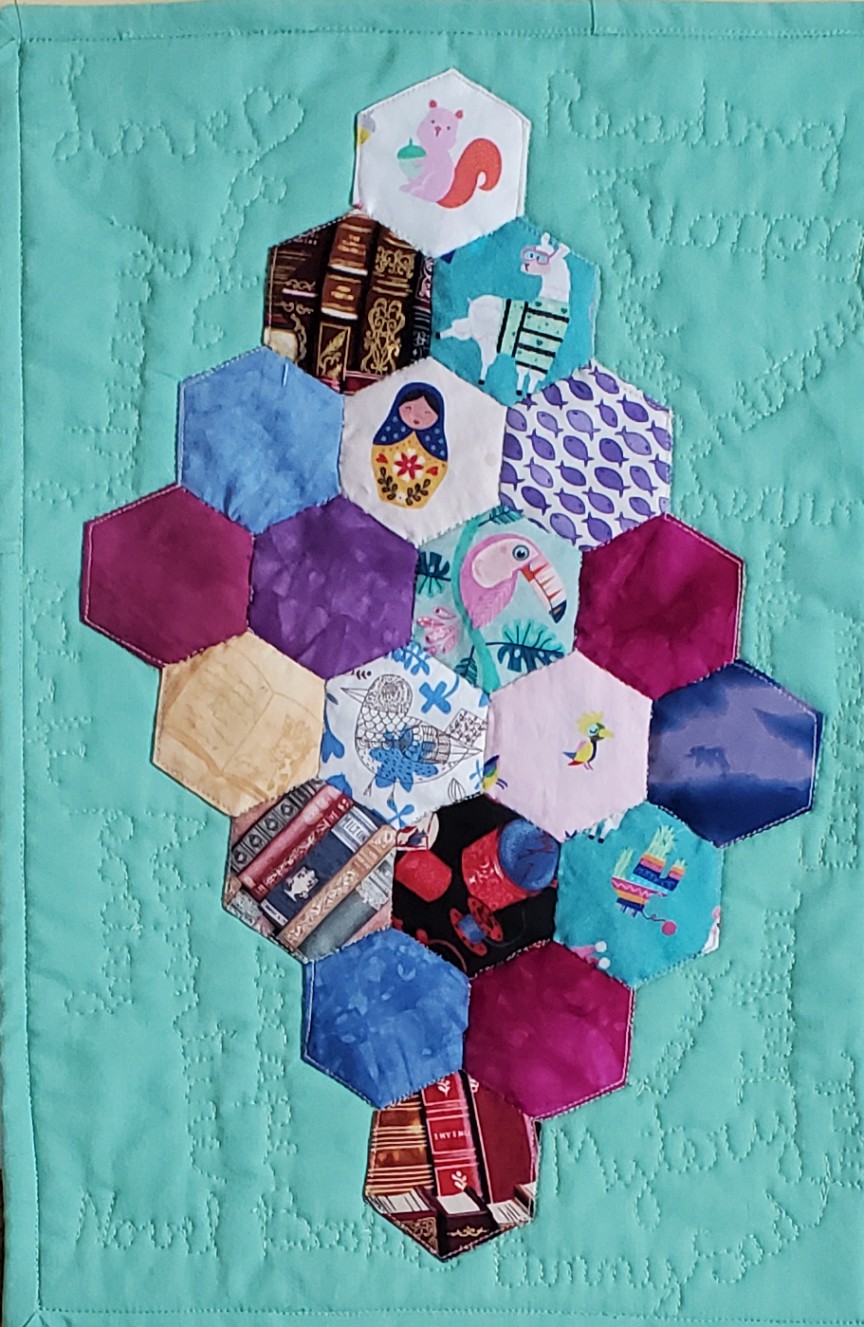
My project was inspired by the fabric that I've put aside for last year's Summer Book Challenge with Kate Basti. Instead of making more Tall Tale blocks that wouldn't count as a specific project, I used some of those fabrics to make 2" hexies, English Paper Piecing (EPP) style.

Of the 20 hexies, 4 of them are of books.

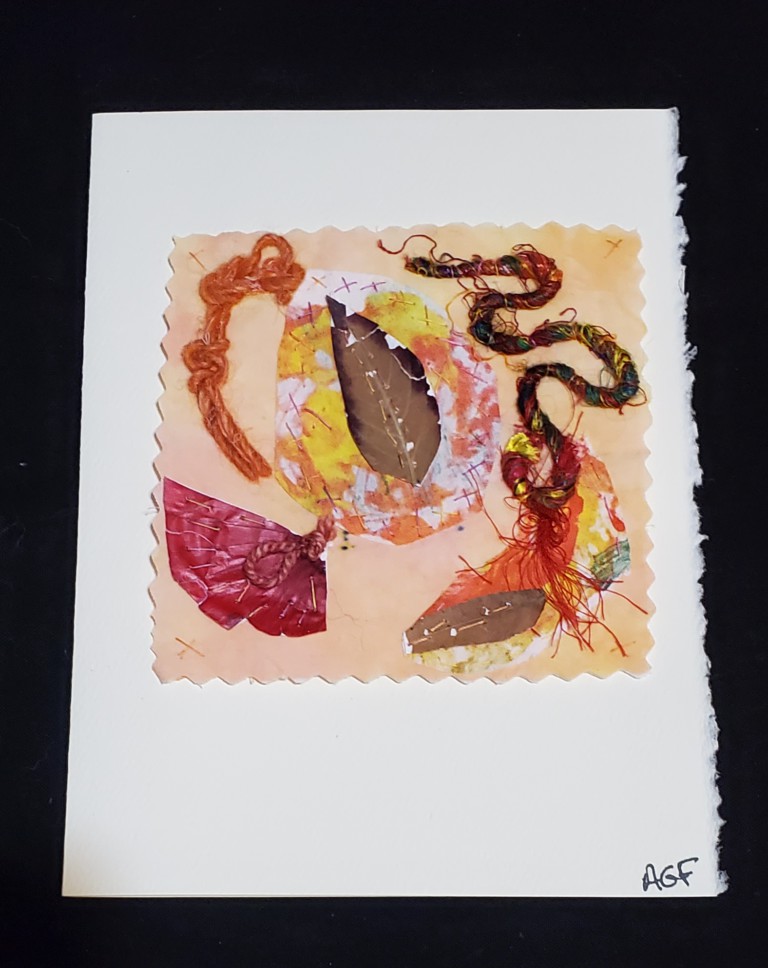
Five (5) are beautiful hand-dyed fabrics that represent my love of colour and art and all of the books that I've read on the subject, including novels about artists.

The rest of the hexies, eleven (11) represent the types of books I love. There is a sewing novelty fabric to represent the tons of books that I devour about quilting, as well as the cozy mysteries that I've read. 

The purple fish represent Douglas Adams' book - So Long, and Thanks for All the Fish.

The large bird with the blue flowers is a Nordic fabric, representing the amazing and scary Nordic Noir novels that I enjoy, even if they sometimes spook me!

The nesting doll and the toucan fabric represent the books that I read about other cultures and countries.

The final four hexies of the squirrel, lama, cactus and colourful bird represent the quirky, fun, fantastical books that take me away on adventures.

Here is one of the photos that I took of the fabric pulled for the Summer Book Challenge. You'll recognize a few.

Fabric pulled for the Summer Book Club

Right now I'm reading up on penguins to get ready for my upcoming trip to Argentina, Chile, Uruguay and Antarctica. 

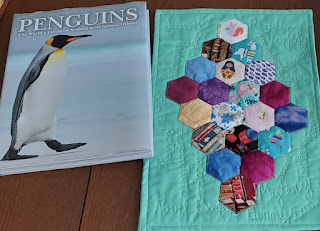
Reading all about Penguins

Free Motion Quilting


For the FMQ, I stitched around the hexies and then in-the-ditch between the hexies. I then added words that were related to reading and books. They are: books, library, love, reading, knowledge, fiction, history, learn, culture, fantasy, thriller, true, mystery, funny, sad, travel, escape, novel, adventure, poetry and sci-fi.

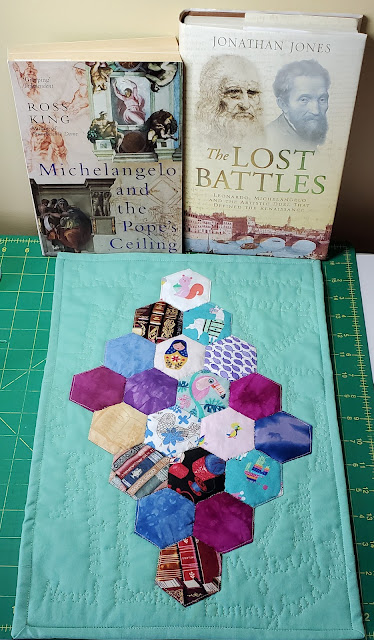
Books about artists!


What I learned
  • Books are too important to me to skip this Project Quilting challenge, even if I have other things to work on!
  • It's been a long time since I did EPP hexies. I still love it!
  • In 2020, I did a Project Quilting, Challenge 11.2 of Team Colours. Since I'm not a sports fan (or even a team person), I created a book case quilt of my favourite team - Library! See, I really can't resist 😊
  • Thanks so much to Kim and Trish for these wonderful challenges!
My team colours:
The colours of a library


Related links

Linking parties
I'll be linking up to many fun linking parties, including Project QUILTING 14.4 – A Novel Project . Let's check out the other Novel related posts! Can I Get A Whoop Whoop?, Beauties Pageant, Off The Wall Friday, Oh Scrap!, Slow Sunday StitchingPatchwork & Quilts, 15 Minutes to Stitch 2023Sew & Tell, TGIFF

Project details


Books in my life
Made for Project QUILTING 14.4 – A Novel Project 
Size: 11¼"x 16½"
Material: commercial and hand-dyed fabrics
Techniques: English Paper Piecing (EPP) and free motion quilting (FMQ)


Thursday, February 16, 2023

FMQ Wild Hexies and Making Flying Geese

Hi, welcome to week 420 of Free Motion Mavericks. I have a free motion quilting (FMQ) project to share as well as the flying geese for Round 4 of the SAHRR. I'm glad that you can join me today.

FMQ Wild Hexies, a Mystery UFO


I called this a mystery UFO in my July 2021 post because when I wrote the post, I had a partially made quilt on my design wall with extra fabric in a project box, but no pattern! Since I had been inspired to make the quilt by seeing a finished version on someone's blog, I asked if any of my readers could help me. Wendy of Pieceful Wendy found the post for me - Nancy of Grace and Peace Quilting had made the quilt. I couldn't find the pattern because it was in one of my digital quilting books! Thank you Wendy and Nancy 😊

Mystery UFO is finally getting FMQ

The pattern is called Strip Lash from Stripology 2 by GE Quilt Designs. You can read about my making adventures in my previous post (see Related links).

I stitched-in-the-ditch around the hexies and then each row of hexies. Then I started FMQ the top and bottom partial hexies with some of my favourites - elongated loops (I call them cursive l's), twist (j's and l's) and then some triangle dot-to-dot patterns.

FMQ the top and bottom triangles or partial hexies


FMQ elongated loops (cursive l's), twist (j's and l's) 
and triangle dot-to-dot patterns

This is not a great picture but you can see my Swirling Stars in the top row. The next row of hexies contain a sun, clouds, and snowflakes.

FMQ the partial hexies and the first 2 rows

You can see glimpses of the sun, clouds and snowflakes in the image below.

Glimpses of the sun, clouds and
snowflakes designs

Next came a row of trees.

FMQ a row of trees

Finally some houses.

A row of houses

If these look familiar it's because I FMQ them in the Places and Communities section of my son's Version 2.0 quilt. The designs are from Lori Kennedy's book, Free Motion Machine Quilting 1-2-3.

Round 4 of SAHRR


This week we got to add flying geese to our quilt. I wasn't sure what method to use, but I was inspired by Denise of The Quiltery - For the love of geese, to make some foundation paper pieced flying geese. I checked out one of her patterns and drafted my own pattern.

Round 4 - a top row of flying geese was added

Here is a close up of the 5 flying geese that I made using my own foundation paper piecing pattern. 

Close-up of flying geese and wonky stars

You may notice that my pattern below is for 6 flying geese. Let's just say that I made every mistake possible, which included cutting my pattern while trimming. I'm very lucky that it happened on the 5th goose! I took it as a sign that 5 was plenty 😊

My foundation paper piecing pattern

Extra flying geese blocks

After I finished the top row and attached it to the quilt, I decided to see how else I could make these blocks. I vaguely remember that they weren't that difficult to make. I found a post in Simply Handmade Everyday by Kristin Esser with a tutorial on making flying geese blocks 5 ways. Her 5 ways didn't include foundation paper piecing! 

I ended up using the Oversized Stitch and Flip method since I'm accuracy challenged! They worked out very well. I now have 5 extra flying geese on the design wall and have fabric to make a few more. I'm going to see what Round 6 brings before I add them to the quilt.


What I learned
  • For my FMQ, I should have spent more time practicing my Swirling Stars design. The fabric is so busy that looks fine.
  • I love Lori Kennedy's pictural designs and am looking forward to making cars, pencils, apples, etc.
  • I actually know who the baby quilt is going to, so I'm going to have to figure out how to quilt a teddy bear!
  • I considered using the No Waste method that makes 4 flying geese blocks at a time, but those blocks all have the same middle piece. I wanted them to be different, so that method was out.
  • For my SAHRR quilt, I ended up re-doing the bottom row. I had added fabric to make it fit, but I ended up not really liking what I had done. I was also surprised that the hourglasses in the bottom row really didn't show up. The fabric with the multi-coloured dots just faded away. I added two bright hourglass blocks and then re-did the corner blocks. I like it much better.
  • I'm not sure if I have enough fabric to make a much larger quilt. I would rather incorporate the extra flying geese blocks into the next row if it makes sense. I guess I'll figure that out on Monday!
Related links

Linking parties
I'll be linking up the SAHRR quilt at Anja Quilts. Let's go see how everyone is doing on their quilt! Put your foot down, Sew & Tell, Midweek Makers, Needle & Thread ThursdayFinished (or Not) FridayCan I Get A Whoop Whoop?Peacock Party, Patchwork & Quilts

Free Motion Mavericks


We've had some lovely FMQ last time! 
Chris from Chrisknitssews made this lovely Carpenter Star baby quilt. She quilted it with gentle curves and lines. What a lucky baby!
Carpenter Star baby quilt by Chris

Melva is carefully quilting a quilt for a client. It needed some work, but she's doing a great job (I peaked to a later post!)

Melva carefully quilting a quilt

Gail made a second fabulous Lone Star quilt in some beautiful Island Batik pre-cuts and dark green. She FMQ it with small arcs in the diamonds and fake feathers on the grey. 

Gail's fabulous Lone Star quilt

Frédérique of Quilting Patchwork Appliqué made a baby quilt for the neonatal care unit. She FMQ the centre diamond densely and then added light curves for a soft and smooth quilt.

baby quilt for the neonatal care unit by Frédérique

It's now your turn 😊

You are invited to the Inlinkz link party!

Click here to enter

Tuesday, February 14, 2023

So many projects on the go!

Welcome! Have you ever felt like your quilting life is out of control? Since finishing Version 2.0 I have been working on more and more projects. Some are classes, others are my usual TextileArtist.org workshops and then there are those squirrel projects from who knows where. 😃

2023 Stitch Camp


This year's Stitch Camp at TextileArtist.org was a revised version of the Gwen Hadley workshop from June 2021. Since I hadn't done the original workshop, I thought that I would give this version a go. TextileArtist.org does an amazing job with their workshop and Gwen Hadley is very popular. I just hadn't participated because I had tons of other projects on the go and it involved paint. I am getting more comfortable mark making with paint but it's not my favourite thing to do. I do like how it came out.

First cloth is heavily marked

The first cloth is heavily marked, half in one colour and the other half in the second colour. We added little bits of the "other" colour in each half. I used many tools for mark making, including the bottom of a plastic insert from an assorted box of crackers.  

Second cloth has more background showing

We used the same colours for the second cloth but applied the paint marks sparingly. I used many of the same tools but added a plastic fork as well as the end of a swimming noodle. For both pieces I used Pebeo Setacolor  - a shimmer opaque turquoise and a glitter tourmaline (purple/fuchsia). I figured that they would play nice together 😊

The next step is to cut these two cloths up and join then back together with stitches, appliqué, etc. The suggested project is to stitch together a long narrow band such as a snippet roll. For this project, I would rather make an art piece that I can attach to a canvas frame. 

Starting to put some stitches in to blend the pieces

I've put everything together (i.e. fabric, yarn, thread, etc.) to work on the project. This is the best way that I've found to keep ongoing projects. Every once in a while, if I find something that could be used for the project, I just add it to the bag.

My project so far.


Rocks, Pebbles & Stones, Oh My!


The Rocks, Pebbles & Stones, Oh My! workshop was taught by Ana Buzzalino, through the Craft Napa 2023 Uncorked at home (virtual). When I saw the images for the course, with those rocks attached to her art quilt, I was hooked.

Ana is a great teacher and her work is wonderful. We learned 3 techniques for making and attaching rocks to our work. The first is to use the background fabric to make the rock, sort of like trapunto. For me this was the easiest technique to use.  

My project so far

I found an amazing piece of painted fabric in my stash. In the picture above I've covered the top sections with different blue fabric since I want it to be more of a water and beach scene. 

Here are some of the photos of my trapunto-like process of making rocks and pebbles. For this technique, it was easiest to work with the padding and background fabric within an embroidery hoop, underneath the top fabric.

Adding the batting over the back

Stitching the first rock

Keeping the fabric as tight as possible and having as little gathering fabric as possible was difficult. To hide these pleats, I'll be adding beads after the rocks are finished. This covers up the pleats, looks like sand and gives a wonderful effect.

Pinning the fabric to stitch a second pebble

Three rocks or pebbles imbedded within the piece

We learned two other methods of making rocks or pebbles. The first is to create a flat stone using a cardboard  template while the other used more batting and stiff interfacing. These can then be attached by appliqué to the piece. Again the most difficult part is getting rid of pleats because rocks don't generally have them 😁

A collection of stones on a partly FMQ background


Card featuring a Meditation block


A couple of weeks ago I needed to send a card. Since I have lots of blank cards and envelopes in my stash, I though that it might be the time to see what I could make.

Hand-made card using a Meditation block

I attached my favourite meditation block with natural elements to make the card. I stitched the corners of the block into the paper to attach it. I really like how it turned out. This is a great way to use meditation blocks.

Card with natural elements


What I learned

Stitch Camp
  • I enjoyed the mark-making process in Gwen Hadley's workshop. 
  • There was also no pressure to make it look great since it would be cut up.
  • When cutting the fabric, I was nervous because the fabric's weave is quite open. I think that the paint kept it from fraying too much. Besides, I'm sure that I'll be adding some frayed bits for effect!😊
  • A week was not enough for me to get this workshop done but then I always take it further, and of course having all of these projects on the go isn't helping. 
  • I've arranged all of the materials in a lovely bag that I can grab at any time. This one is coming with me on holidays. I just need to ensure that I have some good contrasting thread and material so that things don't all blend into a puddle!
Rocks, Pebbles and Stones
  • The first thing that I learned is that I need to read course descriptions better before signing up! When I saw the images of Ana Buzzalino's art pieces, I had no idea that the stones were made of fabric - they are that good! So, I though that I was going to learn to attach stones to art quilts, not make the stones! 😁
  • I'm not sorry that I took the course. I did learn new techniques and the teacher was terrific, but it's going to require a lot of practice before my stones look like the real thing.
  • I'm not sure what I want to do as a finished piece. I will be adding shells and driftwood with embroidery, like I did in the Embroidered Seascape workshop (see link below). That would be very cool, but I'm not quite ready to tackle that yet. One day inspiration will crash into my consciousness!
Card featuring Meditation blocks
  • I'll be making more of these and playing with that concept!
  • I'm not sure how the card survived the postal service - I hope that the recipient didn't end up with a bunch of crumbled bits at the bottom of the envelope. I'll have to work on that if they are going to be mailed!

Related links
Linking parties


Project details


Card with Meditation block - Natural Elements
Meditation block made based on Claire de Waard's workshop
Card size: 5" x 6⅞"
Material: Meditation block made with fabric, sari yarn, painted fabric, thread, yarn and leaves and onion skins glued to paper; card is ivory with deckle on acid free paper
Techniques: embroidery and stitching