Sunday, April 24, 2016

More deadlines

I've often said in my blog that I don't like quilting under deadlines. Well, I still don't like it, even if I sometimes have to!

The first deadline was getting ready for the Fibre Fling 5 Show & Sale earlier this month. It was a huge success. The art was fabulous and I got everything done on time.


My two next deadlines are the Sew full of love quilt show with the Common Threads Quilt Guild (CTQG) from May 6 to 8 and the Art with Fabric Blog Hop (May 9th).

Sew full of love Quilt Show

Our guild's quilt show is every second year. It's always great to look back over the last two years to see what I've made and decide what to enter in the show. I've registered 5 quilts for this year's show. Thank goodness I've been productive. There's only one item in the show that I haven't completed yet.

Here's a glimpse of Floral Fantasy. My next post will be about the process of making this lovely lady.
Floral Fantasy - a wholecloth quilt
WIP (Work in progress) Floral Fantasy - a wholecloth quilt
I still need to finish beading it and then bind it. I'm actually going to block this one like we're supposed to. I hope it'll be worth it. I'll let you know how it goes.

Of course, after finishing the quilt comes the label and hanging sleeve. I know that 2 of the 5 quilts in the show are ready since they were in the Fibre Fling 5 show, but I suspect that I'll have to attach a sleeve and label on at least two of the other three.

Art with Fabric Blog Hop

I've been thinking about this project for a while now but only started choosing my fabrics as I was finalizing the pieces for Fibre Fling 5. I can't trust myself to start a new project before finishing something with a deadline. My middle name could be Procrastinate!

I don't want to spoil the surprise, but here's the background of the piece.

Background of the Art with Fabric Piece
Background of the Art with Fabric Piece
The project is based on a painting. Not a famous one - since I own it! It doesn't look like much now, but it's the foundation with lots more to come.
It would seem that I don't naturally notice details in paintings. Even if I've been looking at this lovely work since I was 18, I didn't realise how complex it was until I started really looking at it to plan this project. Not to give too much away but what I saw were the vivid colours and the mouvement. Although I won't be reproducing the painting, there is still a crazy amount of detail in it that I don't want to loose. It will be to find that "juste milieu" between detail and impression.

Since I'm on a deadline (Yikes!!!) I need to stop writing this blog (i.e. procrastinating) and finish piecing it tonight or tomorrow at the latest. I haven't decided how much thread sketching to do vs. quilting. I still have trouble with this part. I will have next weekend to thread paint, quilt and bind it since I need to have a photo of the finished product by May 2nd. 

What I learned:
  • Saying yes to projects with deadlines is easy when it's a few months into the future. Deadlines are not a bad thing - it's just that I don't really take them seriously unless they are looming! 
  • I'm looking forward to summer and being deadline-free, until I find something else to do!


Sunday, April 17, 2016

Learning to write - again

Colour Me Positive Challenge
Like most of you, I've been writing since I was 5 or 6 years old. At different stages of my life, what I wrote and why I wrote has changed. At first, I wrote mostly for school - homework, math, essays, posters and stories. As a mom, I wrote lists of things to do and buy, notes for sick or late kids and the occasional letter or card to family. Since working on a computer, I only write when I'm at meetings or when I have no idea what I'm doing - then I'll take out a pencil and a pad of paper and write until I have some sense of what I should do, or at least what I should ask. It's my personal brainstorming session.
Week 6 of Colour Me Positive
My penmanship has never been great, but not as bad as some. I've never had a reason to worry about it until I started making art. As I participate in the Colour Me Positive Journal Challenge, it's become obvious that if I want to use words in my free motion quilting (FMQ), then I had better learn to write - again!

These first couple of efforts weren't too bad. The large writing in my "kindness to all always" pieced was fine, but the words on the fingers needed a little help, especially since I misspelled Smiling (I've always had problems with cursive "n" and "m").

Week 3 of Colour Me Positive
In the "be here now" piece, the link between the letters isn't great, particularly between the "o" and "w" in "now". Since I was mostly practicing my FMQ stitches, I wasn't paying much attention to the letters.

Then came my latest piece for week 14. From the start, the letters were a problem - and there's only one word and four letters!!!

"Once you choose hope, anything can happen" Week 14 of Colour Me Positive
There are a couple of reasons for the problem. The first is that I didn't plan my project. I'm a "jump right in" kind of gal and that's what I did. I made my quilt sandwich, threaded the sewing machine with maroon thread and started outlining the letters.

I really could have removed the letters' stitching and started over, but where's the fun in that! I love fixing things and adapting - and that's what I did. (ok, the sorry truth is that I always hope that it won't be that bad and I'll be able to ignore it!)

So of course, at first I ignored the letters and did some pretty nice FMQ around them. That was fun. Then came the challenge and fixing part. What was I going to do with those letters outlined in maroon?

I decided to hide the sewing by covering the letters with organza and then beading around them. It sure would have been quicker to have removed the thread at the beginning of the project and have started over :-) Placing a few beads here and there is fun. Outlining the word HOPE was painful. I'm just not that patient. After doing one letter, I get in the "Been there, done that" mode. I was SO happy when I finished the outlines.

Title page of my lettering journal
Back to my original thought. This work made it pretty obvious that I needed to learn to write - again. Since looking at everyone's amazing creations on the Facebook page of Colour Me Positive, I've become very impressed with the writing in their art. So how can I do that? Many participants have mentioned Joanne Sharpe, whimsical art maker extraordinaire. I have seen her book and was tempted, but what convinced me was her free video series that goes with the book.

I'm not quite ready to translate my letters to a quilt yet, but it won't be long. I also get to practice my lettering and FMQ every time I have access to a paper and pen. How cool is that?
Applying the Pencil Sketch Technique

Here are a couple of my practice pages. This first one is the pencil sketch technique from her book. I used it to write her mantra - "Play, practice, write, repeat." Replace the word "write" with the word "quilt" or "FMQ" and the saying now applies to quilting.
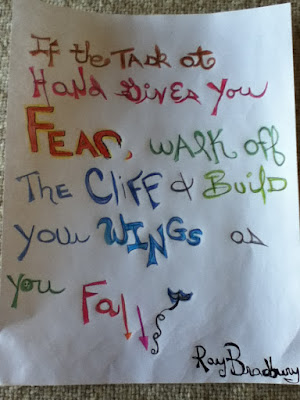
I found this quote by Ray Bradbury in the book Quilt of Belonging: The Invitation Project by Esther Bryan and Friends. It describes courage, hope and/or faith so well - you still experience fear but you know that you can walk or jump off the cliff and your wings will support you.

I'll be writing about the Quilt of Belonging project after I visit it with my daughter, between June 9-12, in Kingston, Ontario.

What I learned:

  • A little planning when using words in a quilt is not an option - it's necessary. I really hope I remember this!
  • Beading is fun in moderation.
  • Learning from artists in other disciplines is great. It can all be relevant to quilting. It's a great way to broaden my horizons and learn all kinds of new things.
  • My new lettering journal will also be used for free motion quilting designs and for creating writing exercises. What a wonderful journey.

Hope you keep learning and passing it on.


Sunday, April 10, 2016

Fibre Fling 5 Show

It was amazing to see my art quilts hanging beside other wonderful art and feel that they fit right in! I have to admit that I didn't expect this to happen to me, at least before I retired and got to play and create full time.

It was great to help set up the Out of the Box Fibre Fling 5 art show and sale. Some of the larger pieces were hung on the wall, but there were a dozen free-standing structures to hang the art pieces. I worked with one of the artists to set up the pieces on the structures. What a great learning experience.

I learned what pieces played well together and would look good hanging on the same surface while others did not play nice. See my "What I learned" section below for some basic tips on choosing which pieces should hang out together.


Here is the video of my interview with Liana Voia.

Envelope for "Imagine"
"Imagine" 26½” x 30½”
Even before the show, it was quite the job getting my pieces ready. Each piece needed a good label, a card with information and a photo for display purposes as well as a hanging rod. I always use a dowel, but had to attach eye hooks and then a length of wire to each dowel.

Each piece also needed a container or envelope for transportation to the show. If the piece was for sale then the container needed to look good in case it sold and was taken home by a customer. Here are the envelopes I created as well as the pieces that were in the show.

The envelope for "Imagine" was the largest since it had 2 sections - one for the quilt and the other for a piece of cardboard so that the quilt could stay rigid and not get folded and creased. I couldn't roll it up since it was three-dimensional.

Imagine
Inspiration: Musical Challenge for the CTQG representing the song “Imagine” by John Lennon. The people are holding hands around the crazy-quilted world. Each fabric represents a culture or part of the world.
Materials: Cotton fabric, ribbons, beads, embroidery floss
Techniques: Hand embroidered, machine appliquéd, free-motion quilted, beaded

I made the envelopes for the next two quilts out of a pillow case. You can see that "Woven Landscape" got the edge of the pillow case while "Yellow Kayak" got the end part.


Yellow Kayak
Inspiration: Quilt based on a friend’s photograph of her kayak in the river.
Materials: Cotton fabrics, shoe lace, metal clasp, button 
Techniques: raw-edge appliquéd, free-motion quilted

Yellow Kayak 11½” x 12½”


Envelope for Woven Landscape


Woven Landscape
Inspiration: Playing around with a woven background and creating a whimsical landscape.
Materials: cotton, organza, jute-cotton ribbon, beads, embroidery floss
Techniques: woven background, raw edge appliqué, beaded, embroidered and hand-quilted

Woven Landscape 13" x 17½"

Hockey Day in Canada
Inspiration: Playing with fabric in a winter theme. I finished it on Hockey Day in Canada 2016.
Materials: Cotton fabrics, beads, buttons, tulle
Techniques: raw-edge appliquéd, free-motion quilted, beaded

Hockey Day in Canada  12½ " x 9½"
The envelope for "Hockey Day in Canada" was made from lovely snow flannel with a blue border to extend the envelope. 
Envelope for Hockey Day in Canada


A very practical envelope

I didn't make anything special for the "Memories of the South-West" piece since it was small enough to fit into a plastic pouch and it wasn't for sale. Some duct tape to secure the information to the envelope and it was done! 

Memories of the South-West 12" x 9½"


Memories of the South-West
Inspiration: After a trip to the American south-west, I wanted to create a landscape art quilt, however the photo used as inspiration is from Ayers Rock in Australia.
Materials: cotton, wool and acrylic yarns, embroidery thread, tulle
Techniques: hand appliquéd, embroidery, machine sewing.

During the Fibre Fling 5 show, we had the privilege of being interviewed for a short YouTube video of our work. I was interviewed this morning. After a couple of false starts, it went really well. As soon as it's ready, I will link it to this post and possibly to my blog page - something else to learn to do :-)

What I learned
While helping to put up the show on Thursday, I learned some tips about placing art pieces together. Here is what I surmised:
  • A face in a piece will always attract the most attention. Our eyes are drawn to it. To be placed with such a piece, the second piece has to be visually strong enough to command its own attention without distracting from the face. 
  • Similar colours in two pieces may help them to "play nicely with each other". There still needs to be enough contrast so that they don't just blend into each other.
  • Shapes in both pieces are important. A piece with straight lines may not play nicely with a piece that is mostly curves or more flowing. 
  • I also learned that I have pretty good colour instincts. It's great though to know why something works or doesn't work since saying "that it doesn't feel right" isn't the best way to express your opinion.
  • As I write these tips down, I realise that these also applies to auditioning fabrics for a project. On the other hand, breaking the rules will often create stress, contrast and interest. It just depends on the effect the artist is going for.
I have linked this post to the following linky parties. Please check them out to see what others are doing. Thanks for stopping by.
Off the Wall Friday; Can I Get a Whoop Whoop? Fabric Frenzy Friday; and Lessons Learned Linky