Showing posts with label beading. Show all posts

Wednesday, October 05, 2022

Exciting News

Hi, you may remember that I taught a Meditation Stitching course this summer. It was a great experience, and I'll be repeating it (in French!) at the end of November.

Getting Ready

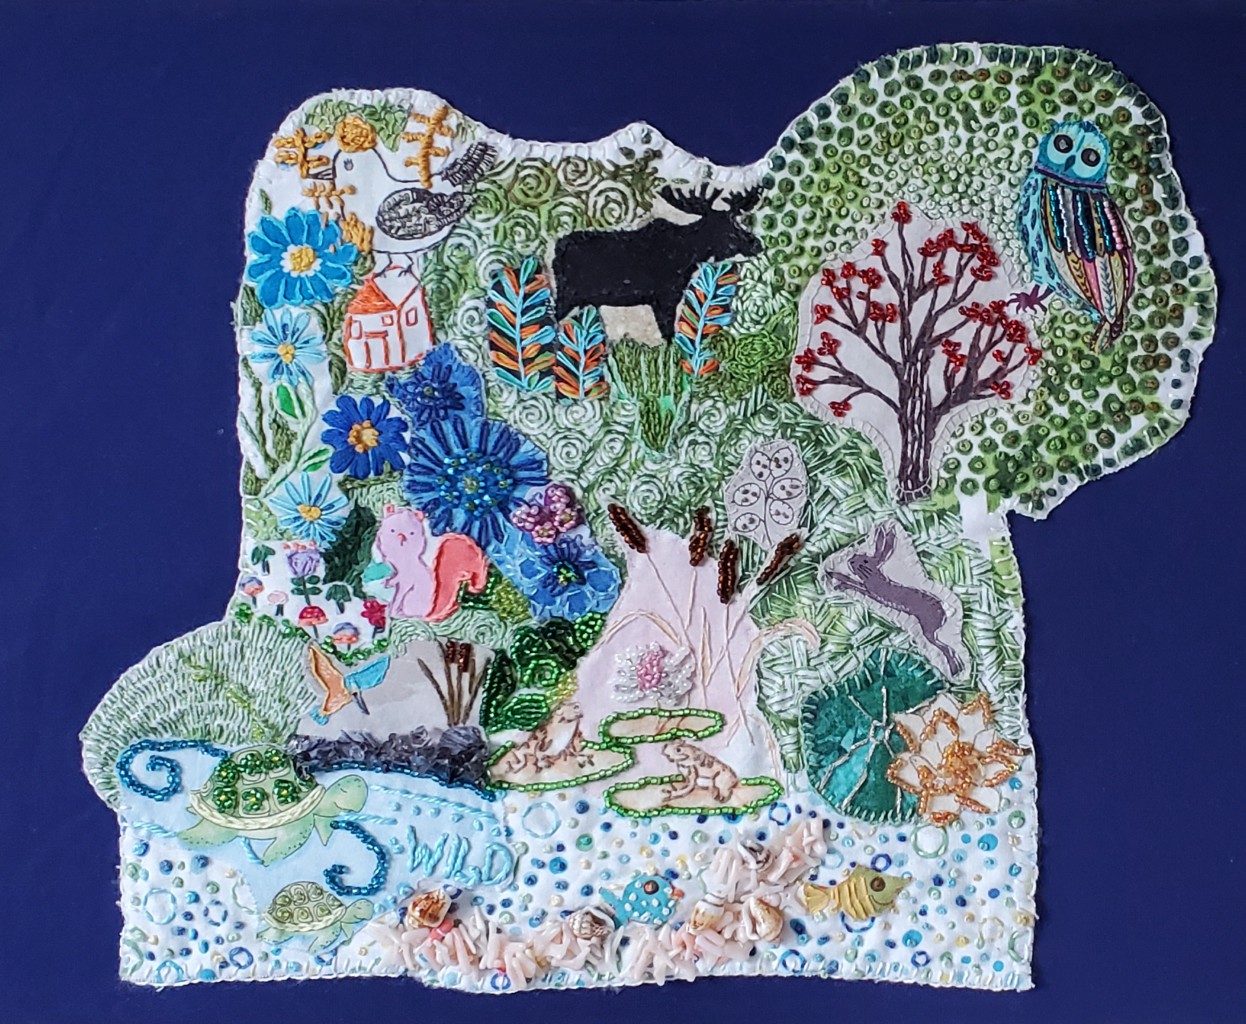
I know that I have a lot of time to get ready, and that this is probably another great way of procrastinating, but I've prepared this lovely piece to show at the course.


Joyful

There isn't anything very about doing mindful stitching. It's all about taking the time to be creative, to set a few parameters around what you want to do, and then enjoying the meditative process of stitching. I believe that doing this process regularly can help to keep you grounded, bring relaxation and encourage creativity. 

As an exercise, I used my wonky block sample to see if I could create four different blocks from each quarter of the cut-up block.

I cut this sample block into 4 to make meditation blocks

Here is my stitching process. I chose various fabrics that might go with the base block and then started stitching. My favourite stitches are the running stitch, cross stitch, blanket stitch, chain stitch and a variation of the fly/feather stitch. These embroidery stitches are about as basic as it gets. 

Adding fabrics and colour

Using stitches to add texture
(and more colour!)


At some point I trim the block, although I do like having things sticking out when I can. 😊 Here are close ups of the blocks. 

First block

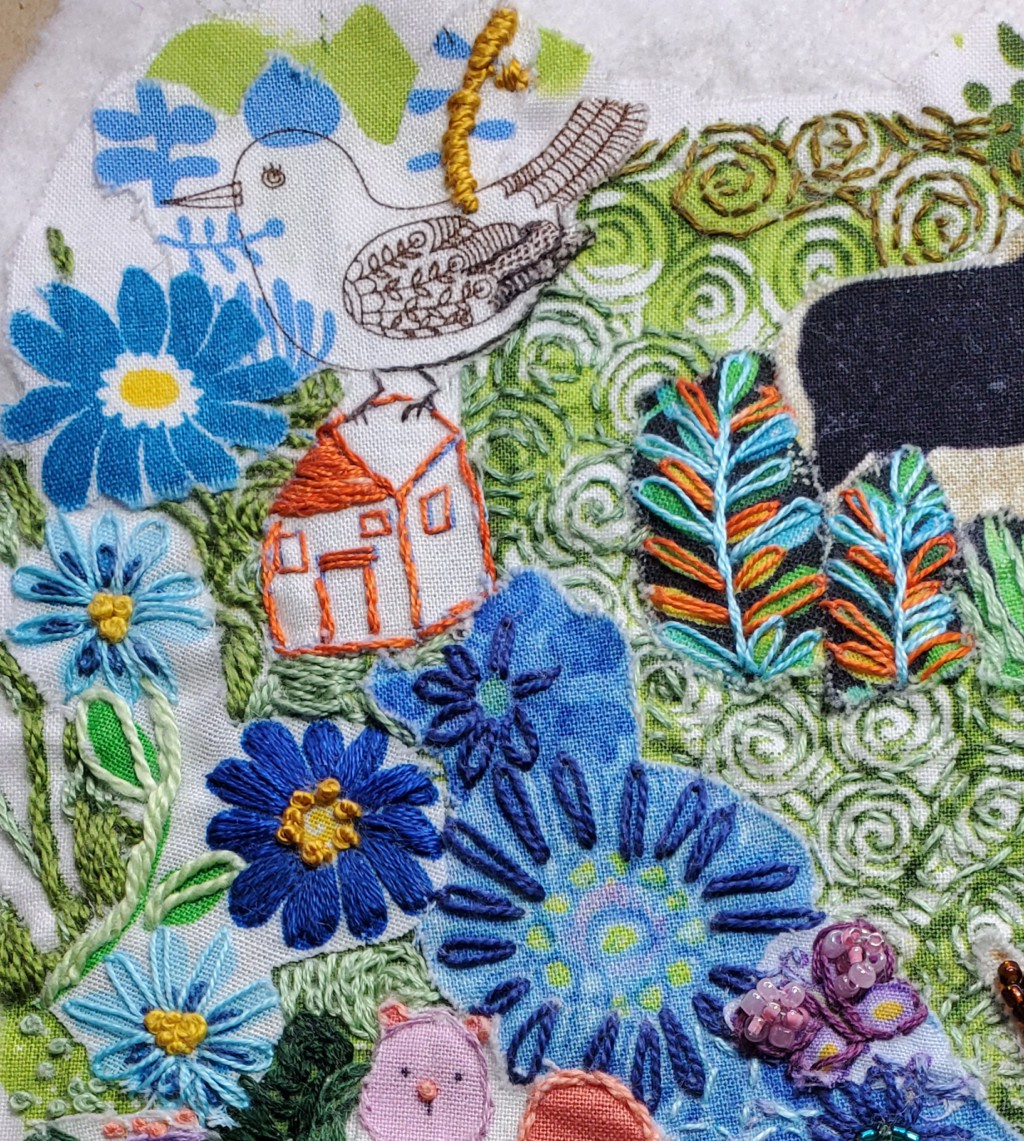
You can see that all of the bases started with the wonky star but evolved pass that! I love using different thread, yarn, and fabrics like hand-dyed cheese cloth, organza, felt, linen and velour. The flowers were cut from one of my favourite top. 

Second block

I love how I can use up little bitsy pieces of some of my favourite fabric. Now I have an excuse to keep all of my tiny scraps if they are interesting :-)

Block 3

I also added beads on this last one. It looks so elegant! 

Block 4

Creating a 4 drop hanging


One of the things that I want to include in my class are options for how these wonderful mindful stitching blocks can be displayed. 

While reading a "new-to-me" Creative Embroidery book by Dilys Blackburn, I found a wonderful example of a drop hanging that is used to display embroidery pieces. The link to the book is in Related links below.

Since my finished blocks were roughly 4" square, I decided to make the finished hanging square 4½". I started by cutting my white fabric in 5" squares. I placed 2 squares facing each other, then added the square of batting on top. With my walking foot, I stitched with a ¼" seam all around the square except for a 1½" opening on one side. I then trimmed the batting and then turned the square inside out through the hole. In the image of my first block, I left a 3" space to turn the square inside out. This was a little too large, so I reduced the openings of the other blocks.

Opening pinned before stitching

I repined that opening so that the square would be more square. Then I top stitched around the whole square, as close to the edge as possible. After the four blocks were finished, I attached some wide white ribbon.
Back of the hanging

To prevent fraying, I cut the ribbon with pinking shears and the added a ½" fusible web and folded it over. I made sure that the ribbon was long enough so that I could sew a single layer over the original top stitched line. After I was all done, I just hand-stitched the edges down to stop them from flopping over.

I attached the meditation blocks with a couple of beads on the top corners. I want the students to be able to look at the blocks as much as possible. This also allows me to switch out the blocks if I wanted to.

I then went on a photo shoot in the back yard. 

Twix and Taffy (my brother's dogs) exploring the area.

A close up with the tree and sun as backdrop 

The picture that I took at night because I was so impatient 😊


What I learned

  • I do find it difficult to know when to stop embellishing these beauties. Often it's when I've had enough 😊
  • I've been reading about blogging and decided that I need to up my game by taking better photos. It's not always easy because I usually finish a piece in the evening and then have to wait for the next day to take good pictures.
  • I got so caught up with making the hanging that I only took one process picture. If I make another, it might be a good subject for a tutorial!

Related links

Linking parties

I'm linking up this post to many fun linking parties. Why not see what's going on in the quilty universe? Put your foot down, Slow Sunday StitchingMonday Making, Oh Scrap!Peacock Party, TGIFFBeauties PageantOff The Wall FridayPatchwork & Quilts

Project Details


Joyful     
23" x 4½"
Materials: Meditation embroideries with wool, thread, felt, lace, hand-dyed fabric scraps, tule, beads, etc.


Friday, September 16, 2022

Embroideries in hoops

I've been doing some slow stitching in the last few weeks. It's always such a relaxing thing to do. 

Stitching a second seascape 

Last month, I wrote a post about Embroidering a seascape. It was based on TextileArtist.org's workshop with Bethany Duffy (see Related links below). I decided that I wanted to go further with this technique since it's a lot of fun and since I changed it up a little, was able to learn a new beading technique 😊!

A second seascape with a shell and sea glass

As you can see, it's still a work in progress (WIP). 

I used a piece of cotton for reinforcement and a hand-dyed piece as the background. On top of that, I added hand-dyed cheese cloth. I love the way that it looks like an old fishing net.

I attached the sea glass by making a beaded bezel. Since I had not way of attaching the sea glass, I treated it as a cabochon. I used Thom Atkins' book, Beading Artistry for Quilts. His explanations were great. It's obviously working since the sea glass is still attached after a couple of weeks!

Update: Here is a picture of the finished Seascape and Sea Glass 

Finished Seascape and Sea Glass (Dec 2022)

I love how it's turning out, so much so that I started another squirrel - literally 😊

Getting caught up in a Squirrel

Here is my second WIP. I found a half nut shell that had holes inside, so why not use it too? With a nut comes a tree and a squirrel! I used a double layer of a blue-grey sheet as my base and added some of my own hand-dyed cheese cloth. I love the texture that it gives the piece. 

A tree, a nut shell and a Squirrel!

I started with a tree trunk (a scrap of brown batik) and then some kind of olive green voile (from an old skirt) for the top of the tree. I've added a few daisy stitches as leaves and I'll continue doing that. I haven't attached the squirrel on the log yet. The squirrel may move, depending on what else I add to the piece. 

It's far from finished but it makes me smile when I look at it. 

Meditation stitching


Last weekend I spent a couple of hours at the Out of the Box (OOTB) booth at Fibrefest in Almonte. I did some great shopping beforehand and at the booth worked on some meditation stitching. A little difficult to be mindful with people asking questions but it was enjoyable talking with like-minded people 😊

Wonky star mat and the meditation block

Practice wonky star block


Can you see the quarter of the practice wonky star block as the background to the meditation block? I love trapping bits of thread and yarn beneath the tulle. This tulle is nice and glittery. I just finished the block, so here it is!

The beginning of a meditation block
Finished meditation piece


What I learned

  • Learning how to create a beaded bezel was interesting. I'm surprised that I was able to follow it easily - the instructions were very well written. 
  • I should have used smaller seed beads as I went up and around the sea glass. I didn't even know that they made them smaller than size 11! I'll have to go to a beading store for those.
  • I don't think that I have much to do to finish the seascape embroidery, just tidy it up and finish the back.
  • I pierced a hole on the inside of the nut to attach it. It was tricky getting the needle through it. Now I know what a curved needle could be used for!
  • I will probably be working on the squirrel hoop for a bit - there is still lots to do.
  • I'm working on more meditation pieces since it looks like I'll be teaching this later in the fall. I want to create a few finished articles to show what can be done with these, other than my huge traveller's blanket.
  • Did you notice the lovely polar bear pin cushion that Turid sent me last year? I love it 😍

Related links

Linking parties 

I'll be linking up to many fun linking parties. Let's see what's going on around the quilty world! Put Your Foot Down, Off The Wall Friday, Peacock Party, Slow Sunday Stitching, Finished or Not Finished Friday, Oh Scrap!, Patchwork & Quilts, Monday Making, Design Wall Monday, Midweek MakerDrEAMi!


Saturday, May 28, 2022

Let Them Flourish is finished!

If you've been following me on Instagram, you've seen lots of images of the progress of this piece. Lately I've been adding a gazillion French Knots, finishing up the beading and then finally mounting it on a fabric-covered canvas.

Let Them Flourish - Ready for Exhibition

Let Them Flourish (aka Biodiversity)

In the Beginning

This piece started off as a fabric collage of images related to Biodiversity, the theme that was given to us as part of the February 2021 TextileArtist.org's Stitch Club workshop. Kate Tume, our instructor, had us exploring narrative potential with embellishment.

The beginning of Biodiversity (working title)

I attached the fabric pieces to batting using Heat n Bond Lite. From there I started stitching and beading. To say that it was slow going is a huge understatement. Again, not called slow stitching for nothing 😊.

Starting the embroidery and beading

At some point I got tired of its slow progress and wondered off to other projects. I came back to it during my #100dayschallenge on Instagram. I would say that the majority of it got done between March and May 2022. It also helped that I had a deadline approaching - the Conversations exhibition with Fibre 15 (see related links below).

Towards the Finish Line!

I love using my own hand-dyed perle cotton 💙

At one point I got bored and had an aha moment. I realised that I didn't have to embroider the images using the same colours that was on the fabric. Notice the house in the image below, which was printed in blue but covered in orange thread. I love that the blue peeks through. That was quite liberating! 😊

Adding different colours than those on the fabric

The green embroidered background around the moose took forever -
I was seeing swirls in my sleep!

I added a gazillion French knots around the tree. I knew by then that it would drive me crazy, so to keep it interesting, I used different shades of green and went roughly from light to dark.

So many French knots!!!

I was worried about the owl - I wanted to add beads but wasn't sure how much. I found out fairly quickly how much was "too much"! I was going to bead every other line but got mixed up and ended up beading all of the lines. It wasn't really bad but it made the owl the focal point, which is not what I wanted.

Too many beads....

Just the right amount of beads 😊

I used sewing thread to lightly embroider various parts of the owl. 

Finishing up!

Finishing up involved covering a 14" x 11" canvas with fabric and then attaching the piece to the canvas. I used Sulky's Invisible thread since it was clearer than the other kinds I have. I wasn't able to make a knot at the end of the thread, so I left a long tail and then after taking the next stitch, tied a knot at the back.

I just put in a few pins through the canvas to keep the piece from shifting as I was sewing it down. I stitched around the edges but also within the piece to keep it securely in place. It was easiest to stitch behind beads.
Attaching the piece to the canvas


Let Them Flourish

What I learned

  • I learned that this technique is called textile collage. This is probably my favourite technique of all times. I've used it a few times to make some of my favourite pieces. I'll include links to my favourite ones in Related links below.
  • I love being able to add bits and pieces of fabric to tell a story or show a moment in time. 
  • The hardest part is probably leaving reality behind since there is no way to keep the actual perspective real since the elements come in the size that they are on the fabric! I love that whimsical part of it.
  • I'm glad that I figured out that I don't have to use the same colour as the background image to embroider. It adds a different look when using a different colour and having the original fabric colour peek through.
  • I realised that I need to change things up to keep me interested. What's not to love about many shades of green instead of just using one?!
  • I really got to know my threads - there's nothing wrong with embroidering with regular sewing thread if you just want a small accent of colour and texture. 
  • A bonus is that the technique almost always needs the little bling of beads 😊
  • It's always a slow project, even if using FMQ but it's usually well worth making. I'm making myself finish this one before I start another one - it would be too easy to get sidetracked at this point!

Related links

Linking parties

I'll be linking up to many fun linking parties. Remember to visit Muv to link up to Free Motion Mavericks this week! Put your foot down, Off The Wall Friday, Finished or Not Finished Friday, Peacock Party, Beauties Pageant, TGIFF, Patchwork & Quilts, Oh Scrap!, Slow Sunday Stitching, 15 Minutes to Stitch 2022Monday Making, Design Wall MondayMay's Favorite Finish Monthly Linkup

Project details


    Let Them Flourish
    Workshop with Kate Tume through TextileArtist.org
    Attached to a 14" x 11" fabric-covered canvas
    Materials: commercial quilting cotton, beads, shells, 
    metallic, embroidery, sewing thread and perle cotton 
    Techniques: collage, embroidery, beading


Sunday, March 07, 2021

Embroidery & Beads for Slow Sunday Stitching

 We have another great workshop that got me totally inspired at the TextileArtist.org's Stitch Club. Kate Tume's workshop is about exploring narrative potential with embellishment.

Embellishing with embroidery and beads

We were supposed to make some sampling but I got inspired and just had to jump right in 😊. The prompt was biodiversity. I guess I was in a creative mood because this is what I came up with as my collage background (it all started with the frogs!).

Biodiversity - collage ready to be put together

Once I had an idea of what I wanted, I used Heat n Bond Lite to affix the collage pieces to the background fabrics. 

I started adding beads and other embellishments from the bottom. I really wasn't sure if I needed to embroider and bead right on the fabric, or if I should do it through the batting. It turns out that embroidering through the batting brings up a lot of white fluff, so I am generally embroidering first and then beading through all of the layers.

Details of stacked beading and embroidery


More beading and embroidery

This is what I've done so far, but it's still early on Sunday and I have lots of hours left in my audiobook to keep me going. I'm really, really loving this!

Biodiversity in progress

What I learned

  • I've been using all kinds of material for the embroidery and beading. I used metallic thread for the leaf of the lotus flower, beads that look like coral in the water. These came from a bracelet that I bought in my travels. There are shells from a necklace, regular beads, embroidery thread as well am my hand-dyed thread. It's just so much fun!
  • I'm not sure about having added the batting already but when I was beading the shells and coral at the bottom, it just seemed so heavy that I wanted something stronger behind it. I also like the change in puffiness that comes from beading or embroidering with batting. 
  • To minimize the fluff when embroidering, I pull back the batting as much as I can and embroider the fabric first. Once an area is more or less done, then I bead through the batting. 
  • I'm going back to add French Knots at the bottom, but the fuzz is minimal since it's just one stitch at a time.
  • I probably should have embroidered everything first, but that's just not how I work - I was too impatient to wait. Besides this feels better - more organic.

Related links

Linking parties

I will be linking up to many fun linking parties. If you are looking for Free Motion Mavericks, it will be with Muv on March 11, 2021.

Slow Sunday Stitching, Off The Wall Friday, Patchwork & Quilts, Put Your Foot Down, Can I Get A Whoop Whoop? Design Wall Monday, Finished or Not Finished Friday, Peacock Party, Free Motion Mavericks, Monday Making, DrEAMi with Sandra at mmm quilts


Sunday, December 20, 2020

Christmas decorating fun

I love seeing our Christmas tree full of ornaments bought, inherited, received and made over the years. It's also the time when those Christmas runners, placemats and wall hangings get to come out and shine.

Adding to our Christmas decorations

Each year I try to make a little something for the tree or the house. I found the tutorial for the Christmas bell - the bell was supposed to be made of "sheer paper cloth" but I used organza backed with light stabilizer instead. The stabilizer gave the organza a crispness without removing the translucence. For the three-sided bell I used organza with dots and hearts on two of the sides and then embroidered the third side with a star. I hand-stitched the sides together and added the bell through it. If you're interested, the link to the tutorial is in Related links below.

Three sided Christmas bell
The embroidered side of
 the Christmas bell


I also made a snow frame. I started with a meditation stitched piece that I made last year, added an extra piece of fabric to make it wide enough and then added a couched snowman, snow and extra stars.

Snow frame with Christmas tree and snowman

For the Out of the Box Fibre Artist group, I made a Christmas postcard. It was dropped off on November 30 and should have arrived to it's new home by now.

The postcard was 4" x 6". The background is a fluffy fabric that I hand dyed in very light green. I used a pink cheese cloth to outline the tree and then couched some green chenille yarn. I used a Murano star bead for the top. Behind it I attached a small piece of yellow silk to add a little pop of colour. There are also many seed beads within the tree.

In the background, I used a white silk thread to embroider the snowflakes. I like the subtleness, like an impression of flakes. Instead of cardstock, I attached interfacing and then added a white backing.

Stylized Christmas tree postcard

Christmas postcard

Decorating the workplace

It's so different from previous years. This was my office in 2018. My colleague and I had a great time decorating with things that I had brought from home.

Adding colour to our 
workspace (2018)


Decorating the office plant (2018)


This is my present workplace - our dining room.

Working from home, in my dining room (2020)

It certainly is a lot cozier and the commute is very short 😊 I also love that Chevy is always near by!

What I learned
    Chevy in my studio.
  • I loved the idea of making the bell decorations but once I was done, although I liked it, I didn't feel the need to make more - which is a good thing because I still have way too many projects on the go!
  • The snow frame is on my window ledge in my studio. It's so lovely to look at while I'm writing this post. The couched yarn and backing makes it just a little too thick for the frame so I had to tape around it. Since it's for my office, I don't mind but I'll have to remember this if I ever make more as gifts.
  • I'm really not missing my physical workplace. It's so much easier to concentrate in my quiet dining room. You can see that I'm not trying to work in my studio - that would be a recipe for disaster...just too many distractions there 😊. 
  • Today I took pictures of my studio - it's pretty much finished. I'm hoping to write the post this week. Here's a teaser....
Related links

Linking parties

I'll be linking up to many fun linking parties, including with Muv for Free Motion Mavericks until Tuesday. On Thursday, please join me for the next Free Motion Mavericks. Your project doesn't have to be free-motion quilted to link up! Put Your Foot DownOff The Wall Friday Beauties Pageant, Peacock Party, Patchwork & Quilts, Oh Scrap!, Slow Sunday Stitching, 15 Minutes to Stitch 2020Monday Making

Monday, May 11, 2020

Adding rug hooking to my artist's tool box

It's been a while since I felt like reaching out. Although I needed some quiet time, I did continue to stitch and learn. That is my go-to in times of stress. Here is a bit of what I've been up to. 😊

Rug Hooking


I met a lovely lady, Robin Whitford of Hooking Outside the Lines, who teaches rug hooking. I must admit that it suited me better to take a virtual class rather than going to the store as it is usually taught. For an introduction course to rug hooking, it wasn't really necessary to be next to the teacher. The technique is really not very complicated. Like anything else, practice makes it easier. That's not to say that it can't get complicated, but for an introduction - it was perfect.

rug hooking - Echoed Heart
A rug hooked Echoed Heart 
After a two-hour class, I had made a square and rectangle with wool. Those were my practice pieces.
orange rectangle rug hooking
Making a practice rectangle
and then pulling it out

One of the things that I like best about rug hooking is that I can just pull on the wool to take it all out. If you don't like it, it's relatively easy to just start over. Of course that also depends on the type of yarn and the backing that you use. Burlap and the wool I used were very forgiving so that it's possible to just start over with the same wool, in the same place on the burlap.

After the class, I wanted to keep practicing because the hardest part it getting the wool hooked on the other side of the hoop. Once your fingers figure this out, the rest is fairly simple. So I started making a shape in the blue yarn. It sort of looked like a heart, so I continued with that shape. Then I got bored and added the red yarn around it (an echo in quilting terms 😊).
heart rug hooking in hoop
Echoing the heart in red

rug hooked blue heart shape
Making a heart shape with blue wool


Since I want to learn rug hooking to use in my textile art, I knew that I would want to make smaller pieces. I removed the burlap from the hoop and then zigzag stitched around the heart. I also zigzagged around the piece of burlap so that I could continue to use it without it un-raveling. 

I was very happy with this first piece and incorporated it into one of the art quilts that I'm working on. I used a square of red velour, cut out the shape of the heart from the centre and then reverse appliquéd the heart onto my piece. It was easy to attach because the wool of the heart extends over the edge. 
rug hooking inserted into reverse appliqué square
Reverse appliquéd the heart to my art piece
The next day, I decided to make a small landscape - nothing like diving right in!

It's wonderful that I can use most of the lovely novelty yarn that I've been accumulating in the last few years. It's great to see how a yarn translates to rug hooking. Some keep their shapes while others end up splitting or getting quite shaggy (like the top of the tree).  

Small rug hooked landscape

close up of rug hooked landscape
Close up of rug hooked landscape
partially done rug hooked landscape
In progress picture -
it needed help.
It was fairly simple to make the foreground in green and I added some purple in shapes that could have been flowers.

My son helped me by suggesting a longer trunk for the tree. It also helped when I added blue yarn for the sky on both sides of the tree. You can see the improvement from the progress image, which mostly looked like a big clump of fuzzy green. I used three different yarns for the sky.

I added some beads to the flowers, hoping to make them look more like flowers.

What I learned
  • Rug hooking is very cool. Not too difficult to learn the basics but has so much potential.
  • My teacher, Robin Whitford, is very experimental and doesn't follow the rules - my kind of artist!
  • I really loved how the different fibres and yarns looked after they have been hooked on. 
  • The bark was particularly interesting because I used pieces of twine that one of my favourite restaurants uses to tie the paper that wraps their sandwiches. If the twine has never been used, it comes out in distinct curls but once it's been used and pulled out, it became all fluffy.
  • I used the hoop to learn, practice and make the first heart shape. After that, I just did the rug hooking without the hoop. That's also how I do a lot of my embroidery unless it's a really precise piece.
  • I'm not sure how I will be using rug hooking in my art, but it's great to think of the potential. I do want to experiment with other types of backing. I have some cotton and linen pieces that I would like to experiment on. Actually, wouldn't it be cool to hand-dye the backing material and then add rug hooking to it, leaving some of the spaces empty? Oh the possibilities 😊
Related links
Linking parties
I will be linking this post up to Free Motion Mavericks which is hosted by Muv right now. I'll be hosting on Thursday so remember to come by. Let's see what's going on and join in the fun! Monday Making, Design Wall Monday, What I Made MondayColour & Inspiration Tuesday Midweek Makers, Needle & Thread Thursday, Put Your Foot Down, Off the Wall Friday, Finished or Not Finished Friday, Friday Foto Fun, Can I Get A Whoop Whoop?, Peacock PartyOh Scrap!, Slow Sunday Stitching,