Showing posts with label Out of the Box Artists Group. Show all posts

Thursday, October 10, 2024

Joyful Embroidery with Fleur Woods and Free Motion Mavericks

Hi and welcome! 😊 I hope that the change in weather is not too rough on you. I was not enjoying the extreme heat but it would be nice to have temperate weather for a little longer. It looks like we'll be enjoying a couple of warmer days at the end of the week and I'm very grateful that it's not below freezing yet! 🧤 I'm in Canada - what can I say, weather is an important topic of conversation here.

Painting fabric to stitch on 


Being very keen to take the class, I signed up for Fleur Woods' class, Joyful Embroidery the first day enrollment opened. I don't normally watch courses ahead of diving in but I think that I was a little intimidated and watching the videos helped me to see where we are going. Eventually I started doing.😊

Flower drawn on painted fabric - ready to embroider

One of our first tasks was to paint some fabric. I think that half of the fabric is linen while the larger pieces are cotton. I mixed up some blue and yellow with the Colour Vie pigment system. I know that it works well on fabric. I watered it down a bit to get a soft wash.

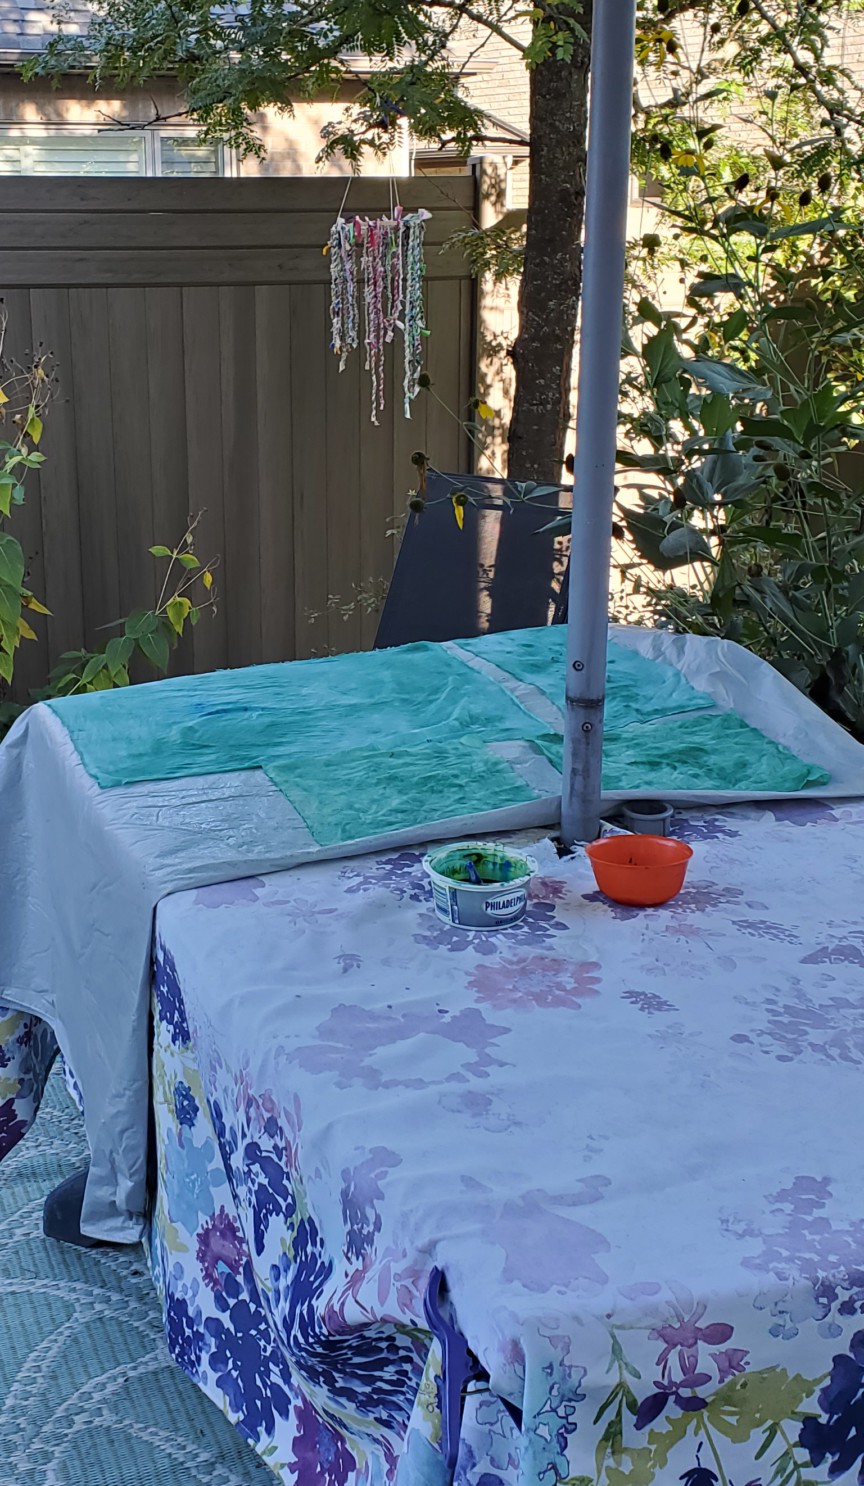
Painted fabric drying outside

Since it was quite cool outside, the fabric stayed out overnight and dried in the morning sun. I took pictures as soon as they were dry but they were very wrinkled. I don't mind some wrinkles but this was too much, so I ironed it and it looks so much better!

The two top pieces on the left are a loose weave linen while the rest is cotton. It's mostly a mottled teal green, with more green than blue. I did have a few splatters of blue on the cotton that I decided to keep - it adds interest and shows the painting process.

Linen squares on the top left with cotton

Practice Stitching


After painting the fabric I decided to start doing the practice stitching. These are all stitches that I've done before and I have so many samplers everywhere that I decided to just stitch up a little area on my eco-printed fabric piece to practice almost all of the stitches. Here it is below. I'll have to use some of these stitches elsewhere on the piece so that it doesn't look out of place.

Practicing most of the stitches on my eco-dyed piece

The only two things that I didn't put on this piece was the Turkey stitch and beading. I added these to a challenge piece that I'm making for the Out of the Box (OOTB) Fall Fling show. More about that below.

Sketching flowers


As you saw at the beginning of the post, we had a section on drawing. I'm not very good at it but with practice I am getting better. Since most of my garden is past its prime, I checked out my photos from this summer. I took these two photos at the beginning of September. I just love that the birds are eating the seeds of the flowers instead of just going to the bird feeder!

I used the image of the flower, without the bird

Using the image of the flower at the bottom

Here are my two sketches, transferred onto fabric using a light box

I just want to mention that I'll be using my special journal to take notes and keep my sketches.

Joyful Embroidery Journal

OOTB Challenge


This spring I helped to organise a brown bag challenge for Out of the Box (OOTB) fibre artists group. Everyone who wanted to participate put a few things in a brown bag for someone else to use in their challenge piece. I had a little bit of plaid fabric, plain white fabric, two kinds of ribbon, a snowflake button, a green flower button and pieces of green felt and red leather. I used a little bit of most of it in the piece, as well as some scraps that I picked up at my quilt guild. 

My OOTB brown bag challenge piece

I used the Turkish stitch as well as beading (one bead!) from my Joyful Embroidery sampler exercise. You can see the small tuff of Turkey stitch at the top middle of the piece. The bead is on top of the felt and leather circle at the bottom. I pulled apart one of my daughter's large bracelet. 
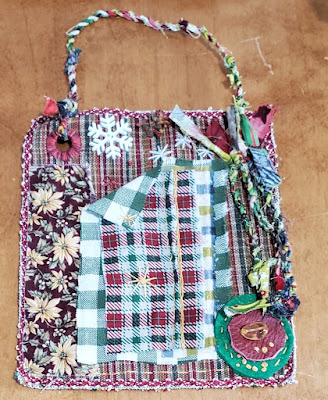
Close up of the challenge piece "2B Merry!"

You'll notice that I used a bit of home-made twine in the piece and to hang it up. I really love making twine 😍. I'll be adding the flower button and the other ribbon on the back, as part of the label, which will be written up on the white fabric.

"2B Merry" reveals its secret!

Out of the Box (OOTB) Fall Fling


My piece will be part of the Challenge exhibit at Fall Fling in a couple of weeks.

What I learned
  • I am really enjoying the Joyful Embroidery course will Fleur Woods. Watching most of the course ahead of time has helped me figure out what I want to do and has lowered my anxiety.
  • I stitched up the practice stitches on my eco-printed cloth as well as in a couple of blocks in my Almost Daily Stitching project of 2024. That was a great way to practice without having to start a new sampler.
  • In the course, instead of doing the Turkey Stitch which is a very time consuming stitch, we will be learning to do Punch Needle. I just received my Oxford needle punch from Robin, my local distributor. I took her rug hooking course a few years ago. I'll put the details in the Related links section below.
  • I enjoyed watering down my Colour Vie pigments and painting the fabric with it. It's going to make a great base for the embroidery. Since I had lots of paint left, I painted a few sheets of water colour paper so that I can use it to sketch on, before embroidering. You can see the paper in the first image of this post, above the fabric and sketch.
  • I've also been stitching on eco-printed paper (more in another post) so I could also use those painted papers to embroider on. That would be very cool!😎
  • I had a lot of fun working on the "2B Merry" OOTB challenge piece. The background fabric is a swatch of upholstery fabric that I got from a fellow artist. What a great way to use it! I also stitched around one of the grommets. It's great to be able to keep it to hang the piece. 
  • I didn't have to stitch around the second grommet since it's hidden by the fabric of the twine.
  • I haven't really done anything to enter into the Fall Fling show yet. I'm not sure that I'll have time to make anything before then but I will be attending both days since I'll be sitting at the membership table. 
Related links
Linking parties
I'll be linking up to many fun linking parties. You might want to check some of the out, before you link up below! Monday Musings, Design Wall Monday, Sew & Tell, Midweek Makers, Put your foot down, Needle & Thread ThursdayOff The Wall FridayBeauties Pageant, TGIFF, Patchwork & Quilts15 Minutes to Stitch 2024, Oh Scrap!,

Free Motion Mavericks


Welcome to week 502 of Free Motion Mavericks! It was a very productive week! Thanks so much for linking up😊. Check out these amazing projects from last week that included FMQ, ruler work or walking foot quilting. 

Last week Preeti of Sew Preeti Quilts had two quilt patterns published! Both of them used the Peppermint Sprinkles collection of Island Batik fabrics. The first quilt, "Good Tidings" is in Annie's Christmas Pattern book while the second, "Austin", is in Make Modern #60. Check out Preeti's post for links to the patterns.

Preeti's "Good Tiding", now in 
Annie's Christmas Pattern book 

Preeti's  "Austin" is in Make Modern #60

Donnalee has started making more table toppers for her guild's sale in 15 months!  Check out her first three.

More table toppers by Donnalee

Melva of Melva Loves Scraps quilted up a lovely vintage table cloth, ready to use for tea. 

Melva's lovely quilted vintage table cloth, ready for tea!

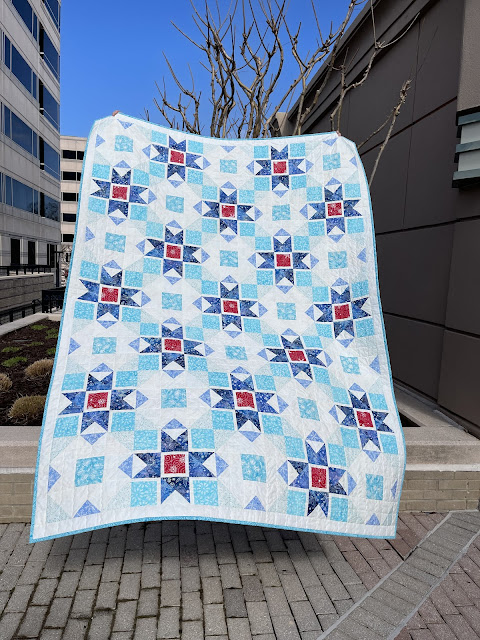
Kathleen of Kathleen's McMusing created a lovely quilt, "Accidental Stars" for the Flower Pot Blog Hop. I really love the quilt's secondary pattern.

Kathleen's "Accidental Stars" quilt

Margo of MY Quilts and Crafts finished her baby quilt as well as a fabric basket. Both are lovely!

Margo's finished baby quilt

The perfect gift basket by Margo

Thanks so much for linking up and visiting! It's now your turn 😊

You are invited to the Inlinkz link party!

Click here to enter

Thursday, May 09, 2024

Odds and Ends on Free Motion Mavericks

Hi and welcome to week 481 of Free Motion Mavericks.

Fibre Fling finds 


Last Friday and Saturday was the Out of the Box (OOTB) Fibre Artists' Fibre Fling 2024. I was there for most of the two days, spending my time at the Membership table. I had a chance to meet with fellow members, potential members and see all of the wonderful work of these very talented artists.

If you didn't see it, here are my two pieces at the show.

My tulips and birds at Fibre Fling

Over 30 potentially new members signed up for more information on OOTB. The show is a great way to promote our group.

Every year, I purchase a couple of pieces from fellow artist and blogger, Connie at Connie's Textile Art. Connie has started stamping on her hand-dyed fabrics. I plan on making next year's Agenda with one of these (or maybe both?)

Wonderful stamped fabrics

I saw the dark fabric below and fell in love! Then I looked at the fabric piece behind it and gasped😮 It's really that wonderful (and the photo doesn't do it justice!) I'm not sure what I'll be doing with these - they are going with my other Connie fabrics until I figure out what to make with them.

Gorgeous printed fabric 😍

There was also a raffle next to the membership table, so I spent a lot of time talking with potential ticket buyers. Of course I had to buy some. There were about a dozen different textile art pieces, each with a box to hold tickets. You had to choose where to put your tickets - that was the most difficult part! I put one of my tickets in a box that I knew was very full, but a girl can dream.....except that some dreams do come true! Look at what I won - an original Nancy Garrard! I'm going to have to find a special spot for this one in my home!

Changing Seasons by Nancy Garrard

I also treated myself to a small felted piece by fellow artist Laura C. I just love the pops of turquoise, cherry and lime. It also has lots of interesting hand-stitching and beading. 

A lovely felted piece by Laura 

While I was at Fibre Fling, I had time to finish embroidering my Noon Sun for my outdoor hanging sculpture. 

Noon Sun - part of my outdoor hanging sculpture

What I learned
  • Fibre Fling was a lot of fun, but as an introvert, it took a lot out of me!
  • As you can see, I've got one finished piece of my outdoor hanging sculpture. 
  • I haven't done any kind of quilt or stitch work since the show - I need to re-boost my battery. I have done some gardening. The manual labour was difficult but good 😊I now have 3 rhubarb plants in my side garden.
  • Now that I've played with the big garden tools, I'm ready to tackle the last corner of my garden, where there will be a small fountain and meditation area...wish me luck! 
Related links
Linking parties
I'll be linking to many fun linking parties. Why not check them out after you've linked up below? Design Wall Monday, Sew & Tell, Midweek Makers, Put your foot down, Needle & Thread ThursdayOff The Wall FridayPatchwork & Quilts, 15 Minutes to Stitch 2024, Slow Sunday Stitching

Wonderful news! Spring Tulips was featured on Needle & Thread Thursday! Thanks Kelly.

Free Motion Mavericks


We had a busy party here last week! Thanks to everyone who linked up 😍. Here are the projects that included FMQ, ruler work or walking foot quilting. 

Vicki from Vicki's Crafts and Quilting made this Delectable Teal Mountain runner. Isn't it gorgeous? You may want to check out her post to see her lovely FMQ feathers.

Vicki's Delectable Teal Mountain runner

Preeti of Sew Preeti Quilts outdid herself by making and quilting three quilts for the Pantone Quilt Challenge. This year's colour is Peach Fuzz. To see the Pantone Quilt challenge announcement and all of Preeti's quilts, go to the links beneath each quilt.


Preeti's Peach on Earth

For something different we have Preeti's Mica in 
Island Batik fabrics

Next we have Frédérique's Anaho - a wall hanging that she started in 2009 and finished last week. Those will perspectives are so cool!😎 Check out her post of her process and story behind the quilt.

Frédérique's Anaho

Deb from A Scrappy Quilter quilted this charity quilt on her domestic machine. The quilt was supplied by her guild and she did the rest! Deb quilted it with giant waves to help the geese stay up!

Deb's quilted charity quilt 

It's now your turn!

You are invited to the Inlinkz link party!

Click here to enter

Tuesday, April 30, 2024

Spring Tulips in 3D on Free Motion Mavericks

Hi and welcome! I have a very Spring-like finish this week. My 3D Spring Tulips 🌷is finished! This was my April One Monthly Goal (OMG) and the piece is due to be dropped off on April 30th for the Fibre Fling Show this weekend. No pressure 😁!

Spring Tulips is finished!


I wasn't sure what to expect when I was inspired to do this piece, but it sure is cool and I learned so much! It was all about playing and trying things out to see what worked. I love the problem solving aspect of these types of projects. 

Spring Tulips is finished!

Let me quickly take you through the process of making Spring Tulips 🌷.

Background and Vase


I made a couple of sketches from tulips I had bought. It was mostly to get a perspective of tulips in front and behind, as opposed to little soldiers in a row. 

Drawing tulips in a vase for perspective

I made the tulips, first trying out templates but quickly just winging it (as usual). Once the tulips, stems and leaves were affixed to my background fabric, I cut out a paper shape of the potential vase. This helped guide the making of a translucent vase using Sulky Solvy water soluble stabilizer. 

Vase outline in paper

To make the vase, I used a layer of thicker Solvy topped with hand-dyed pink silk organza. On this, I added thread, snippets of cotton, organza, etc. I covered this with a layer of very light Solvy and free motion quilted it (FMQ). The thread choice is very important here since it's what really shows up.

Layers of silk organza and snippets stitched over Sulky Solvy

On of the side
pieces

FMQ over such a large piece worked well, but I did figure out that on smaller pieces, the regular sewing foot was better.

To make the vase wide enough to contain tulips, I ended up stitching 2 pieces to attach to the sides of the vase. I sure used up a lot of thread on this project!

Once I washed off the glue from the Solvy, I sewed on the sides and then attached the vase to the background. I didn't sew down the bottom of the vase until almost the end since frankly I had not idea how I would do it!

Here is the vase with the background tulips after they were FMQ.

Attached vase, FMQ background tulips and 
playing around to make tulips.

FMQ the Background and Making the Tulips


It took me a couple of attempts to figure out how to make the free standing tulips. I found some tutorials on YouTube but didn't want just quilted tulips, You can read more about this in my last post (see Related links below).

Getting organized to make the 3D tulips with petals, stems and leaves

I finally remembered to take a couple of process pictures while making my final tulip. Three of the tulips have hand-dyed cotton as a background while the other two are stitched on the silk organza.

Making the tulips on layers of Solvy, fabric, snippets and thread

After stitching them, I separated each petal and removed the glue from the Solvy in warm water and hung them to dry.

Drying petals for the last three tulips

Yesterday I put all of the tulips together by hand-stitching. There was a lot of pricking by the needle to make these but there is no blood on the tulips - promise!😁

While I was doing all that, I faced the background and then FMQ it. I was also wondering how to finish the bottom of the vase since I didn't want it to be floating in the background. I was inspired to attach the bottom of a doily under the vase.

FMQ the background and
adding a doily for the vase to sit on.

This is when I added an extra leaf to the background to hide some white space without adding extra tulips.

Adding an extra leaf to the background

Here is the final piece. It's so cool that the tulips can be re-arranged! 😎

Spring Tulips 🌷

Spring Tulips 🌷

Spring Tulips 🌷

What I learned
  • This piece was an incredible amount of work. I wanted to create a 3D piece and I did it!
  • I love being able to blend different techniques in a piece, from stitching on the Solvy, to appliquéing tulips in the background to making a vase with tulips in it!
  • I prefer not using an embroidery hoop when working with the Solvy. It's fine FMQ on a larger piece but it's very difficult on smaller pieces. When the stitching isn't as obvious, using a regular sewing foot worked much better.
  • I only FMQ the background after the vase was attached. In hindsight, it would have been a little easier doing it before! I just didn't know what to expect and it turned out fine.
  • Making each tulip was the most time consuming part. I got pretty good at pulling the stems and the leaves inside out. I stuffed the stems with small strips of batting (about ¼" wide). It was great to use up those scraps since I generally throw them out.
  • I used different methods to make the centre of the tulip. At first I added batting to it but ended up doing the last three without the batting. I'm not sure which technique was better.
  • Making these tulips showed me that there are many ways of making them and the final result is all good.
  • BTW, I just realised that there is only 30 days in April, so it's already the end of the month. Yikes!
The Out of the Box's Fibre Fling Show is on this weekend. If you're in the Ottawa area, please come and say hi! I'll be at the membership table for the two days. 😊 Spring Tulips and Home to Feed will be there too!


My 2 pieces at Fibre Fling 2024


Related links
Linking parties

Wonderful news! Spring Tulips was featured on Needle & Thread Thursday!

Project details


Spring Tulips
Made for OOTB Fibre Fling Show
Size: 19" x 13" x 5"
Material: hand-dyed cotton and organza, commercial cotton, doily, Sulky Solvy water soluble stabilizer, cotton batting, fabric snippets and thread
Techniques: appliqué, free motion quilting (FMQ), sculptural stitching. 


Free Motion Mavericks


Welcome to week 480 of Free Motion Mavericks! My post is early because I just figured out that it's the last day of April and I need to show you my One Monthly Goal!

Last week we had a wonderful linking party! Thanks to everyone who linked up 😍.  Here are the projects from last week that included FMQ, ruler work or walking foot quilting. 


Vicki of Vicki's Crafts and Quilting shared her gorgeous butterflies runner. Look at that lovely 
FMQ and the ruler work in her background and borders. 

FMQ and ruler work by Vicki on her Butterflies runner

What a great Spring Butterflies runner by Vicki

Gail of Quilting Gail has been busy adding hanging sleeves for her guild's quilt show this weekend. She also managed to create a cute baby quilt using Dr. Seuss fabric. She used black thread to help highlight the blocks. 

Gail's Dr. Seuss baby quilt

Finally, Chris of Chrisknitssews made this lovely Flying Geese quilt. I love her ghost Flying Geese that she ended up FMQ within them to ensure that the quilt had an even consistency. It's really great!

A close up of the FMQ on Chris' Flying Geese quilt

Chris' Flying Geese quilt

It's now your turn!

You are invited to the Inlinkz link party!

Click here to enter