Wednesday, May 31, 2023

A Hexie Finish and June's OMG

Welcome to week 433 of Free Motion Mavericks. Can you believe that it's already the end of May? We finally have the weather to prove that Spring is turning into Summer here 😊. I've been watching the new generation of baby chicks being trained and fed by their parents - how incredible! 

May's OMG - Wild Hexies, is finished!


I'm delighted to say that May's One Monthly Goal is fulfilled - one Wild Hexies baby quilt done ✔

Wild Hexies baby quilt - done 😊

I washed it before taking the final pictures because I knew that the amazing texture would come through! There's nothing better than a new quilt washed for the first time.

It's getting very hot so I didn't venture out of the back yard. I still have lots of weeding to do, but at least I did mow the lawn (or what passes for it!) Here are a few glamour shots in my humble back yard!

In the dappled sun

On the grown - at an angle

On the picnic table

On the chair 

As I mentioned this was my May OMG. I made it with only 2 hours to spare! This post will be a "two for" since I'll be posting my June OMG goal below.

June's One Monthly Goal (OMG)


My June OMG is to cut and prepare all of my niece's t-shirts for her t-shirt quilt. I have started cutting them up. I want to have all of them backed with the special interfacing by the end of June, so that I can design the quilt. The entire quilt needs to be finished by September!

Some of the t-shirts for the quilt


What I learned
  • Other than the issue with my darning foot, this quilt FMQ very well. 
  • If it wasn't a baby quilt, I would not have quilted it with different designs since they are very difficult to see - but I'm hoping that this will make it a great discovery quilt!
  • It's now time to work a little more on my niece's t-shirt quilt. I figure that I just need a couple of days with the large ironing board out, to get the interfacing onto all of those t-shirts.
  • I have no idea about placement and such - the quilt will tell me 😊.
  • I'm hoping that I have a couple of days to finish my May Table Scraps Challenge - it just needs to be quilted. The party finished tonight, so I have linked up my in-progress piece from Instagram, to the linking party.
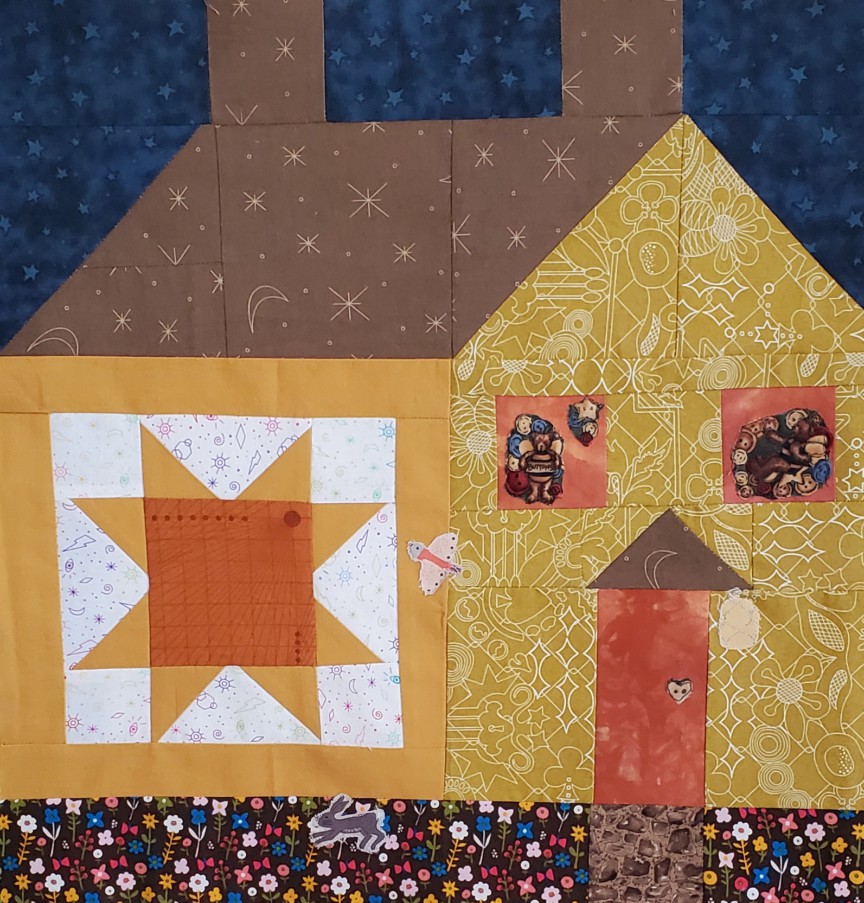
  • After that, I do have to focus on my houses. Since it's going to be hot, I hope to get some quality time in my studio!
Meanwhile in my back yard...

New generation of chicks learning to survive!

Related links
 
Linking parties
I linked this post up to Meadow Mist Designs' Favorite Finish Monthly link-up.

Free Motion Mavericks


Quilting Gail has finished another Hugs and Kisses quilt - I just love these colours! She FMQ it using a  "c" design. It looks great! I just love using FMQ designs based on letters since I do have that memory motor totally absorbed. 

Gail's wonderful Hugs and Kisses quilt

FMQ design of curly c's
It's now your turn!

You are invited to the Inlinkz link party!

Click here to enter

Thursday, May 25, 2023

A Large Experimental Sketchbook on Free Motion Mavericks

Hi, I hope that you are well and spent more time stitching that I did! More sorting in my studio meant that there were no surfaces left to work on - so I've been slow stitching in the living room but don't have much to show for it....it's very SLOW! 😊

Large Experimental Sketchbook


Two weeks ago, after finishing my first experimental sketchbook/journal (see Related links below), I decided to make a second larger journal. I just had to make a second book to try out the separate spine technique that Jennifer Collier demonstrated. I learned a lot, which I'll share with you.

Large experimental sketchbook
with a separate spine

In case you don't remember, here are both sketchbooks/journals. The first sketchbook had a flexible cover made from a donut box! This second sketchbook is made of stiffer scrapbook cardboard on one side and covered with decorated kraft paper on the inside. 

Two experimental sketchbooks/journals 

So far, the journals that I've made have spines that are part of the cover, like the one in the smaller book above. You can see in the image below that the signatures (groups of pages) in this book are attached only to the spine of the cover. This enables you to add whatever type of cover you want, without having to make holes in it. 

Signatures (or groups of pages) added to the spine

In this image, you can see the spine as well as the front and back covers. I attached the covers to the spine with glue. It works very well!

The spine with the covers glued to it

To make the journal closure, I used a great big button that I bought on sale at a yarn store. It's probably for a shawl or wrap. Isn't it gorgeous? I don't think that it's leather but it looks like it. I used a piece of blue ribbon to close it.

A big beautiful button to keep the book closed

On the inside of the book, I was a little less creative than in my first sketchbook. That's because I spent most of my time having to create all of the pages since the papers I had were all too small for the size of the journal. 

When making signatures, you generally fold the paper in half, so that you can attach the pages to the spine at the fold. Since you can't do that if the paper is not big enough to fold in half, I had to fold and then glue pages together. Sometimes the folds of both papers overlapped at the spine, like those below. 

Two smaller pages attached together, with stitching to cover 
part of the glued sections.

On other pages, I attached the paper to one side to make the second page. In the page below, there is one larger paper that is folded, to attach to the spine, while the other smaller page is glued on. I used pretty paper to decorate the glued part on the left, and just added another piece on the right.

Smaller paper attached to one side of the larger paper

On the page below, I attached a photocopy of found music sheet and covered the glued part with more pretty paper. I also added some washi tape as embellishment.

Found sheet music attached to a larger piece of paper

In two instances, I glued and stitched ribbon to cover the glued sections.
 
Ribbon added as embellishment
and to keep the pages together

On this page, I glued the first ribbon down and then stitched a second ribbon on top.  You can also see that I added tabs at the front of each of the three signatures. To keep the tabs secure, I glued them on and then added a few stitches. On the other side, I glued a piece of paper over the stitching. 

Two layers of ribbon, glued and stitched.
A tab added for each signature.

I also added different types of pockets to add things. The pages below contain two pockets - one made of sewing pattern paper while the other one is made of a scrapbook page folded and then glued. This page is the only one that is smaller than the rest.

Pockets made with sewing pattern paper and scrapbook paper


This is the other side of the scrapbook pocket. I've included a flyer of the Out of the Box (OOTB) Fibre Fling 2023 show as well as a paperclip that I added picot stitch to. 

Pocket

Here is a closeup of the paperclip with picot stitch. Isn't it cute?

Closeup of the paperclip with picot stitch


Finally, here is the page that was originally supposed to be the cover. It's from a sparkly gift bag! I didn't use it because it was much flimsier than the scrapbook paper. It does make a lovely adding to the journal.

Gift bag was too flimsy to use as a cover for this journal


What I learned
  • I've been experimenting with the larger format in the hopes of making one for my trip to Antarctica.
  • I don't think that I want to spend all of my time gluing more pages together. It's more fun decorating pages than it is creating them, even if they include embellishments! 
  • I did make a larger Stitchers' journal, a couple of years ago, using large kraft paper. I just reviewed that post (see link below) and I had used washi tape to make larger pages. I think that very larger paper bags might be the solution for my trip journal.
  • This time I watched the video again and prepared the spine properly (not too many holes!) It works so much better when you follow the instructions 😊
  • I discovered that one of the papers that I was using for the signatures doesn't fold well when not on the grain. I had some ripping where the stitches were, so I added small strips of book tape. That stuff really is wonderful. 
  • I'll have to be more careful to fold on the grain when I can. It does make a difference.
  • My only real issue when making this book was gluing on the decorative paper on the other side of the cover. It's very difficult to glue that much paper without getting air bubbles. I think that practice will help.

Related links
Linking parties


Free Motion Mavericks


We had some wonderful FMQ quilts last time, by experienced and new quilters. How wonderful! 😍

Donnalee finished quilting her second large quilt, Butterfly. What a beauty. She did a wonderful job and even had extra panels for a runner. Way to go!

Donnalee's lovely Butterfly finish

Margo of MY Quilts and Crafts finished her Pantone Challenge quilt. It really is a beautiful modern quilt and quite large at 42.5" x 52". If you haven't read about it, head right over there!

The Pantone Challenge quilt by Margo

Melva has finished the eighth and last quilt for her client - it's a lovely "Ribbon, Lace and Fancy" quilt. You can check out a close-up here or her post here. Melva has done an amazing job with all of the quilts.
"Ribbon, Lace and Fancy" quilted by Melva

And last but not least, Gail of Quilting Gail made a wonderful quilt with the “Sandalwood” collection, designed by Kathy Engle for Kari Nichols of Quilting Renditions and the Wedge Star Tool. That must be one h... of a tool 😁. It's really a gorgeous quilt! Click here to see the back of the quilt and Gail's FMQ.

What Quilting Gail made with the “Sandalwood” collection
and the Wedge Star Tool

It's now your turn!

You are invited to the Inlinkz link party!

Click here to enter

Thursday, May 18, 2023

FMQ Wild Hexies is done!

Hi! Welcome to week 431 of Free Motion Mavericks. I hope that you are doing well! I had a burst of creative energy after my Out of the Box Fibre Artists meeting this week and finished free motion quilting (FMQ) Wild Hexies. Yeah!

Adding Flowers and a Border


The first thing I did when I started to work on Wild Hexies again was to see if I had to re-do the cute cars and trucks, since that's where I was having so much trouble with my stitches. It turned out that it wasn't that bad, so I just stitched over the skipped or loose stitched and all is well. 😊

Since the fabric is so busy, there aren't many photos of the FMQ. 

Adding flowers among the animals

This is my favourite - I was able to add a small flower under the nose of the elephant so that he's watering it! 

Baby elephant watering the flower

Finally, here is the border. I used Lori Kennedy's Leaves and Circles. It needed to be something easy and forgiving. I think that I chose well.

Lori Kennedy's design of Leaves and Circles

Of course it was only after I finished that I realised that I could have used a matching colour thread. Oh well, on the whole, it looks fine 😊.

Wild Hexies - sideways!

Wild Hexies - all quilted!

Since this is my May One Monthly Goal, I'll be squaring it up, binding it and making a special label within the next week. I'm looking forward to giving it, and meeting the new owner! 

What I learned
  • I'm glad that I didn't have to undo any of my stitching - although I had psyched myself up for it. It is a baby quilt, it will be greatly used and there are only a few areas where there is extra stitching. It really doesn't show!
  • I was so used to stitching the whole quilt with the same thread that it never crossed my mind to change threads for the border. At least some of the FMQ is visible!

Related links

Linking parties
I'll be linking up this post to many fun linking parties. Why not check them out after you link up below? Design Wall Monday, Sew & Tell, Midweek Makers, Put your foot down

Free Motion Mavericks


We have some budding free motion quilters joining us. I'm so thrilled! 

Donna Lee FMQ her latest appliqué project with wavy lines - it really looks great!

Donna Lee's latest appliqué project

Gail of Quilting Gail had her lovely Baby Stars quilt in the Prairie Spirit Alpacas booth at the Central Alberta Quilt Show in Red Deer. I hope that this gorgeous quilt with the FMQ swirls resulted in lots of pattern sales! 

Baby Stars quilt by Quilting Gail

Frédérique finished her Village de Provence quilt for a house themed quilt-along! To learn more about how Frédérique made and quilted Village de Provence, as well as interesting facts about the region, link up to her post!

Frédérique of Quilting Patchwork Appliqué's lovely Village de Provence

It's now your turn!

You are invited to the Inlinkz link party!

Click here to enter

Friday, May 12, 2023

Making an Experimental Sketchbook

Hi, I hope that Spring has finally shown up in your part of the world (on the top side of the equator). Otherwise, I hope that you're enjoying your Fall weather 😊

Making an Experimental Sketchbook


Before this year, I had no idea how many ways there were to bind and make a book, journal or sketchbook. What a fascinating world! This sketchbook was made following a workshop through TextileArtist.org, with Jennifer Collier, an amazing textile artist who does incredible things with paper. 

The cover of the sketchbook is made from the top of a SusyQ doughnut box. The donuts were awesome and their box was too cool for the recycling bin!

Front of the Experimental Sketchbook

I learned a lot through this workshop - including paying more attention to the instructions! 😁

For the signature pages, Jennifer encourages us to use all types of old papers, envelopes, etc. I did use one envelope to make a pocket. I also had some glossy magazine pages that I had tried to make photo transfers with. That project wasn't a success, but it was great to be adding them to the sketchbook. 

Two altered magazine pages glued and stitched together

I used some found music photocopies to create a page. Since the edges of the photocopies were black, I glued on some washi tape to cover them.

Recycling music sheets with washi tape

I also used scraps from other book making projects to decorate the pages. These are pieces of scrapbooking paper used as an accent and a book tab. I glued the book tab and then stitched it. I also used some pretty printing paper that I've been collecting for years.

I used a strip of bookbinding tape between the signatures. I recently bought a few bookbinding tools and love them!  

Using scraps of other projects to decorate the pages.

For the inside of the sketchbook, I glued a lovely piece of craft paper instead of gluing the first page to the book cover. I did this mostly because my cover was a bit larger than my pages. 

The inside of the cover

Of course I had to chase a squirrel within my squirrel! I made this page using a thick scrapbooking paper. You can see in the next picture that on the inside I glued a couple of pages from an old book. Since I didn't feel like taking out my paints, I added tule over a part of the page and stitched it down following the pattern of the scrapbooking paper. I really love the effect.

Stitching following the pattern on the page

The real squirrel is the circle in the middle of the page. On a scrap of hand-painted fabric I attached a piece of tule that is cut into strips at one end. This allowed me to weave tule, wool and rope. I then stitched around the piece to keep it together. 


Woven piece with tule

Finally, for something different, I glued tissue paper to one of the pages. I love the texture that it created.

Tissue paper glued onto a page

This is the sketchbook cover. The binding of the signatures is in the middle (for the middle signature) and then on each side for the other two signatures. This is very cool 😎.

Sketchbook cover with stitching for each signature

What I learned
  • When I saw Jennifer Collier's first workshop in 2020 with TextileArtist.org, I didn't think that paper was for me. It's incredible how time and experience has changed my opinion and practice. Fabric may be me first love, but paper is pretty impressive!
  • Using the altered magazine pages was a great idea, but they shouldn't be placed in the middle of a signature since that is where the pages are tied. These were too fragile for that.
  • Old Washi tape tends to loose its stickiness. After learning this from making my washi tape journal, this time I glued the tape down.
  • I also learned that spreading glue down with a brush seems to work better than using a glue stick. 
  • It's great to use what you have to make books but I don't ever want to use a needle in a cork instead of an awl. What a difference using the real tools makes!
  • I love to experiment. Gluing the tissue paper to the page is a great way to add texture. It could even be cool to write on it 😎
  • I've also been experimenting with layering in my art. The pages with the text, tule and weaving is part of that effort.
  • I should have re-listened to the video before I started making holes and stitching the book together. Other than extra holes everywhere, the damage was minimal...so I didn't have to buy more donuts...unless I make another book 😋
Related links
Linking parties
I'll be linking to many fun linking parties. Let's see what's going on out there! Put your foot downCan I Get A Whoop Whoop?Peacock PartyOff The Wall Friday, Sew & Tell, Patchwork & Quilts, Slow Sunday Stitching


Thursday, May 11, 2023

Rainbow Neighbourhood Houses 5 and 6

Welcome to week 430 of Free Motion Mavericks. I didn't get much free motion done this week, except for adding details on one of the Neighbourhood houses.

Houses at Night


The two houses that I completed will be at the bottom of the quilt and are night scenes. I have beautiful night sky fabric and chose colours for the houses that are a little darker than those done to date.

Two houses at night

The last time I made these houses, I did two at a time - so that's what I did. At least if I mess up the first house, I'm not likely to do the same mistake in such a short period of time 😁

I made the mustard coloured house first and had to unpiece the roof section a few times. Luckily my theory worked - the second house went together easily. The roof fabric was bought last weekend at a quilt show. It's great for a night scene, as is the flowers on brown fabric. 

Mustard house with an Evening Star block, at night

For the extra details, I used images on darker fabric - in the windows you see bees (or teddy bears with wings) and lots of buttons! I also added a bunny, because they tend to wonder in the evening. There is a bird that looks like a moth (or a moth that looks like a bird - you pick!), and since the porch over the door was off-centre, I added a lantern on the over-hanging edge. 

Teddy bear (or bees) playing with buttons

The second house is a lovely deep orange colour. I used the mustard fabric for the centre of the star, but found some rich brown/burgundy for the star points and frame. For the lawn, I used a darker green.

Deep orange house with an Eight-Pointed Christmas Star

I had so much fun finding fabrics for this party! I remembered that I have a basket of novelty scraps. These are really perfect for this fun house! I didn't FMQ these little additions yet. I used adhesive bonding web to keep them on. I'll FMQ them when I'm more alert. 😊

The night is filled with music and dancing.

Here are my 6 houses so far.

Six houses so far

What I learned
  • Making two houses at a time was still a good idea!
  • I'm so happy that I remembered my scrappy novelty fabric basket. There was so much to choose in there!
  • I've been experimenting with different ways of adding those lovely details on the quilt. So far, this time was the best. I  used adhesive bonding web and then FMQ the first house. The second house will get FMQ soon. 
  • After making 6 houses, it's time to start planning my quilt layout. I know that I want it larger than the throw, but smaller than the twin, especially the length.
  • I drew quite a few pictures until I found something that may work. Here's my very rough plan.
    • I want to add sky fabric above all of the houses. For the bottom houses, this will be a night sky.
    • Between the top and bottom row of houses, I would like to add picket fences and a tree or something. This could be a lot more complicated than I want...so we'll see.
    • There will be a road between the first and second rows.
    • The middle row will have two houses. The first house will be one of the ones I have made, but the second one will look more like my friend's home. I will add a lake between the two houses, and a small forest on the other side, probably using the trees provided in the pattern.
A very rough plan of the layout

Related links

Linking parties
Sandra of mmm quilts, who is hosting the Rainbow Neighbourhood QAL, is having a mid-point link-up. Let's go see what everyone else has done 😊. Design Wall Monday, Sew & Tell, Midweek Makers

Free Motion Mavericks


Last week we saw some wonderful finishes. Thanks to everyone for linking up!

My Free Motion Mavericks partner, Muv, quilted her first quilt in a long while. It's a Union Jack baby quilt - just in time for the Coronation. Glad to have you back Muv! It's a sweet quilt in a variety of blues.

Muv's Union Jack baby quilt


Denise participated in the Tool Craze Blog Hop. She used a tool to make Half square rectangles from Studio 180. The fabric is Island Batiks "Make A Wish" - they are so lovely and vibrant in her quilt. I just love the details at both ends of the quilt, which she FMQ with feathers. 

Denise's Half square rectangles quilt

Sandra is working on her PHDs (Projects Half Done challenge) and finished up her last 2 Rainbow Scrap Challenge quilts from 2015. She had so many blocks that she got two quilts out of them. They are called Dawn and Dusk. Each got a different quilting design. They look so comfy. Congrats Sandra!

Sandra's Dawn and Dusk quilts

It's now your turn!

You are invited to the Inlinkz link party!

Click here to enter