Thursday, September 24, 2015

Too Much Quilting?

My version of the Charley Harper Quilt
I finished quilting almost every inch of my version of the Charley Harper quilt, designed by Melissa Lunden. The original was on the cover the the International Quilt Festival Quilt Scene magazine (2013\2014). I originally wanted this to be the front of a quilt with a pieced back, but I just couldn't do it. I'd rather have two quilts to FMQ than one!

This is the first quilt larger than a wall hanging that I quilted so densely. I had an absolute ball quilting it. Free motion quilting (FMQ) is sooooo addictive. I was going to practice all kinds of FMQ designs in the rectangles but it only took one block to figure out that they wouldn't show up since the printed fabric was so busy. Really, I should have known that. Oh well, that's what experience is for. After this quilt, I may actually remember this!

Letting the fabric dictate the quilting
So except for two of the fabrics, I did what I usually do with busy fabric; I let the design dictate the quilting. I followed the fabric design and quilted around flowers and leaves, and lines and scrolls. For the maroon fabric, to add contrast, I didn't FMQ it at all. As for the fabric with tiny hexagons, that's the fabric I started practicing my FMQ designs and quilted 3 larger hexagons within it. I quilted them all like this for consistency, but they're practically invisible!


For the circles at one end of the quilt, I FMQ the first one by going around the design and then quilting from the edge of the circle to the inside, following the fabric pattern. I wasn’t really pleased with it, so all of the other circles were quilted using one of Angela Walter’s FMQ patterns from her Shape by Shape book. The FMQ doesn’t show much from the front, but can be seen better from the back.
The back of the quilt - FMQ the circles


I did all of the stitch-in-the-ditch and FMQ in the rectangles and bottom circles using the taupe Superior Thread’s Bottom Line.

To quilt the feathers on the brown background, I bought some WonderFil – Invisifil, which is a 100 wt. soft poly. After my second feather, I knew I had a problem. Even after playing around with the tension, there was no way I could get my machine to play nice with the thread, which kept breaking. I decided to change thread but was in a panic about finding thread that would match. I bought some thread but they weren’t the right colour. Finally in desperation I looked in my miscellaneous thread drawer and found the perfect thread. It was an Omni Thread, poly-wrapped Poly Core, size 30 by Superior Threads. I had gotten it from Superior Threads’ Try Me Specials where you choose the type of thread (at very good prices) and they choose the colour. The Omni Thread was the perfect colour and quilted like a charm.
Close-up of the background feathers

I drew the outline of my first feather, but after that, I was able to just keep going. I love making big feathers and then making smaller ones to fit particular spaces.

The only problem I had while I was quilting the feathers occurred when I was about ¾ finished. I ran out of taupe Bottom Line thread. Thank goodness I have a supplier who came through for me. Crisis averted!

If you’ve read any of my blog posts, you will know that I’m not a great planner. That’s why I’m very proud of the fact that I put together my binding before I started quilting.

This week I got to work early and had a wonderful photo shoot with the quilt! I felt like an artist draping my quilt over benches, walls and fences to take photos. It was a great way to start a work day!
The quilt's photo shoot


What I learned:
  • A year ago I would have laughed if someone had said that I would care a lot about thread! I’ve really come to appreciate the effect that thread has on a quilt.
  • I didn’t FMQ the maroon rectangle at all. I’m still not sure if I like it – but if I ever decide that I don’t, I’ll just lightly quilt it. 
  • Have you noticed in the picture of the quilt on a fence, that I used a few inches of the background fabric in my binding (on the left side)? Not good. It looks like there’s no binding there. I think I won’t forget this lesson!
  • I love FMQ but I don’t think that I’ll be quilting other quilts as heavily as this. I’m not sure what the perfect amount of FMQ is for me, but I do find this quilt too stiff. That is definitely a drawback of quilting so densely.
  • In October 2013. I posted a blog called "Too Much of a Good Thing", where I wondered if a quilt so densely quilted would be stiff. It turns out I was right. 
  • This quilt was done as a learning project – from choosing the fabrics to the quilting. I’ve learned so much from this quilt. It was totally worth the effort!

I've linked my post to the following Linky Parties. Check out the fun!


Sunday, September 20, 2015

Quilting Expectations

I've been thinking about expectations a lot lately. These thoughts are mostly quilting related, but these could apply to many parts of my life. As with many things, the only time I'm conscious of expectations (mine and others) is when things are not going as I think they should be, otherwise why question them?

Landscape Art Quilt Challenge button
I've decided to re-examine my quilting expectations. I've often said that quilting is about fun and wanting to do things as opposed to having to do them. I'm also about avoiding deadlines - and ironically I started a monthly landscape art quilt challenge! (more about that later).
Still flitting around like a butterfly

I’m thinking about all of this as my list of active quilting projects keeps expanded. I've had a difficult summer and it would seem that I dealt (or didn't deal) with this by starting many projects but not finishing much.

I started by looking at my list of ongoing projects, especially those that have been in the design stage for a long time. It might be time to question these. Do I still want to make this? If I do, what's stopping me from completing it? If I don't want to make it, then is there a reason that I have to?

Block 36 of Grandmother's Choice
Reviewing the list, I decided to remove four projects. One was a quilt that I said I would make for friends, but I'm not interested in doing it anymore. Since my friends don't really have expectations of what quilt I'll make, I've opted for a much simpler quilt made of 5" charm square batiks. This will be much easier to make and probably just as appreciated. The other three projects seemed like good ideas at the time. I did start one of them, but I'm sure I'll be able to use the few blocks I've already made for something else.

Embroidered Frogs
Blogs for Frog Quilt
After making a few of these quick and fun landscape art quilts, I've decided that I don't want to make complicated (i.e. pieced blocks and/or appliquéd) large quilts any more. I do have two of these on my list, but they’re more than half done. I want to finish my Grandmother's Choice quilt (I’m looking forward to designing a medallion centre block for it); and the Frog quilt (it's too cute to stop but may take a while!)

As for the monthly landscape art quilt challenge, I have to say that it hasn't been too stressful, mostly because I can't image anyone in blog land would really care if I do this or not; and it has helped me think of techniques and subjects that I'd like to try. Speaking of which, here are a few ideas that may or may not happen:
  • I saw a flock of Canada geese that was landing on the water. It was so cool. I'd love to find photos of these and try quilting them.
  • I have a really great picture that I took in China of rice fields in the evening. The colours are amazing and it would be a great image to make in the style of Monika Kinner-Whalen, of My Sweet Prairie Studio. I love her mixture of background thread sketching and hand-embroidery.
  • I’ve also fallen in love with Muv's (of Free Motion Mavericks) Free Motion Landscapes. Her friend, Linda Wulf Koenig also made a lovely one using hand-died fabrics. This is definitely on my list!
  • The Great Wall of China would be great, done from photos we took there last year.
  • I love swamps and I want to depict the swamp we had next to our cottage. I've already started gathering photos for a project.
Since it's already past the middle of September, instead of starting a new landscape art quilt, I'm going to complete a landscape UFO. It’s a tree that I started in a course with Elaine Quehl of Ottawa. I thought I had lots of work still to do, but after taking it out last night, it might be manageable in the next couple of weeks. For some reason, I find this project very intimidating. I guess that's another reason to keep at it!

I’ve decided to make the tree in the fall season. I've been intensely looking at the trees as they change colours. Hopefully I'll find the fabrics to pull it off!  

What I learned:
  • I am often my harshest critic and a lot of my crazy expectations are self-inflicted. It's good to take a step back every once in a while and review these.
  • I often get great ideas for landscape quilts on the drive into work (that's because I'm not driving and I get to look at the amazing scenery on the parkway). I think that it's a good idea to put these ideas down somewhere. I don't have to make them all, but at some point I may be ready to try them.
  • I love that the quilt world is so huge and includes so many types of quilting. It's wonderful to be able to try all of these things and see what I like and what I'm best suited for.
How are you handling your quilting expectations?

I hope you have a great week.
I have linked up this week with Free Motion Mavericks.

Monday, September 14, 2015

Yellow Kayak Landscape Quilt

The Yellow Kayak landscape quilt for August’s challenge is done!

August's Landscape Art Quilt - Yellow Kayak
August's Landscape Art Quilt - Yellow Kayak (11½ x 12½)
I wrote about most of my process a week ago. I did get a question in my comments, do I thought I would address it here.

Did I fuse the fabric pieces together? In this quilt, I did. I don’t always but I knew that I probably wouldn’t work on it soon after I layed it out, so I added a little bit of fusable web to the pieces to keep them in place. I do use a light fusible interfacing under by background fabric to ensure some stability, especially when I do the thread sketching. Otherwise the fabric tends to pucker up.

Sky buckling
If you look at the photo after I thread sketched the trees, you can see that the sky fabric is buckling because there is so much stitching in one section and none in the other. It also did the same in the water section, around the flower.

Maybe professional quilters might disagree, but when it’s a small art quilt, as long as you end up quilting about these spots, most of the puckers will leave or not show as much. Around the flower, the water evened out well. In the sky, because I didn’t quilt it much, it comes out puffier – but as far as I’m concerned, this is fine.

I followed the picture to quilt the water. The shading on the fabric was great, so I just quilted around the spaces that had waves, while keeping the still areas unquilted.
Water puckering around the flower

In the area around the rocks and the log, I actually used a black colouring pencil to add some shading. Since I don’t expect this quilt to get washed, this should be fine. Maybe one day I’ll have the nerve to use paint or even markers – but I’m not there yet (especially since I added this near the end of making the quilt. It wasn’t time to ruin it!!!)

For the kayak, I used a metal clip from a lanyard. (I collect bits like that!) I then added a button on top (another collection) and finally, after a lot of consideration, I used 2 black shoe laces.
Original photo


I wasn’t sure what the logo was, but my daughter very helpfully Googled it. I tried using a marker and even machine quilting the design – until my daughter suggested that I hand-embroider it. I’m sure glad she was there :-)

I couldn’t resist adding the butterfly to the finished piece to add a little bit of colour and fantasy I think that might be my signature (when ever it makes sense of course).

What I learned:
  • I love having the help and advice of my kids. They often add ideas or see things that I don’t.
  • The border is some wood fabric from my stash. I love it. If I had planned this ahead of time though, I would have made it a little wider.
  • I’ve read a great tip since I finished this that I hope to try next time. That’s to block the quilt (without cutting it) and then apply 1” painter tape around the edge before quilting the piece so that I don’t quilt on the edge.  If I had done this, the best part of my sky wouldn’t have been cut off!
  • This landscape quilt was for a friend’s birthday – it’s her wonderful photo of her kayak. I’m happy to report that she likes it!

Yellow Kayak
Yellow Kayak
Come back later to see what great landscape art quilt I’ll come up with. I’m really hoping to get struck by inspiration soon!!!

Enjoy the fall.

I've linked my post to these parties. Have a look at what everyone is doing.
Wow! Muv has featured my quilt on her blog, Free Motion Maverick! Check it out! (and thanks so much).


Friday, September 04, 2015

August Update in September

I can't believe that it's September already. It's still crazy hot in Ottawa but the lovely cool fall weather will come eventually, I hope.

background fabrics
Perfect hand-dyed background fabric 
I had all kinds of plans for August - prayer flags and the landscape art quilt. The month is over and lots of things moved ahead, but nothing got finished. What have I been doing? Mostly hiding from the heat! (It's called estivation - what animals do as they hide in the earth from the heat!)

August's Landscape Art Quilt is coming along - there's a long weekend coming up, so hopefully I'll be able to complete it.

Here's some of the process and progress:

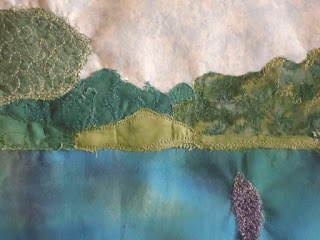
I found some amazing hand-dyed fabric that is absolutely perfect for the water. It even had the shading in the right places!

I then went through my stash. I'm so glad that I now have a nice collection of greens for trees and forests. It really helps the process along. I think that auditioning fabrics is my favourite part of the process, especially when it goes well :-)
Fabrics in place
I know that the fabric for the plant is a little much, but I'm hoping to sketch over it. I really wanted the background to help it stand out.

Thread sketching the trees
I think that I'm finished with the thread sketching of the trees. I love the fact that if I change my mind, I'll be able to make changes as I go along.

I thought that I didn't have a great selection of green thread, but when I looked in my box of miscellaneous thread, I found some great shades of green. What a find! That extra thread gave me so many more options.

Thread sketching the plant
Last night I worked on the plant. What fun. I love that part too!

This morning I had a few minutes before leaving for work and I worked on the rock below the plant.

Here's what it looked like last night.

What I learned:

  • Inspiration is not the same as actually doing it! Oh well, it was just a plan. 
  • My box of miscellaneous threads consisted mostly of non-pretty colours, like many shades of green. They are not so yukky any more!
  • Since I've thread sketched the trees so much, the fabric is starting to buckle. I'm not finished sketching yet, but I know that this can be fixed in the quilting process.
  • I suspect that every part of making a landscape art quilt is my favourite part. There's no serious cutting, piecing and measuring. What's not to love!

 Have a great labour day! I'll be working at what I love best - my quilting.
Link ups - check out these posts! Monday MakingOh Scrap!, Patchwork Times' Design Wall, WIP WednesdayLet's Bee Social with Sew Fresh Quilts, Needle and Thread Thursday with My Quilt Infatuation