Thursday, November 24, 2022

A Finish on Free Motion Mavericks

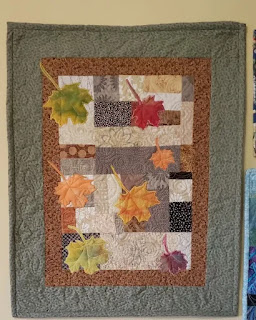
Welcome to Free Motion Mavericks, week 408. You may be tired of seeing Swirling Leaves 2 on this blog, but it's finally finished! I'll be dropping it off at the Parks Canada mailroom on Friday, one week before the deadline of the silent auction for the GCWCC (Government of Canada Workplace Charitable Campaign).  

Swirling Leaves 2 - a Finish

Here it is, in all of its glory 😊
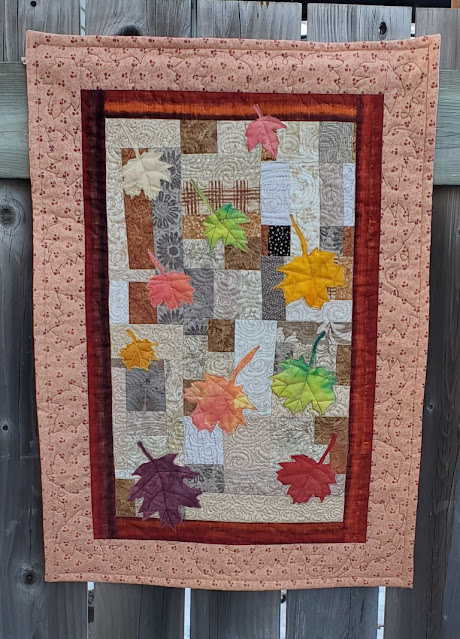
Swirling Leaves 2

Yesterday was the first day since my retirement that I spent the whole day in the studio. What a treat! I was as tired as if I had worked, but it was with so much joy and a sense of accomplishment! I know that I'm going to be able to get used to this.😊

After doing all of those swirls, I hadn't settled on a design for the borders. Should I treat the two borders separately or as one? I knew that I wanted leaves in the outer border...but which ones? I looked in a couple of my FMQ books and tried out a few designs, but it was obvious that I couldn't quilt them without some kind of pattern. So, if I had to use a pattern, I might as well choose one of the quilt's leaf templates.

Once I chose a medium leaf pattern that was slightly larger than the outer border, I drew two leaves on the borders, facing each other, and then linking them up with loops. Repeat that several times around the border et voila!

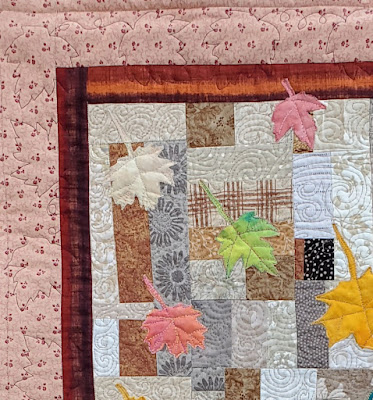
A close up of the border

Finishing the wall hanging

If you quilt, you know that the quilt is not done once it's FMQ. I was happy not to have to bind the quilt since the edge of the front was longer than the batting and backing and was just turned under and machine stitched. I did hand stitch the corners to make them more even and then added the hanging sleeve at the top and the label at the bottom.

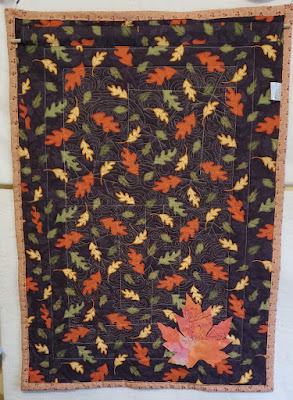
The back of the quilt

For the label, I used a leaf that I wasn't able to use on the front because it was too large. It was a great way to use it since the fabric is wonderful. I added an iron on adhesive to the back of the large leaf, wrote the message with a permanent marker and then ironed the leaf onto the back of the quilt. I was even able to add one of my small printed labels on the side, where the finished edge was wider. 

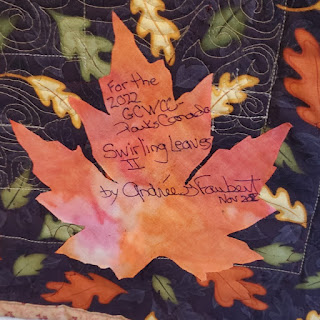
Label on the wall hanging

What I learned

  • I was nervous about the FMQ border because the thread that I used was a dark cabernet colour which shows up almost as black on the red background. I didn't want the border leaves to be more prominent than the actual leaves on the piece, which is why I decided against adding veins to those leaves. With just the outline of the leaves, I think that it looks great!
  • I used a blue Frixion pen to mark the leaves on the red border (the pink didn't stand out enough) and then used the chalk pen when the leaf went into the inside border. It worked very well. It was great that the quilt wasn't huge so that I could turn the quilt around when I couldn't see the pattern.
  • I'm very happy to say that I did most of this during the day yesterday, but at around 3:30 pm, I was tired and took a break! I went back to the studio later in the evening, after a refreshing break and didn't make any mistakes. See, I can learn! 😁
  • I was thrilled not to have to add binding since the border included the binding. I really love this technique - it's great for quilts that won't be washed, and therefore don't need a double folded binding.
  • This was the second Swirling Leaves wall hanging, so you could say that it's the beginning of a series! I'm really glad that I took the time to re-think the border choices. Although I love the first quilt, I think that this one is even better! 
  • Can I have your opinion? Do you think that if the background, under the leaves, was mostly off-white and beige, that it would look better? These two quilts have some darker brown and even dark grey in the backgrounds. Do you think that it's too much? Please feel free to add a comment if you have an opinion. Maybe I'll just have to make a third quilt eventually to test this out!
Here's a look at the first and second Swirling Leaves so that you can see the differences for yourself.

Swirling Leaves

Swirling Leaves 2


Related links

Linking parties
Wonderful news! Susan at Midweek Makers has featured my quilt. Thanks Susan! 

Project details

Swirling Leaves 2
Size: 20" x 28"
Materials: commercial and hand-dyed cotton fabrics
Techniques: improv piecing, appliqué, stitch-in-the-ditch with walking foot, free motion quilting


Free Motion Mavericks

Thank you so much for following along and for linking up, whether you have FMQ done or not. I really appreciate your encouragement and will keep going as long as you are linking up! 😊

Amazingly enough we had three FMQ projects link up last week. That is very exciting. For that reason, here they are:

Melva had a variety of FMQ on her Lily Clara Bridal Veil piece. She had leaves in the border, cross hatching in the background and then stippling around her embroidery. Thanks for sharing this with us Melva!

Melva's Lily Clara Bridal Veil piece

From Quilting Gail, we saw several lovely versions of Travel Posts. Gail made a sample quilt for the class, her two students each made very different quilts and then Gail made another version using Island Batik fabrics. She FMQ it with swirls and did some ruler work using the Kite ruler from Silly Moon. The FMQ designs are perfect for the horizontal stripes in the quilt! Thanks for sharing your students and your quilts Gail!

Travel Posts, FMQ by Quilting Gail

Finally, after two years of doing incredible quilting on her computerized longarm, Rebecca of Rebecca Grace Quilting practiced her FMQ on her longarm. Apparently it's very different from FMQ on a domestic sewing machine, but after an hour of practice, she got into the grove! Here is her practice piece. I'm really looking forward to seeing her own Jingle Christmas quilt FMQ. Thanks for sharing all that you learned Rebecca!

Rebecca's FMQ practice piece

Now it's your turn!

You are invited to the Inlinkz link party!

Click here to enter

Monday, November 21, 2022

Hexies and my doggy family

Hi! I thought that I would give you a quick update on my hexies since that's what I've been doing a lot of these days. It's perfect for mindful stitching because there are very few decisions to make. I love all of the slow stitching involved.

More hexies

While I was away with my girlfriend at my brother's cottage, I had time to play with more hexies. Here are some images of what it looked like at the beginning of November.

The eventual Hexie blanket

You can see that I'll have to work at making some of those sides even but I'm sure that I'll think of something interesting when the time comes (that may be putting a lot of pressure on my creativity!) At this time, everything is good and I just keep adding to it😊

A mass of hexies with double flowers on two of the edges

At the top of this picture, you can see some of the hexie flowers that I attached during my time away.

Attached hexie flowers at the top

This weekend I spent most of my time on the first floor with Poppy, my son's beautiful dog. She is a real treat and walking her in the early winter was a lot easier than in the heat of the summer. This was her first walk in snow. She seemed to enjoy it! Some even came into the house with her!

Poppy in the snow


Poppy bringing in the snow 😊

While she was here, I prepared a whole bunch of hexies. I then started attaching some to the eventual Hexie Blanket. The picture below are some of the hexies before I attached them. I am trying to even out those edges.

Working out how to fill in the holes.

The weekend before, I borrowed my brother's two sweethearts. They are photogenic and love having their pictures taken. 

Taffy and Twix, happy to have their pictures taken!

I didn't realise that I haven't spoken about my hexie blanket for a long while. I did post a few things on Instagram, so here are a couple of pictures from August 2022. It seems like forever now that my phlox were so beautiful 😊

Double hexie flower in the back yard

A close-up of the double hexie flower.

What I learned

  • I'm glad that I'm back to working on those hexies. It's really starting to look like it might be a blanket some day.
  • English Paper Piecing, especially hexies, is a wonderful way of quietly stitching. It's also very meditative.
  • I'm not too worried about the edges of the piece at this time, although I am making sure that the new hexies on the edges will be relatively straight.
  • I've enjoyed my time with my doggy family. I get to play with them as much as I can and then give them back. It's a sweet deal!😊
  • It seems that I haven't really posted about my hexie blanket in a while. It's sometimes hard to keep track of what goes on Instagram and what get's posted on the blog.
Related links

Linking parties

 I'm linking this post to Slow Sunday Stitching (I just made the deadline!) Put Your Foot Down


Wednesday, November 16, 2022

FMQ Swirling Leaves 2 on Free Motion Mavericks

As the snow arrives, Swirling Leaves is almost finished! Welcome to Free Motion Mavericks, Week 407.

Free Motion Quilting Swirling Leaves 2

I was hoping to get this piece finished today but I was getting tired and I'm learning when to stop 😊

Background Swirls FMQ

I guess that it's been a while since I free motion quilted (FMQ) swirls. It took me some practice drawing and then I looked up one of Angela Walter's FMQ swirls video. That helped my confidence, even if I didn't really follow her instructions. I did some practice stitching but got really good about half way through the real quilting. It was a little more difficult than just quilting swirls since I had leaves to contend with. I wanted to stitch around the leaves as much as possible while still doing the swirls. Let's face it, from far, it all looks great!

An oops moment!

I did have an oops moment. You may remember that I had wanted to trim the backing so that I wouldn't stitch on the folded backing? Well, since I trimmed the backing improperly and had to sew it back together, I didn't trust myself to trim it - so, sure enough, I quilted over my folded backing.

I'm slowly removing that extra bit from the backing. I'm hoping to do it without removing the stitching but if it gets too difficult, I'll just remove it all and re-stitch it.

After completing the FMQ background of swirls, I started quilting the veins on the leaves. I used the same thread that I had appliquéd the leaf with. I decided to free motion quilt over the zigzag stitches since there were small parts of the leaves that hadn't been stitched down properly. This worked quite well and isn't really noticeable. I've finished 7 of the 10 leaves.

Preparing the border

I wanted to make a border that I could stitch down by machine, without having to add binding. I cut my outside border 2½" wider than it was needed so that I could turn the fabric over and just stitch it down. 

I trimmed the batting and backing first and then marked my turning line with a Frixion pen that will iron out. I then turned the border over, pinned it and then stitched it from the front. I'm going to have to hand stitch the corners a little bit at the back, but it really went well.

Trimming the backing and batting
Marking the turning line on the border


The border flipped to the back and sewn from the front

This is what the outside border looks like. Now both borders are ready to be quilted 😊

Close up of the finishing of the outside border

What I learned

  • After the last time I disastrously trimmed the backing, I was quite nervous about doing it again! I must have checked my calculations and my measurement 10 times before I actually trimmed the batting and the backing. It all went very well 😊
  • Right now the borders are a little floppy - this will be fixed once they are quilted.
  • I'm still not sure how I want to quilt these borders. I'm considering doing some straight line stitching in the inner border and then possibly some big leaves in the outer border.
  • It took me longer than I expected to get into the groove of FMQ the swirls. Although I have been doing some FMQ, I think that I need to do it more often. With the holiday season coming, I have a plan and I hope that you'll enjoy it and maybe even stitch along with me! More about that soon.
  • I'm hoping to get this finished this weekend so that I can hand it over to the auction organisers.

Related links

Linking parties

I'll be participating in many fun linking parties. Remember to link up below - your project doesn't have to include FMQ! Midweek Makers, Design Wall Monday, Needle & Thread Thursday, Put your foot down, Can I Get A Whoop Whoop?, Off The Wall Friday, Peacock Party, Oh Scrap!, Patchwork & Quilts

Free Motion Mavericks

Last week, Stitching Farm Girl, Raewyn, shared with us her FMQ on her Boxer floor cushion. It's so cute! If you didn't see it, you'll want to get right over there....after you've linked up below!


Boxer floor cushion by Raewyn

It's now your turn!

You are invited to the Inlinkz link party!

Click here to enter

Friday, November 11, 2022

Travel Adventures on Free Motion Mavericks

Welcome to Week 406 of Free Motion Mavericks. Sorry to be late but life is good and got in the way 😎. I was on a mini retreat with a great friend earlier in the week and then cooked up a birthday supper. I'm back in the studio and all is good 😊.


Designing FMQ travel for Version 2.0


Last week before I left, I started free motion quilting (FMQ) another section of my son's Version 2.0 quilt. This time it's about a wonderful holiday that we took as a family. With the Xterra truck packed to the max, we drove from Ottawa to the mid-west of the US. It was an unforgettable family adventure that is being depicted on Version 2.0.

From a photo, I traced the truck and then FMQ it. Here are the three images - FMQ over the tracing paper, the front and the back of the quilt. My wheels are a little wonky but the truck was awesome!

FMQ Xterra truck - over tracing paper


FMQ Xterra truck 

FMQ Xterra truck - from the back of the quilt

The next image is a topographical map of a part of Monument Valley, since Stéphane studied geology. I used the same process - copied a map onto the tracing paper and then FMQ over it.

FMQ a part of Monument Valley's topographic map over tracing paper

FMQ a part of Monument Valley's topographic map

Monument Valley's topographic map from the back of the quilt

It was time to take a picture and see how much was left to FMQ on Version 2.0. Unfortunately, it's really difficult to see from the photo but it's at least half quilted, and I finally know what's going to go in the other spots 😊

Over half quilted, although it's hard to tell

What I learned
  • When choosing which topographical map to FMQ, I realised quickly enough that it had to be relatively simple. My first choice was the Grand Canyon.... but it really would have been impossible 😊
  • I've figured out what and where I want to FMQ on the rest of Version 2.0. It's finally coming along well.
  • My son has printed up some game designs to incorporate. It's going to look great.
  • I've figured out most of the sun design what will be in the centre of the quilt. If you want a sneak peek, it will be a combination of Lori Kennedy's Spirograph Sun and Sunshine Variations
Related links
Linking parties
I'll be linking up to many fun linking parties. Why not check them out, after you've linked up below.😊

Free Motion Mavericks

Last week we saw the Patchy Pumpkin Farm Quilt by Sandra of mmm quilts. She used a floppy feathers with swirl and hook as an overall design. The quilt's backing is a beautiful, soft Minky. The quilt is just calling to be curled up in! If you didn't see it, it's really worth checking out! 

Patchy Pumpkin Farm Quilt by Sandra of mmm quilts


It's now your turn.

You are invited to the Inlinkz link party!

Click here to enter

Thursday, November 03, 2022

Swirling Leaves at Free Motion Mavericks

Hi and welcome to week 405 of Free Motion Mavericks. I'm not used to posting quite so often but if you don't mind, then I don't either 😎. I can't believe that we are now in November! October was a whirlwind but I know that November will be calmer - because I will make it so 😊.

Walking foot quilting

This week I finished sewing up Swirling Leaves 2. Here's what it looks like so far.

Swirling Leaves 2 so far - quilted with the walking foot

In my first post of this project, I mentioned that I had picked leaves and made the template for the leaves within a few hours. It turns out that if you put them under books to dry, they shrink and become brittle, so it really is best to make the templates right away.

Making the templates

Stored templates from my
original quilt


I'm thrilled to say that I found the templates of the leaves that I used when making the original Swirling Leaves. I love it when I do something brilliant 😁 These templates were made on freezer paper and worked just as well. They were also more in the medium size range, so were better than that huge leaf that I picked!
Tracing the leaf from my tracing paper template

It was then time to appliqué those leaves onto the background. Did you know that your machine probably comes with a Satin Stitch Foot? Turns out it's really good because it's possible to see the fabric under the clear plastic foot.

I also took a picture of my stitching since of course I forgot that when you turn your machine off, that it resets to the original straight stitch. Of course you can take out your manual to see how to save your stitch, or you can take a picture, reset your machine and then use it for your post!😊

Appliquéing the leaf with the
satin stitch foot

Stitching setting for my appliqué


Once the leaves were all appliquéd, I used my walking foot to stitch-in-the-ditch. I've learned over time that my accuracy is better if I used the walking foot instead of my free motion quilting (FMQ) foot.

Knowing when to take a break


I was feeling quite proud of myself. I had taken the ironing board out, pressed the quilt, found the batting and decided on what to use for my backing. Good job 😎! 

After pinning the quilt down, I decided that I should trim my backing before starting to quilt. We don't like having that extra fabric in the back to get stitched under when we quilt...right? I trimmed the backing fabric, went to start quilting and noticed that my backing was no longer big enough. 😒

Stitching the back together again
Backing stitched


I was not impressed, but at least I still had the fabric to stitch it back together! I pinned it up, went to stitch it and my sewing machine chair slid right under me - THUMP! Nothing was bruised but my pride. So I listened to the Universe and took a break.

What I learned
  • Sometimes we don't listen to our bodies and over do it. After supper, I came back and stitched the back together again and used my walking foot to stitch up most of the seams. I'm happy to report that I stopped before I was over tired. That's why this post is a little late and the FMQ is not finished - but that's a good thing. I do have to keep things in perspective!
  • I found out that if your dried leaves are very brittle, but that you still want to hand them, that you just need to soak them in water for a few minutes. I've started a new hand-stitching project and learned a lot about working with dried leaves and such. I'm looking forward to working on it more and sharing what I learned.
  • I was so happy to find those leaf templates. I have started saving my templates, because you never know when you might need them again! They were exactly where they should be (if I keep them!). See, I can learn 😉

Related links
  • Swirling Leaves 2 coming together, October 31, 2022
  • Playing in isolation, October 23, 2022
  • Swirling Leaves for Hello Fall Blog Hop, September 23, 2020

  • Linking parties
    I'll be linking up to many fun linking parties. Let's see what's going on out there....and remember to link up while you're here! Design Wall Monday, Midweek MakersNeedle & Thread Thursday Put your foot down, Peacock Party, Finished or Not Finished Friday, Can I Get A Whoop Whoop?, Off The Wall Friday
    * I linked up to Tips and Tutorials on the 22nd with Kathleen McMusing

    Free Motion Mavericks


    As I mentioned last week, I'm currently doing this link up party solo for a while. I hope that Muv will be back in a few months, but until then, just come by every Thursday(ish) to link up! Last week, Kathleen McMusing linked up her 4 Block Bee Challenge Quilt that she quilted with her walking foot. If you didn't see it, I recommend that you go to her blog to see what her colleagues in the challenge made, and to get your free copy of her foundation paper pieced pattern. 

    Kathleen's 4 Block Bee Challenge Quilt

    Now it's your turn!

    You are invited to the Inlinkz link party!

    Click here to enter