Showing posts with label hand-dyed fabric. Show all posts

Thursday, August 01, 2024

"Enjoying Alaska" on Free Motion Mavericks

Hi and welcome. It's been a busy and very hot week here. Other than taking Poppy out for short walks, I've been staying indoors (estivating) where it's cool. When there is humidex in the middle of the night, you know that it's hot!😓😎 

"Enjoying Alaska"


I started this piece during my holidays in Alaska. It's always tricky making something other than a scrappy quilt when travelling because odds are, you don't have all of the fabrics you need. I did use a batik that I bought in Alaska that worked beautifully, but the second one, not so much. Since I'm always up to a challenge, I thought that I could make it work. Maybe you'll think that I did, but I decided that I didn't like it and changed it this morning - that's why this post is later than usual!

"Enjoying Alaska" 

Here is the photo that I used as inspiration. The water and the forested hills were simple enough to do, but those snow-covered mountains gave me a really hard time - mostly because of the fabric I used as background.

A lovely view of the mountains from the ship

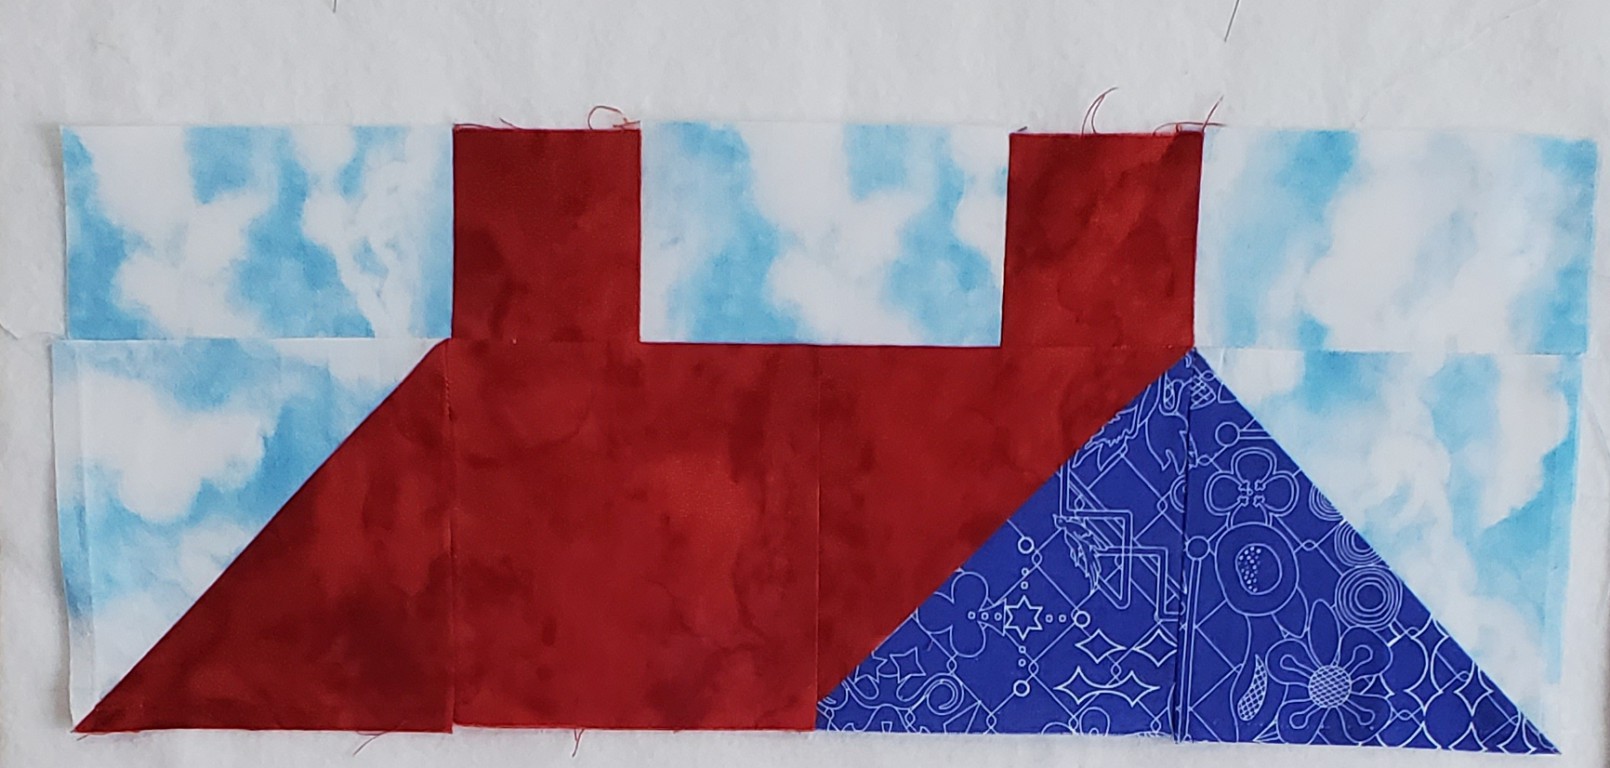
Here are a few pictures of the evolution of the piece. I cut and pinned all of the fabrics onto a white background. I really hoped to transform that lovely print into a mountain. I did stitch all over it but I'm not sure that I succeeded. 

Original fabrics - starting to stitch

When I got home, I zig-zag stitched around the green fabrics.

Slowly creating the mountains

Mountains almost done

I got to this point last night and I didn't like it. It's not bad but I'm not a fan of those long embroidery stitches. I slept on it and still wasn't happy with it this morning, so I took out some of my hand-dyed gray fabric and stitched over the snow-covered mountain.

My first attempt at the snow-covered mountain

I covered the mountain with the gray fabric and then added some hand-dyed green fabric at the bottom. I FMQ the snow-covered mountain with gray thread, then used three different green thread to stitch over the green fabric. I blended the areas between the gray and the green.

Final stitching of the snow covered mountain.

It's pretty amazing how many hours it took me to stitch the original snow-covered mountain and then only about 2 hours to cover it up and FMQ it.

To finish off the piece, I added some facing. I used fabric that my girlfriend had brought me from Alaska last year to face the top and bottom. I faced the sides with strips of fabric and then placed the top and bottom fabrics to cover the back. 

Making the facing with different fabric.

I hand-stitched the top and back fabrics at the sides. I didn't stitch the two fabrics together since they are both finished and you can peak between them to see the original back of the piece.

Back of the piece with the batik fabric showing

A glamour shot against the rocks

"Enjoying Alaska" among the flowers

What I learned
  • It's important to challenge myself. 
  • Challenges are easier when they're made of fabric - you can always remove or cover them up if you change your mind 😊
  • I like the thought that there's a secret, more primal mountain below the gray layer of the snow-covered one that we see. 
  • There are several textile artists who use those large stitches, They make lovely art, but for some reason, it's just not my thing.
  • I love the contrast of texture between the hand-stitching and the free motion quilting. It's great to be able to use both in a piece.
Related links
Linking parties
I'll be linking up to many fun linking parties. Why not check some of them out, after you've linked up below! Sew & Tell, Put your foot down, Needle & Thread ThursdayTGIFFMonday Musings, Design Wall Monday, Midweek Makers, Beauties Pageant15 Minutes to Stitch 2024, Oh Scrap!Off The Wall FridayPatchwork & Quilts

Project details

"Enjoying Alaska"
based on a picture taken off the coast of Alaska
Material: commercial cotton scraps, Alaska batik and hand-dyed fabric.
Techniques: hand-stitching, machine stitching, free motion quilting


Free Motion Mavericks


Welcome to week 492 of Free Motion Mavericks! Thanks for linking up. Here are the projects from last week that included FMQ, ruler work or walking foot quilting. 

Gretchen finished the largest of her quilts. It's a beauty called Dots & Dashes that she quilted-in-the-ditch.

Gretchen's  Dots & Dashes 

Kat from Scrapbox Quilts finished a UFO into a lovely dresser scarf. This was part of a FMQ whole cloth row by row designed by Jeanne Harrison in 2019. I checked out Jeanne's YouTube channel - there are a lot of gems there. Thank Kat for introducing me to Jeanne's work.

This whole cloth FMQ dresser scarf was designed by Jeanne Harrison and made by Kat

Details of the dresser scarf 
It's now your turn 😍

You are invited to the Inlinkz link party!

Click here to enter

Thursday, May 09, 2024

Odds and Ends on Free Motion Mavericks

Hi and welcome to week 481 of Free Motion Mavericks.

Fibre Fling finds 


Last Friday and Saturday was the Out of the Box (OOTB) Fibre Artists' Fibre Fling 2024. I was there for most of the two days, spending my time at the Membership table. I had a chance to meet with fellow members, potential members and see all of the wonderful work of these very talented artists.

If you didn't see it, here are my two pieces at the show.

My tulips and birds at Fibre Fling

Over 30 potentially new members signed up for more information on OOTB. The show is a great way to promote our group.

Every year, I purchase a couple of pieces from fellow artist and blogger, Connie at Connie's Textile Art. Connie has started stamping on her hand-dyed fabrics. I plan on making next year's Agenda with one of these (or maybe both?)

Wonderful stamped fabrics

I saw the dark fabric below and fell in love! Then I looked at the fabric piece behind it and gasped😮 It's really that wonderful (and the photo doesn't do it justice!) I'm not sure what I'll be doing with these - they are going with my other Connie fabrics until I figure out what to make with them.

Gorgeous printed fabric 😍

There was also a raffle next to the membership table, so I spent a lot of time talking with potential ticket buyers. Of course I had to buy some. There were about a dozen different textile art pieces, each with a box to hold tickets. You had to choose where to put your tickets - that was the most difficult part! I put one of my tickets in a box that I knew was very full, but a girl can dream.....except that some dreams do come true! Look at what I won - an original Nancy Garrard! I'm going to have to find a special spot for this one in my home!

Changing Seasons by Nancy Garrard

I also treated myself to a small felted piece by fellow artist Laura C. I just love the pops of turquoise, cherry and lime. It also has lots of interesting hand-stitching and beading. 

A lovely felted piece by Laura 

While I was at Fibre Fling, I had time to finish embroidering my Noon Sun for my outdoor hanging sculpture. 

Noon Sun - part of my outdoor hanging sculpture

What I learned
  • Fibre Fling was a lot of fun, but as an introvert, it took a lot out of me!
  • As you can see, I've got one finished piece of my outdoor hanging sculpture. 
  • I haven't done any kind of quilt or stitch work since the show - I need to re-boost my battery. I have done some gardening. The manual labour was difficult but good 😊I now have 3 rhubarb plants in my side garden.
  • Now that I've played with the big garden tools, I'm ready to tackle the last corner of my garden, where there will be a small fountain and meditation area...wish me luck! 
Related links
Linking parties
I'll be linking to many fun linking parties. Why not check them out after you've linked up below? Design Wall Monday, Sew & Tell, Midweek Makers, Put your foot down, Needle & Thread ThursdayOff The Wall FridayPatchwork & Quilts, 15 Minutes to Stitch 2024, Slow Sunday Stitching

Wonderful news! Spring Tulips was featured on Needle & Thread Thursday! Thanks Kelly.

Free Motion Mavericks


We had a busy party here last week! Thanks to everyone who linked up 😍. Here are the projects that included FMQ, ruler work or walking foot quilting. 

Vicki from Vicki's Crafts and Quilting made this Delectable Teal Mountain runner. Isn't it gorgeous? You may want to check out her post to see her lovely FMQ feathers.

Vicki's Delectable Teal Mountain runner

Preeti of Sew Preeti Quilts outdid herself by making and quilting three quilts for the Pantone Quilt Challenge. This year's colour is Peach Fuzz. To see the Pantone Quilt challenge announcement and all of Preeti's quilts, go to the links beneath each quilt.


Preeti's Peach on Earth

For something different we have Preeti's Mica in 
Island Batik fabrics

Next we have Frédérique's Anaho - a wall hanging that she started in 2009 and finished last week. Those will perspectives are so cool!😎 Check out her post of her process and story behind the quilt.

Frédérique's Anaho

Deb from A Scrappy Quilter quilted this charity quilt on her domestic machine. The quilt was supplied by her guild and she did the rest! Deb quilted it with giant waves to help the geese stay up!

Deb's quilted charity quilt 

It's now your turn!

You are invited to the Inlinkz link party!

Click here to enter

Thursday, June 22, 2023

Daisy Beauty on Free Motion Mavericks

Welcome to week 436 of Free Motion Mavericks. Happy Solstice 😊 I actually have a finish with free motion quilting (FMQ) for you today. Yeah!

May's Table Scraps Challenge done ✔


It's a tad late, but it's done well and I love it 😍. May's Challenge colour was orange and the letters were F and L. The scrappy log cabin block was quickly finished and the gorgeous yellow daisy batik Flowers were attached...but something was missing. I hoped to add lace for my "L" but I wasn't happy with what I tried. 

Sometimes a project needs to percolate before it talks to me or I find that perfect thing that will make it sing.

Daisy Beauty - May's Table Scraps Challenge

This is where it sat for a while. I did post this image on Instagram and linked it up to the May Table Scraps Challenge link-up. 

 Where it sat - simmering

I tried a few pieces of lace but couldn't find anything I liked. Finally, looking for something else, I found this crochet lace - perfect! 

I found the lace - now what?

I didn't know how I wanted to finish it. Do I add stems and/or leaves? Finally today it came to me - FMQ daisies so that there is an impression of lots more daisies. I think of them as shadow daisies. 

I did add a second echo around the yellow daisies and then I started the shadow daisies. I only quilted the first one with yellow thread. I wanted the daisies to recede, so I used variegated threads in pink and yellow, and light and dark pink.

More daisies and a line of small leaves

First daisy with an echo


I moved the lace out of the way - at that point it was only attached at the binding - to FMQ a daisy underneath it.

Once the daisies were quilted, I added a continuous line of small leaves around everything, including the binding.

Here is the back - you can see the FMQ better from there.

FMQ as seen from the back

Daisy Beauty label

Since I had the fusible web handy, I made the label right away.


What I learned
  • You can see in the image where the project was percolating, that I had left an extra large backing. I was hoping to just turn the backing to finish the quilt, but when I trimmed it, I cut through it. So the piece has a regular binging.
  • I actually added the binding before the FMQ. On such a small piece, it really doesn't make a difference, and it's so nice to have a finished piece once it's quilted!
  • These hand-dyed fabric scraps come from my friend Elaine Quehl's extras. I absolutely love those orange-pinks and have used them quite a bit. I may have to dye some myself eventually!
  • We had a presentation at our last guild meeting by someone who has studied the judging of quilts. She gave us many tips. I was extra careful when I FMQ the curves - going slower than usual and it paid off - no eyelashes (that's when the back tension is off in a curve, because the quilter is going too fast!)
  • I also followed my own advice about bindings and it came out really well.
  • Before adding the label, I attached the lace with a few stitches. It doesn't show except in the back, when it's not covered by the label.
  • I don't want to be so finicky about my quilts that it won't be any fun to make them, but these small steps make for a better piece, and are really not any more work. I just have to remember them 😁
Related link
  • Tips for adding a binding - see What I learned: An Agenda Cover and Update on Free Motion Mavericks, January 05, 2023
  • Posts for this year's #Table Scraps Challenge 2023
Linking parties
This project was a squirrel - I made the deadline for DrEAMi! Yeah!

Free Motion Mavericks

Welcome and thanks to everyone who linked up 😊

Brenda from Songbird Designs has FMQ a beautiful flying geese quilt in the Island Batik Challenge. She used feathers, diagonal lines and block within a block in the middle of her stars! Click on the image on her page to get a close-up.

Come Fly Away With Me by Brenda of Songbird Designs

Donnalee had some left over fabric from a quilt kit and was able to make a lovely runner and a mini. So cute! Aren't small project fun to make?

mini wall hanging by Donnalee

Melva finished a Dresden quilt for a client last week. I love these pink and red fabrics.

A finished Dresden quilt for a client by Melva

Gail hosted TGIFF last week with her finished quilt. She used Graffiti and Wild quilting designs. This week we'll be seeing the back of her quilt since she made if following Kelly Young's “Perfectly Pieced Backs” book.

Gail's quilt with Graffiti and Wild quilting

Margo of MY Quilts and Crafts got terrific news - two quilts, 'Modern Time' and 'Inside Lines', were accepted in the International Quilt Festival Houston 2023. Congrats!

Margo's quilts, 'Modern Time' and 'Inside Lines' will be at the 
 International Quilt Festival Houston 2023

It's now your turn!

You are invited to the Inlinkz link party!

Click here to enter

Tuesday, April 25, 2023

Rainbow Neighbourhood Houses - Blocks 2 to 4

I was falling behind on my Rainbow Neighbourhood QAL so I'm now all caught up. 

A Mauve House


The second house was finished in the middle of last week. It was easier to make the second time around. Of course the star blocks are all different, so there is a learning curve there.

The mauve house with a blue Friendship star!

For the window details, I added a hanging planter and a bird who is visiting out of his cage. Will he go back in? I found a beautiful mosaic type fabric that looks like stained glass, so that's what I used for the window in the door. I also used my fancy machine stitches to hang the planter and make a door knob.

Details of the mauve house

Here are the first two houses.

The blue house has a mauve Evening star
while the mauve house has a blue Friendship star

I placed a sky fabric between the two houses, with some green for a yard and a little tree. I'm trying out a few things to see how I'll be able to place the houses on a quilt. I would like the sashing to act as a yard between the houses. These houses have tiny yards, just like mine! 😊

An Orange House


I finished up the third, orange house. In keeping with the funky lawn, I used some fun fabric to decorate the windows, door and the yard. 

The orange house with the yellow Woven star

Details of the orange house


A Yellow House


The fourth house is yellow. I haven't added anything to the windows yet. I may wait until I get them into the final layout and find more possibilities in my stash (or... add to it with a fat quarter or two 😁).

Yellow house with an Ohio Star 

Yellow and orange houses 😍

What I learned
  • Practice definitely helped me make these houses faster. Making them two at a time helped even more!
  • So far all of the star blocks have worked out well. I also learned that I don't really like making the Ohio star 😒 I made all of the little stars the exact same way and two are smaller than the others! It was also difficult stitching them in a row with all of those seams. There will probably be some repetition of the star blocks, but it won't be that one!!!
  • I made myself a little pattern out of tracing paper for the lawn and walkway. That has been more helpful than just writing the measurements. 
  • As I mentioned, I didn't add anything to the windows of the yellow house yet. I have more fabric that I have to look at to see if I can make something different. I also don't want to over do it because I may have some other fun ideas when I put all the blocks all together. 
  • I'm glad that I didn't have many traditional lawn and garden fabrics. I've had to think outside the box by using more fun and funky green fabrics. I love them!
  • I have run out of the roof and the sky fabric. I'll be finding some alternative fabrics for these. I know that traditionally it's better to plan all of this out, but this is much more fun 😊. That's when happy accidents happen!
  • I'm making this quilt as a large throw for some friends. I think that one of the houses should look a little bit like theirs. Since they live in the country, that could make for a wonderful centre house with a little forest and lake. 
  • It's never to late to start planning the quilt, even in the middle of the project!

Related links

Linking parties
I'll be linking up to many fun linking parties. Why not check them out? Sew & Tell, Midweek Maker, Put your foot downOff The Wall FridayCan I Get A Whoop Whoop?Peacock PartyPatchwork & Quilts


Saturday, April 08, 2023

Block 1 of the Rainbow Neighbourhood QAL

Hi! I hope that you are all well 😊. The winter storm is over and it looks like Spring is finally here 🌞 Yeah!!!

Rainbow Neighbourhood QAL


I can't believe that I'm doing another QAL! I've been looking at Sandra's Rainbow Neighbourhood pattern for a while, so why not join? Who knows, I just might make a whole quilt, now that I've done the first block. Here's hoping 😁

First house - blue!

I chose my fabric for the whole quilt, which is pretty unusual for me. They are mostly Alison Glass fabrics that I bought a few years ago. I'm using the ones with the white drawings over the various colours - her Sun Print collection.

Mostly Alisson Glass fabrics

I must say that I love these huge blocks! It was a little scary cutting up the fabrics for the roofs and sky - I don't think that I'll have enough of these, but I'm sure that I'll be able to find others. I'm really going to try to make the whole quilt from my stash. We'll see how that goes!

This is the finished roof section

This was my first attempt at putting the roof together....oops!

If I'm going to make this whole quilt, I have to find ways to amuse myself, so I've decided to have fun with the windows and the grass. I'll be using hand-dyed fabric for all of the doors and windows. I also want to add something in each window - probably something whimsical like these.

Going for a whimsical feel 😍

For the grass in front of each house, I'm going for an interesting lawn or garden. For the first block I've added some garden fabric and a path leading up to the door.

Each house will have it's own grass or garden in front.

What I learned
  • I'm really not used to quilting this big. The whole house block is 16½" square! For me, that's huge!!!
  • I mentioned in my last SAHRR post that working with larger blocks seems to be easier....and many of you agreed with me. Well I now have the proof! This could be the beginning of a new era for me, as far as traditional quilting goes.
  • I've decided to use a matching Kona cotton for the star blocks. I'd be very surprised if I don't have something that will match all of the house fabrics.
  • You probably saw my one big oops moment above. Next time I need to look at the block before I stitch two parts together! I was so concerned about accuracy that I didn't notice that they were in the wrong place....but my seams were accurate 😁😂!
  • It took me most of the day yesterday to make one block! I'm hoping that each block will be faster to make. 
  • To help me along, I originally cut 2 of the sky and roof pieces. After I finished the first house yesterday, I took the time to cut out the pieces for the second house. It will be sort of the reverse of this first house, so the house will be plum and the star will be blue. I wrote myself a lot of notes so that I'll be able to, hopefully, whip it up, and prepare a couple more blocks next week.
  • I'm thinking of making a variation of Sandra's larger quilt, but with yards or fences between the houses. At this time the plan is to make as many houses as I can, and then figure out how to put them together.
Sandra's twin size quilt - isn't it gorgeous?

Related links

Linking parties