Tuesday, June 28, 2016

Another Baby Quilt

Fox in a Box by Row House Creations
Last week I made a baby quilt. It was easy since I designed it to include the things I love; some colour, very few blocks made from foundation paper piecing and a lot of FMQ.

However, I have a quilt that I've promised to make for my friend Sonya. Since I made her two other babies a quilt, I had to make one for the third child. I had seen a beautiful quilt at the show-and-tell part of our Guild meeting. I googled for a baby quilt with foxes and sure enough, found the pattern. It's a Row House Creations pattern, called Fox in a Box. Sonya loved it so I ordered it.

All the triangle and background pieces cut out

It took me a few months to find the right fabrics and then a day to cut the fabric. Cutting fabric for the whole project is not something I usually do. I generally cut my pieces as I go along but I knew that everything needed to be cut before I started.

I slowly worked on the piecing, but I didn't get far. It's a good thing that I took it with me at the quilting retreat. I was able to piece most of the various geese blocks there. Unfortunately I didn't work on it when I got back to home and reality.

The last two weeks have been incredibly productive (quilting wise - nothing else!), and after finishing a totally unplanned baby quilt, I started feeling very guilty about not finishing the Fox in the Box quilt. I think William will be one year old soon - it's past due!
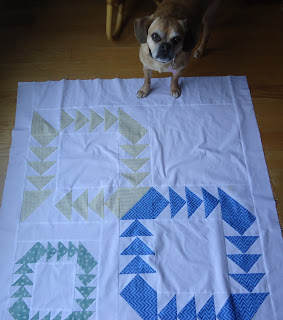
The background is almost done - while Chevy supervises!
Here are the boxes, without borders or appliqué. There was no way Chevy was letting me take this picture without her. She wanted attention since I've been quilting too much!

Ready to sew on the appliqué
The next day, the foxes and tree are ready to be appliquéd. Some minor glitches in putting the foxes together, but it all worked out. Last night I finished appliquéing all of the pieces. It just needs to be sandwiched, basted and then FMQ. Should be ready in a week or so!

What I learned:
  • When picking out a pattern, I need to work more to my strengths - that means less piecing and minimal appliqué. I hope I remember this when I'm caught up in the beauty of the quilt pattern!
  • It turns out that I didn't place a couple of the large square-triangles in the right spots. My son noticed it right away, but only after it was all sewn together. I could call it creative design or rather a sign of my human imperfection. I can definitely live with that.
  • I was very careful about cutting the appliqué pieces correctly, although they are on solid fabric, so it wouldn't have made a difference. What I wasn't careful about, however, was placing the fusible webbing on the correct side of the pieces. Oops! The placement of the foxes isn't the same as the pattern, but really, it worked out fine. This one I'll call a creative design :-)

I'll be joining up a few quilty parties. Check out what everyone is doing!
Design Board Monday, Fabric Tuesday, Freemotion by the River, Midweek Makers, Let's Bee Social, Main Crush Monday! Needle and Thread Thursday, Fabric Frenzy Friday, Can I get a Whoop Whoop! and Off the Wall Friday

Friday, June 24, 2016

A Beautiful Day Baby Quilt

I started last week, finished it last night, washed it, sewed on the label, took a few pictures and it was given this morning. That was the creation and life of my latest baby quilt. It has now moved on to another mother who will cherish it with her child.

I know that it sounds sappy, but my quilts, like my children, are a part of me. As joyful and sometimes cranky as a child. They are my creations. Some will grow old with me while others will leave the nest too early. The one thing that is consistent is that they will be appreciated where ever they are. It may be weird comparing quilts to my children, but as my two young adults grow older and eventually leave the nest, I will still be creating. The mother in me is very thankful for this.

A Beautiful Day

A Beautiful Day Baby Quilt
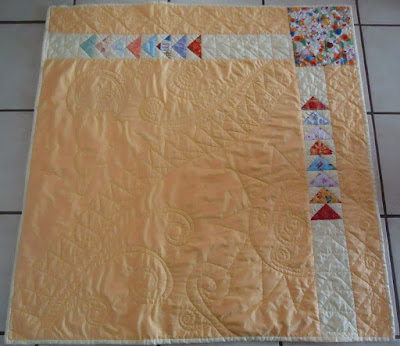
I wanted to make a modern baby quilt. I first thought of a wholecloth quilt, but I needed more colour. I decided on a flying geese block made with foundation paper piecing for the two strips. This required four blocks of foundation paper pieced flying geese. It was a great way to use my favourite scraps to add some colour. The fabric in the corner was perfect.

Free Motion Quilting (FMQ)

I needed something that would be appropriate for a baby or child, but that was gender neutral. I wanted triangles but also curves to provide contrast. I would have loved to have densely quilted the piece but it needed to be perfect for cuddling.
The FMQ curved strip of flying geese crosses the quilt

I drew a few sketches and finally decided on the curved strip of flying geese going across the quilt to divide the space.

The sun coming up in the lower part of the quilt
I love quilting suns. As much as I would have loved to leave the space inside the sun empty, I knew that it wasn't a practical idea. Too much space between the quilting creates bunching, which creates perfect conditions for rips. Not a good thing!

Through the shadows, you can see the moon behind a cloud
If there's a sun, then you need a moon! I FMQ the moon in grey while I used a variegated yellow thread for the rest of the quilt. It's subtle but I wanted to contrast the sun and moon. Again, I quilted within the moon - three swirls symbolizing mother, father and child.

The quilted strip and border
I quilted in the ditch around the flying geese and then continued the pattern across the strip. I used on-point squares in the outer border, with a little curl inside them.

The back of the quilt is great, although the picture doesn't to it justice.
The back of the quilt
What I learned:
  • I'm not sure if it's because I designed it or if it's because it was a baby quilt, but A Beautiful Day was truly a labour of love. 
  • This was the first time that I've FMQ on a larger scale - it's much more difficult! I found it hard to keep the longer lines flowing and straight. I have to work on stopping and starting at the same point. Too many times I created a little hiccup between stopping and starting.
  • The larger scale also means being more careful about stitch size. It had to remember to  significantly speed up the needle when my hands moved faster.
  •  The difficulty in quilting on a larger scale is my lack of practice on larger pieces. I almost always practice my FMQ on smaller pieces, which means smaller scale. 
  • It was also difficult to find the "juste milieu" - the middle ground between too much quilting and not enough. I learned this from fixing the quilt my mother made for my son. If there isn't enough quilting, the fabric will bunch up, get caught and rip. 
  • The on-point squares in the outer border are too large. Since I quilted these last, I should have trimmed the quilt before quilting these.
I hope that you have a lovely St. Jean Baptiste Day, perfect for both quilting and blogging!

I was able to access Photoshop - so here's a better picture.
A Beautiful Day Quilt
A Beautiful Day Quilt for a special mother and baby


I've linked this post to some fun linky parties. Please check them out!
Free Motion Mavericks, Needle and Thread Thursday, Can I get a Whoop Whoop?, Off the Wall Friday, Midweek Makers, Oh Scrap!, Cooking Up QuiltsMOP Monday and Freemotion by the River.

Tuesday, June 14, 2016

My First Swap

I've been avoiding them for years but I finally succumbed to a swap through my guild, the Common Thread Quilt Guild. In the excitement of the moment I just forgot that I don't do swaps. Don't get me wrong, it's a great idea, but I know myself - it'll mean another deadline, agonizing over what to make, is it good enough, will she like it, etc. At least this swap is in person, so I don't have to mail it. That would have added another layer of anxiety.

I really tried to plan ahead and minimize the agony of the decision and the deadline. Two months ago I went to Quilty Pleasures, our local quilt shop where the recipient of my project works, and asked her colleagues what she might like. They gave me a great idea and I got fabric that is typically "her" as well as a pattern.

A runner for the guild swap
I knew that the pattern would be challenging for me since I have less and less patience with instructions. That's why I planned to make two Sew Together Bags - one for me to practice on and the other for the swap. I brought everything to the retreat, thinking I would at least get mine done, since she was also attending the retreat.

You may recall from my post that it didn't go so well. Every piece of fabric I cut was wrong. It's a good thing that the fabric was for my own bag, or it would have been a complete disaster! On the way home from the retreat, my girlfriend offered to bring me a couple of patterns for a runner. I gratefully accepted.

Details of the hexagon 
Here it is! I'm not sure which magazine the runner is from. I did have difficulty with one of the pattern templates - it was too small, but I took out my graph paper and drafted a new one.

The block was interesting since the middle hexagon is actually appliquéd to the outer edges of the hexagon. The pattern suggested using stabilizer and glue but since I liked appliquéing orange peels so much, I just used freezer paper and basted them. It's ironic to think that I used to skip most of the basting required when I used to sew clothes!

I stitched-in-the-ditch using Bottom Line thread and then FMQ a six-petal flower in the middle of each hexagon. Nothing fancy since it's quite busy.

After making the runner and placing it on my living room table, I'm very happy with it. Hopefully the person who receives it will also like it!

Update


Fabric Play by Deanne Moore
Fabric Play
Our swap exchange was last night - and it turns out that my secret sister, Sherrill, also had my name!!!! Apparently the colours I used go with her decor - so the table runner will look good on her living room table.

Two Christmases ago, Sherrill was my secret sister and I gave her a copy of the book, Fabric Play by Deanne Moore. When Sherrill got my name for this swap, she decided that she wanted to make one of the quilts from the book.
My very own lap quilt :-)


The book is all about using different fabrics to get different looks for the same quilt. If you click on the link for the book at Martingale, look at the fourth quilt image in the preview- you wouldn't even recognize the "Your Own Way" quilt.

Although I've gotten lovely quilty gifts from friends, I've never gotten a quilt. I'm so thrilled. It will be used and cherished.


I've linked to the following parties. Come see what's happening! Linky Tuesday with Freemotion by the River, Main Crush Monday with Cooking Up Quilts, Free Motion Mavericks with Muv, Off the Wall Friday with Nina-Marie, Monday Making with Love Laugh Quilt and MOP Monday.

Wednesday, June 08, 2016

Needle Felting Play Day

I learned to needle felt this weekend when I attended my first play day with the Out of the Box Fibre Artists. I learn a new technique, met some great people and best of all, I got to play!

Needle felting is very forgiving, which is something I look for in a technique (as in life!). It doesn't look like you imagined? Add more here and there, or just pull it apart.

In the morning we were introduced to the tools and materials used in needle felting. We each got two needles and a thick piece of foam to work on. We then chose materials to work on, different types of felt - synthetic, wool and other natural fabrics such linen to felt on.
My first felted piece - a little car (for a future project)
My first felted piece - a car-shaped cloud

I have a couple of ideas for some future quilting art pieces, so for my first try, I felted a car-shaped cloud. The wool roving will be perfect for making big fluffy clouds.

Of course, I just had to try my hand at making a landscape. That's why I mentioned the pulling apart! I had fun making it, and I did like some of the effects that I could do for the water, but take my word for it - it wasn't worth keeping.

After lunch I looked at what other participants were creating. Since we had been asked to bring a memento to work with, I saw many beautiful projects that incorporated jewelry of all kinds.

I knew that I wouldn't be keeping my landscape, so I made a felt piece using various felt pieces, hand-made paper, wool roving, tea-dyed cheese cloth, silk fibres, a feather pin and beads.

"The Feather" is a keeper! 
I  started by felting some wool rovings onto the cheese cloth and the grey felt. I knew that I wanted to use the hand-made paper, so I used colours that would compliment it. It's really amazing what a little bit of wool roving will do. I mixed a couple of the different colours and needle-punched them into the background.

I had brought some silk fibres that I wanted to incorporate into something. I just couched them onto the piece and added the beads. I didn't think about it at the time, but I guess that the nests go well with the feather and the airy cheesecloth.
Details of the felting on the cheese cloth with beads, silk fibres and feather
I basted the paper to the bottom felt piece, sewing the together where it wouldn't show.  I then added the side beads and felted around them so that they look like they're in a nest.

The next day at home, I looked at my landscape again, pulled it apart and then made this cute flower on a piece of linen.
Beads in a nest of wool
I had to make a flower :-)


What I learned:

  • Playing is fun and if it's done without expectations, it's not a big deal to pull a piece apart (think Lego!)
  • When I create, I try not to think too much about what I'm doing. I may start out with an idea, but then I follow my instinct since the results are often better than listening to my overthinking mind.
  • I'm going to have to do some research on how to incorporate needle felting into my landscape quilt art. I know that it'll make amazing clouds but I'll have to figure out the rest.
  • I really like the results of my needle felting play day. The one drawback to making "The Feather" is that it won't look finished until it's framed. That's one step that I can gladly do without!
  • I doubt that I will get addicted to needle felting, but it's a great technique to add to my quilting.

I've done a little bit of research. If you're interested, here is a good, very basic tutorial on needle felting: "The Basics: How to Needle Felt (or Dry Felt)"by TLC Inspirations. Here is something a little more interesting to quilters who might want to embellishing with felting "Needle Felting Embellishments and Applique" by the National Quilters Circle.

You may also want to check out Felted Skies Studios. They sell landscape kits and have tutorials on YouTube. After watching parts of their tutorials, I figured out what went wrong with my landscape.

  • I was using too much wool roving - it really doesn't have to be thick, and it's best to add more as you go along.
  • You also have to think 3D - the background like water and sky can be thinner while the elements such as trees can be thicker and lay on top of the backing.
I will probably be using needle felting on my of my next art quilt projects - so come back to see it!

I've linked this post to the following Linky parties. Check them out!
Linky Tuesday with Freemotion by the River, Let's Bee Social with Sew Fresh Quilts, Design Board Monday at Bits n' Bobs, Main Crush Monday with Cooking Up Quilts, Needle and Thread Thursday with My Quilt Infatuation, Off the Wall Friday with Nina Marie, Fabric Frenzy Friday at Fort Worth Fabric Studio and Lessons Learned Linky with Quilting Mod.