Tuesday, August 23, 2016

Great Hockey Jersey Quilt in the Making

It's finally coming together - the great Hockey Jersey Quilt!

My nephew graduated from high school this spring and is going away to University very soon. He loves hockey and was a goalie in both Ottawa and Denmark, so a t-shirt quilt made up of a few t-shirts and many hockey jerseys is a perfect gift.

the great hockey jersey quilt in progress
The Great Hockey Jersey Quilt needs one more row of t-shirts and borders
I've been working on this project for about a month. Typically when I am starting something new, I read the book!

I bought it at Martingale, my favourite quilting book shop. The book is Terrific T-Shirt Quilts by Karen M. Burns. It was really informative. Since you sort of have to make-it-up as you go with this type of quilt, it was great to get some ideas as well as technical information.
Terrific T-Shirt Quilts
Funky Monkey Fabrics Logo
Funky Monkey Fabrics

I was very nervous about sewing with stretchy fabrics. Not only did I have t-shirts but I also had all kinds of hockey jerseys! It turns out there's a great secret that makes these fabrics as easy to sew as regular cotton fabric! It's called FusiKnit Tricot Fusible Interfacing. You just iron it onto the back of the t-shirt or jersey and voila! You now have fabric that's easy to handle and sew. I bought it at Funky Monkey Fabrics, a Canadian fabric store, recommended by a colleague, that specializes in knits. The interfacing is only 20" wide, so I bought 5 yards. That was enough to back most of the hockey jerseys. I then had to order another 3 yards. Now I have enough to finish the quilt!

There are many different ways of putting a t-shirt quilt together. Since I'm not renown for my planning, I just started cutting around the logos and anything else that might be of interest for the quilt. My brother told me what was important but otherwise I was free to do as I please (my kind of project).

The interesting pieces were the ones where the front, the back and sometimes the sleeve were going to be part of the quilt. I didn't want to separate them, so I ended up piecing them together in different ways. Here are some of them:

Front of the jersey with a patch from the sleeve
This first block has the sleeve at the top to show the team colours, then the front of the jersey with a patch from the back .
The sleeve, front and back of the jersey


The second block is the front of the goalie jersey and a patch from the sleeve.

The third example includes the front of the jersey, which had to be cut in a particular way and so includes some additional piecing as well as one sleeve and then the goalie patch from the other sleeve.
The front as well as a sleeve and patch
The front as well as a sleeve and patch 


I will leave this post to finish up the top row. These have t-shirts of things that my nephew loved as a kid - Spiderman, Toy Story etc.

There are also a couple of blocks that I left blank. I will add various patches to these.

I used a few Kona cottons to make the sashing or borders around the blocks. Today I ordered the border and backing fabric from my favourite local online supplier - Mad About Patchwork. The crunch is on - my nephew leaves for school in 11 days!

I expect to be doing a whole lot of quilting next week :-)


What I learned:

  • When using the FusiKnit Tricot Fusible Interfacing, it's important that the stretch of the interfacing is in the opposite direction to the stretch of the fabric. I highly recommend Terrific T-Shirt Quilts. The advice on working with knits was terrific and saved me a lot of headaches.
  • When cutting up the t-shirts and jerseys, cut as large a piece as possible. It's much easier to cut off more than to sew it back together!
  • I really like Kona cottons but I'm going to have to invest in a colour chart. It's so hard to keep track of which colours are which when you want to re-order anything. I have kept track of some of the fabrics by cutting a small piece and stapling it to the invoice before I wash them. Unfortunately I haven't always done that :-(
  • BTW, the quilt is a surprise. My nephew doesn't read my blog....so don't tell him!


This post is linked to some great linky parties. Check out what everyone is up to!
Monday Making, Main Crush Monday, Fabric Tuesday, Let's Bee Social, Midweek Makers, Needle & Thread Thursday, Off the Wall Friday, Oh Scrap!


Saturday, August 20, 2016

Back on Track

My sewing machine is back and I'm on a role! I've spent a good part of my week on holidays quilting. I had really missed doing free motion quilting (FMQ). The good news - my girlfriend's baby quilt is done, only a year later!

Here are some pictures to remind you of the project. It's a Row House Creations pattern called Fox in a Box. You can read more about it in this June post.
At the very beginning, cutting the fabric
Chevy overseeing the project
All the Appliqué is done
This is where I left off at the end of June. The quilting didn't get done as quickly as I expected since I had to take my sewing machine in for a tune up. 

The first thing I worked on when I got my machine back was William's quilt. As much as I didn't really enjoy making it (nothing to do with the pattern, just my preferences), it really is a lovely quilt.

Fox in a Box
Here's where I started having fun!
Race car 
This first FMQ design is the race car. Follow the links under the images to Lori Kennedy's tutorials.
Baby Bird with a variation of Modern Leaf  
In the empty square, I FMQ Lori's baby bird with some branches and fruit.


Kite, an apple with a worm and a house


The tree is FMQ. At the top there is a kite and a flower; at the bottom, an apple with a worm and a house.


The back of the tree block


Here is what the same tree block looks like in the back!
Quilted, washed and ready to go!

What I learned:
  • The best part of the project was the FMQ I did once I finished stitching-in-the-ditch. I had a blast quilting interesting designs that would appeal to a child. There is a bird, sail boats, a fish, an apple with a worm, a sun, a kite, a car and a couple of flowers. 
  • Many of the designs are based on The Inbox Jaunt's Free Motion Quilt Tutorials by Lori Kennedy. Thanks Lori!
  • Although I have three large quilts to make with deadlines in the next three months, I`m going to have to make time to play with FMQ. 
I have linked to the following Linky Parties. See what others are working on!
Can I get a Whoop Whoop?  Off the Wall Friday, MOP Monday, Fabric Frenzy Friday, Monday Making, Main Crush Monday, Fabric Tuesday, Linky Tuesday, Free Motion Maverick.

What a treat - this post was featured on Fabric Tuesday at Quilt Story! Have a peak...


Tuesday, August 09, 2016

Microwaveable Fabric Bowls

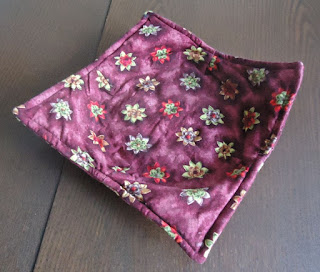
Microwaveable bowl to use at work
As summer flies by, I’ve been hiding from the heat as much as possible (that's estivation!). I still don't have my sewing machine back but I’ve done some work on a new quilt. It’s a surprise – so I’ll have to wait till it’s done to write a post. In the meantime, here’s an on-going project.

A few months ago I made some microwaveable hot pads or bowls. These are easy to stitch up, useful and make great gifts. My first fabric bowl was a tester. I used some funky fabric that I wouldn't care if it ended up being scrapped.

Largest fabric bowl
Largest fabric bowl

There are many tutorials online. I used the one by Kathy from Tamarack Shack.  As Kathy advises, it’s imperative that you use cotton fabrics and batting. Anything metallic could create sparks!

Her instructions are for 8”, 10” and 12” bowls. This first bowl is the 12” version. It’s really big as you can see from the image with the bowl in it. That’s a large cereal bowl – my son’s favourite! I use both the bowl and the microwaveable bowl at work. It’s great for reheating my lunch and then taking it to the table or my desk.

The fabric bowls match the table runner


After the first experiment worked out, I made one of each size to go with the orange peel table runner I gave my friend Heidi. Aren’t they pretty all nestled together? They really went well with the runner.


Nestled fabric bowls
Nestled fabric bowls for Heidi
I made a couple more for our kitchen, since the kids kept asking me when would we get some!

Smallest fabric bowl  perfect for single servings
Smallest fabric bowl 
perfect for single servings


I really like the small 8” version. It’s perfect for a single serving of something yummy.


Medium 10" bowl
Medium 10" bowl


The medium 10” microwaveable bowl pictured here is great to use with our soup bowls.


fabric bowl with bowl
Great for dinner bowls


Large fabric bowl adapted for dinner bowls and serving dishes


I adapted the large 12” pattern to fit our dinner bowls as well as serving dishes by making the four darts a little shorter.


What I learned:

  • One word of caution - I think that the fabric bowl traps the heat from the microwave. Try warming something up for a little less time that you would normally. I've stopped using them under the bowl I use to make gravy (yup, my nasty secret is out!) because it always seems to overflow. That's also a good reason to use fabrics that hide minor spills. They do, however, wash up really well
  • These microwaveable fabric bowls are easy to make, but I'm not very good at making more than one of anything. I love learning new things but when it's no longer new, I get the "been there, done that" blues.
  • I did purchase some fun fabrics that will be perfect for more of these fabric bowls. Hopefully I'll get to them. They are great to make when you want a project where you don't want to have to think too much.
  • Is it really going to be an ongoing project? We'll see - there is no time limit to ongoing :-) 

This post was linked to the following linky parties. Check them out! Monday Making, Main Crush Monday, Linky Tuesday, Let's Bee Social, Can I get a Whoop Whoop?  MOP Monday,


Monday, August 01, 2016

Working with Needle and Thread

It's been ten days since my sewing machine (my Jag) went into the shop. In my last post, I was wondering what I would do....bring up one of my other machines to do some piecing, do some handwork and/or finish some projects?

So far, I haven't brought up another machine. I worked on an outstanding project, started a hand sewing project, read a few books, cleaned my sewing space and started on a new project.

Block 47 Heroine's Crown
This hand appliquéd block is from the Grandmother's Choice Block of the Week project that I started a few years ago. I went through my blocks and realised that I only have 8 blocks left to do. When I complete a few more blocks, I'll write a post about how they relate to the fight for women's rights.

Hand appliqué is not my strength, even after making many orange peels, I appliquéd most of the pieces in this block by basting over the freezer paper, except for the oak leaves. Considering how difficult it was, the block came out better than I expected.


A few months ago, I discovered the Make Modern magazine from Australia. It has some lovely projects, it's a great price (the Australian dollar is roughly the same as the Canadian dollar) and it's available to download.

I've been interested in English paper-piecing but I really don't like hexagons! Don't know why, I just don't! I found a great little project that involves English paper piecing with triangles. It's called Shattered Cushions by Susan Bolte. It's from the eleventh issue of Make Modern magazine.


Aren't they lovely? I found some fat-quarters that I had been saving for something special - and this is it. They are grey and that lovely teal that's been so popular in the last couple of years.

The instructions suggest using a quick way of English paper piecing, but for me the whole point is to enjoy working with needle and thread. So I'm using the freezer paper, applying it to the back of the fabric and then basting each piece. It's just like doing those orange peels I loved so much.

Last weekend, I went away with my hubby. He went golfing and I drove around the wonderful back roads of the Upper Ottawa Valley. Most of the time, I had the roads to myself.

Antique embroidered hankies
I found an antique shop that had a few old hankies. When I spoke to the owner, he took out a box full of beautiful hand embroidered runners and tablecloths. Here is what I came home with.

I didn't dare iron them since I don't want to set any of the stains. I'm going to have to find some Retro Clean in Canada. This is what Cindy Needham recommends to clean these old beauties.

One of the hankies has a great lace border. Since it's plain, it would make a great background for a pretty art quilt. I'm still thinking about that one!

Antique hand embroidered runner


Finally, I framed "The Feather", the needle felted piece I made at an Out of the Box play day, It's hanging in our bedroom, but there isn't much wall space left.

"The Feather" is now framed
What I learned:

  • I didn't think I had much to say for this post, but it looks like I've kept busy, even without my sewing machine. 
  • It's been a nice change to do some hand work. I've even brought the projects to work so that I can play during my lunch break. It's a great way to spend a lunch break with my fellow crafters.
  • My trip through the Upper Ottawa Valley gave me a lot of time to ponder on one of the projects I want to do. I may have finally figured out how to put it together. I've chosen the fabrics and will slowly start playing with ideas. I want this one to be 3-D as well include needle felting and possibly fabric painting. I'm really going out of my comfort zone with this one!

Thanks for dropping by. This post is linked to a few linky parties. Please check them out!
MOP Monday, Main Crush Monday, Let's Bee Social, Midweek Makers, Fabric Frenzy Friday, and Slow Sunday Stitching.