Showing posts with label Batik. Show all posts

Thursday, April 30, 2026

Island Batik Fabric and I Quilted This!

Hi and welcome 😊. The weather here is all over the place but this morning the poplar in my back yard had leaf buds. There was no greenery yesterday and now there are tiny leaves peaking out! Between the explosion of bulbs and the birds hard at work constructing their nests in the neighbourhood, it must be Spring! 😍

A Future Quilt Make-over


I was one of the lucky winners of a bundle of Island Batik fabric for the 2026 SAHRR. That was the best gift ever since after over 10 years of sleeping under it, I have a king-sized quilt to repair/make-over.

Island Batik bundle of fat quarters

With 169 blocks to quilt, I never did finish FMQ it. This caused some of the problems but unfortunately a few fabrics just disintegrated around the FMQ. I've been buying batik fabrics ever since I started quilting. Back then, I didn't know that not all batik fabrics are of the same quality.

Batik king-size quilt - after 10 years, in need of serious repairs


I started FMQ the quilt in 2016. All of the 8" blocks had been stitched-in-the-ditch. When we first slept under it, only 23 blocks had been quilted. By 2019 I had 54 blocks FMQ and in 2020 I had 120 blocks done, that's about 2/3 done.

In my 2020 post I had repaired a few of the blocks but since then it's gotten worse and I just did what I do best - I ignored it by putting another smaller quilt over the worst of it! I really didn't know if I should fix the quilt or just throw it out but when I won these fabrics, I knew that it would eventually get fixed.

A couple of weeks ago we bought a new bed cover. Since it wad deeply discounted, it's quality and lovely to sleep under. This means that I can now work on the original quilt without having to take it off  the bed and then put it back on to sleep 😁

Block I fixed the last time  - there are many more!

Next week I'll be washing the batiks as well as the king-size quilt. After that, I'll figure out how many blocks need to be repaired or replaced. I'm hoping to fix a few blocks at a time but this will be a big job over several months. 

May's One Monthly Goal (OMG)

For April's OMG I managed to iron the flimsy. Next will be the backing and then the sandwich. My objective remains the same - to start quilting it, at least in-the-ditch. I'll be linking up to May's OMG when it opens 😊

May's OMG

What I learned
  • I now know that batiks, like other fabrics, are not all the same quality. I now should have enough batiks to fix the whole quilt.
  • Since I'm not sure which batiks were the cheaper made ones in my stash, I've only been using batiks for art or wall hangings that won't be washed.
  • I was gifted some gorgeous batiks from Alaska that I'll be adding to the quilt - thanks LiseπŸ˜€
  • Thank you so much to everyone who was involved in the SAHRR 2026 and a particular thank you to Kathleen who mailed the box to Canada - wow, no wonder no one wants to ship to Canada from the US anymore....so a very special thanks!😍
Related links
Linking parties
I'll be linking up this post to many fun linking parties, including the May OMG. Monday Musings, Sew & TellPut your foot downOff The Wall FridayPatchwork & Quilts,


I Quilted This!


Welcome to the I Quilted This! linking party that celebrates quilting on a domestic machine or custom quilting on a long-arm. Feel free to link up and share any recent project, even if you're not quilting it! 

Here are the posts that included FMQ, ruler work and walking foot quilting last week. Thanks for linking up 😊 and consider grabbing the button (contact me if you need the coding). 

Gretchen quilted this colourful Fabric Vortex quilt for her grandson. She quilted it with a spiral design. Gretchen made the quilt reversable using orphan blocks. Her grandson was thrilled! If you're interested in learning more about making a fabric vortex quilt, Gretchen has included all kinds of links in her post. I'm looking forward to going down that rabbit hole once this late post is finally published!

Gretchen's Fabric Vortex quilt, quilted in a spiral design

The back of Gretchen's Fabric Vortex quilt - made of orphan blocks

Kat from Scrapbox Quilts worked on her second quilt in the 6 quilts in 6 weeks challenge. She was able to find a UFO started last year that was a Villa Rosa design - Honey Bouquet. Kat quilted her scrappy quilt on her domestic.

Kat's second quilt for the 6 quilts in 6 weeks challenge

Anne-Marie of Stories from the Sewing Room found out that one of the quilts that she custom quilted in 2024 was on "display at the AQS shows in Daytona Beach and Hartford this spring and will also be on display in Paducah." What amazing news! You'll want to check out the FMQ on her original post.

Custom quilted by Anne-Marie in 2024
It's now your turn 😍

You are invited to the Inlinkz link party!

Click here to enter

Wednesday, September 10, 2025

FMQ a Baby Quilt and Cell Phone/Device Holder

Hello and welcome. By the time you read this, I will be ready πŸ˜• and hopefully making my way across the Pond for an amazing trip! Our first destination is LondonπŸ’‚ and then Southampton to embark on the ship. Before I leave, I'll share my latest finish. 

FMQ a Baby Quilt for the Guild


You've seen the two scrappy BB/cuddle quilts that I made this summer. I took them, as well as the quilt shown below to the Common Thread Quilt Guild (CTQG) meeting this week. They are donated through our Community Projects.

I picked up the flimsy, batting, backing and binding last year at a guild meeting. I quilted most of it months ago and just needed to finish FMQ the borders. This time I didn't bind the quilt before quilting the border since the borders are 6" wide. That's quite wide and I didn't want to take a chance that it wouldn't work out.

Finished baby quilt for Community Projects

Back of the baby quilt

I FMQ the centre blocks with straight lines converging to the middle of the triangles but extending out to the next rows/columns. With that geometric quilting, I wanted to add organic shapes to the borders. I FMQ vines of heart shaped leaves. Even though I was using an orange thread, it was still sometimes difficult to see within the colourful fabric pattern. I'm always amazed how a colour that I think should pop out, will disappear. The only reason I wanted it to pop out was so that I could see it clearly when I FMQ it. πŸ˜•

Here is the pretty backyard photo. My garden is mostly weeds but at least they're mostly alive now that we've finally gotten some rain.

Backyard glamour shot 😎

Scrappy Cuddle Quilts

Because we all love photos of quilts, here are the two scrappy cuddle quilts that I handed in this week at the guild meeting. You can read more about them in previous posts (see Related Links).

Purple Scrappy Cuddle Quilt

Teal Scrappy Cuddle Quilt

Cell Phone/Device Holder

Last Spring, my childhood friend, Sylvie, made me a cell phone or device holder. JJ (my adult child) and I have been moving it around the house and using it. JJ asked me to make more so that we could keep them handy....so I finally did. They will be very useful and I have made one to take with me and another as a gift for my niece.

Original holder made by my friend Sylvie

More cell phone/device holders

The holders only require a 9" x 12" fabric piece., a cup and a half of rice and some fluffy batting. I used batik fabrics since they are pretty and already out to use for the Bloomers blocks, Of course, the neutral batik one is for my niece - I love the leaves pattern on it. The one supporting my old cell phone is an amazing fabric that looks like cathedral windows. I've been wanting to use that fabric for years - so now I have and I'm keeping it 😍 JJ got the two other two and we'll keep my friend's one downstairs to share.

I did learn a couple of things 😊while making these. The first thing is that once the holders are filled with rice and fluff, you want to place the pins facing the top so that they can easily slide out of the way when sewing that last seam. This became very evident when I tried to remove the pins that were pointing up and difficult to remove before stitching.πŸ˜‰ 

Ensure that the pins can be easily slid out of the way!

I also added a quilting clip at the beginning of the seam. It just keeps the fabric together while you fiddle around with it but is easily removed just before you start to sew.

What I learned
  • I enjoyed FMQ the baby quilt that I didn't have to piece.😁
  • At the guild meeting in June, I picked up another quilt top to be finished. It's wonderful - the committee puts the quilt top, batting, backing, binding and a label together. It goes so much faster to finish without having to figure things out...since there's always a chance of getting it wrong!
  • I'm really glad to give back to the community, now that I have a little more time. Since my favourite part is the FMQ, it's a great way to get more practice without spending so much time piecing.
  • Making the phone/device holders went really well and it was as easy as promised!
  • I didn't have any fibre fill, so the first holder I made, after adding the rice, was filled with scraps of batting. I just had to try - but I removed it and then refilled it once I had bought the correct fill. 
Related links
Linking parties
I'll be linking up to many fun linking parties. Consider checking some out, after you've linked up below. 15 Minutes to Stitch 2025, Finished or Not Friday, Beauties Pageant, Off The Wall Friday, Put your foot down, Patchwork & QuiltsSew & Tell, TGIFF


Free Motion Mavericks


Welcome to week 548 of Free Motion Mavericks! It was a very productive week! Thanks for linking up. Here are the projects from last week that included FMQ, ruler work or walking foot quilting. 

Kat of Scrapbox Quilts finished two scrappy bargello quilts in the RSC colours. Each was simply FMQ. They are so lovely!

Kat's scrappy bargello quilt FMQ with slight waves

Kat's scrappy bargello quilt FMQ with straight lines

Sally from Crafts, Cavies and Cooking is in the process of FMQ a lovely, large quilt. In her plan of attack, she stitched all of the stars first. Now she's working on the crosses. What lovely FMQ!

Sally is now FMQ the crosses!

Sally was FMQ the stars

Deb, the Scrappy Quilter is rolling along and finishing more quilts! This latest one involved curves :-) The FMQ is lovely as it echoes the curves of those gorgeous blocks. 

Deb's lovely curved blocks quilt

Details of Deb's FMQ as she echoes the curves

Gwyned Trefethen is busily FMQ her very large 2024 RSC quilt. Here is her latest accomplishment.

Gwyned FMQ her 2024 RSC quilt

Melva of Melva Loves Scraps had another finish this week! Here is her Rainbow Korner Kabin quilt. She FMQ it with a Baptist Fan design.

Melva's Rainbow Korner Kabin quilt

Close-up of Melva's Rainbow Korner Kabin quilt

It's now your turn 😍

You are invited to the Inlinkz link party!

Click here to enter

Thursday, August 01, 2024

"Enjoying Alaska" on Free Motion Mavericks

Hi and welcome. It's been a busy and very hot week here. Other than taking Poppy out for short walks, I've been staying indoors (estivating) where it's cool. When there is humidex in the middle of the night, you know that it's hot!πŸ˜“πŸ˜Ž 

"Enjoying Alaska"


I started this piece during my holidays in Alaska. It's always tricky making something other than a scrappy quilt when travelling because odds are, you don't have all of the fabrics you need. I did use a batik that I bought in Alaska that worked beautifully, but the second one, not so much. Since I'm always up to a challenge, I thought that I could make it work. Maybe you'll think that I did, but I decided that I didn't like it and changed it this morning - that's why this post is later than usual!

"Enjoying Alaska" 

Here is the photo that I used as inspiration. The water and the forested hills were simple enough to do, but those snow-covered mountains gave me a really hard time - mostly because of the fabric I used as background.

A lovely view of the mountains from the ship

Here are a few pictures of the evolution of the piece. I cut and pinned all of the fabrics onto a white background. I really hoped to transform that lovely print into a mountain. I did stitch all over it but I'm not sure that I succeeded. 

Original fabrics - starting to stitch

When I got home, I zig-zag stitched around the green fabrics.

Slowly creating the mountains

Mountains almost done

I got to this point last night and I didn't like it. It's not bad but I'm not a fan of those long embroidery stitches. I slept on it and still wasn't happy with it this morning, so I took out some of my hand-dyed gray fabric and stitched over the snow-covered mountain.

My first attempt at the snow-covered mountain

I covered the mountain with the gray fabric and then added some hand-dyed green fabric at the bottom. I FMQ the snow-covered mountain with gray thread, then used three different green thread to stitch over the green fabric. I blended the areas between the gray and the green.

Final stitching of the snow covered mountain.

It's pretty amazing how many hours it took me to stitch the original snow-covered mountain and then only about 2 hours to cover it up and FMQ it.

To finish off the piece, I added some facing. I used fabric that my girlfriend had brought me from Alaska last year to face the top and bottom. I faced the sides with strips of fabric and then placed the top and bottom fabrics to cover the back. 

Making the facing with different fabric.

I hand-stitched the top and back fabrics at the sides. I didn't stitch the two fabrics together since they are both finished and you can peak between them to see the original back of the piece.

Back of the piece with the batik fabric showing

A glamour shot against the rocks

"Enjoying Alaska" among the flowers

What I learned
  • It's important to challenge myself. 
  • Challenges are easier when they're made of fabric - you can always remove or cover them up if you change your mind 😊
  • I like the thought that there's a secret, more primal mountain below the gray layer of the snow-covered one that we see. 
  • There are several textile artists who use those large stitches, They make lovely art, but for some reason, it's just not my thing.
  • I love the contrast of texture between the hand-stitching and the free motion quilting. It's great to be able to use both in a piece.
Related links
Linking parties
I'll be linking up to many fun linking parties. Why not check some of them out, after you've linked up below! Sew & Tell, Put your foot down, Needle & Thread ThursdayTGIFFMonday Musings, Design Wall Monday, Midweek Makers, Beauties Pageant15 Minutes to Stitch 2024, Oh Scrap!Off The Wall FridayPatchwork & Quilts

Project details

"Enjoying Alaska"
based on a picture taken off the coast of Alaska
Material: commercial cotton scraps, Alaska batik and hand-dyed fabric.
Techniques: hand-stitching, machine stitching, free motion quilting


Free Motion Mavericks


Welcome to week 492 of Free Motion Mavericks! Thanks for linking up. Here are the projects from last week that included FMQ, ruler work or walking foot quilting. 

Gretchen finished the largest of her quilts. It's a beauty called Dots & Dashes that she quilted-in-the-ditch.

Gretchen's  Dots & Dashes 

Kat from Scrapbox Quilts finished a UFO into a lovely dresser scarf. This was part of a FMQ whole cloth row by row designed by Jeanne Harrison in 2019. I checked out Jeanne's YouTube channel - there are a lot of gems there. Thank Kat for introducing me to Jeanne's work.

This whole cloth FMQ dresser scarf was designed by Jeanne Harrison and made by Kat

Details of the dresser scarf 
It's now your turn 😍

You are invited to the Inlinkz link party!

Click here to enter

Thursday, September 08, 2022

Wildflower Vest on Free Motion Mavericks

Welcome to week 398 of Free Motion Mavericks. I hope that you've had a chance to play this week. I did 😊 

Dynamic Wildflowers in Stitch Workshop

I've been wanting to free motion quilt (FMQ) the wildflowers in Jo Hill's July workshop on TextileArtist.org's Stitch Club. Since I wasn't up to tackling Version 2.0 this week, I thought that this would be a quick FMQ project - and it was!

The back of my Wildflower Vest

The first step was cutting up shaped for the flowers. I decided to use some bright batik scraps. You essentially cut up large circles for the large flower (red), some elongated triangles (green), cut up some strips (purple) and some small circles (light blue).

Placing the batik fabrics

After placing some Heat & Bond Ultra Hold at the back of the batik, I cut everything up and then placed these on the back of a old denim vest. I actually used the back of the red batik because it was a little less bright! 

After ironing these down, I used some regular black cotton thread for the FMQ. I did use a larger needle (a topstitch 100) and it went very well. I mostly followed Jo's sample to piece and quilt the flowers. I wanted to see how it would turn out before I started experimenting.

Fun FMQ with black thread

I really love how the black thread looks against the batiks and the denim. I was thinking of adding either different coloured thread or embroidery but I think that I'll leave the back as is. I can always experiment with the front.

What I learned

  • Since I had the ultra hold of the Heat and Bond, I thought that I would try it on the denim. That was probably a good idea.
  • It was great to use some lovely batik scraps for this project. 
  • I might consider using a thicker thread next time - I have some nice stuff, somewhere...
  • I'm looking forward to FMQ the front of the vest. There is less space since there are pockets, but the long vertical space could be cool!😎
  • I've also been thinking about other jackets and such that I could use this technique with. That would be a lot of fun!
  • If you like this style, check out Jo Hill's website (see below). She has really lovely work. She also offers some FMQ courses online that look interesting. She is a great teacher.

Related links

Linking parties

I'll be linking up to many fun linking parties. Why not check them out, after you've linked up your project below! Midweek Makers, Put your foot down, Needle & Thread ThursdayTGIFFPeacock PartyOff The Wall Friday, Finished or Not Finished Friday, Patchwork & QuiltsOh Scrap!, Monday Making, Design Wall Monday


Free Motion Mavericks

Did you see Sandra's lovely Grapefruit Pizzazz quilt last time? I so love those colours - they look good enough to eat!

Grapefruit Pizzazz quilt by Sandra at mmm quilts

It's now your turn!


You are invited to the Inlinkz link party!

Click here to enter

Sunday, February 13, 2022

Dresden neighborhood quilt class and project

I may have been relatively quiet on the social media front, but this time it's because I've been busy quilting 😊 I love being able to say that! Here's the latest class that I've taken.

Dresden Neighborhood Quilt Class

I've loved the Dresden Neighborhood Quilt since the first time that I saw it...but I also saw the word "Dresden" in there and figure that since I would rather not do needle-turn appliqué again, that this wasn't for me. However, after seeing a class offered through my local guild, I thought that it would be easier if I was sharing the pain with a virtual class. I was so thrilled when I learned that all of it was sewn by machine! 😊

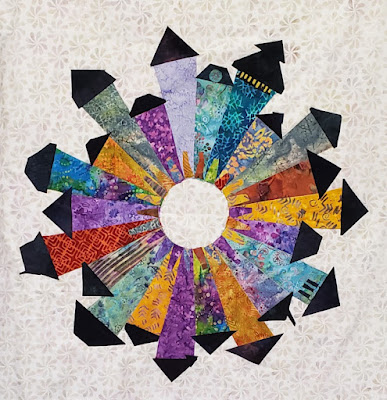
My Dresden Neighborhood quilt so far

Since I wasn't sure what fabrics to use, I googled "Dresden Neighborhood quilt" and looked at tons of pictures of these finished quilts. All of them are great, but I was drawn to a couple of them that I uploaded onto my phone to study them. The ones that I liked had strong colours with a light background. 

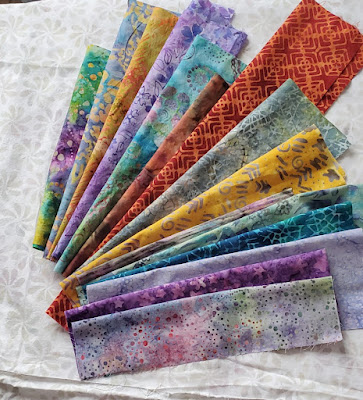
Since, of course, I wanted something funky, I used bright batiks that have a small range of colours on them. I used the very orange-on-orange and the gray-on-yellow batiks as my starting point. From there I added other colourful batiks. Many have purple and colours that are complimentary to orange and yellow.

Fabric choices

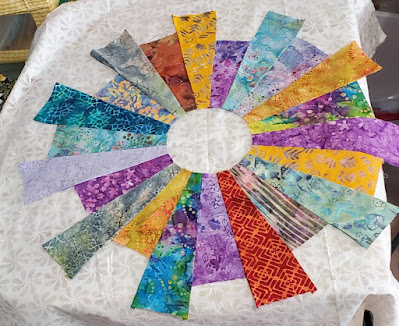
During the class, I cut out my house fabrics with a template. I'm not sure what happened but the template was not the size it should have been so I ended up needing 21 houses instead of the 20 from the pattern. When I sewed them together (I was so nervous!), I thought that I would have to do some major fudging to make it work, but finally I just added one more house (that's 22) to create a perfect circle....no fudging required 😊

Houses cut to different heights -
still 21 of them
Houses before cutting
 and sewing


After sewing them together and adding one more house, it was ready to be tacked onto the background.

22 houses sewn together

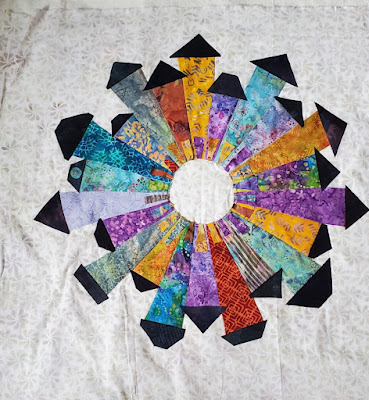
At this point, the class members had a discussion with our teacher, Michelle Banton of Little Pups Designs about whether to sew the pieces on or to quilt them on, that is to add the batting and backing right away before doing more than tacking the houses to the background. I opted to add the batting right away, so I sandwiched it and started quilting as I sewed things on. 

After making the houses, the fiddly but fun part starts - finding the perfect combination of fabrics for the rooves, doors, windows and whatever else is to be added 😊 I used some scraps of very dark hand-dyed fabrics that a friend gave me to make all of the rooves. The doors are all made of the same fabrics as the houses.

Adding roofs and doors to the 22 houses

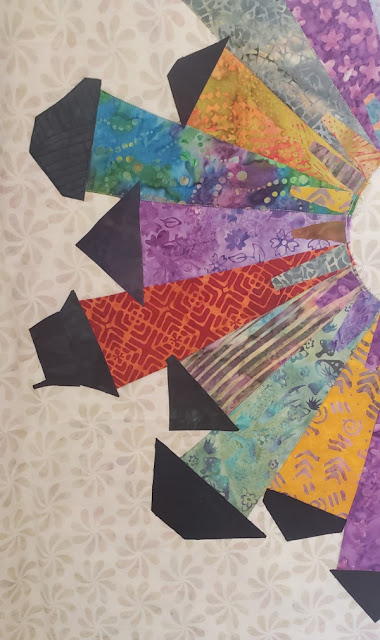
I made some slightly more elaborate rooves and started adding things such as awnings and windows. 

More elaborate rooves with other fun features

FMQ around the houses and some of the rooves

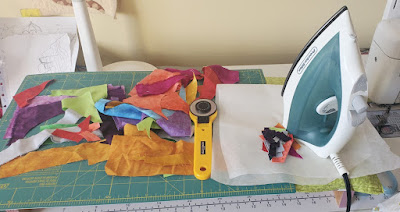
I've added adhesive bonding web to more hand-dyed fabrics to add the windows, etc. I haven't had the iron out for ages before the last two projects. With my mini ironing platform and small cutting mat, I can iron and cut small pieces anywhere in the studio.

Adding adhesive bonding web to the fabric scraps

What I learned

  • If I left the FMQ to the end, I know that I have too many other projects right now and would only finish it in a few months.
  • My other Dresden needle-turn
    appliquΓ© project
    Another incentive to get this mostly done is that our teacher holds a quick show and tell two or three weeks after the class so that we can share our progress. Since it's on Zoom, I will be receiving all of the participant's pictures of their project and arranging them in PowerPoint. It really is the best and easiest way to see them virtually. 
  • I've made this project larger than I usually do so that I can hang it up in our entrance. I can't wait to see it up there all finished!
  • FYI, the quilt here is my first (and last?) Dresden needle-turn appliquΓ© project.
  • It just occurred to me that there must be a way to make the Dresden shape using a technique like English Paper Piecing. I think that it would make it easier to stitch down....I'll have to check that out! 

Related links

Linking parties

I will be linking up to many fun linking parties this week. Why not check them out? Patchwork & AppliquΓ©, Oh Scrap!, Put your foot down, Off the Wall Friday, Peacock Party, Design Wall Monday, Monday Making, Free Motion Mavericks with Muv, Midweek Makers