Thursday, September 28, 2023

A Scrappy Improv Runner Reveal at Free Motion Mavericks

Welcome to week 449 of Free Motion Mavericks. Today is the reveal of the happy, scrappy improv runner that I made for my brother. It was a lovely party and he really liked his new runner. ๐Ÿ˜Š

Happy, scrappy improv runner


I really enjoyed making this improv runner. Since I have tons of scraps, I chose to use colourful geometric fabrics. I was gifted many of these scraps and added others from my stash. 

Happy, scrappy improv runner

Since the colour for this month's 2023 ABC (Table) Scraps Challenge is aqua, I decided to add bits of aqua to the runner. The thread I used to FMQ the runner is aqua, and there are beautiful aqua dots in the binding fabric. This month's letters are P and Z, perfect since this is Paul's runner and my machine zoomed through the FMQ gentle curve design. 

Challenge


Have you ever trimmed your quilted sandwich to discover that you're missing a sliver of fabric on one edge that is wider than a ¼ ", but that you don't want to trim your whole project? I have to admit that this has often happened to me (remember, I am accuracy challenged!) ๐Ÿ˜Š 

This is what the quilted runner looked like. There is a sliver of fabric missing on the right edge, and it's larger than ¼ ", so it won't be covered by the binding. This time, instead of trimming the runner again, I decided to add more fabric to cover that area.

Missing a sliver of fabric on the edge

I sewed a couple of pieces of fabric together and attached it to the edge. It was the perfect solution, except that I used my stitching thread to attach it through the sandwich.... not great since it really showed up in the back, as you can see when I went to bind the runner.
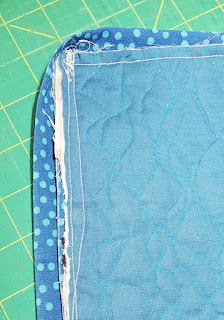
Gray sewing thread shows at the back! 

Here is what the front looked like after I attached that extra sliver. Because this is a scrappy quilt, it looks fine. Once I finished binding the runner, I added one more line of FMQ on the edge with my aqua thread. It looks great!

New sliver of fabric attached to the runner

So, what about that gray line of stitching on the back? Well, don't tell the quilting police, but I used a fine blue Sharpie marker to cover it. It's not the exact colour but doesn't show unless you really look.

Here are some glam photos of the runner ๐Ÿ˜€

Happy, scrappy improv runner - it's so cute
that I may have to make myself one!

Happy, scrappy improv runner 

Here is the lovely runner with my scrappy placemats.

What I learned
  • I'm really happy that I solved my challenge without further trimming the runner.
  • I should have realized that I needed to use aqua thread to sew through the sandwich to add the sliver - but the marker worked fine to conceal it. It really is a matter of thinking through all of the consequences of doing something.๐Ÿ˜”
  • I did have a hard time with the binding. I sewed it by machine but it would have taken much less time if I had stitched it by hand. The solution to this is simple - I need to find a good tutorial to teach me how to attach binding by machine. Winging it just doesn't cut it in this instance. 
  • Since I have a membership to Craftsy and keep forgetting about it, I'll be taking the Finishing School: Edges and Bindings class with Mimi Dietrich. I'll let you know, hopefully when I finish next month's scrappy project, how well it went!
  • I'll be finishing the t-shirt quilt top by Friday, so that I can join up with the September One Monthly Goal link up. It will be a separate post, so please watch for it!
Related links
Linking parties
I'll be linking up to many fun linking parties. Let's see what's going on out there, and remember to link up below. 2023 ABC (Table) Scraps Challenge, Design Wall MondayMidweek Makers, Put your foot down, Needle & Thread Thursday, Finished (or Not) Friday, Peacock Party, TGIFF, Beauties PageantPatchwork & Quilts, Oh Scrap!, Sew & TellDrEAMi,  

The runner was featured on Put your foot down. Thanks Denise!

Free Motion Mavericks

Last week Quilting Gail made a lovely zipper pouch using some beautiful Shweshwe fabric. She also did a little bit of FMQ on some of her doggie bags...too cute! 

Gail used beautiful Shweshwe fabric to make this zipper pouch

Fun doggie bags made by Gail for
It's a Dog's Life Blog Hop


It's now your turn!

You are invited to the Inlinkz link party!

Click here to enter

Thursday, September 21, 2023

Secret FMQ and T-shirt Quilt Update on Free Motion Mavericks

Hi and welcome to week 448 of the Free Motion Mavericks' linking party. I hope that you've had a good creative week with time at your sewing machine or studio! I've been busy making a runner that I'll be able to reveal next week. I can share the back since it won't give away much and you can see the free motion quilting (FMQ).

Making a runner


My brother is having a birthday/house warming party so I asked him if he wanted a small quilted project. He said that he could use a runner, 30" x 8", so that's what I'm making. The front is a scrappy, happy, improv quilt. 

FMQ back 

FMQ wavy intersecting lines
I'm surprised that it's not obvious from the back that these are wavy intersecting lines. It's pretty obvious from the front, but it is an interesting pattern from the back.

There are a few horizontal lines where I stitched in-the-ditch to stabilize the quilt before FMQ the vertical wavy lines.

There is also another horizontal line where I joined the fabric (the line that is not straight!๐Ÿ˜ฒ)

Since the front was going to be scrappy, I checked the Joyful Quilter's website for the September colours and letters for the 2023 ABC (Table) Scraps Challenge. The September colours are aqua and the letters are P and Z.

When I looked online for a colour wheel, I found that teal is related to aqua and is a darker version of it. So I used aqua thread to FMQ the runner. Since the front includes quite a few colours, it could have been FMQ with a number of colours but the aqua thread looks good. You'll have to take my word for it until next week ๐Ÿ˜Š


T-shirt Quilt Update


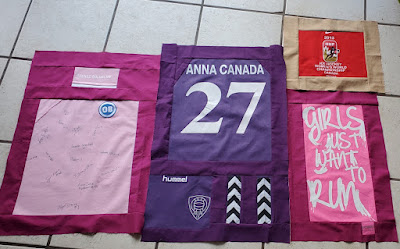
My numbers aren't adding up but it looks like I have 11 t-shirt blocks done and 13 left to go. I arranged the completed ones on my bed today, and this is what it gave me. Now I have to figure out how big (more or less) the quilt will be and work from there.

Some of the t-shirt blocks so far

About half of the t-shirt blocks

I'll see if I have enough blocks of the same width, and try to put these into rows or columns. I'm finding it all a little over whelming, especially since I don't really have a wall or floor big enough to place them all.

What I learned
  • As I'm preparing this post, I can see that it's not going to be easy putting this quilt together. I like puzzles, but I prefer them smaller than my entire family room space ๐Ÿ˜Š
  • Many of the remaining t-shirts have white backgrounds, so I'll be able to choose the border colours based on the blocks that will go next to them.
  • I'm going to try to keep math out of this, but doing research, a queen size quilt can be anywhere between 84" to 90" wide, and 90" to 105" wide! I guess that's a lot of leeway. 
  • Of course I didn't write in my posts how big my first t-shirt quilt was, or even how big Version 2.0 was. I'm sure that I have notes...somewhere!
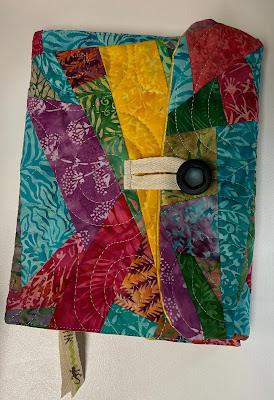
  • Except for a cool Dragon Scale binding notebook for my daughter, a few hexies to get caught up with the #100hexies100days challenge and the binding on my brother's runner, I am not letting myself play with any other project until this one is put together (by Sept 30) and then quilted (the next week)!!! 
Related links
Linking parties

Free Motion Mavericks


Donnalee had great success quilting her monster! It was the largest quilt done one her Bernina 750Q. She also tackled some placemats and a runner made with panels from Connecting Threads. Way to go!

Donnalee's monster - quilted and done!

Donnalee's placemats


Donnalee's runner


Gail managed to finish and FMQ 2 wonderful quilts. I've used the images from her original post so that you can admire her FMQ!

Let's admire the lovely texture on Gail's quilts!

It's now your turn!
You are invited to the Inlinkz link party!

Click here to enter

Friday, September 15, 2023

Slow stitching to create Ephemera 1

I've spend a lot of time playing this summer. For some projects I followed the instructions closely, while for others, anything goes! Here's one of the latter. ๐Ÿ˜€ 

Experimental embroidered world


In a new workshop with TextileArtist.org's stitch club, Elnaz Yazdani taught us how to make experimental embroidered worlds. The 3D embroidery is created on a hoop and uses all kinds of non-traditional items. It's one of the few workshops that I watched as soon as it came out and then dove right in. I guess that I was in a creative, whimsical mood! ๐Ÿ˜Š 

Ephemera 1 - oh what fun it was to create ๐Ÿ˜

My Ephemera 1 piece is quite different from those of Elnaz. If you're intrigued, you can check out her website, Instagram or the article in Related links below. I think that Ephemera 1 reflects my experience as a quilter and embroiderer. There is a lot of appliquรฉ in the background that is then embellished. 

Another view of Ephemera 1

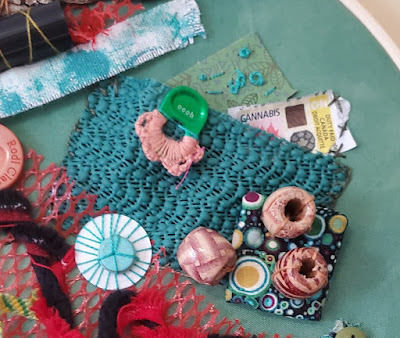
For the appliquรฉ, I used pieces of fabric, a mesh bag (possibly holding onions), and a piece of non-slip fabric that I know some quilters use under their machine foot to stop it from sliding. Here are a few close-ups.

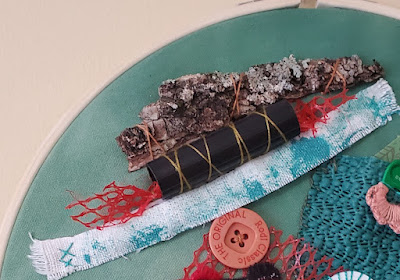
I started the piece by appliquรฉing the mesh to the green hand-dyed fabric background. Then, an edge piece of buffalo red & black plaid flannel was wrapped around a black cord. The cord came from an old jacket that could be tightened at the bottom. The clasp to keep it closed is still attached to the end of the cord, at the bottom of the hoop.

To add some height, I twisted three of my niece's hand-woven bracelets and attached them to the piece. I then stitched on some fun buttons which also come from my niece's bracelet making supplies that I inherited this summer. Isn't that a great collaboration? (Thanks Anna!)

Adding couched cord/fabric, twisted bracelets
and lots of buttons

I created a pocket with that piece of non-slipping fabric with a few things in it. At the corner is a fabric-covered piece of foam to add height, with large beads attached to it. I have added a green can tab that is embroidered with perle cotton. Isn't it cute?   
A pocket, beads and an embroidered can tab

On the right side of the piece, an appliquรฉd fabric is covered with buttons.


The top of the piece needed a little something, so along with a piece of painted fabric and a doggie poop bag roll stuffed with the mesh, I added a piece of nature among all of this manufactured and created stuff. 

Finished off with a little bit of nature among all the stuff

On the left, another fabric appliquรฉ. The can tab has a bead suspended from it.

A bead is suspended from the can tab
through a chain stitched cord.

Here is a side views to see the various heights within the piece.

View from the side

I've now finished Ephemera 1 (except for the label) using the method that our instructor suggested. I did, however, add a piece of felt on the back, before tightening the fabric. 

Finishing the hoop

I had so much fun with this project that I decided to make another one. However, this one is a little more subdued and serene ๐Ÿ˜Š I still haven't figured out what else I want to add, other than more beads. I'll write a post and give you more details once it's done.

Purple Delight - in progress

What I learned
  • I've been wanting to make an art piece with all kinds of mundane everyday items such as doggy poop bag rolls, can tabs, mesh and other things that we take for granted. This was my chance and I embraced it๐Ÿ˜
  • I have a few containers where I keep a lot of this stuff. It was so much fun digging into it to see what I could use and how to showcase them.
  • It would be really cool to do another piece but with all natural elements - I'm still thinking that one through.
  • The second piece is a little more "sophisticated" but I still want to add a few surprises to it. The item on the bottom is the top of a champagne bottle. It's been embroidered and then covered with fabric and beads. Really!!!
  • I'm so happy to be "collaborating" with my niece on this, even if she doesn't know it yet. I have so many of her bracelets that I want to use in my art. I also have a few of my daughter's that I'll be using at some point too.
  • The definition of ephemera: noun - things that exist or are used or enjoyed for only a short time such as "there were papers, letters, old boxes—all sorts of ephemera"
    • items of collectible memorabilia, typically written or printed ones, that were originally expected to have only short-term usefulness or popularity. such as "Mickey Mouse ephemera" Google search: meaning of ephemera Dictionary - Definitions from Oxford Languages 

Related links

Linking parties
I'll be linking up to many fun linking parties. Why not check them out? Put your foot downCan I Get A Whoop Whoop?Peacock PartyPatchwork & Appliquรฉ, Off The Wall Friday, Sew & Tell, Slow Sunday Stitching


Project Details


Ephemera 1
Size: 10" hoop
Material: fabric, plastic mesh, plastic roll, can tabs, beads, buttons, embroidery thread, hand-made woven bracelets, stitching on cardboard and paper, tree bark
Techniques: embroidery, couching


Wednesday, September 13, 2023

Update on T-shirt quilt at Free Motion Mavericks

Welcome to week 447 of Free Motion Mavericks. I've started putting together the t-shirt quilt. After doing all of the prep work, I'm finally having fun putting these t-shirts together. A couple more weeks and there'll be some free motion quilting (FMQ) happening. ๐Ÿ˜Š

4 T-shirt blocks made


It's been a slow start. In May, I went through all of the t-shirts and started cutting. My May and June One Monthly Goals (OMG) were to have the t-shirts cut and the fusible interfacing ironed to the back. That didn't happen until a few days ago. 

Anna's Quilt - blocks 1 to 4 

On the weekend, I added the interfacing to all of the t-shirts. It was a long and tedious job, but I was well organised (see What I learned), so it went quite smoothly. This morning, I decided that it was the day!!!  No more procrastination. ๐Ÿ˜

Anna's t-shirts

T-shirts getting prepped

This spring, I bought some dark teal Kona solid to use for the quilt. This morning, as I lay the t-shirts down on the fabric, I realised that it wasn't a great colour choice. I went through my Kona stash and found quite a few darker colours that would be much better suited. The Kona fabric used will depend on the t-shirt's colour. I don't have a lot of some colours, but I had enough of the dark pink for my first two blocks.

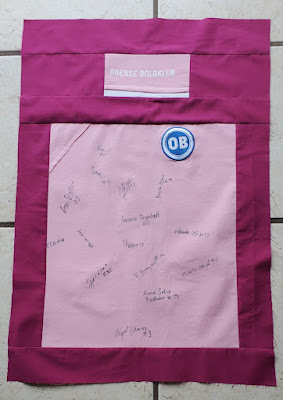
First block - a signed t-shirt and
the sleeve with the team name

Next I made the second dark pink block. This t-shirt includes the store's logo in the bottom sashing. I used a brown Kona for the next block - it matches the background in the decal.

Second and third block -
with different coloured sashing

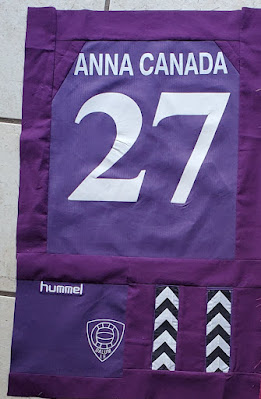
This fourth block was interesting. I had to cut around the sleeves, so I ended up adding some fabric in the top corners. They're not the same but it looks fine. The front of the t-shirt in at the bottom and then the shoulder patches are attached next to that. I did forget to add sashing to the front piece at the bottom, so I'll have to figure that out when I attach the t-shirts together.

Fourth block includes the front,
back and sleeve patches.

With 4 t-shirts block done, I have 9 more trimmed blocks to add borders to. Most of these are very straight forward. After that, I have 10 more t-shirts that I could trim down if I need to make them fit with the others. This is where I'll have to figure out the layout of the quilt. I'll be doing these last and I can add borders/sashing as required to make things fit.

All of these will be done by the end of September, so in 17 days. That means an average of 2 blocks per day with a week or so to put everything together. When broken down, it seems quite reasonable. ๐Ÿ˜“

What I learned
  • I really don't like prepping anything, but I knew that already ๐Ÿ˜
  • For the fusible interfacing, I bought a package of Stabili-tee from Connecting Threads. The package contains a 60" x 72" piece of fusible interfacing. This will probably be enough, although I do have some other t-shirt stabilizer from my previous projects. This product is wonderful and I highly recommend it.
  • To make the prepping of the t-shirts a little easier, I first cut all of the t-shirts and figured out what to use on the quilt.
  • After cutting a few of the t-shirts, I figured out that I might want to keep more fabric on the t-shirt and cut away any excess later. It's so hard to tell if I'll have enough t-shirts for a queen sized quilt.
  • Once the t-shirts were roughly cut with scissors, I went back with my rotary cutter and evened everything out.
  • When I started adding the fusible interfacing, I cut a couple of pieces of interfacing and then ironed them on. This proved to be rather inefficient.
  • I decided to cut all of the interfacing to roughly the size of the t-shirts and then lay the t-shirt and interfacing aside in a pile. 
  • This weekend I ironed all of the interfacing to the t-shirts in a few very sweaty sessions. Rough but finally done!
  • I've decided to use a variety of Kona solids for a 2" sashing. 
  • I'll have to decide what to do when I start piecing them together, but for now, I'm concentrating on the t-shirts that can't be trimmed further. They'll get an all-round border that can always be trimmed down. I have 9 more of those to do. 
  • After these, there are 10 more t-shirts that can be trimmed, as well as a few odd and ends. I'll prepare these as I figure out the layout.
Related links
  • Stabili-tee from Connecting Threads
  • I've made two t-shirt quilts to date. Here are the links:
  • Planning 2019 and finishing Charlotte's quilt, December 31, 2018
Linking parties


Free Motion Mavericks

Melva worked on a couple of pieces. The first one is a cover for her husband's table and was quilted with diamond grids. The second one is the beginning of a feather.

Melva's table topper quilted in a diamond grid

The back of the fabric - Melva FMQ a feather
It's now your turn!

You are invited to the Inlinkz link party!

Click here to enter

Wednesday, September 06, 2023

Scrappy Yellow Placemat on Free Motion Mavericks

Welcome to week 446 of Free Motion Mavericks. I published this a little early so that I can make the September 6th deadline for the Joyful Quilter's August Table Scraps Challenge. Nothing like racing the clock to publish. Thanks again Joyful for this great challenge.

Scrappy Yellow Placemat


August's colour is yellow which is perfect for the second placemat that I will make. This one is for my daughter, who requested yellow. The letters are X and O, which I will add to the free motion quilting (FMQ). If the verb tenses are a little wonky in this post, it's because I'm writing this post as I finish the placemat. ๐Ÿ˜Š

Yellow Placemat

I started last week with that I thought was a pile of yellow scraps. It turns out that there were only 3 yellow fabrics in that pile - so I went back to my scrappy bins.

Bins of scraps at the top of my shelves

I had lots of yellow to choose from, but to give it some interest, I wanted other colours. My daughter said that she likes gray and yellow, so I added some of that. I even had some fabric with circles, so that's good for the "0".

The improv pieced placemat ready to be quilted

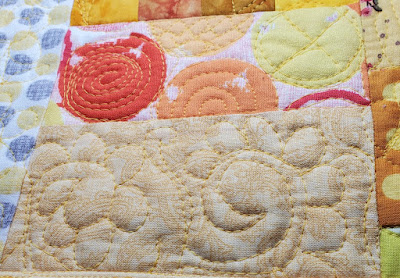
I had so much fun FMQ it. I started with meandering flowers, a feather and then let some of the fabric tell me how to quilt it. I quilted 4 lovely flowers in the two yellow blocks under the gray strip. The image below is as good as it gets.

4 FMQ flowers

The quilted placemat, before the binding

Details of the FMQ - the Sun

FMQ meandering flowers and above that, "O" and "X"

FMQ a feather and other random designs

We now have 2 scrappy placemats at the table - the blue one is mine (made in June) and the yellow is my daughter's. I guess that I could have put more effort into the display, but I am tired and ready for it to be done....besides I had to make supper!

Two scrappy placemats ✔

What I learned
  • I'll be publishing this post with roughly an hour to spare. That's what happens when I'm tired, procrastinating and hiding in my books!
  • I was just thrilled when I checked the challenge's deadline on Aug 31. I had almost a whole week to procrastinate get it done!
  • The piecing and the FMQ went really well. My only problem was with the binding.
  • I'm sure that you've heard that you can't have the binding seam on one of the corners. Usually, when I see that I'm going to have a seam at the corner, I catch it early enough and cut the binding to ensure that the seam comes before the corner. Well, I was tired and frankly wasn't sure if that was a guideline or a rule. I can now tell you that it's a rule! That seam made for a very messy corner.
  • I also struggled with joining the binding edges at the end. I'll blame that on being tired and impatient! It's ok - better done than perfect....and it still looks great on the table. 
  • I can't wait to wash it - the quilting will become all puffy and perfect. ๐Ÿ˜Š

September's One Monthly Goal (OMG)


The crunch is on! That famous t-shirt quilt needs to be pieced together into a quilt top by the end of September. It will happen! 

Prepped t-shirts for the quilt

I have about half of the t-shirts backed with the fusible web while I have the webbing cut for the other half. A couple of hours with the iron and that will all be done. Then comes the fun part...putting it together ๐Ÿ˜Š

Related links
Linking parties
I'll be linking up to Joyful Quilter's August Table Scraps Challenge, September's One Monthly Goal, Midweek Makers, Design Wall Monday, Sew & Tell, Put your foot down, Needle & Thread Thursday, Off The Wall Friday, Finished (or Not) Friday, Beauties Pageant, Peacock Party, TGIFF, Patchwork & Quilts, Tips & Tutorials on the 22nd


Free Motion Mavericks

Thank you everyone who has linked up to the party. ๐Ÿ˜Š

Last week DonnaLee finished 18 table toppers for her guild's quilt show boutique shop. What a great way to use up fall, Christmas and Hanukkah fabrics. They are lovely.

DonnaLee's table toppers

 In August, Quilting Gail got 4 great projects done. Here is her composition cover. What a lovely, scrappy, colourful piece!

Quilting Gail's Composition Cover

Margo Yang of MY Quilts and Crafts, FMQ a lovely modern baby quilt on a longarm. It was more challenging than she expected, but she did a great job! Now she has a reason to make more quilt tops...practice!

Margo Yang FMQ modern baby quilt on a longarm

 It's now your turn!

You are invited to the Inlinkz link party!

Click here to enter