Showing posts with label embellishment. Show all posts

Thursday, July 27, 2023

Cottage escape on Free Motion Mavericks

Hi and welcome to week 441 of Free Motion Mavericks. I hope that your summer is going well. It seems to zoom right by, doesn't it? This week I have a couple of things to share with you - including some oldies but goodies! 

Cutwork and Broderie Anglaise


My daughter and I went for an overnight trip to my brother's cottage. We had the place to ourselves and had a lovely, relaxing change of scenery. Of course I brought supplies to keep working on my whitework. I just can't seem to leave it 😊 I added some cutwork to my original sampler.

Cutwork added to the Whitework sampler

The closeup photo is very revealing. I started working with beige perle cotton since I couldn't see the white on white well, even with a strong lamp. Photos from afar are forgiving!

Photo of the sampler outside

I also did a little sample of Cloth Stitch - this looks a bit like lace and covers an entire hole cut out of the fabric. It was lovely and simple enough to make, however the sampler looks much better in this image than the finished one. When I went back to this the next morning, my stitches were much looser and I messed up the finishing of it. I'll have to try this again, but in one sitting!

Cloth Stitch sample in the making

Meditation Stitching 


In my Meditation Stitching Journal, I've been making small meditation pieces to commemorate specific events. Sometimes it's abstract but it can also depict something specific. Last November I attended a Jann Arden concert that was also the annual National Arts Centre (NAC) Gala. We had amazing tickets and I've been wanting to make a meditation piece about it. I finally took the time at the cottage. 

Remembering the NAC Gala

I used the logo from the top of the program and added some glittery and rich textiles and ribbon, just like Jann's dress!. The funny looking pink piece is a flute of bubbly pink drink that was served 😋.


Gala meditation piece with a view from the cottage

Quilts at the cottage


Finally, here are a few quilty gems that are in the cottage.

I finished this quilt in August 2013. It went to Denmark, came back, and is now at the cottage. It was FMQ with a square within a square. It also had a great backing that you can see if you go to the original post (see Related links) 

A very scrappy quilt!

This is a wall hanging that is now a runner. It was made in 2017 for my niece. For the FMQ on white fabric, I had to quilt it from the back, since I couldn't see anything from the front's white on white. It is very heavily FMQ with wild quilting. You can see the details in the original post.

Black and white wall hanging

This next piece is a wall hanging that I made for my brother for the cottage. It's a panel that I FMQ. If you want to see the difference that the FMQ made, check out the original post. 

FMQ moose panel

This is a quilt that my mother made for my brother. This flying geese quilt has been around for a very long time and still looks good!

One of my mother's quilts

I made these tab top curtains for my niece a couple of years ago. Don't they looks great?! 😁

Tab top curtains in
buffalo red & black plaid flannel

What I learned
  • The cutwork and broderie anglaise were very interesting to do, and like most skills, would require a lot of time to get good at.
  • When making the Cloth Stitch, tension is very important...so is reading the instructions properly to finish it off!
  • I'm not sure that I will keep working on cutwork and broderie anglaise. It was great to try and see how it's made, but would require a lot of practice. I think that just playing with whitework on burlap will probably be best for me at this time.
  • It was so nice to chill out at the cottage. It was also great to see some of my earlier work! I hope that you enjoy them, and their original links!

Related links
  • Whitework sampler
  • Quilts at the cottage
    • Procrastination Over - Quilt on its Way to Denmark, August 08, 2013 
    • White and Black Wall hanging: Learning QAL - October Goal Setting Link-up, October 01, 2017
    • FMQ moose panel finished, October 09, 2020
    • Tab top curtains in buffalo red & black plaid flannel: September OMG done, September 29, 2020

Linking parties

Free Motion Mavericks


Quilting Gail participated in the Sew It - Show It Picnic Party Blog Hop by making a lovely picnic bag. She had to design it herself since she wanted it tall enough to fit a thermos. That's a colourful and useful bag!

Gail's picnic bag that's big enough to hold a thermos

It's now your turn!

You are invited to the Inlinkz link party!

Click here to enter

Tuesday, February 14, 2023

So many projects on the go!

Welcome! Have you ever felt like your quilting life is out of control? Since finishing Version 2.0 I have been working on more and more projects. Some are classes, others are my usual TextileArtist.org workshops and then there are those squirrel projects from who knows where. 😃

2023 Stitch Camp


This year's Stitch Camp at TextileArtist.org was a revised version of the Gwen Hadley workshop from June 2021. Since I hadn't done the original workshop, I thought that I would give this version a go. TextileArtist.org does an amazing job with their workshop and Gwen Hadley is very popular. I just hadn't participated because I had tons of other projects on the go and it involved paint. I am getting more comfortable mark making with paint but it's not my favourite thing to do. I do like how it came out.

First cloth is heavily marked

The first cloth is heavily marked, half in one colour and the other half in the second colour. We added little bits of the "other" colour in each half. I used many tools for mark making, including the bottom of a plastic insert from an assorted box of crackers.  

Second cloth has more background showing

We used the same colours for the second cloth but applied the paint marks sparingly. I used many of the same tools but added a plastic fork as well as the end of a swimming noodle. For both pieces I used Pebeo Setacolor  - a shimmer opaque turquoise and a glitter tourmaline (purple/fuchsia). I figured that they would play nice together 😊

The next step is to cut these two cloths up and join then back together with stitches, appliqué, etc. The suggested project is to stitch together a long narrow band such as a snippet roll. For this project, I would rather make an art piece that I can attach to a canvas frame. 

Starting to put some stitches in to blend the pieces

I've put everything together (i.e. fabric, yarn, thread, etc.) to work on the project. This is the best way that I've found to keep ongoing projects. Every once in a while, if I find something that could be used for the project, I just add it to the bag.

My project so far.


Rocks, Pebbles & Stones, Oh My!


The Rocks, Pebbles & Stones, Oh My! workshop was taught by Ana Buzzalino, through the Craft Napa 2023 Uncorked at home (virtual). When I saw the images for the course, with those rocks attached to her art quilt, I was hooked.

Ana is a great teacher and her work is wonderful. We learned 3 techniques for making and attaching rocks to our work. The first is to use the background fabric to make the rock, sort of like trapunto. For me this was the easiest technique to use.  

My project so far

I found an amazing piece of painted fabric in my stash. In the picture above I've covered the top sections with different blue fabric since I want it to be more of a water and beach scene. 

Here are some of the photos of my trapunto-like process of making rocks and pebbles. For this technique, it was easiest to work with the padding and background fabric within an embroidery hoop, underneath the top fabric.

Adding the batting over the back

Stitching the first rock

Keeping the fabric as tight as possible and having as little gathering fabric as possible was difficult. To hide these pleats, I'll be adding beads after the rocks are finished. This covers up the pleats, looks like sand and gives a wonderful effect.

Pinning the fabric to stitch a second pebble

Three rocks or pebbles imbedded within the piece

We learned two other methods of making rocks or pebbles. The first is to create a flat stone using a cardboard  template while the other used more batting and stiff interfacing. These can then be attached by appliqué to the piece. Again the most difficult part is getting rid of pleats because rocks don't generally have them 😁

A collection of stones on a partly FMQ background


Card featuring a Meditation block


A couple of weeks ago I needed to send a card. Since I have lots of blank cards and envelopes in my stash, I though that it might be the time to see what I could make.

Hand-made card using a Meditation block

I attached my favourite meditation block with natural elements to make the card. I stitched the corners of the block into the paper to attach it. I really like how it turned out. This is a great way to use meditation blocks.

Card with natural elements


What I learned

Stitch Camp
  • I enjoyed the mark-making process in Gwen Hadley's workshop. 
  • There was also no pressure to make it look great since it would be cut up.
  • When cutting the fabric, I was nervous because the fabric's weave is quite open. I think that the paint kept it from fraying too much. Besides, I'm sure that I'll be adding some frayed bits for effect!😊
  • A week was not enough for me to get this workshop done but then I always take it further, and of course having all of these projects on the go isn't helping. 
  • I've arranged all of the materials in a lovely bag that I can grab at any time. This one is coming with me on holidays. I just need to ensure that I have some good contrasting thread and material so that things don't all blend into a puddle!
Rocks, Pebbles and Stones
  • The first thing that I learned is that I need to read course descriptions better before signing up! When I saw the images of Ana Buzzalino's art pieces, I had no idea that the stones were made of fabric - they are that good! So, I though that I was going to learn to attach stones to art quilts, not make the stones! 😁
  • I'm not sorry that I took the course. I did learn new techniques and the teacher was terrific, but it's going to require a lot of practice before my stones look like the real thing.
  • I'm not sure what I want to do as a finished piece. I will be adding shells and driftwood with embroidery, like I did in the Embroidered Seascape workshop (see link below). That would be very cool, but I'm not quite ready to tackle that yet. One day inspiration will crash into my consciousness!
Card featuring Meditation blocks
  • I'll be making more of these and playing with that concept!
  • I'm not sure how the card survived the postal service - I hope that the recipient didn't end up with a bunch of crumbled bits at the bottom of the envelope. I'll have to work on that if they are going to be mailed!

Related links
Linking parties


Project details


Card with Meditation block - Natural Elements
Meditation block made based on Claire de Waard's workshop
Card size: 5" x 6⅞"
Material: Meditation block made with fabric, sari yarn, painted fabric, thread, yarn and leaves and onion skins glued to paper; card is ivory with deckle on acid free paper
Techniques: embroidery and stitching


Thursday, January 26, 2023

Going somewhere is Finished on Free Motion Mavericks

Welcome to week 417 of Free Motion Mavericks! I hope that you've had a chance to play since I last posted. When I began this piece, I had no idea that it would end up being free motion quilted (FMQ). I think that the FMQ added a lot to it. I'll let you judge this for yourself.

"Going somewhere..."


This piece began, as many of them do, with a workshop on TextileArtists.org. I haven't had time to do as many workshops as I would like, but this one grabbed my attention. It took me a while to start, but once I did, I couldn't leave it! 😊

Going somewhere... original orientation

Going somewhere... is upside down better?

It all started with a fat quarter of Kona "School Bus" and some lovely hand-dyed orange-pink fabrics by Elaine Quehl. I also took out my stash of translucent fabric scraps. The workshop, Stitching in the Round, was created by April Sproule. She provided a template of a spiral, but of course, I had to make my own! 😁 

Following April Sproule's Further Development video, I created my own template of two connected spirals. To work, the spirals needed obvious negative and positive spaces. I coloured in the negative space and added a couple of extra starting and finishing points to create some interest and clear paths to follow. 

Creating my own spiral template

I transferred the template to my fabric and started playing. I asked April how she decided where to put the extra fabrics onto her background. She mentioned focal point and colour, but since I was just starting, I wasn't sure what I was doing, so I just added different sheer fabrics in 5 areas, mostly below and to the side, but with one stripe in the middle. Connecting some of that background fabric with the spiral creates unity, so that's what I did on the left side. I had lots of empty space under the smaller spiral, so just create an interesting block underneath it. 

Starting to put it together.


That interesting block is one of my favourites and I stitched it early on.

An interesting block

At the beginning, I spent most of my time on the left side spiral and background. There was a lot of hand stitching! 

Very slowly stitching things up

I used some beautiful scraps of hand-dyed fabrics as well as sheer fabrics. I also varied my thread, although I tried to use each element a few times in the piece so that it would add consistency. This is what my final stitched piece looked like. I knew that I would have to do something with it - either add a lot of hand stitching around everything, or do some FMQ.

Finished attaching the appliqué

Free Motion Quilting (FMQ)


As  you can guess, FMQ won out! 😊It was soooo much fun 😁

FMQ finished - so how do I finish the actual piece?

You may have noticed in some of the pictures that at the top right corner and the bottom left corner, there were small chunks of fabric missing. My original intention was to trim the fabric, but of course I waited too long and wanted to keep the whole area. I covered these holes with matching fabric and all is good!

I didn't have any more Kona "School bus" fabric for the binding so I came up with (it turned out) a great idea! I used strips of one of the sheer fabrics (it's curtain fabric) to add interest at the top of the piece. Why not ruffles at the top? I based this down and then machine stitched it so that it would stay upright. I worked in sections to make sure that I liked it before continuing.
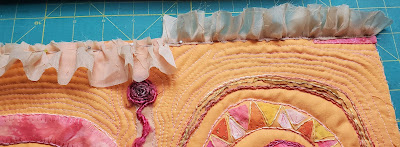
Making ruffles for the top

Adding ruffles was a lot of work and probably would have been too much all around the piece, so I used 1½" strips and attached these like regular binding. I am really happy with the result.😊 I thought that I was finished, but this morning I decided that it needed just a little more stitching. I added a chain stitch in a #12 perle cotton over the machine stitching of the ruffles. I also coiled up the bottom of that hanging sari yarn. 

Going somewhere.... when I thought that it was finished

Here are some of the details.

Embroidery and FMQ over very shiny sheer
with silk and hand-dyed cotton

Fancy tissue paper swirl
over silk


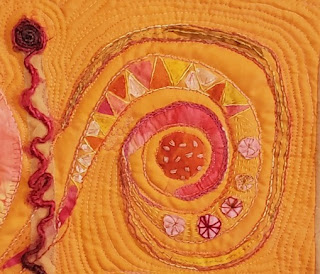
Spiral with embroidered hand-dyed
fabric pieces and snippets


Sari yarn coil, appliquéd triangles and circles
 with embroidery

Interesting block of sheer fabric (overlapped to makes it darker),
silk and hand-dyed cotton square with simple embroidery


What I learned
  • There was a lot of learning in the last couple of weeks as I worked on this piece.
  • The bottom, shiny sheer fabric had a very loose weave so I was glad to FMQ around and into it to add stability. My overcast appliqué stitch was shredding away.
  • I worked with some beautiful printed tissue paper that came in a lovely box of chocolates. I added the spiral on the left and used it in some of the triangles. It stitched up really well. I do want to experiment more with stitching on paper.
  • The circles of fabric on the smaller spiral were stitched down with blanket stitch circles. They came out very well.
  • It's not always easy to figure out when to stitch fabric down before you embroider it, or just to let the embroidery stitch it down. There was only one piece, near the centre of the small spiral that I could have stitched down before I edged it with chain stitches. The chain stitch didn't catch everything, but once it was embroidered, it was easy to stitch a few sections down with thread. This didn't show, so I'm not sure that stitching it down before the embroidery was necessary. 
  • I loved using sheer fabric for the binding. I will do this again!
  • April suggested that we use silk organza (not washed) as a stabilizer behind the piece. I usually use a very lightweight cotton but since I had some silk organza I tried it. It was really lovely to stitch on and did give it a nice stability to the piece. I'm not sure that it's better than my lightweight cotton but it's a great option.
  • I curled up the other end of the sari yarn because without it, it looked too much like sperm (not the effect that I was going for) 😲
  • In the end I'm happy with the sheer fabric that I added to the background. It's hard when you don't really have a plan, but I thought that the focal point would be the spirals.
  • Did I change the focal point when I added the coiled sari yarn, or the darker interesting block? I may have, but I hope that since everything is connected, either physically or though colour and fabric, that it's ok. 
  • I did want lots of movement, which I think I was successful in doing.
  • When I showed my daughter the finished piece, she suggested that I turn it around. I like it but it does change the focus. Do you have a preference? Let me know😊
Related links
Linking parties

Project details


Going somewhere....
Made based on a workshop with April Sproule
17¼" x 12½"
Materials: Kona cotton, sheer fabrics, sari yarn, hand-dyed fabrics, tissue paper, perle cotton and embroidery floss
Techniques: embroidery, FMQ, ruffles 
April Sproule


Free Motion Mavericks


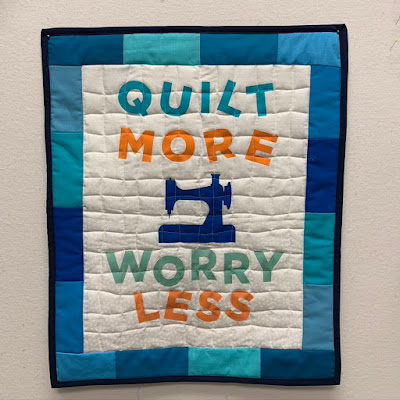
Gail from Quilting Gail finished her lovely "Quilt More Worry Less" hanging. If you didn't see it, you may want to check it out! She has also picked a centre block for her SAHRR quilt (Stitch at home round robin). You can see it here.  

"Quilt More Worry Less" hanging by Quilting Gail

It's now your turn 😊

You are invited to the Inlinkz link party!

Click here to enter

Saturday, May 28, 2022

Let Them Flourish is finished!

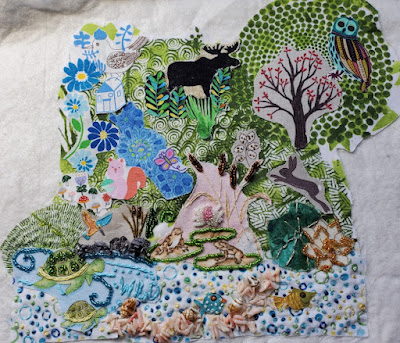
If you've been following me on Instagram, you've seen lots of images of the progress of this piece. Lately I've been adding a gazillion French Knots, finishing up the beading and then finally mounting it on a fabric-covered canvas.

Let Them Flourish - Ready for Exhibition

Let Them Flourish (aka Biodiversity)

In the Beginning

This piece started off as a fabric collage of images related to Biodiversity, the theme that was given to us as part of the February 2021 TextileArtist.org's Stitch Club workshop. Kate Tume, our instructor, had us exploring narrative potential with embellishment.

The beginning of Biodiversity (working title)

I attached the fabric pieces to batting using Heat n Bond Lite. From there I started stitching and beading. To say that it was slow going is a huge understatement. Again, not called slow stitching for nothing 😊.

Starting the embroidery and beading

At some point I got tired of its slow progress and wondered off to other projects. I came back to it during my #100dayschallenge on Instagram. I would say that the majority of it got done between March and May 2022. It also helped that I had a deadline approaching - the Conversations exhibition with Fibre 15 (see related links below).

Towards the Finish Line!

I love using my own hand-dyed perle cotton 💙

At one point I got bored and had an aha moment. I realised that I didn't have to embroider the images using the same colours that was on the fabric. Notice the house in the image below, which was printed in blue but covered in orange thread. I love that the blue peeks through. That was quite liberating! 😊

Adding different colours than those on the fabric

The green embroidered background around the moose took forever -
I was seeing swirls in my sleep!

I added a gazillion French knots around the tree. I knew by then that it would drive me crazy, so to keep it interesting, I used different shades of green and went roughly from light to dark.

So many French knots!!!

I was worried about the owl - I wanted to add beads but wasn't sure how much. I found out fairly quickly how much was "too much"! I was going to bead every other line but got mixed up and ended up beading all of the lines. It wasn't really bad but it made the owl the focal point, which is not what I wanted.

Too many beads....

Just the right amount of beads 😊
I used sewing thread to lightly embroider various parts of the owl. 

Finishing up!

Finishing up involved covering a 14" x 11" canvas with fabric and then attaching the piece to the canvas. I used Sulky's Invisible thread since it was clearer than the other kinds I have. I wasn't able to make a knot at the end of the thread, so I left a long tail and then after taking the next stitch, tied a knot at the back.

I just put in a few pins through the canvas to keep the piece from shifting as I was sewing it down. I stitched around the edges but also within the piece to keep it securely in place. It was easiest to stitch behind beads.
Attaching the piece to the canvas


Let Them Flourish

What I learned

  • I learned that this technique is called textile collage. This is probably my favourite technique of all times. I've used it a few times to make some of my favourite pieces. I'll include links to my favourite ones in Related links below.
  • I love being able to add bits and pieces of fabric to tell a story or show a moment in time. 
  • The hardest part is probably leaving reality behind since there is no way to keep the actual perspective real since the elements come in the size that they are on the fabric! I love that whimsical part of it.
  • I'm glad that I figured out that I don't have to use the same colour as the background image to embroider. It adds a different look when using a different colour and having the original fabric colour peek through.
  • I realised that I need to change things up to keep me interested. What's not to love about many shades of green instead of just using one?!
  • I really got to know my threads - there's nothing wrong with embroidering with regular sewing thread if you just want a small accent of colour and texture. 
  • A bonus is that the technique almost always needs the little bling of beads 😊
  • It's always a slow project, even if using FMQ but it's usually well worth making. I'm making myself finish this one before I start another one - it would be too easy to get sidetracked at this point!

Related links

Linking parties

I'll be linking up to many fun linking parties. Remember to visit Muv to link up to Free Motion Mavericks this week! Put your foot down, Off The Wall Friday, Finished or Not Finished Friday, Peacock Party, Beauties Pageant, TGIFF, Patchwork & Quilts, Oh Scrap!, Slow Sunday Stitching, 15 Minutes to Stitch 2022Monday Making, Design Wall MondayMay's Favorite Finish Monthly Linkup

Project details


    Let Them Flourish
    Workshop with Kate Tume through TextileArtist.org
    Attached to a 14" x 11" fabric-covered canvas
    Materials: commercial quilting cotton, beads, shells, 
    metallic, embroidery, sewing thread and perle cotton 
    Techniques: collage, embroidery, beading