Thursday, October 01, 2020

300 Posts Party at Free Motion Mavericks

Happy 300th to Free Motion Mavericks! 


What a special anniversary to be celebrating. Muv from Lizzie Lenard Vintage Sewing started Free 
300th Linking up Party
Motion Mavericks on Thursday, 5 June 2014, to fill the void after Leah Day stopped hosting her Free Motion Friday. I had a wonderful trip down memory lane going through all of the posts to get to the first, original Free Motion Mavericks post. 

I discovered the Free Motion Mavericks linking party in March of 2015, at Muv's 36th post. I was free motion quilting (FMQ) a wholecloth quilt based on one of Cindy Needham's courses on Craftsy (which I highly recommend - all links are in Related links below). I was thrilled that there was a place to link up and to see other quilter's FMQ. 

My first FMQ link-up to Free Motion Mavericks!


Original button


I've been linking up all of my FMQ with Muv since then, and when it got quiet and Muv opened it up to other projects, I was linking up even more. I know that it's difficult to host a specialty linking party because it's easy for bloggers to forget to link up their posts. 😊 

I started co-hosting Free Motion Mavericks in January 2019, at week 212. I was really excited to co-host since I had hosted a couple of specialty linking parties (Celebrate - Fêtons 150 and Learning Quilt-A-Long (QAL)) but I just didn't have the time or energy to host a linking party every week. In December 2018, Muv asked me to co-host - I was thrilled and the rest is history!


I had a great time making these new buttons. You can see Muv's free motion quilted rudbeckia in the background. I learned to FMQ rudbeckia through her videos. 


In this special party post, we are asking you to link up to 3 of your favourite FMQ projects. I can't wait to see them all. I'm going to show you a couple of mine and then it will be your turn!

Lone Tree 2 art quilt
This small art quilt was FMQ within an inch of its life - but I love it. It's still one of my favourites.

Batik lap quilt - Chevy is always up for a picture!
Of all of the FMQ that I've done, why did I pick this one? Well it's because of the Notre-Dame Cathedral and the Eiffel Tower that I quilted into the quilt. 😊 

Notre-Dame Cathedral FMQ

Eiffel Tower FMQ

What I learned
  • Hosting a linking party is a lot of work. I'm so grateful that I am co-hosting with Muv. She's a great partner, a good friend and a great free motion quilter. 
  • I've learned to organise my posts around Free Motion Mavericks. I haven't always been successful, especially this spring when I was doing very little FMQ. Fall is here and I have started doing more FMQ. 
  • I love learning and having ongoing projects to write posts about every two weeks has helped keep me on track. Last year FMQ Garden & Pond kept me going roughly from March to September. This year I've been working on the Pinwheels and Stars Baby Quilt since May. 
  • I've also learned that the best way to promote the Free Motion Mavericks linking party is to link up to as many quilting linking parties as possible to get the word out, as well as asking quilters who FMQ to link up to Free Motion Mavericks. This is not easy for me to do since I don't like bothering people - but quilters are very generous and have been great in supporting this linking party.
  • To all quilters who have linked up or followed the Free Motion Mavericks in the last 6 years and to Muv, the founder of Free Motion Mavericks - THANK YOU!!!! 
Related links
Linking parties
Here are some great linking parties that I will be linking up to this week, This includes Free Motion Mavericks with Muv. I hope that you check them out, once you have linked up to this one, of course 😊 Monday MakingColour & Inspiration TuesdayMidweek Makers, Long Arm Learning, Needle & Thread Thursday, Off The Wall FridayFriday Foto FunCan I Get A Whoop Whoop?, Peacock Party

Free Motion Mavericks 


Wow! 300 parties since 2014! That is definitely something to celebrate. We had a record number of link ups since I've started co-hosting. Thank you so much!

I thought that you might want to see this lovely baby quilt by CHRISKNITSSEWS

A lovely baby quilt from CHRISKNITSSEWS

Now for the trans-Atlantic linking party! This week, both Muv and I are hosting a linking party. 

Here at Quilting & Learning - What a Combo, you can link up to three (3) Free Motion Quilting posts you want, either recent or past.

Muv of Lizzie Lenard Vintage Sewing will dig out some of her favourite posts from her archives (she's an amazing cook and a fabulous knitter!). You can link up to three posts on absolutely any subject, quilting related or not! 

You are invited to the Inlinkz link party!

Click here to enter

Tuesday, September 29, 2020

September OMG done

Hi! I'm cutting it pretty close but they are done - my niece's curtains for her cottage bedroom. These are my September One Monthly Goal (OMG). 

Tab top curtains in buffalo red & black plaid flannel

This was the first time that I made tab top curtains. In my curtain making days, we made a sleeve to pull it though. These curtains weren't very difficult but I'm really glad that I didn't have to buy a pattern. YouTube can be pretty wonderful.

Buffalo red and black plaid flannel curtains

I watched the DIY Tab Top Curtains YouTube video by Online Fabric Store - I have included the link in the Related links section below. The tutorial was very good but I do find the music distracting. Anyway, after watching it a few times, I made some notes, cut my fabric and that's as far as I got. My poor niece had to wait a few months for these but finally here they are😊

Before this, I had never heard of buffalo red and black plaid. Again....thank you Google! I found the fabric at Funky Monkey. My niece bought 2½ meters but really, 3 meters would have been better. I forgot about the flannel shrinkage. The fabric is from Kaufman and it's the nicest flannel I've ever worked with. Wow, I guess that's what quality flannel is like!

Kaufman's flannel
Chain stitching the tabs

In this post, I thought that I would share with you how my sewing has changed since I'm a quilter.

The most obvious tool that quilters use is the rotary cutter - with all straight cuts, it went really well.

The picture on the right is the chain stitching of the tabs. I sure didn't know about this before quilting! 

Since I didn't have enough flannel for the top facing, I used a colourful plaid that I had in my stash. It's certainly not the same quality but since it was also pre-washed, it should be fine for the facing.

You may also notice that I used a walking foot. Again, until taking Christina Cameli's Free-Motion Quilted Gifts course on Craftsy last year, I would never have thought to use the walking foot for this type of sewing. It really made everything so much easier to sew together. 

Sewing down the facing with the walking foot

What I learned
  • The fall weather has finally re-activated my brain. I was able to slowly think this project through and get it done. The OMG deadline was also a motivator - thanks Patty at Elm Street Quilts.
  • Sewing curtains is not the same since I'm now a quilter. I'm the first to admit that I don't really like piecing but all of that work paid off for learning techniques that are very transferable. 
  • It may have taken several months, but taking my time, watching the video several times, making notes and being organised really helped me make the curtains. 
  • I was very anxious about making these because I knew that I didn't have ANY extra fabric for making mistakes! For an accuracy challenged quilter, that's a lot of extra stress 😊
Related links

Remember to join us starting October 1st to the 8th for... 
Free Motion Mavericks' 300th Post Tea Party!


Wednesday, September 23, 2020

Swirling Leaves for Hello Fall Blog Hop

Welcome to my stop at the Hello Fall Blog Hop. When I saw Carla's button for a fall blog hop, I couldn't resist. I'm thrilled to be part of this fun event - Thanks Carla 😊

Making Swirling Leaves

Swirling Leaves

I have to admit that I had some pretty grandiose ideas for this blog hop....and then it was two weeks before the event and I got realistic! This wall hanging is a simpler version of my original plans. I'm really happy with the way it came out - and it didn't take months to make!

All along, my idea was to make a wall hanging with falling maple leaves. About a month ago, while walking with Chevy, I found a small bunch of maple leaves that had fallen off a tree. That was the first part!

I then made freezer paper templates from most of them, ironed them onto some gorgeous hand-dyed fabrics and Voila! I had a whole bunch of leaves to work with. Only the orange leaves are made from my own hand-dyes.

Freezer paper template
Once the leaves were cut, I rummaged into my neutral scraps and made up the background. These are from the last three neutral quilts that I've made in the last few years.

Choosing neutral fabrics for the background
I had a great time doing some improv piecing, my favourite kind of piecing. Since I wanted this quilt to be as simple as possible to make, I even took the time to square up the pieces so that it would be relatively easy to finish. It worked!
Choosing borders
With the background finished, I auditioned some fabrics for borders. Since these are relatively muted colours, I went into my civil war reproduction fabrics and found two perfect pieces.

On the weekend I added the borders and appliquéd the leaves. I found a perfect piece of batting and backing. 
A sandwich ready to FMQ
Then came my favourite part - free motion quilting (FMQ). I started by quilting-in-the-ditch around the two borders. I then chose different thread colours to quilt around each leaf and stitch in the veins, following my freezer paper template since my leaves had all dried up by then. Because the quilt is pretty muted, I took the opportunity to use some lovely variegated thread for the leaves.
Details of the FMQ

I FMQ the background with swirls and extended them into the first border. For the final border, I quilted some leaves.

Swirling Leaves with the Burning bush


What I learned

  • I'm glad that I reduced my plans based on the limited time I had. Maybe one day I can make that original one, but like I said, it would have taken months!
  • I love improv piecing. I kept it simple this time, using square and rectangular pieces of fabric that fit together easily. 
  • My big lesson learned was taking the time to square up blocks as I was putting the improv pieces together. It really made a difference in the end.
  • I like how the FMQ in the neutral background sort of makes it recede. I was afraid that some of the fabrics would overpower the piece.
  • I even stitched down the binding by machine from the front. There was only one spot that I had to hand stitch down at the back. That was a huge time saver.
  • Of course I lost that saved time when I stitched the sleeve to the wrong end of the quilt (sigh). 

Links to Carla's Creatin' in the Sticks

Links to Wednesday's participants
Linking parties

I'll be linking up to many fun linking parties around the virtual world of quilting. Lets see what's going on! Muv is hosting the Free Motion Mavericks linking party this week - visit and link up! Monday Making, Design Wall Monday, What I Made Monday, Colour & Inspiration Tuesday, Midweek Makers, Long Arm Learning, Put Your Foot Down, Needle & Thread Thursday, Off The Wall Friday, Finished or Not Finished Friday, Can I Get A Whoop Whoop?, Friday Foto Fun, Beauty Pageant, Peacock Party, Oh Scrap!, Quilting & Patchwork

A reminder to join us on October 1st for the trans-Atlantic party! Find out more about this special linking party.


Thursday, September 17, 2020

Sparkling Star on Free Motion Mavericks

Welcome to Free Motion Mavericks, week 298. We are getting ready for the 300th Week Linking Party on October 1st. It's going to be a virtual trans-Atlantic party to remember. You can read all about it below!

FMQ a sparkling star

This is the third star that was free motion quilted (FMQ) on the Pinwheels and Stars Baby Quilt. I love how it turned out!

Lots of sparkling diamonds in this star block

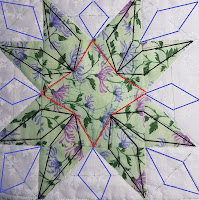
This design is based on Star Struck, a post that I found on the Seams French blog (see Related links below). Here is what the block design looked like when I originally drew it. I knew that I would have a difficult time with the star in the middle, so I simplified it, although not really on purpose.


When I drew the diamonds from each star point, it turned out that two of them would meet. That meant that there wasn't any space for all of those points in the middle star - which would have been a mess anyway.
New design

Original plan

There is still a star in the middle, but it was much simpler to quilt. If you could click on the image of the newer design, you may be able to see some Frixion pen marks - it was a mess, but it did work. (You'll have to take my word for it since I can't seem to make that image  clickable.)

It's easier to see the design from the back

If I hadn't changed the thread colour in the star, it could have been a continuous design. I ended up travelling using the middle star since I thought that it would be fine if it showed up more.

What's on this week
I'm going on a short holiday so I'm bringing a lot of my hand stitching with me. I've started my Hello Fall piece. I'll be appliquéing and FMQ it this weekend. I'm presenting Wednesday, September 23rd .

What I learned
  • Design plans, like any other plans, can keep evolving. I'm really glad that this one got simpler. I was much more confidant about making it.
  • I did quite a bit of marking and it paid off.
  • I did start on Monday, just as I said that I should in my last post! It's mostly because I'm going away for a short visit and will be travelling Wednesday evening...but still, I'm following my own advice😊
  • This is a really pretty design and I'm glad that it worked out.
Related links
Sparkling diamonds
Linking parties
I'll be linking up this post to many fun quilting linking parties. If you get a chance, check them out, after you've linked up to Free Motion Mavericks below! Colour & Inspiration Tuesday, Long arm Learning, To-Do Tuesday, Midweek Makers, For The Love Of Geese, Needle & Thread Thursday, Finished or Not Finished Friday, Friday Foto Fun, Can I Get A Whoop Whoop, Peacock Party, Patchwork & Quilts, Monday Making, Let's Make Baby Quilts

Free Motion Mavericks

Thank you to everyone who linked up last time. There are many wonderful quilters out there and we are glad that you are joining us. Don't ever think that your quilting is not good enough! We were all beginners at one time and slowly got better with practice. We are here to support and encourage you, no matter what your perceived level of FMQ.

This week I want to highlight two very different quilts. Kathleen McMusing finished a UFO that she had started during a workshop in 2017. This was a difficult quilt to get back into but Kathleen persevered and got it done! If you didn't read her post about Backshore, here's the link.

Backshore by Kathleen McMusing 

The other quilt is Purple Palace, an improv adventure quilt by Joy, of the Joyful Quilter. She shared her quilting process with us. It's a really lovely quilt and you can see it here!

An improv quilt by the Joyful Quilter

Remember to come back and celebrate with Muv and I on October 1st. You can start thinking about which Free Motion Quilting posts you would like to link up (any post, up to three of them, recent or past) with Andrée (me!) and which posts about absolutely any subject (again, up to three of them, recent or past) with Muv. 

Now it's your turn!

You are invited to the Inlinkz link party!

Click here to enter

Tuesday, September 08, 2020

How many more blocks to FMQ?

Two free motion quilting (FMQ) posts in a week - wow! I had the weekend to myself and spent most of it fixing and continuing to FMQ our king size batik bed quilt. At 13 x 13 blocks, it's huge! It wasn't always pleasant but I did get a lot done.

After this weekend,
only 49 blocks left to FMQ


Fixing ripped blocks

When I sandwiched this quilt in July of 2016, I stitched-in-the-ditch around each block. However, since each block is 8", that really wasn't enough quilting, especially considering that we've been sleeping under this quilt since November 2016. At that time, only 23 had been FMQ.


By August 2019, I had FMQ 54 blocks and still had 115 to go! Well, today's count is much better - I now have 120 blocks quilted and only 49 left to quilt. 😊 That's more than 2/3 finished!

Some of the blocks had ripped. Three needed major work and were replaced while a couple only needed minor surgery.

A full replacement was needed here!

I'm not sure what the process should have been - but this is what I did. First I cut a piece of fabric slightly larger than the one being replaced. I ironed the seam allowance and then stitched it on top of the ripped one that had been removed.

The replacement is in position

Here is the block with the replaced piece of fabric. 

A successful operation

Here is another replacement. It's the smaller square on the top. I got a little carried away with the stitching. That sucker is never coming out again! 😊

Another successful operation.

FMQ many, many blocks

I wish that I could say that I had a blast FMQ these blocks, but it was a generally painful, tedious project. It wasn't the FMQ that was the problem, it was trying to stop my thread from breaking and bunching up.

I remember having problems the last time I FMQ some of these blocks. I was hoping that the cause was just the extra drag and that I would be able to work around it. Well, it was only partially the problem. I did what you're supposed to do. I changed my needle, I used another bobbin, I even tried to use a Kimono silk thread instead of the Bottom Line that I was using. I've been using Bottom Line for different projects and have never had a problem, but then if something is going to affect the tension, it's a huge king size bed with a batik top!

As you can see, I had a lot of support for my quilt. I had an extra table on the side and a chair on the other side.
Supporting the quilt
Can you imagine that I even tried using the walking foot? It worked wonderfully except for all of those turns every few seconds. It was nasty!

Finally it did turn out OK. If I went really slowly and stayed within the small quilting area around my FMQ foot, everything was mostly fine. Now I know that the slow and steady turtle wins the race, but boy was that tedious. I'm used to zooming around but this brought me right back to basics. 

Sometimes it was good, and sometimes it was ugly!

I do want to mention that I read Christina Cameli's FMQ Step-by-step book and practiced about 8 or 10 different FMQ designs. There are three of these new designs in this block.

I'm going to make sure that I read this post the next time that I start FMQ this baby again.😊

What's on this week

Coming up very soon is the Hello Fall Blog Hop. I had a really good idea but I don't think that I'll have time to make it, so it's on to Plan B - that means a lot less work but probably just as lovely...I guess we'll see! Make sure that you check it out - it starts September 21st and I'm on Wednesday, September 23. See you then.

What I learned

  • More than I was hoping to!
  • I guess I can't expect to zoom through all of my free motion quilting. I'm surprised by how much I've been getting away with! I may start slowing down a little to see if that might improve my FMQ overall....you never know!
  • In my two other posts, I worked on some really lovely FMQ designs but this time, except for some simple stuff, I just wanted to get it done! I'm hoping that now that I know what works, that I'll be able to enjoy quilting it the next time I get to it.
  • I took the time to plot out the blocks that still need to be quilted. I really hope that I'll get to them sooner rather than later, especially where there are a few blocks in a row that haven't been FMQ. 
Related links

Linking parties

Thanks so much for dropping by. This week it's Muv's turn to host Free Motion Mavericks. I hope that you'll go and link up. Also, we will be celebrating Free Motion Maverick's 300th linking party on October 1st. I hope that you will join us that week! You can see the invitation below.

I'm also going to link up to a bunch of great linking parties. Take a look and see what's happening out in the quilting universe! Colour & Inspiration Tuesday, Monday Making, To-Do Tuesday, Oh Scrap!, Long Arm Learning, Midweek Making, Put Your Foot Down, Needle & Thread Thursday, Finished or Not Finished Friday, Can I Get A Whoop Whoop?, Friday Foto Fun, Peacock Party


Thursday, September 03, 2020

Seeing stars with Free Motion Mavericks

Welcome to Free Motion Mavericks, week 296. Have you noticed the number? We are getting near 300 weeks! Make sure that you come back on October 1 to participate in the 300th Linking Party. We'll have virtual balloons, cake, tea and loads of fun. 🎈🍰 😀 You can read about our linking up plans below.

Another star is quilted!

As you may remember, I've been trying different free motion quilting (FMQ) designs for my Pinwheels and Stars Baby Quilt. From May to July, I tried out 7 different FMQ designs for the pinwheel blocks. Once that was done, I found several FMQ designs for the 6 star blocks, and quilted the first star block in August. It's now time for the second star.

This design is a variation of Leah Day's Sun Star Block. It wasn't difficult to quilt but it did involve 5 different steps.

Second star FMQ
Here are the steps:
  1. I drew lines through the square to make sure that I would stop at the right place when making my diamond. This was FMQ in the four corner blocks.
  2. I then quilted the triangle. In hindsight, I should have quilted these triangles as I was moving around the block quilting the corner diamonds.
  3. I drew out these diamonds - it was well worth it since there were only four.
  4. The circles are only between the diamonds so I quilted each set and traveled using the lines of the diamonds.
  5. The squiggly lines were the last thing to add. They started from the outside circle to the star point. I was able to travel to make these and then get to the next one. 
Steps to quilting this FMQ design

This design really looks good from the back.
The back of the block looks good but is much less forgiving!

I now have one completed free motion quilted row of the Pinwheels and Stars Baby Quilt
One row completed

September's One Monthly Goal (OMG)
Red flannel curtains 
ready to be sewn

I have been feeling guilty about not making these curtains for my niece's cottage bedroom for several months now. This is the month that it gets done! 

My biggest anxiety was cutting the fabric since there is nothing extra - so nothing can go wrong! Well, last week I watched the YouTube video a couple of times, made my notes and finally cut the fabric. As far as I know, all is well, but I'll find out when I make them! 

What's on this week
Since I'm the only one in the king size bed this weekend, I am taking the time to keep FMQ my king size batik bed quilt. At last count there was only 115 blocks to go! I'm hoping to get some of the middle of the quilt blocks done while I don't need to sleep under the quilt.😊 p.s. it's also a PHD for 2020!

What I learned
  • I made the second easiest star block and it took me about two days (between work and life). I did start early but I will have to start on Monday to get the next ones done by Wednesday night. Wish me luck on the others!
  • The quilting went quite well. As I mentioned, I could have done the first diamonds and the triangles at the same time, so something to look for next time.
  • I always have problems making the lines for the diamonds straight. I tend to do a curve instead of a straight line. Marking all of them helped.
  • I'm really happy with how it came out - and I can now make these images in PowerPoint in much less time. Yeah! 😊
Related links
Linking parties

I will be linking up to many fun linking parties, so check them out if you can. September's One Monthly Goal, Long Arm Learning, Midweek Makers, Put Your Foot Down, Needle & Thread Thursday, To-Do Tuesday, PHD in 2020, Peacock Party, Can I Get A Whoop Whoop?, Friday Foto Fun, Finished or Not Finished Friday, Patchwork & Quilts, Monday Making, Colour & Inspiration Tuesday, Design Wall Monday, What I Made Monday, and Let's Make Baby Quilts! 

Free Motion Mavericks

We had a lovely turn out last time. Thanks so much to those who linked up and those who left comments. It's wonderful to see everyone's quilts and hear your thoughts. Thanks!

Karin of the Quilt Yarn made a Lemur quilt. She's a lady after my own heart - she stopped at two lemurs since it would give her more background to quilt! When she linked up, she wasn't quite finished so here's the link that she shared with us and here's the link to her finished quilt. Enjoy!

Lana Lemur quilt in progress by Karin at The Quilt Yarn

Before we get to the linking party, I have something special to share with you.

Thank you to Greeting Islands for the invitation design

We hope to see your then!

Now it's your turn.

You are invited to the Inlinkz link party!

Click here to enter

Saturday, August 29, 2020

Swamp visit & slow stitching

Can you believe that August is almost over? Now that the weather is cooler, I feel like I'm finally coming out of my cocoon (aka my home's AC) and I even have a little more energy. As much as I love the cool fall weather, I have to remind myself to enjoy it because I keep thinking of the winter that's on it's way. I know....enjoy the moment! 😊 

Progress on Marks & Stitches

As my post title suggests, I went on a road trip and while hubby was driving, I was able to stitch to my 💖's content! I spent most of my time working on Marks and Stitches, the piece that I started at the end of July for Gregory T. Wilkins' workshop (see Related links for the other 2 posts).

Marks and Stitches - more progress


Taking advantage of the lovely setting

I did get more stitching done after our visit to the park but that's for another time.

A hike and a visit to the swamp


On our way to North Bay, Ontario we stopped in for a couple of hours at one of my favourite parks, Samuel de Champlain Provincial Park. (I actually have a few favourites since we have amazing parks in Ontario!)

We went on a walk to a lovely swamp - the trail was closed but we were allowed to go at our own risk. Considering the times, it's not surprising that they didn't spend a lot of time fixing the trail, but except for a slightly tilted boardwalk and some over grown areas, the trail was fine.

Here are my favourite pictures.

Dancing on the water - Samuel de Champlain Provincial Park

Driftwood and reflections - Samuel de Champlain Provincial Park


Waterlily - Samuel de Champlain Provincial Park

My daughter, husband and I had a great weekend. I got to visit with a great friend, eat home-made corn dogs, walk in the water of Lake Nipissing (I forgot my swim stuff) and visit family. It was so good to be out of the house. I'm very grateful that my son stayed with Chevy while we were gone.😊 

What I learned
  • I love embroidering in the car. It really makes the miles (or km) fly by!
  • A few days ago I undid some of my stitching on Marks and Stitches. I don't usually do that but I didn't really like a couple of spots. I'll share this with you in a future post.
  • I'm now trying to figure out how to finish Marks and Stitches. I don't think that I want to quilt it, so I bought a frame that will probably look good. I'll just have to get a bigger mat for it. 
  • About the swamp....I love swamps. When I was growing up we had a cottage that was next to a swamp. I've always been drawn to all of the activity going on in swamps.
Related links
Linking parties
I'll be linking up to some fun linky parties. Remember to go see Muv and link up to Free Motion Mavericks! You don't have to be doing FMQ to link up!