Showing posts with label metallic thread. Show all posts

Saturday, May 28, 2022

Let Them Flourish is finished!

If you've been following me on Instagram, you've seen lots of images of the progress of this piece. Lately I've been adding a gazillion French Knots, finishing up the beading and then finally mounting it on a fabric-covered canvas.

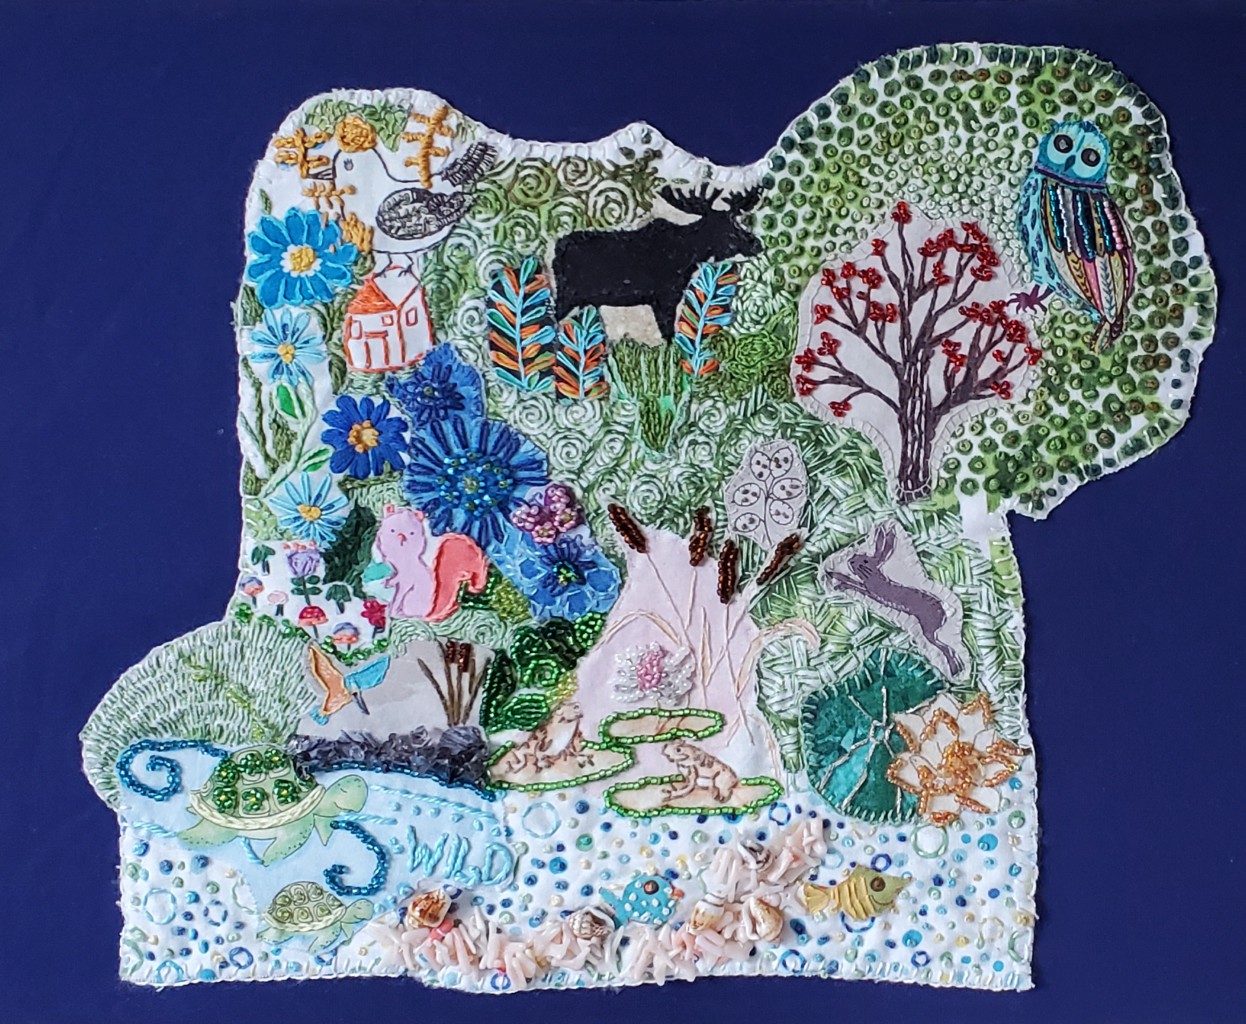
Let Them Flourish - Ready for Exhibition

Let Them Flourish (aka Biodiversity)

In the Beginning

This piece started off as a fabric collage of images related to Biodiversity, the theme that was given to us as part of the February 2021 TextileArtist.org's Stitch Club workshop. Kate Tume, our instructor, had us exploring narrative potential with embellishment.

The beginning of Biodiversity (working title)

I attached the fabric pieces to batting using Heat n Bond Lite. From there I started stitching and beading. To say that it was slow going is a huge understatement. Again, not called slow stitching for nothing 😊.

Starting the embroidery and beading

At some point I got tired of its slow progress and wondered off to other projects. I came back to it during my #100dayschallenge on Instagram. I would say that the majority of it got done between March and May 2022. It also helped that I had a deadline approaching - the Conversations exhibition with Fibre 15 (see related links below).

Towards the Finish Line!

I love using my own hand-dyed perle cotton 💙

At one point I got bored and had an aha moment. I realised that I didn't have to embroider the images using the same colours that was on the fabric. Notice the house in the image below, which was printed in blue but covered in orange thread. I love that the blue peeks through. That was quite liberating! 😊

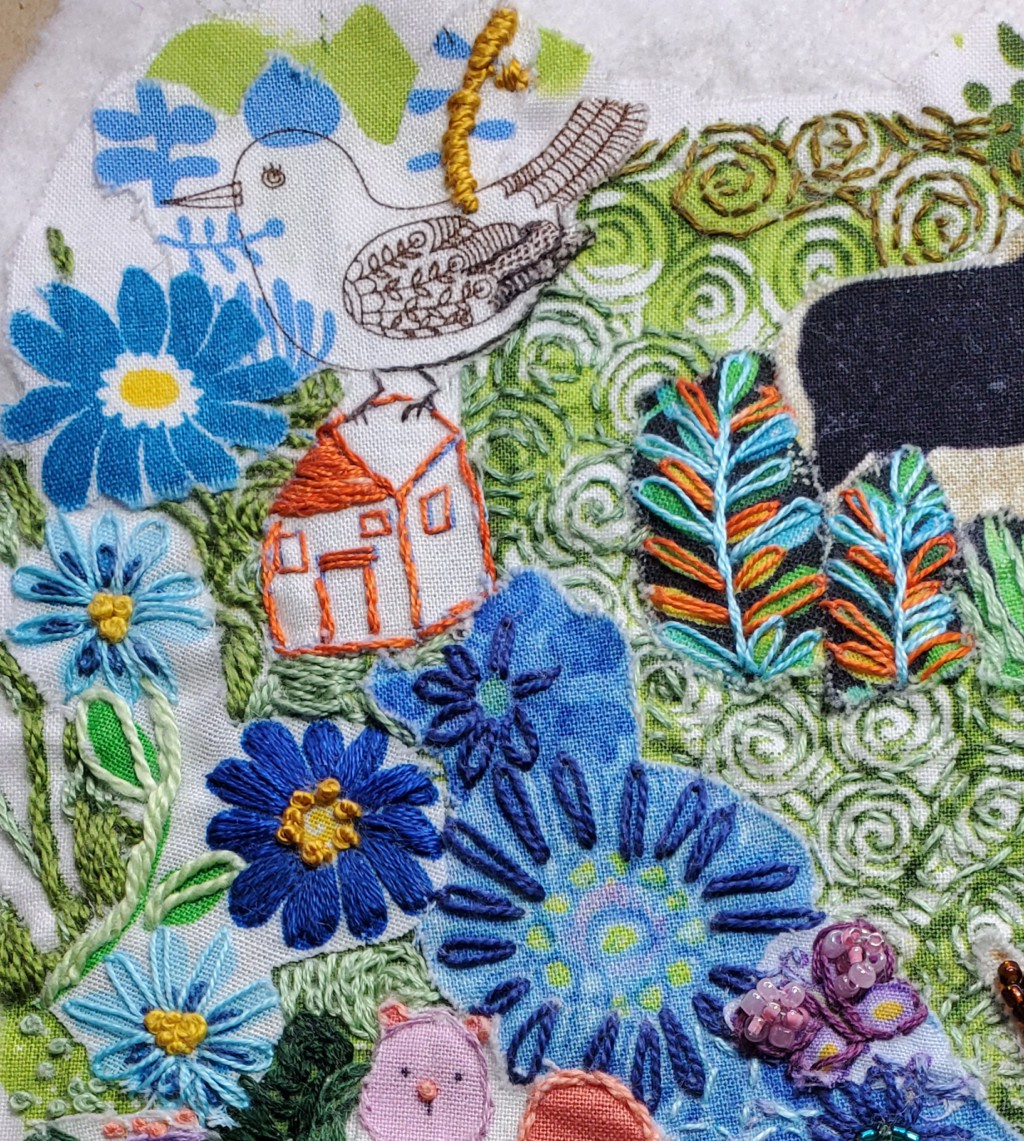
Adding different colours than those on the fabric

The green embroidered background around the moose took forever -
I was seeing swirls in my sleep!

I added a gazillion French knots around the tree. I knew by then that it would drive me crazy, so to keep it interesting, I used different shades of green and went roughly from light to dark.

So many French knots!!!

I was worried about the owl - I wanted to add beads but wasn't sure how much. I found out fairly quickly how much was "too much"! I was going to bead every other line but got mixed up and ended up beading all of the lines. It wasn't really bad but it made the owl the focal point, which is not what I wanted.

Too many beads....

Just the right amount of beads 😊

I used sewing thread to lightly embroider various parts of the owl. 

Finishing up!

Finishing up involved covering a 14" x 11" canvas with fabric and then attaching the piece to the canvas. I used Sulky's Invisible thread since it was clearer than the other kinds I have. I wasn't able to make a knot at the end of the thread, so I left a long tail and then after taking the next stitch, tied a knot at the back.

I just put in a few pins through the canvas to keep the piece from shifting as I was sewing it down. I stitched around the edges but also within the piece to keep it securely in place. It was easiest to stitch behind beads.
Attaching the piece to the canvas


Let Them Flourish

What I learned

  • I learned that this technique is called textile collage. This is probably my favourite technique of all times. I've used it a few times to make some of my favourite pieces. I'll include links to my favourite ones in Related links below.
  • I love being able to add bits and pieces of fabric to tell a story or show a moment in time. 
  • The hardest part is probably leaving reality behind since there is no way to keep the actual perspective real since the elements come in the size that they are on the fabric! I love that whimsical part of it.
  • I'm glad that I figured out that I don't have to use the same colour as the background image to embroider. It adds a different look when using a different colour and having the original fabric colour peek through.
  • I realised that I need to change things up to keep me interested. What's not to love about many shades of green instead of just using one?!
  • I really got to know my threads - there's nothing wrong with embroidering with regular sewing thread if you just want a small accent of colour and texture. 
  • A bonus is that the technique almost always needs the little bling of beads 😊
  • It's always a slow project, even if using FMQ but it's usually well worth making. I'm making myself finish this one before I start another one - it would be too easy to get sidetracked at this point!

Related links

Linking parties

I'll be linking up to many fun linking parties. Remember to visit Muv to link up to Free Motion Mavericks this week! Put your foot down, Off The Wall Friday, Finished or Not Finished Friday, Peacock Party, Beauties Pageant, TGIFF, Patchwork & Quilts, Oh Scrap!, Slow Sunday Stitching, 15 Minutes to Stitch 2022Monday Making, Design Wall MondayMay's Favorite Finish Monthly Linkup

Project details


    Let Them Flourish
    Workshop with Kate Tume through TextileArtist.org
    Attached to a 14" x 11" fabric-covered canvas
    Materials: commercial quilting cotton, beads, shells, 
    metallic, embroidery, sewing thread and perle cotton 
    Techniques: collage, embroidery, beading


Sunday, January 19, 2020

More slow stitching, meditation style

I've been doing some more slow stitching. This time with a little meditative quiet time added in.

Slow stitching, meditation style

In the October/November edition of the Quilting Arts magazine, I read an article that spoke to me. The article, Stitch Meditation, by Liz Kettle talked about meditating while stitching, since she found that regular meditation didn't really work for her. Wow! I've been trying to meditate and find it one of the most painful things to do. Quieting the mind is really difficult, except when I'm immersed in my quilting, or playing with code! Since I rarely play with code except occasionally at work, my best bet is probably stitching and quilting.
First four meditation squares
In the article, Liz says that she only has a few guidelines and one rule.

  • Avoid planning - choose your supplies quickly (less than 5 minutes)
  • Minimize distractions (for the meditative part)
  • The one rule: don't undo stitches - there is no need for perfection
Liz does talk about doing this every day, but I'm staying away from that since I don't need another commitment that I won't follow. I do it when I remember and when I feel like it. I trust that I will remember to do it when I need it.

I've cut up a bunch of 4" flannel squares from a dearly loved flannel blanket. I use this as my backing. For the fabric on top, I have a small bag of my hand-dyed fabrics. They are really perfect for this.

Angles is made with hand-dyed fabrics and stitched with several weights of thread and embroidery floss.
Angles
Green & Blue with bark includes an unraveling piece of dyed fabric, thread and wool, and two pieces of hand-dyed that friends though was bark .
Green & Blue with bark 
The moon in Pretty moon and star was made of pieces of felt from the backing of my daughter's embroidery pieces. The stones are pretty pink quartz and the star is a Murano glass bead bought in Venice last year.
Pretty moon and star 
For Shining rose, I cut up a hand-dyed cloth napkin that I had embroidered a very long time ago. I added shiny ribbon that I save up when I buy things. I also used some metallic floss.
Shining rose
Last week I started this piece. I was in the mood for ruffles so I just took another fabric piece and stitched it on. I used sewing thread, embroidery floss and even did some chain stitch. I like the look of the feather charm.

Orange, pink and a feather
If you've seen my Flower of Life piece for the first challenge of Project Quilting last week, you will see where I got the inspiration for this block. Now that I know about the Flower of Life, I see it everywhere! In this block, I did some embroidery, including fly stitches without tails, and added beads.
Web in the Flower of Life
What I learned

  • Making these blocks is really meditative.
  • I often start with fabric or embellishment from a recent project.
  • I really don't plan what I'll be doing. If I have some embellishments that I want to use, I'll make the block around them. Otherwise I take a piece of fabric and start stitching.
  • Some of the blocks were finished the same day I started them, but others took a couple of days working on them. They usually take about an hour to make.
  • I don't name the blocks when I make them - but it's fun to name them when I'm saving the images on the computer.
What's on this week
  • Today Challenge 11.2 of Project Quilting came out - something about Team Colours. I'll have to think about that since nothing jumps to mind. The project is due next Sunday morning - so I'll be working on that this week!
  • Join me on Tuesday for my post in The Winter Blues Blog Hop hosted by Carla of Creatin' in the Sticks. My piece is done but I have to figure out how to bind it....????
  • I will also be hosting Free Motion Mavericks on Thursday - so come back and link up your post - it doesn't have to be FMQ.
Related links
Linking parties
I'll be linking this post to many fun link-ups. Follow me and see what's going on out there in Winter Quilt Land! Slow Sunday Stitching, Oh Scrap!, Off The Wall Friday, Monday Making, Design Wall Monday, What I Made Monday, Free Motion Mavericks with Muv, Colour and Inspiration Tuesday, To-do Tuesday,


Sunday, December 11, 2016

Embellished Dress-up Shirt

The back of the shirt has an embellished red dump truck
The back of the shirt
I just finished embellishing a fun dress-up shirt for my friend Sonya's son. He loves trucks and dinosaurs and now he'll have his own dress-up shirt to play in.

I found the truck at kidsplaycolor.com It's a simple dump truck that I could copy and then embellish. I drew the truck onto freezer paper. Not an easy thing to do since I was at the fall retreat and didn't have a printer. I cut out the truck shape and used the freezer paper template to copy it onto the shirt. I then sewed the truck outline in red and then embroidered the tires in red and black. The metal-looking beads are perfect for the tire rims. The grill of the truck is sewn with metallic thread from the bobbin.

This week I read  Lara Buccella's Crafted Appliqué book. I had seen all of the blog posts about her book and was looking forward to reading it. Her technique is really great. I used it for both the truck and the dinosaur. Frankly I hadn't even though of using appliqué in this project until I read her book. It was the perfect technique.

Once I finished the appliqué, I used a black fabric pen to outline the windows and finish the tires. I also added three rows of red seed beads.
An embellished red dump truck
A very cool dump truck!
The front of the embellished shirt
The front of the shirt
For the front of the shirt I found an easy dinosaur to draw from fourpencil.com It's a Diplodocus.

To cover the Diplodocus,  I took out all of the colourful scraps I could find. I used the Crafted Appliqué technique,and then cut and ironed the fabric pieces in place, I used a multi-coloured King Tut thread to zig-zag stitch around each fabric piece. I embroidered the mouth and the eye with black embroidery floss.

a multi-coloured Diplodocus
The multi-coloured Diplodocus


What I learned:

  • I really enjoyed making this piece. I wasn't sure how I was going to fill in the truck, so I was really glad to read about the Crafted Appliqué technique.
  • I didn't think that I could draw both the truck and the Diplodocus from the computer screen. I am very pleased with the results. 


I've linked this post to the following parties - please check them out! Can I get a Whoop Whoop? Off the Wall Fridays, Oh Scrap! MOP Monday, Monday Making, Main Crush Monday, Slow Sunday Stitching, Let's Bee Social, Midweek Makers, Needle & Thread Thursday, Off the Wall Friday, Fabric Frenzy Friday.


Thursday, January 14, 2016

Update - Landscape Art Quilt Challenge

It's been 7 months since I launched my Monthly Landscape Art Quilt Challenge. This is where I challenged myself to complete one landscape art quilt per month. A little ambitious? Maybe....

"How's it going?" I can hear you ask. Well, here are the results to date.


June 17, 2015: Monthly Landscape Art Quilt Challenge Announcement
July 3, 2015: June Landscape - the Lone Tree
June's The Lone Tree (8" x 11")
July 29, 2015: Fireworks for July's Landscape Art Quilt
July's Fireworks for July (14" x 8")
September 14, 2015: Yellow Kayak Landscape Quilt

August's Yellow Kayak (11½" x 12½")
November 30, 2015: Fall Tree Project
September, October and November's Fall Tree (19.5" x 25.5")
January 13, 2016
December's Project
December's Mountainscape Project
Thread Paining and Beads
I started December's Mountainscape Landscape Art Quilt on November 11 (Remembrance Day in Canada) when I attended a workshop with quilter Hilary Rice. Here's the post about the workshop.

Once the pinning was done, I left it until my Christmas holidays to complete. I didn't know how to thread paint and quilt it because the colours didn't bring anything to mind. It's more of a desert landscape but with a river. I ended up finding a few pictures of mountains and rivers on the internet and thread painting it as best as I could. Two of the hills are covered with trees while a third one has rocks or sand. The big brown hill had a pale area that I thread painted around. It could be a glacier or, in a desert area, a hill without vegetation.

I added metallic thread in the river. This was done by sewing from the back of the piece, with the metallic thread in the bobbin.

Metallic thread and beading in the river

Once I had finished, I found the piece a little dull, so I added bling to bring it to life. The river and one of the hills has beads while I added some birds in the sky.


What I learned:

Tape at the edges so that I could stop quilting
  • I seem to need a specific idea for my landscape before I start, and choosing the fabrics is an important part of this. I found this project very difficult because I didn't know what it was supposed to represent and I hadn't chosen the fabrics.
  • I know that the landscapes don't have to represent real things and that I can make things up. It was only when I allowed forced myself to do this that I was able to keep going on this piece.
  • I did put one of my former recommendations in practice - I marked off the edges of the piece with tape so that I didn't quilt or sew much past it. It really helped.
  • Sewing on the metallic thread through the bobbin went well, but I should have checked my tension!

Mountainscape Landscape Quilt (17"x 11")
This is my 100th post on this blog. How cool is that - time sure goes by quickly!
Here are my linky parties: Let's Bee Social, Fabric Tuesday, Freemotion by the RiverOff the Wall Friday, Free Motion Mavericks, Needle and Thread Thursday, and Can I get a Whoop! Whoop!


Wednesday, July 29, 2015

Fireworks for July's Landscape Art Quilt

Here is the result of my Monthly Landscape Art Quilt Challenge and the 2015 Lovely Year of Finishes...Fireworks in July.
Fireworks in July (14" x 8")
Canada Day is the 1st of July. I must admit that I haven't braved the heat and the crowds to see the festivities and the fireworks on Parliament Hill in a few years. After my rather muted June landscape, I was ready for some colour and sparkle. Here's my journey.

Parliament before the appliqué
I found a couple of photos of Parliament and cut out the shape in a grey fabric. I put a black fabric behind it to make the grey stand out.

I did some thread sketching of the parliament building with grey thread on grey fabric, which, not surprisingly, didn't show up. I was, however, able to use the stitched outline as a guide for sewing with metallic thread in the bobbin.

Thread painting with metallic thread in the bobbin 
After starting over the sky on my last landscape art quilt, I was more careful with this one. I cut out the colours I wanted in long, wavy strips to blend them into each other. I didn't want to deal with the buildings or landscape around parliament, so I just made it black. It's great to be making a representation, and not trying to copy the real thing.

I've learned that in a landscape quilt, it's important to minimize the details and get to the essence of the image. If you're not sure what to cut out, just ask yourself "What am I really trying to show here?" In this instance, it was the parliament building, the sky and the fireworks. Nothing else was necessary.

Embroidered and beaded fireworks


I embroidered the fireworks using as inspiration my favourite embroidery book, The Beginner's Guide to Freestyle Embroidery by Christina Marsh. One of the projects actually includes fireworks. I used the shapes of the fireworks but not the same stitches. For the two largest fireworks, I appliquéd fabric as a background and then embroidered over them. I really like the glittering stars of the yellow firework.

I then FMQ by echoing the fireworks and following the curves of the sky.

The last step was beading the fireworks. I didn't have any mauve beads, but the ivory beads on the mauve fabric look mauve as they reflect the colour around them.

I used a new technique for finishing the art quilt. Instead of binding it I created a facing for it. Here's the link to the tutorial by Terry Aske. It worked out well. I'll probably keep using this technique whenever I don't want a border and binding.

Fireworks in July Landscape Art Quilt
I took some lovely pictures of the quilt one morning outside of the building at work. I thought I was finished, but I forgot something...the Canadian flag! I've looked for a couple of days, but I can't seem to find any small Canada flag pins. The flag will be at the top of Parliament as soon as I find one!


What I learned:

  • The wavy strips for the sky worked really well. I joined the strips using narrow ends. I learned a lot from my first attempt last month!
  • Using metallic thread in the bobbin is really easy and gives such a lovely result.
  •  I liked using a facing instead of binding the piece. It gives it a clean look. Thanks to Terry Aske for the tutorial.

What's coming next in the Monthly Landscape Art Quilt Challenge? You'll just have to come back and see!

Thanks for dropping by.

This post has been linked to A Lovely Year of Finishes, Fabric Tuesday at Quilt StoryWIP WednesdayLet's Bee Social, Free Motion Mavericks and Link-A-Finish Friday with Richard and Tanya Quilts. Check out everyone's work.


Monday, March 16, 2015

FMQ Madness!

I once blogged that there might be such as thing as too much of a good thing - that is, free-motion quilting (FMQ). Now I'm not so sure. Since I've gotten better at it, it's become incredibly addictive. I'm not sure that I'll ever be able to just stitch-in-the-ditch or do some minimalist quilting. It doesn't mean that every inch of every quilt needs to be quilted. It still depends on the quilt; its design, use, etc. I'm just saying that it's really, really difficult to not keep going when you're FMQ.

I can safely thank (or blame) Cindy Needham. I have taken both of her Craftsy courses and have watched them both a number of times. Design It, Quilt It: Free-Form Techniques has some great tips on FMQ. The one that got me though, is Machine Quilting Wholecloth Quilts. This course is about creating Wholecloth quilts (basically from one piece of fabric as opposed to a pieced top). Since most of the quilts are just one colour, which means ample opportunities to FMQ.

Her incredible quilts are usually made of vintage linens over plain cotton or silk fabric. Cindy clearly loves her vintage linens and incorporates them on wholecloth quilts while highlighting the original creator's work. This is all beautiful and truthfully, a little intimidating. So, instead of starting with a wholecloth quilt made of linen, I've started with a project that was less intimidating but that let me FMQ like crazy. It's creating a wholecloth quilt from large print fabric. You use a fabric that has interesting shapes that would be fun to quilt, and you quilt it from the back. Let me explain.
The fabric you quilt on becomes the back of the quilt

Here's the fabric that I chose. It's got all kinds of interesting shapes that would be fun to quilt. I created a quilt sandwich with some lovely light yellow-orange fabric. I chose a couple of threads that would go well with the fabric. I used a thicker thread to outline the shapes while the other finer thread was used for the scribbling and other FMQ shapes such as pebbles, straight lines, S-curves and feathers.
Large print wholecloth quilt


All of the quilting is done on the front of the large print fabric. The beauty comes when you look at the other side! Isn't it amazing that quilting that rather gaudy fabric could create a piece of such simplicity and elegance?

This technique is perfect for quilting with metallic threads. These can be very finicky to quilt with unless they are in the bobbin. Since this project is quilted from the back, it highlights all of the bobbin thread. As you can see from the photo, the flowers were quilted with the metallic thread, sometimes 3 or 4 times so that they will show up.

Here are images of some of the details. The metallic thread and the beading add an elegant touch. You can see the scribbling, pebbles and feathers between the outlines of the flowers and leaves.
Details

More details of metallic thread and beading


What I learned:

  • Quilting from the back of the quilt took some getting used to but what an end-product! I couldn't wait to take it out to see the results.
  • I've since tried to work with metallic thread that was not in the bobbin. What a mess!
  • This was a great project to practice FMQ. There was TONS of FMQ and you can't tell from the end product if you followed the lines or not!
  • I suspect there will be a few more of these wholecloth large print wall hangings since they were sooooo much fun to work with.
  • I may be ready to work with some linens. I'll start with hankies that I picked up in China. At least if doesn't turn out as well as I'd like, I won't have destroyed a vintage piece!
I linked up to Free Motion Mavericks. Have a look!