Showing posts with label King Tut thread. Show all posts

Saturday, March 15, 2025

Reclaiming Fallen Feathers

Hi and welcome! Today is a special post for Project Quilting (PQ) 16.5, "Follow Your Arrow". This little FMQ (free motion quilted) piece recalls Icarus' flight.

Free Motion Mavericks for March 20th
Please note that I'm not able to host Free Motion Mavericks this week, so the linking party is below.  Hubby was operated but is doing quite well. Thanks!

Note: It would seem that I'm still having problems with dates and time ๐Ÿ˜’- the PQ 16.5 closed last week! So please enjoy this post. I did link up to the Project Quilting Facebook page. 

Reclaiming Fallen Feathers


The PQ challenge theme was "Follow Your Arrow" and the Table Scraps Challenge colour for March is yellow. My thought process: arrow → feathers → bird → Icarus

Reclaiming Fallen Feathers

On a very bright piece of yellow hand-dyed fabric, I used a FriXion pen to draw the bird and the fallen feathers. Then I thought of Icarus and drew in the sun. Finally I added the arrow. 

Reclaiming Fallen Feathers on my outdoor carpet

I took out the black thread and free motion embroidered the bird, filling in the area with black. Then came the feathers. I FMQ tiny feathers in the shape. I did the same with the arrow.

Switching thread, I used a lovely variegated orange to pink King Tut thread for the sun. Yellow wouldn't have shown up!

Another view of Reclaiming Fallen Feathers

It was then time to finish it off. I repurposed a scrap strip of blue backing and batting left over from my blue scrappy quilt and used the pillowcase method. Once turned right-side out, I stitched the edge with a very light yellow thread and to FMQ around the embroidered sections. I added some vertical waves to highlight the falling feathers and then an arrow head pattern to give the arrow mouvement.

Note: The prompt this month for the Table Scraps Challenge was a song. I didn't start with a song but did find one that suits and which I love. It's by Calexico - Falling from the Sky. Here is part of the lyrics: "What do you feel when you're all alone? It's a song that circles round and around like a bird lost inside the cloud, cut off from the stars and they're guided in the light, not sure which way is up or down anymore..."

What I learned
  • I wanted this piece to be as easy as possible. I had all kinds of complicated ideas and gave them a firm pass! Yay for me ๐Ÿ˜ƒ
  • I found the yellow fabric, checked out pictures of flying birds and discarded most of them as too difficult for me to FMQ. I then settled on the image of a flying gull, something that even I can draw!
  • This was probably one of the fastest pieces that I made, mostly following my intuition. Thanks intuition! ๐Ÿ˜
  • Once I started the piece, I was done in a couple of hours. Wow!
  • I must admit that after I finished drawing the piece, I went on Wikipedia to make sure that I had the story straight. I'm happy to say that I remembered correctly (well at least one version of it!)
  • It's funny how I usually start with complicated ideas that I often (but not often enough!) simplify.
Related links
Linking parties
I'll be linking up this post to many fun linking parties, including Project Quilting Facebook page, Free Motion Mavericks and the March Table Scraps Challenge when it opens as well as my Favorite Finish for March. You may want to check some of these out! Put your foot downOff The Wall FridayFinished (Or Not) FridayBeauties Pageant, TGIFF, Patchwork & Quilts,

Project details

Reclaiming Fallen Feathers
created for Project Quilting 16.5, Follow your arrow
Size: 6½" x 5½"
Material: hand-dyed fabric, thread
Techniques: free motion embroidery and free motion quilting


Free Motion Mavericks

Next week I'll do a recap of the last two weeks. Please link up below.


You are invited to the Inlinkz link party!

Click here to enter

Wednesday, April 14, 2021

Planets, Stars and More on Free Motion Mavericks

Welcome to Free Motion Mavericks, week 327. This is probably the last post on the progress of this Pinwheels and Stars baby quilt. I'm really hoping that the next post with be the big finish ๐Ÿ˜.

Planets, Stars and More...

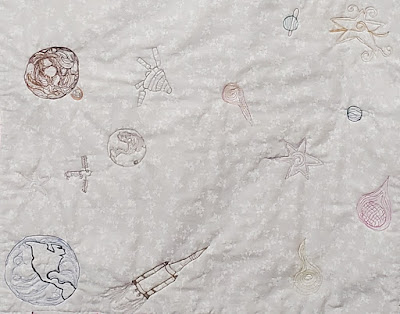
There are many wonders in our sky - so here are the latest additions to the sky surrounded by pinwheels and stars.

A nebula and oh....a UFO (not of the fabric kind) ๐Ÿ˜Š

 Here is the negative space viewed in two parts.

A view of the top part

A view of the bottom part

And now we have a view of most of the quilt.

Major elements FMQ onto the negative space of the quilt

What's left to do
    The sky
  • I will be FMQ small stars and swirls around the major elements. This will even out the quilting and give it a bit more stability and durability. I'll be using either regular white thread or Bottom Line white thread. I haven't decided yet. If I'm smart, I'll practice to see how the tension is and how it looks.
  • I also need to square off the quilt - not my idea of fun, but certainly less difficult when it's a smaller quilt.
  • Next comes the binding and a label. 
  • I really want this done by my next Free Motion Mavericks post which is on April 29th. It would also be in time for my One Monthly Goal of April ๐Ÿ˜Š

What I learned

  • I love it when I do things the way that I should, and that it pays off. This was one of those times. Since I was taking a virtual ruler quilting course on the weekend, I had quite a few sandwiches that hadn't been used. I took one of those last night and practiced some of the designs that I was going to FMQ, including the space ship. I also got some new King Tut variegated thread to try out at the same time.

Practicing my FMQ of the space ship and 
trying out new variegated thread.

  • I'm sorry that I didn't use some of the wilder variegated thread for the actual quilting. As beautiful as the thread it, some of it just doesn't show off as well. On the other hand, there will be a lot for a child to discover as they grow up with this quilt.
  • The nebula is actually a Wavy Spiral. I found it incredibly difficult to FMQ since I've been working hard for years to have lovely curved lines - wavy may have been natural at the beginning, but it isn't any more ๐Ÿ˜Š
  • I'm really looking forward to finishing this quilt - it's been a UFO and a WIF for way too long!

Related links

  • Christa Watson, 99 Machine Quilting Designs - Wavy Spiral design (#20)
  • Latest Pinwheels and Stars baby quilt post
    • Orbiting planets and funky stars on Free Motion Mavericks, April 01, 2021

Linking parties
I will be linking up to many fun linking parties out there is blog land. Let's find out what's going on...after you link up to Free Motion Mavericks below, of course! Monday Making, Midweek Makers, Let's Make Baby Quilts, Put Your Foot Down, Off the Wall Friday, Can I Get A Whoop Whoop?, Peacock Party, Patchwork & Quilts, Design Wall Monday

Free Motion Mavericks

Welcome. I'm really glad that you're taking the time to link up, whether you have done FMQ or not. Last time, we had an exceptional quilt linked up by Sandra of mmm quilts. One day, this is how I want my quilts to come out...of course I would have to actually quilt large quilts and I believe that having an Avril would help, but still...I'm sure that Sandra will tell you that it's all about practice. Here is Heading North in the Make Modern Issue 39. What a beauty. If you didn't read Sandra's post yet, it's a must do and see.
Sandra's amazing Heading North quilt

It's now your turn!

You are invited to the Inlinkz link party!

Click here to enter

Saturday, April 25, 2020

Bubble Up Lap Quilt in the making

It's almost done! I've been wanting to make another lap quilt for our love seats in our living room to keep Chevy cosy and the seats relatively dog hair free.

Bubble Up Lap Quilt - Where two spirals meet

Bubble Up fabric strips
The day that I heard that Quilty Pleasures, our local quilt shop, was not an essential service, and would have to close to customer traffic, I rushed out and supported the shop ๐Ÿ˜Š Among my purchases was a package of Bubble Up fabric strips. Enough to make one lap quilt!

I didn't get fancy, I just sewed all of the strips together. The fabric is so colourful and amazing that I didn't want to mess with it (that's my story and I'm sticking to it!)

It took me a while to figure out how to quilt it since the fabric was too busy, colourful and amazing. It wouldn't have been worth doing any fancy free motion quilting (FMQ). So I didn't.


Quilting spirals using the walking foot
Quilting spirals using my walking foot
In the meantime, I've been watching some excellent BluPrint (Craftsy) classes. I never used to watch them unless I was going to start doing the work, but in the last couple of months, I'm just watching them for entertainment. That way I can view many and just follow the ones that I want.

I started by watching the first of Jacquie Gering's walking foot courses, Creative Quilting With Your Walking Foot. I then watched her second course, Next Steps With Your Walking Foot. Jacquie is a really excellent teacher and her courses are interesting and instructive. I highly recommend them!

So how to quilt my Bubble Up Lap Quilt - with a walking foot using spirals. I learned so much from watching the courses and quilting this piece.

I'll be mentioning what I learned below but I did want to talk about the constructive interference that I experienced when these two spirals met. If you look at the picture, you will probably start to cringe!
Constructive interference -
when two spirals meet
Yup, you guessed it!

It looks like my quilt top wasn't quite taunt enough and trouble was coming. Anyway, I wasn't in any mood to remove any of the stitching, so I forged ahead. Yup, my quilt has some lovely pleats where the two spirals met. At that point, Better Done Than Perfect was my mantra. If you examine it closely, you can see the lovely pleats, but otherwise they are quite inconspicuous.๐Ÿ˜Š

I looked in my stash for fabric to bind the quilt but really, none of it was up to these amazing colours - so I just had to find an online store in Canada that had some Bubble Up fabric. My fabric is coming to me from East Coast Quilt Co, in St. John's, Newfoundland. If I can't travel, at least my fabric can!

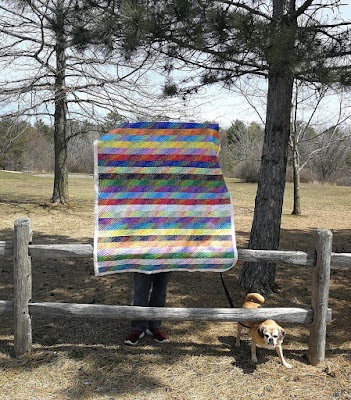
Since it was a beautiful day, I went out with my son and Chevy for a photo shoot to a deserted park down the street.


Bubble Up - where two spirals meet
quilt and dog
Fun with Chevy

There's a lot going on in that quilt!

Bubble Up Quilt
basking in the sun
See the flowers blooming - oh, and there's the quilt!


What I learned
  • As you know, I love free motion quilting (FMQ) but since I've been using my walking foot to make journal covers, I've come to appreciate it. I thought that it would be good to try out quilting with the walking foot on this quilt.
  • Jacquie Gering warned us that quilting spirals with the walking foot could be tricky. It is! The hardest thing to master, in my opinion, is turning the quilt around while not leaving a trace on the quilting. I have quite a few tiny bumps in the quilting. I'm sure that if I had been in a more zen mood that it would have gotten better earlier in the quilting. I was getting the hang of it by the end.
  • I used a colourful variegated King Tut thread for the top of the quilt - and I wasn't sure that I would have enough. I'm happy to report that I did, although I don't think that there's much left on the spool.
  • I love the secondary pattern that comes from the two spirals intersecting. 
  • I'm really looking forward to binding the quilt when my fabric arrives. Of course, I'll post it when it's finished! 
Related links
Linking parties
I will be linking up to many fun linky parties, including Free Motion Mavericks which is with Muv this week. Make sure that you go link up - it's not only about FMQ!
I'm also linking up with Sandra's DrEAMi quilt party, as well as many other fun linking parties. Let's check them out and see what's going on while we stay home and quilt! Peacock Party, Friday Foto Fun, Can I Get A Whoop Whoop?, Tuesday Colour and Inspiration, What I Made Monday, Monday Making,


Friday, January 31, 2020

Finishing up One Monthly Goal - OMG

I can't believe that it's the end of January. It was pretty intense quilting wise. I finished my two Project Quilting and the Winter Blues project with very little time to spare. That's how I live dangerously. ๐Ÿ˜Š

January's OMG 
A journal cover for my quilting agenda

My only other goal for January was my One Monthly Goal - to make a journal cover for my quilting agenda/notebook. As I'm writing this, I'm still not sure that it will get done in time. You'll find out by the end of the post (which has to be linked to the OMG linky party by tonight at Elm Street Quilts), or it will be my February OMG. Find out what happens....Can I write most of this post, go sew up the journal cover within 9 hours???

My FMQ piece for a journal cover
It took me a few days to find the fabric that I wanted to use for my journal cover. So many choices.... When I looked into my box of hand-dyed fabrics (mine and stuff that I've bought), I decided that these would be perfect for FMQ a journal cover. Most of the pieces are fairly small so they could be used for art quilts, but this is a nice alternative.

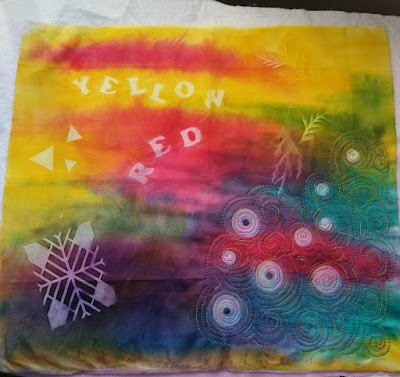
This first piece is so much fun. It was hand painted, printed and or dyed by Gunnel Hag of Colour Vie (see Related links below). Gunnel is an amazing fibre artist who gave a talk to the Out of the Box Fabric Artists Group a couple of years ago. I bought some of her fabric paint as well as a few beautiful pieces of fabric. This is the funkiest one.

Of course I forgot to take a picture of the fabric before I started FMQ, but you can see most of it here, as I started quilting it. I just love that there are many things going on that I could work around. It helped to separate the fabric into quilting areas.

The fabric by Gunnel Hag, before it got totally FMQ
The threads I used were all variegated - from Superior Threads, King Tut and Rainbows and from  Wonderfil, Konfetti. The fabric was a joy to quilt and I got to use a bunch of different designs.

I started off doing spirals around the circles (above) and then slowly moved towards the left image. Since it was more structured, I used boxes within boxes and triangles.

Adding more structured designs
I added triangles around the triangles and then pebbles around the word "Red". It was fun changing threads and seeing the different effects.
Triangles and pebbles around the word "Red"
In the un-quilted fabric, you can see a faint image of ferns or maybe spruce leaves. I went a little nuts with these. I started by just outlining the larger one but then kept on adding thread. For the other two, I restrained my enthusiasm (I got bored!)
Adding colour to the ferns
Faint outline of ferns


I added small swirls around the ferns to try to emphasize them. It might have been more effective if the thread had matched the fabric!


It was then time to outline the word "Yellow". By then I wanted to use simpler designs. I used wavy horizontal lines around the word "Yellow". In the pink above I used a design that I don't know the name of - I call them j's and f's because that's what the motion feels like when I make them. Finally on the left side I made some meandering swirly flowers. I considered using matching thread when I got out of the yellow section but it was lovely to see the effect of the yellow thread on the green fabric.

Yellow and pink at the top
A finished agenda cover

Yes, I just made it. With only 5 hours before the OMG linking party closes, I'm now showing you the finished product. ๐Ÿ˜Š

This is the third journal cover that I've done, and it would seem that practice makes things much easier. I followed Christina Cameli's class on BluPrint and made lots of footnotes.  

The finished front of the agenda cover

The back of the cover

The back and front of the cover
Agenda cover with fancy fold-over elastic
For this cover, I even added a ribbon to keep my place.
My quilting agenda and notebook

What I learned
Cutting the fabric was the most difficult part!
  • It took me 4 hours to FMQ this fabric piece and only one hour to make the journal cover - and things went without problems.
  • I made tons of notes for myself so that I can keep making these journal covers easily.
  • I had to cut some of the FMQ fabric - it was difficult. I like what I chose but I'm sorry that I didn't keep more yellow and pink in the final piece.
  • I would also have liked to have the back of the cover be the front, but the word "Red" would have been upside down.
  • I never throw these extra quilted pieces out, so one day, you may see that lovely yellow incorporated into another piece.
  • Do you know if there's something I can do to make the ribbon a little stiffer? Would coating it with ModPodge work? If you have any ideas, please let me know.
Related links
Linking parties
I'm linking up to Elm Street Quilts' One Monthly Goal Finish for January. It looks like I made it ๐Ÿ˜Š I will also be linking up to Free Motion Mavericks with Muv since it's her week to host the party. Make sure that you go link up too! Midweek Makers, Colour and Inspiration TuesdayPut Your Foot Down, Needle & Thread Thursday, Off the Wall Friday, Finished or Not Finished Friday, Friday Foto Fun, Can I Get A Whoop Whoop?, Beauties Pageant, TGIFF, Peacock Party,

Dione scored a rainbow for her Outback Weather Bingo with this project! Check it out at Colour and Inspiration Tuesday

Project details


FMQ agenda cover
Pattern and instructions by Christina Cameli
8½" x 6"
Techniques: FMQ, sewing
Material: hand painted, printed and or dyed cotton by Gunnel Hag, fold-over elastic, agenda


Tuesday, October 16, 2018

Diamond Mini

I love trying out new patterns, especially when they come from a fellow blogger. I often don't have the time to try them out, but this weekend I wanted to make a special little something for my sister-in-law who was visiting from Vancouver.

Diamond Mini 

When she was here last Thanksgiving, she mentioned that she loved the colour combination of bright green and pink. I had promptly picked up some Kona fat quarters but never did get around to making anything. So finally, a year later, here it is. ๐Ÿ˜Š

Diamond Mini
This foundation paper pieced diamond block is one of 9 diamonds that make up the Hodge Podge Diamond in the Rough mini quilt. It was created by Sherry of Powered by Quilting.

Here is Sherry's pattern. Isn't it lovely?
Hodge Podge Diamond in the Rough mini quilt
What I learned
  • I meant to use a very light pink for the middle triangle of the diamond but forgot about it. I think that it's fine. Sherry's mini is really cute and uses printed commercial fabric that looks really nice. In a quilt with 9 diamonds, it's really effective.
  • I wasn't too sure how to quilt it but Sherry had used some echo lines that were very effective. I couldn't do quite the same thing since I only made one block, so my quilting is much simpler.
  • I do like the two smaller diamonds that I added at the bottom (which turn out to be symbolic at this time in her life)
  • I'm not thrilled with my choice of variegated thread, at least for the echoing on the green. It does look better in person.

Related links
Linking parties

Great News! Dione of Clever Chameleon Quilting has featured this Diamond Mini. Thanks Dione!

Project details


Diamond Mini
size
Technique: foundation paper piecing, free motion quilting
Materials: Kona cottons and King Tut variegated thread by Superior Threads.


Wednesday, October 03, 2018

Throwback Thursday for October

Welcome to Throwback Thursday. I'm hosting this month's link-up for Sandra of mmm! Quilts.

I hope that you've got some great projects to share this month. It's so fun to see older projects that were created before you started your blog.

Beatles Wall Hanging

I made this wall hanging for my daughter many moons ago - I'm afraid that I really don't know when. I know that it was before I started free motion quilting, so before I got my jag (that's my sewing machine - the only jag I'm likely to own!).
Beatles wall hanging
She fell in love with the panel and then I bought the orange and the purple fabric to go with it.

The original panel
It was all done by walking foot using a variegated KingTut quilting thread from Superior Threads.

The back of the quilt
The quilting comes out well in the back.

The quilt never did hang in my daughter's room but it's been the the basement guest room for years now. It was good to take it down and give it a good airing for this photo shoot!

What I learned
  • I believe that this was the only quilt that I ever made with my walking foot. 
  • I remember that it was fairly tricky to quilt since there were many curves and such, but I took it slowly and it worked out. 
  • I mostly followed the outlines of the images in the panel and then added some gentle curves in each of the borders.
  • If I take too long to make something for my daughter, odds are she'll have moved on to something else or will have changed the style of her bedroom ๐Ÿ˜Š
Related links
Linking parties
Please add your link to the link-up below. Throwback Thursday is usually help at Sandra's mmm! Quilts. She'll be hosting the next one in November. I will also be linking up to some great linking parties around the quilting world. Let's go see what everyone is up to! Monday Making, Design Wall Monday, Main Crush Monday, Moving it Forward, What I Made Monday, Linky Tuesday, Tuesday Colour Linky Party, Midweek Makers, Let's Bee Social,

I've also linked up to Sarah Goer's Show Me Something Orange linking party.

Project details


Beatles wall hanging
45" X 53"
Materials: panel and cotton fabric
Techniques: quilted using a walking foot


Throwback Thursday Link-Up


Monday, May 29, 2017

Classy and Scrappy

This crazy month of May is almost over - and it's still raining in Ottawa. Hopefully not enough to cause more flooding! Everything is very green when the sun does shine :-)
I haven't been quilting as much as I think I should. But I have been reading books (not audio or even digital). What a treat!
Classic side of the placemat

This weekend I made a placemat for a very special friend. Tipi was one of my mother's best friends. She didn't want anything big, but said that a placemat would be great. She mentioned dark red, blue and yellow.

All of the fabrics were from my stash. I did have three fat quarters from the same line, full of beautiful roses. I'm not sure that it's her style, so I added some more funky flowers to the mix.

The placemat will go with whatever mood she's in - one classic and the other fun and scrappy. I used a blue and yellow Provence style fabric as well as many red, yellow and gold fabrics from my stash and scraps. I put two log-cabin type blocks together.

Fun and scrappy side of the same placemat
The first, more classic side, comes from the Square Scramble pattern by Kate Colleran in the Spring 2016 Quilts and More magazine.

Square Scramble pattern by Kate Colleran
I free motion quilted (FMQ) the placemat with an all-over design of small flowers with a couple of loops. I used a slightly variegated beige thread (King Tut, 40 wt. from Superior Threads) for the top. 

Free motion quilting on the classic side of the placemat
Free motion quilting in beige on the classic side 
The bobbin was another lightly variegated yellow thread.  I love how the yellow shows up against the dark reds.
Free motion quilting in yellow on the scrappy side of the placemat
Free motion quilting in yellow on the scrappy side
What I learned
  • Even when I was really careful with the cutting and piecing, my classic placemat didn't come out even. I'm really going to have to take our guild's course on sewing with accuracy. Even if it's not my idea of fun, being accurate when I'm trying would be nice!
  • I love the two different sides of this placemat. One classy side and the other fun and scrappy. Great for any mood!
  • I don't often use an all-over pattern when free motion quilting. Because of the two different sides, I believe that this was the best way to go.
Related Links
Project Details
Classic side of the placemat
Classy & Scrappy placemat
20" x 13"
Classy side - Square Scramble pattern from Quilts and More magazine, Spring 2016
Materials: cotton 
Techniques: piecing and improvisational piecing, FMQ

Great News! Classy & Scrappy was featured on Free Motion Mavericks!

Linking Parties: I will be linking this post to the following link-ups. Check out what everyone is making! MOP Monday, Monday Making, Main Crush Monday, Moving it Forward Monday, Oh Scrap, Linky Tuesday, Let's Bee Social, Midweek Makers, Free Motion Mavericks, Needle & Thread Thursday, Off the Wall Friday, Can I get a Whoop Whoop?, 

Update: I linked to Sarah Goer's fun linky, Show Me Something Improv.
I am linking this post to Sarah Goer's Show Me Something With Squares

Sunday, December 11, 2016

Embellished Dress-up Shirt

The back of the shirt has an embellished red dump truck
The back of the shirt
I just finished embellishing a fun dress-up shirt for my friend Sonya's son. He loves trucks and dinosaurs and now he'll have his own dress-up shirt to play in.

I found the truck at kidsplaycolor.com It's a simple dump truck that I could copy and then embellish. I drew the truck onto freezer paper. Not an easy thing to do since I was at the fall retreat and didn't have a printer. I cut out the truck shape and used the freezer paper template to copy it onto the shirt. I then sewed the truck outline in red and then embroidered the tires in red and black. The metal-looking beads are perfect for the tire rims. The grill of the truck is sewn with metallic thread from the bobbin.

This week I read  Lara Buccella's Crafted Appliquรฉ book. I had seen all of the blog posts about her book and was looking forward to reading it. Her technique is really great. I used it for both the truck and the dinosaur. Frankly I hadn't even though of using appliquรฉ in this project until I read her book. It was the perfect technique.

Once I finished the appliquรฉ, I used a black fabric pen to outline the windows and finish the tires. I also added three rows of red seed beads.
An embellished red dump truck
A very cool dump truck!
The front of the embellished shirt
The front of the shirt
For the front of the shirt I found an easy dinosaur to draw from fourpencil.com It's a Diplodocus.

To cover the Diplodocus,  I took out all of the colourful scraps I could find. I used the Crafted Appliquรฉ technique,and then cut and ironed the fabric pieces in place, I used a multi-coloured King Tut thread to zig-zag stitch around each fabric piece. I embroidered the mouth and the eye with black embroidery floss.

a multi-coloured Diplodocus
The multi-coloured Diplodocus


What I learned:

  • I really enjoyed making this piece. I wasn't sure how I was going to fill in the truck, so I was really glad to read about the Crafted Appliquรฉ technique.
  • I didn't think that I could draw both the truck and the Diplodocus from the computer screen. I am very pleased with the results. 


I've linked this post to the following parties - please check them out! Can I get a Whoop Whoop? Off the Wall Fridays, Oh Scrap! MOP Monday, Monday Making, Main Crush Monday, Slow Sunday Stitching, Let's Bee Social, Midweek Makers, Needle & Thread Thursday, Off the Wall Friday, Fabric Frenzy Friday.