Showing posts with label thread sketching. Show all posts

Sunday, February 23, 2020

Birds in the Air with Project Quilting 11-4

Challenge 11.4, "Birds in the Air" certainly challenged my creativity because I was determined to avoid making the traditional block at all cost! My accuracy challenged and tired brain was revolting against all of those HST (half square triangles)!

A conceptual Birds in the Air block


A conceptual Birds in the Air block

Since I didn't want to make those HST, I though of alternatives. When in doubt, I go to my strengths. Could I make a Birds in the Air block with free motion quilting (FMQ)? Sure, why not?

Ironic aside: it would have been much easier to piece the block with those dreaded HST than to figure out all of the challenges that came from making a conceptual block. 😊

I'm not sure what my thinking process was, but I tend to start with the obvious, such as birds within the HST, which then suggested a blue sky fabric. Since I've been working a lot with my dyed fabrics, I was sure that I could find something.

I made the block but since it was the size of the finished block and there was no gripping space for FMQ or embroidering, I added a square of backing fabric so that there was about 1½" extending on all sides of the block. Then I stitched the conceptual HSTs on the blue fabric.

I originally though of embroidering most of the images on the block but I ended up procrastinating long enough that I didn't have enough time, so back to FMQ!

Adding Trapunto

I thread stitched the birds and then decided to add a little bit of trapunto for the tree after watching Patsy Thompson do it on BluPrint. I added a layer of batting between the fabric and the backing and then stitched the top of the tree. I repeated the process for the tree trunk.

You can see a little bit of the Trapunto on the tree trunk, where it's puffier.
The background trees and the grass in the foreground were free motion stitched next. At this point it was Saturday afternoon and I was getting a little nervous, so I decided that it was time to FMQ and bind the piece. I could embroider the rest after I had finished the quilting.

I cut around the block and the backing, leaving the original layer of backing to extend about a ½". I cut batting to this size and then used a lovely green batik as the final backing. I cut this piece 2" larger than the block.

Free Motion Quilting

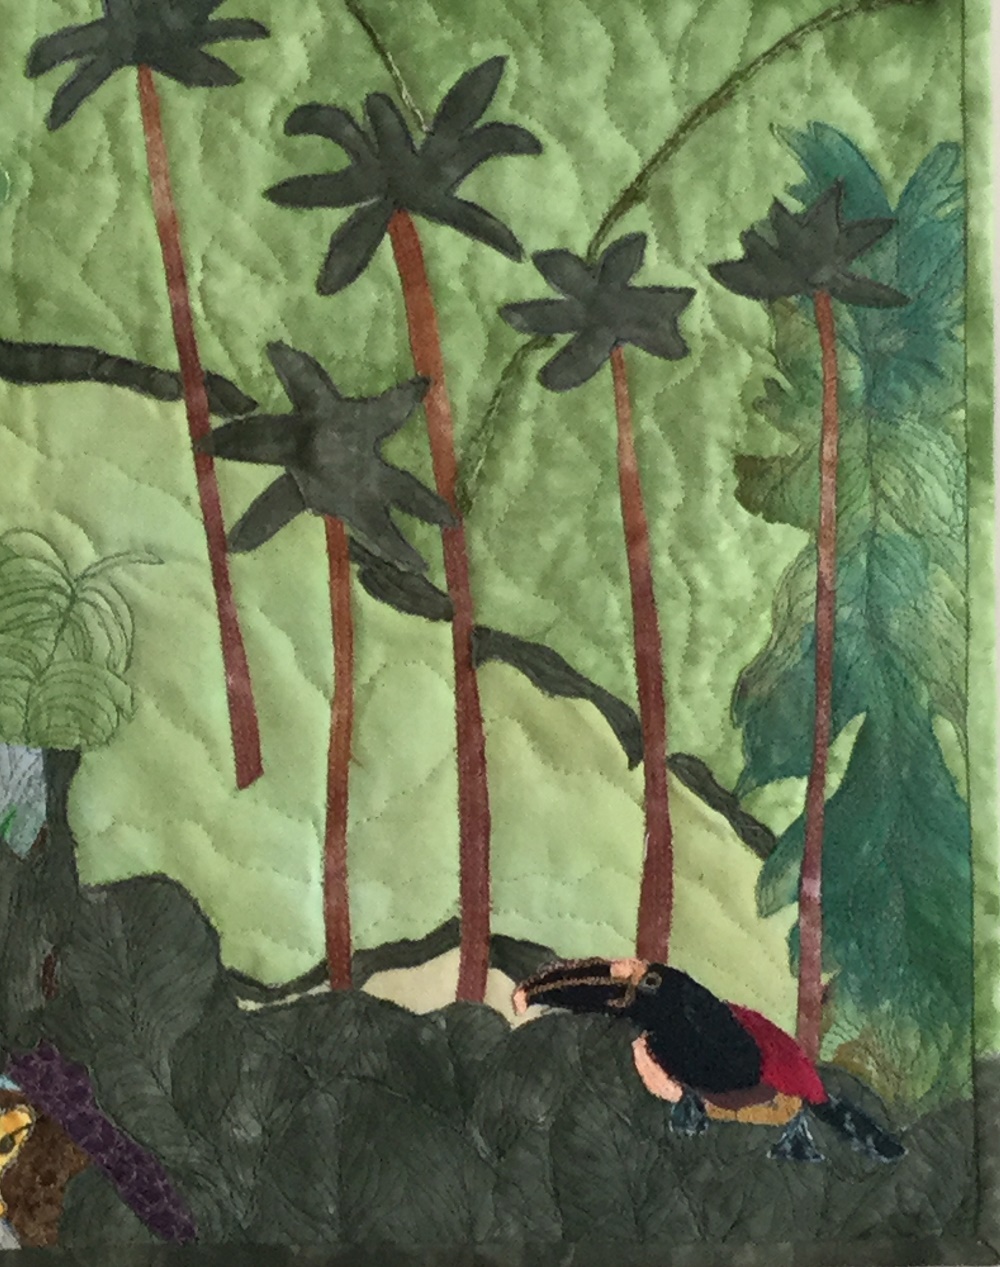
Details of the embroidery and FM stitching
I had no idea how I was going to FMQ this piece since I didn't really want to add more thread to the
piece. Then I remembered that I received a free spool of Invisible Thread at last year's Quilt Canada. I decided to take the plunge. I used the Invisible Thread as the top thread and FMQ the conceptual lines of the HST in the top half. I then stitched-in-the-ditch between the blue and green fabric and then around the tree, grass and background trees.

I bound the quilt and then started embroidering. I ended up hiding the trapunto on the tree top when I added couched fuzzy yarn all over it. I liked the trapunto effect but I like the texture more.

Does it sound like it was a long drawn out process? Well it was. I am happy with my finished piece and I learned more than I really wanted. But it's done and I think that it's lovely 😊

What I learned
  • It took me a while to figure out how the Birds in the Air block was made....until I turned it on point.
  • This piece almost didn't get finished. After cutting and sewing the two large HST, I had no idea what to do. As I mentioned it was too small to work on and deep down, the thought of embroidering all of it didn't appeal to me. It sat for a few days before I finally started free motion stitching it.
  • When I showed my almost finished piece to my son, he said that the birds are upside down. My daughter and I both think that they're correct. Maybe there's more than one way to draw birds in flight?
  • I added trapunto to the tree top. It was a little harder than I expected since I did it between the backing fabric and the stitched birds were sort of in the way of my cutting around the batting. I ended up cutting my backing fabric since I knew that it would be covered with batting and a final backing fabric. At that point, I really felt like I was channeling my mother's MacGyver energy. 😉
  • I would never have tried using invisible thread but one of the teachers on BluPrint recommended water soluble thread, especially to stitch around trapunto areas. Invisible thread isn't quite the same but I used it instead and was very impressed. The thread did show up a bit, although most of it was later covered by embroidery. I believe that they sell a few kinds of invisible thread - I think that a more smokey colour would have been better. I'll have to look into that!
  • Since I have less than an hour to publish this post and link up, I'm going to stop now!!!
Related links
Linking parties
I will, of course, be linking up to Project Quilting, Challenge 11.4 as well as many other fun linking parties. Make sure that you visit some of these and get inspired! Off the Wall Friday, Slow Sunday StitchingCan I Get A Whoop Whoop?, Put your foot down, Colour and Inspiration TuesdayFriday Foto FunPeacock Party, Beauties PageantMonday Making, Midweek Makers, Needle & Thread Thursday, Free Motion Mavericks, I'm also linking up to February's Favourite Finish Monthly Linkup

Project details


Birds in the Air
7" x 7"
Techniques: FMQ, embroidery
Material: hand-dyed cotton, wool, embroidery floss


Thursday, August 30, 2018

Funky Mountain Landscape Quilt Finished

Funky Mountain Landscape Art Quilt

It's done! I have to admit that I'm surprised that I finished it in time for the August One Monthly Goal (OMG) deadline.

As I mentioned in a previous post, this funky mountain landscape quilt is for Joe's graduation and her first apartment. Joe is one of my daughter's friends, and a real sweetheart :-)

Funky Mountain Landscape Quilt is finally finished!
I really enjoyed working with the batiks. It adds some great colour to a traditional landscape.

Thread sketching the mountains

This is the photo that started it all. It was taken on a trip to British Columbia a few years ago.

Mountain landscape in British Columbia

What I learned
  • It was interesting working with batiks and trying not to be too realistic. That wasn't easy for me and I went way outside of my comfort zone to add the purple mountain :-) 
  • The thread sketching certainly helped define the mountains.
  • Finally I didn't embellish this piece. I think that the polar bears in the fabric are enough embellishment or whimsy.
  • The hardest part about making this landscape quilt was determining when to stop thread sketching and when to start quilting. In hindsight, I should have done less thread sketching on the water. This would have given the water section of the piece a little more dimension then quilted.
  • As I look at the finished photo, I realise that I should have ironed the sky before taking the photo. By the time I finish the binding, I'm always in such a hurry to photograph it for the blog 😊
Related Links
Linking Parties

Upcoming Event
On September 13, 2018, I'll be taking part in the Welcome To My House Blog Hop. I've got a funky house that I hope to finish up this Labour Day weekend.

Project Details

Funky Mountain Landscape Art Quilt
14" x 14"
Materials: batik fabrics, glue,
Techniques: raw edge appliqué, thread sketching, quilting.


Sunday, June 24, 2018

Lots of progress

It's amazing how portable hexies are! I've been making hexie flowers everywhere, mostly so that I can have the opportunity to take pictures of them. These are both very addictive activities. 😊

Kingfisher Stitch-Along

If you follow me on Instagram, you will see how addicted I am to taking photos of my hexie flowers among real flowers. What I like about Instagram is that you can "Like" as many posts as you want without driving your non-quilting friends crazy! I've also been saving the posts that I like so that I can go back to them on my computer and read the corresponding blog posts. Well, in theory I can, and will eventually when I find the time.


On my way to work, it made my day to stop in a little park to take pictures of my latest hexie flowers.

I love the photo below of the dappling sun on the flower and making the fabric even more interesting.

That day, I experimented with posting images on Instagram using my computer. I was able to do it, thanks to some helpful googling, but I was only able to post one picture at a time. It's good to know that it can be done.


The sun playing on one of my favourite batik fabric

The last bleeding heart flower of the season
Later I took these pictures in my back yard.

This photo is of the last flower of the season on my bleeding heart. It's gotten too hot for these lovelies.


I took a photo with a daisy, the only one growing in the garden. Technically it's probably a weed, but a flower is a flower and I have very few of them left right now.


As you can see from some of the pictures, I like to hand-baste my hexies. Actually it's my favourite part, so there's no way I'm going to glue them. That's also the part that's the most portable since you don't have to be as careful about your stitches.

I was also able to capture this bee doing its business. Isn't digital photography amazing? You don't have to process all of the images to get that one good shot. You just keep clicking and then delete all the others!

A bee doing what a bee does...
This week at the Kingfisher Stitch-Along it's time to cut out the background diamonds. I'm glad that Stitched in Colour created a good tutorial because I could see myself cutting out one diamond at a time. I'm not very good at thinking in 3D. Turns out you can just cut strips and then cut off triangles at both ends. Don't take my word for it, check out the tutorial in the Related Links section.

Hexies with background
Here is my background fabric. I haven't started cutting it yet. That's a project for this week. Also, I never cut all of my fabric at one time if I can help it, so there may be time to purchase one or two more light batiks. They aren't easy to find.

Hexies with background

The background colour isn't that obvious in this picture but it's an off-white with some pink and grey. I also have a couple of fat quarters that are off-white with some brown and yellow.


Finally here is my stack of hexie flowers to date. There are thirteen in the stack and I am basting 3 more. That's the magic number for my June OMG! I'll be posting in a few days.

Thirteen hexie flowers completed :-)
Free Motion Quilting 

Outlining the pattern which is now the back of the wholecloth quilt
I've really enjoyed all of this slow stitching, but I do miss doing FMQ. Since I don't want to start a big project, I remembered that I have some thread sketching to do on my second wholecloth quilt from last year's Learning Quilt-A-Long.

Thread sketching is just FMQ in a very small area and it is good to be doing it again.

Below you can see what it looked like before I started to add colour. I just FMQ around the outline of the fabric's pattern
The front of the wholecloth quilt, before adding colour
I love doing the thread painting but it is a very slow process. I am now working on some of the leaves and the strawberries.
Slowly adding colour to this piece
For this project, I am using my collection of Kimono silk thread from Superior Threads. They are truly amazing and such beautiful colours.

Details of the wholecloth quilt. It's a very slow process.

What I learned
  • You can probably tell that I'm having fun with my batik hexie flowers. I love batiks, hexies and real flowers, so it's a great combination.
  • It's easier to do the thread painting in daylight. I've found that it's harder on my eyes to be working in the evening, even with the light on. I do want to invest in a second smaller light for this kind of work.

Related Links
Kingfisher Stitch-Along posts:
Wholecloth quilt posts:
Linking parties
I am linking up to many parties this week. Check out what is going on out there in the quilting World.
Free Motion Mavericks, To-Do Tuesday, Slow Sunday Stitching, Can I Get a Whoop Whoop?, Friday Foto Fun, Monday MakingMain Crush Monday, Design Wall Monday, Move it Forward Monday, Linky Tuesday, Tuesday Colour Linky Party, Wandering Camera,

Great News! My Wholecloth quilt was featured on Muv's Free Motion Mavericks. Thanks Muv!


Wednesday, October 11, 2017

Art with Fabric Blog Hop - Gaïa, Mother Earth

It's that time again - the semi-annual Art with Fabric Blog Hop - Fall 2017!


I've been participating in Alida's blog hop for two years now. This will be my fourth entry. It's a great event - I get to make an art quilt from a piece of art that I love, and see all of the participants' creations. Thanks Alida for organising this again!
Gaïa, Mother Earth

This fall event's theme is Mother Nature, sometimes known as Gaïa, the goddess of the earth.

My entry is based on a reproduction statuette of a beautiful Pre-Columbian female figure from Colombia, South America. Technically, the figure probably did not represent Gaïa, but she is, to me, a symbol of Mother Earth.


Reproduction statuette from the Tamaco culture 
When I found her fifteen years ago, I was told that there were very few of these statuettes around since they were extremely difficult to ship to Canada. Since coming to our home, she has always been in my living room surrounded by books and plants.

Provenance
The archaeological area
in Colombia and Ecuador
I've done some research on this lovely lady. This reproduction comes from Colombia, South America, near the Rio Mira (Mira River). The original statuette is from the Tumaco culture, dates from 1000 to 1600 AD and is held in a private collection.

I found two resources, that I have listed in the Related Links below, about the statuette. The first one is about the Tumaco culture while the other one, on the Tolita culture, is from the same region but possibly older. Check them out for a fascinating read.

The area in Colombia where she comes from is near the Ecuador border. Here is a map of the area from the Museo Chileno de Arte Precolombino.

The background
Since the theme is Mother Nature, I wanted to make the background of this art piece based on the area where this statuette comes from.

Tumaco is both a port city and municipality located on the southwestern corner of Colombia, near the border with Ecuador, on the coast of the Pacific Ocean. It has a hot, tropical climate.

It's far from a realistic representation but it includes some interesting animals and plants of the area, and of Colombia in general. The wax palm tree, Colombia's national tree, is found near this area, in the Cocora valley. I've included a poison arrow frog, an orchid, a bird (the Stripe billed aracari), and a morpho butterfly. The landscape includes a river, the valley with the wax palms as well as mountains in the distance.
Panoramic of Cocora valley with wax palms

The making of the art quilt
I started with the background of the valley and the mountains. These are all hand-dyed fabrics - my own and some from my stash. I also wanted to add a water feature. It took me a while to work in the river on the bottom left. You can see one of my earlier attempts in the image below.


My favourite part was making the wax palms. They are so tall and elegant!

After the thread painting and before the quilting
I made the aracari and butterfly on some interfacing and solid off-white fabric, while using some fun yellow fabric to make the frog. All were made separately with lots of thread sketching and then appliquéd to the piece.

I quilted the piece with Superior Kimono silk thread in both the bobbin and the top.

Quilted and almost finished
As I was working on the background, I started with just a cut-out of the statuette's image to make sure that she would belong. When the background was almost finished, I used a photo transfer medium to get the image of my statuette onto fabric. I'll be explaining this technique in a later post.

To outline the mountains, I couched some dark green yarn made of banana fibre.

Finishing
I embellished the statuette, as if they were offerings made to Gaïa, with coral buttons representing baskets and an orchid.
Baskets and an orchid as offering to Gaïa
Wax Palms and stripe billed aracari

River with a Morpho butterfly and a poisonous arrow frog 
The art quilt is finished with a pieced binding that matches the quilt.
Gaïa, Mother Earth
What I learned
  • I hadn't researched the origins of the statue until I decided to make this art quilt. I am really happy to know a little more about her culture and her country of origin. Colombia has an amazingly rich and diverse ecology.
  • I had a really hard time incorporating the river into the piece. When I finally stopped trying to be realistic, it all fell into place.
  • It was fun making the various animals and plants that I appliquéd to the piece. 
  • I had no idea how I was going to finish the piece. This is really something that I should think about before making the quilt - it would make it so much easier at the end. I do like how the pieced binding worked out. I considered quilting over it and making it a more integral part of the quilt, but frankly I was tired and this would have required a lot of work. I just wasn't up to it.

Related Links

Project details


Gaïa, Mother Earth
19¾" x 17¾"
Materials: hand-dyed and commercial cotton fabric, coral buttons, banana fibre yarn
Techniques: appliqué, photo transfer medium, couching, thread painting, FMQ, 


Linking Parties: this post is a part of the Art with Fabric Blog Hop - Fall 2017. Take the time to visit the other participants. I'm sure that it will be worth while!  I will also be linking to some fine link-ups. Main Crush MondayDesign Wall Monday, Linky Tuesday, Let's Bee Social, Midweek Makers, Free Motion Mavericks,  Off the Wall Friday, Needle & Thread Thursday, Can I Get a Whoop Whoop? 

Here is the schedule and links to the Art with Fabric Blog Hop, I will be adding direct links to the  posts as they are posted. I will also be hosting guess blogger Patty, on Friday. Be sure to come back and check out her work!

Monday, October 9th, 2017
Tuesday, October 10th, 2017 
Wednesday, October 11th, 2017 
Thursday, October 12th, 2017 

Friday, October 13th, 2017 


Wednesday, November 09, 2016

Update on Projects

I haven't been able to finish anything recently, but since I'm working on lots of projects and won't get anything done in the next week, I thought I'd post an update.

Canada's 150th Block

Canada goose block
The beginning of my Canada goose block
Many quilt guilds are creating quilts to celebrate Canada's upcoming birthday. The Common Thread Quilt Guild asked its members to make blocks representing Canada. The blocks trickled in, but I believe that we finished with over 30 blocks.

The blocks are 4" x 6" (finished) and will be made into a quilt that will hopefully be part of a travelling exhibit. I made my block during my quilting retreat this fall. As I pieced this Canada goose together, we got a post on our Guild Facebook page - someone had just finished her Canada goose block!

When I got home I thread sketched the block but wasn't going to enter it - but then changed my mind. There are so many Canada geese here that they deserve a couple of blocks!

Lovely Mittens block by Sherrill
Last night all of the blocks were displayed at the Guild meeting. There were some really lovely blocks, in all kinds of different techniques, colours and styles. It's going to make a great quilt.

Here are a couple of pictures - unfortunately I didn't have my good camera so most didn't come out.
Finished Canada Goose block


World Quilting Travel Adventure
with JoJo Hall

I'm still on a World Quilting Travel Adventure
with JoJo Hall. I'm a little behind but this is the beginning of my second destination project - this one is from Hawaii.

I got to learn about Hawaii and received a pattern from JoJo to make a Plumeria Headwrap. The flower is a plumeria, used to make a lei. Here is JoJo's finished project. Isn't that flower amazing?
JoJo's Plumeria Headwrap souvenir from Hawaii

Of course, those who know me will have guessed that I can't just make something like the pattern :-) I am going to make the two flowers based on JoJo's pattern, but will be incorporating them into an art quilt (of course!)

Here is my first flower. I cut and sewed the pieces but I still have to paint and then stitch the petals to my piece.

This plumeria will be incorporated into a mostly peach coloured project while the other flower will be in pinks. I don't expect to have this done until possibly the end of November, but I'm not promising anything because I am really trying to stay away from deadlines.
The beginning of my Plumeria 

King Size Quilt to keep me warm this winter

Finally I have put a binding on my bed quilt - it's a king size so it wasn't a quick job. When we come back from the South-West, we'll be warm and cozy.

I still have 146 blocks left to quilt (out of the 169) but I figure I will just have to take the quilt off the bed and keep at it.  Since I've quilted around each block, the quilt is solid enough to use.

Well, I haven't finished packing and we leave tomorrow morning, so I will be back in a week or so. Heading to the deserts of the South-West US.

What I've learned:

  • Writing a post is more fun that packing - that's why I'm procrastinating!
  • It's great to be able to advance projects - every little bit helps.
  • If it's not fun, what's the point? I have to remember this one!
I'll be linking up to a few linky parties. Check out what everyone is making!
Linky Tuesday, Let's Bee Social, Midweek Makers, Fabric Tuesday, Oh Scrap!


Thursday, October 13, 2016

Art with Fabric - Stained-glass window

Art with Fabric blog hop
Welcome to the Art with Fabric blog hop. My art quilt is based on the stained-glass windows of Gaudì's Sagrada Familia church in Barcelona, Spain.

The windows within the Sagrada Familia are a beautiful progression of colours from blue, green and yellow, to orange, red and purple. My piece is a depiction of the colours found in these windows.

Stained-glass windows
of the Sagrada Familia


The stained-glass windows were created by Joan Vila-Grau based on architect Antoni Gaudi's plans. The shapes of the glass pieces are a mixture of curves and lines. Since Gaudi's designs were greatly influenced by elements in nature, I created my stained-glass to represent parts of nature based on the colours used.
Stained-glass of the Sagrada Familia
My interpretation of the stained-glass window of the Sagrada Familia
White depicting the clear
textured glass
The straight lines and green of trees
The first row of the stained-glass represents the white light of the Creator. In the Sagrada Familia, the windows of the upper portion of the transept are made of clear textured glass that shimmer onto the vaults. In the art quilt, I used white-on-white fabric that I thread sketched based on their designs.

The second row begins with purple that links it to the last row of the window. The blue that follows represents the sky and rain. These shapes are more circular than the green shapes at the end of the row. These have straighter, more angular lines that depict the forests and majestic trees.
The yellow of the sun

I used all kinds of thread sketching designs, and tried to use the same design on all of the pieces of the same colour. This was sometimes difficult to do since some fabrics were only slightly different and I wasn't always able to match them.

Continuation of green
in the third row
The third row continues with blue flowing from the second row; goes to yellow in the middle; and then continues with the green from the second row. The shapes continue to represent elements such as curves and long vertical pieces of blue for rain; a sun and diamonds of yellow and more angular trees in green.

In the fourth row, the blue turns to green and then transitions to yellow and orange. In the yellow and orange section, I have tried to depict the setting sun - circular for the sun with rays streaming down. The bright orange and yellow of this section stand out in the window.
Yellow and orange of the setting sun
Brown, red and purple of the
earth and rocks


The fifth and last row represent the grasses in green, as well as the earth and rocks ranging from brown, red to purple. The purple also links the beginning of the window to the end.


What I learned:
  • This was by far the most ambitious and difficult piece I've worked on. Unfortunately, I don't think that I was quite ready for it.
  • As much as I love the picture of the stained-glass window, the real project was not a success. It's not easy to admit that I made a lot of mistakes - but after my initial disappointment I have to say that I learned a lot and will hopefully be wiser for it.
 What went wrong?
  • I used the freezer paper to cut each piece and then sewed them together using raw edge
    Raw edge applique and freezer paper
    Raw edge applique and freezer paper
    applique. This technique requires a level of sewing precision that I don't have, and am not particularly striving for. I had briefly considered adjusting the pattern to foundation paper piecing. I'm sorry that I didn't do this. It would have changed the pattern somewhat, but since it was mine to make up, I'm sure it would have been fine. It would have taken a lot longer to create but would have resulted in precise piecing, easily covered with "lead cane" or ribbon. It would also have eliminated the need for a bonding agent (see next point).
  • Using Heat and Bond light behind the glass pieces was necessary, as I discovered while piecing the first row. I also didn't cover the full piece with the bonding agent. If I had free motion quilted (FMQ) each piece instead of thread sketching them, they might have turned out better. But since I didn't, many of the pieces came out lumpy.
  • After completing the lead cane with ribbon, I made the sides based on the design around some of the windows in the Sagrada Familia. The fabric I used was too dark and took away from the focus of the window. If the stained-glass window had worked out, the background could have been fixed. But since there is no way to fix the window, it's not worth the effort to change the background.

Although it was a tough piece to work on, I am very happy with my design of the colours and shapes of the stained-glass window. I'm not sure that I will ever come back to this piece, but I might be able to pull it off if I used foundation paper piecing. That could be an interesting challenge, especially if it didn't involve a deadline! Thanks for taking this learning journey with me. You can read the whole adventure in the following posts:
On the very bright side, I now have an amazing collection of solids and silk thread. There's got to be a few wonderful projects resulting from these!

Don't forget to see the creations of the other participating art quilters. See the entire schedule here.


Thank you Alida for organizing this wonderful blog hop. Next time I'm going to try to be a little less ambitious!