Showing posts with label Kate Tume. Show all posts

Thursday, April 20, 2023

Fibre Fling and Free Motion Mavericks

Welcome to week 427 of Free Motion Mavericks. This week I'm busy getting ready for the annual Out of the Box (OOTB) Fibre Artists Group show. It's been virtual for the last two years so it's wonderful and a lot more work, now that it's live again.

Fibre Fling 2023


Fibre Fling 2023 is this week in Ottawa

See you at Fibre Fling 2023!

I have two pieced in the show this year, one of them you've seen a few times on the blog.

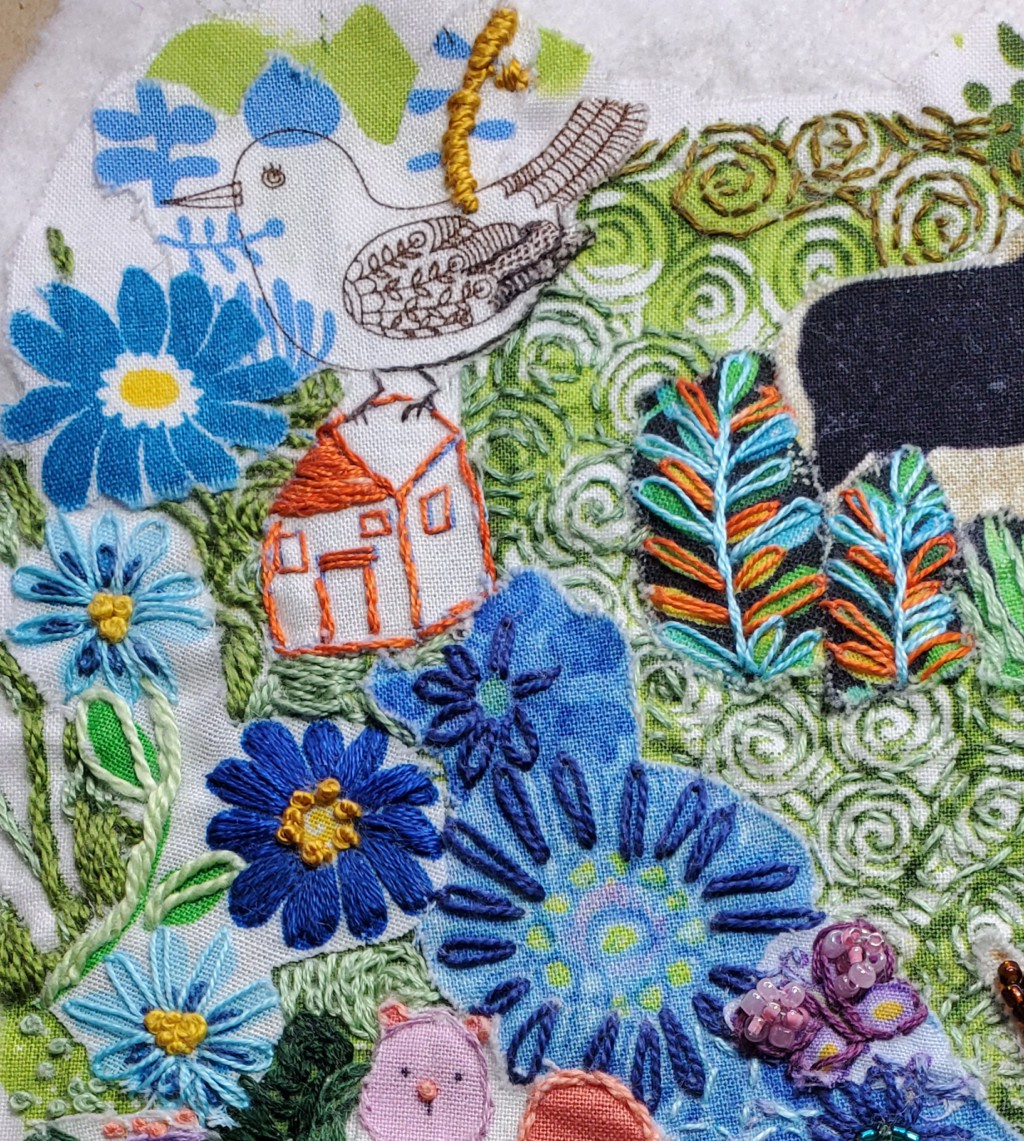
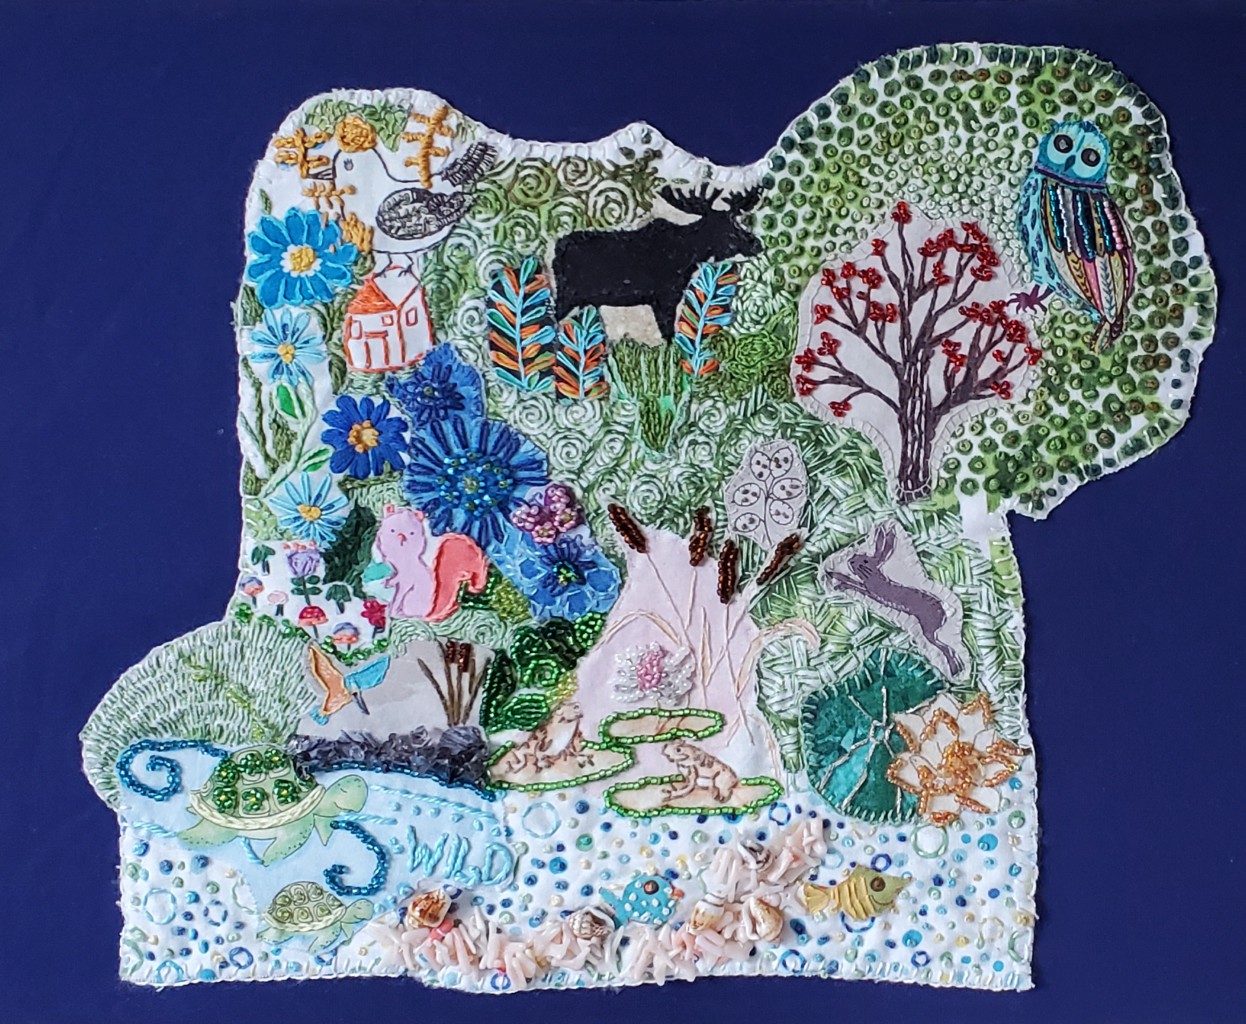
This first piece is still my favourite - Let Them Flourish. This was created through a workshop with Kate Tune for TextileArtists.org It has been exhibited but never at Fibre Fling.

Let Them Flourish

Let Them Flourish
details of the owl and French knots!

I finished this second piece with minutes to spare 😊. I must love living dangerously! This is the third embroidery that I made based on TextileArtist.org's workshop with Bethany Duffy. The other two embroideries were seascape. I loved the technique so much that I used a half-nut instead of a seashell. I just LOVE that adorable squirrel - he looks so mischievous (or stunned - either works for me!). 

Squirrel - finally finished 😊

I brought the unfinished piece to my last Fibre 15 group meeting and asked for advice on how to finish it. This is what it looked like at the time. I knew that something else was needed, or at least that there needed to be something in the top part. Everyone recommended that I extend the tree to cover most of the top. I really like it now.

The embroidery piece before fixing it


I finished it up this afternoon. There wasn't much work to do. I removed the "leaves", added a branch and more fabric on the tree bark for texture. I then added another section to the top of the tree. A few blades of grass helped to ground the tree. The squirrel and tree trunk hadn't been stitched, so I took out my lovely Kimono silk thread and finished it off 😊

Finished backing

The Light Beyond is in the Silent Auction, to raise funds for the Stephen Lewis Foundation and the Ottawa Food Bank. Hopefully it will do well.

The Light Beyond - to be auctioned


Update on Fibre Fling 2023

I spent most of the day at the exhibition. It was so good to see all of the art, the participants and talking with the attendees. 😊 Here are a few pictures to share.

So much beautiful textile art!

Doing a mindful stitching demo

Here's my Squirrel!


What I learned
  • Retirement has really messed with my perception of time.
  • I need to fill in my quilted calendar regularly because I was totally unprepared for Fibre Fling. I was sure that it was next week!
  • Even if I have blogged about a finished piece, it doesn't mean that it's ready for an exhibition. Labels, hanging sleeves or hooks and wire probably still need to be added. 
  • For instance, The Light Beyond, completed over a year ago, not only needed a label, hooks and a wire, it also needed to be permanently stapled to the frame. I had just used tacks! 
  • I have to admit that I'm supposed to have three pieces in the exhibition. This morning I sewed a hanging sleeve on my Courage piece (from Project Quilting 14-6). It was all ready....but I can't find it! Truly, I've looked everywhere in my studio and it's not here. I have no idea where it is, so it won't be in the show. Maybe I need to work on my mindfulness more.😒
  • Update - the missing courage has been found....hanging on the front of my studio door, over my winter quilt....I now have 3 pieces in the show!
Lost but now found!

Related links
Linking parties

Free Motion Mavericks


Check out these two very different quilts from our last party. 

Gail made her crazy quilt as a quilt-as-you-go and used her many, many lovely machine stitches. She had so much fun that the quilt is called A Kid in a Candy Shop!

Quilting Gail's Crazy Quilt for Aurifil

Melva is still working on her client's quilts. Her diagonal quilting is perfect for the quilt and I'm sure that the family will be very happy with all of them.
 
Melva's quilting enhances the quilt!

It's now your turn!

You are invited to the Inlinkz link party!

Click here to enter

Saturday, May 28, 2022

Let Them Flourish is finished!

If you've been following me on Instagram, you've seen lots of images of the progress of this piece. Lately I've been adding a gazillion French Knots, finishing up the beading and then finally mounting it on a fabric-covered canvas.

Let Them Flourish - Ready for Exhibition

Let Them Flourish (aka Biodiversity)

In the Beginning

This piece started off as a fabric collage of images related to Biodiversity, the theme that was given to us as part of the February 2021 TextileArtist.org's Stitch Club workshop. Kate Tume, our instructor, had us exploring narrative potential with embellishment.

The beginning of Biodiversity (working title)

I attached the fabric pieces to batting using Heat n Bond Lite. From there I started stitching and beading. To say that it was slow going is a huge understatement. Again, not called slow stitching for nothing 😊.

Starting the embroidery and beading

At some point I got tired of its slow progress and wondered off to other projects. I came back to it during my #100dayschallenge on Instagram. I would say that the majority of it got done between March and May 2022. It also helped that I had a deadline approaching - the Conversations exhibition with Fibre 15 (see related links below).

Towards the Finish Line!

I love using my own hand-dyed perle cotton 💙

At one point I got bored and had an aha moment. I realised that I didn't have to embroider the images using the same colours that was on the fabric. Notice the house in the image below, which was printed in blue but covered in orange thread. I love that the blue peeks through. That was quite liberating! 😊

Adding different colours than those on the fabric

The green embroidered background around the moose took forever -
I was seeing swirls in my sleep!

I added a gazillion French knots around the tree. I knew by then that it would drive me crazy, so to keep it interesting, I used different shades of green and went roughly from light to dark.

So many French knots!!!

I was worried about the owl - I wanted to add beads but wasn't sure how much. I found out fairly quickly how much was "too much"! I was going to bead every other line but got mixed up and ended up beading all of the lines. It wasn't really bad but it made the owl the focal point, which is not what I wanted.

Too many beads....

Just the right amount of beads 😊

I used sewing thread to lightly embroider various parts of the owl. 

Finishing up!

Finishing up involved covering a 14" x 11" canvas with fabric and then attaching the piece to the canvas. I used Sulky's Invisible thread since it was clearer than the other kinds I have. I wasn't able to make a knot at the end of the thread, so I left a long tail and then after taking the next stitch, tied a knot at the back.

I just put in a few pins through the canvas to keep the piece from shifting as I was sewing it down. I stitched around the edges but also within the piece to keep it securely in place. It was easiest to stitch behind beads.
Attaching the piece to the canvas


Let Them Flourish

What I learned

  • I learned that this technique is called textile collage. This is probably my favourite technique of all times. I've used it a few times to make some of my favourite pieces. I'll include links to my favourite ones in Related links below.
  • I love being able to add bits and pieces of fabric to tell a story or show a moment in time. 
  • The hardest part is probably leaving reality behind since there is no way to keep the actual perspective real since the elements come in the size that they are on the fabric! I love that whimsical part of it.
  • I'm glad that I figured out that I don't have to use the same colour as the background image to embroider. It adds a different look when using a different colour and having the original fabric colour peek through.
  • I realised that I need to change things up to keep me interested. What's not to love about many shades of green instead of just using one?!
  • I really got to know my threads - there's nothing wrong with embroidering with regular sewing thread if you just want a small accent of colour and texture. 
  • A bonus is that the technique almost always needs the little bling of beads 😊
  • It's always a slow project, even if using FMQ but it's usually well worth making. I'm making myself finish this one before I start another one - it would be too easy to get sidetracked at this point!

Related links

Linking parties

I'll be linking up to many fun linking parties. Remember to visit Muv to link up to Free Motion Mavericks this week! Put your foot down, Off The Wall Friday, Finished or Not Finished Friday, Peacock Party, Beauties Pageant, TGIFF, Patchwork & Quilts, Oh Scrap!, Slow Sunday Stitching, 15 Minutes to Stitch 2022Monday Making, Design Wall MondayMay's Favorite Finish Monthly Linkup

Project details


    Let Them Flourish
    Workshop with Kate Tume through TextileArtist.org
    Attached to a 14" x 11" fabric-covered canvas
    Materials: commercial quilting cotton, beads, shells, 
    metallic, embroidery, sewing thread and perle cotton 
    Techniques: collage, embroidery, beading


Sunday, March 07, 2021

Embroidery & Beads for Slow Sunday Stitching

 We have another great workshop that got me totally inspired at the TextileArtist.org's Stitch Club. Kate Tume's workshop is about exploring narrative potential with embellishment.

Embellishing with embroidery and beads

We were supposed to make some sampling but I got inspired and just had to jump right in 😊. The prompt was biodiversity. I guess I was in a creative mood because this is what I came up with as my collage background (it all started with the frogs!).

Biodiversity - collage ready to be put together

Once I had an idea of what I wanted, I used Heat n Bond Lite to affix the collage pieces to the background fabrics. 

I started adding beads and other embellishments from the bottom. I really wasn't sure if I needed to embroider and bead right on the fabric, or if I should do it through the batting. It turns out that embroidering through the batting brings up a lot of white fluff, so I am generally embroidering first and then beading through all of the layers.

Details of stacked beading and embroidery


More beading and embroidery

This is what I've done so far, but it's still early on Sunday and I have lots of hours left in my audiobook to keep me going. I'm really, really loving this!

Biodiversity in progress

What I learned

  • I've been using all kinds of material for the embroidery and beading. I used metallic thread for the leaf of the lotus flower, beads that look like coral in the water. These came from a bracelet that I bought in my travels. There are shells from a necklace, regular beads, embroidery thread as well am my hand-dyed thread. It's just so much fun!
  • I'm not sure about having added the batting already but when I was beading the shells and coral at the bottom, it just seemed so heavy that I wanted something stronger behind it. I also like the change in puffiness that comes from beading or embroidering with batting. 
  • To minimize the fluff when embroidering, I pull back the batting as much as I can and embroider the fabric first. Once an area is more or less done, then I bead through the batting. 
  • I'm going back to add French Knots at the bottom, but the fuzz is minimal since it's just one stitch at a time.
  • I probably should have embroidered everything first, but that's just not how I work - I was too impatient to wait. Besides this feels better - more organic.

Related links

Linking parties

I will be linking up to many fun linking parties. If you are looking for Free Motion Mavericks, it will be with Muv on March 11, 2021.

Slow Sunday Stitching, Off The Wall Friday, Patchwork & Quilts, Put Your Foot Down, Can I Get A Whoop Whoop? Design Wall Monday, Finished or Not Finished Friday, Peacock Party, Free Motion Mavericks, Monday Making, DrEAMi with Sandra at mmm quilts