Showing posts with label Bethany Duffy. Show all posts

Thursday, June 27, 2024

Prayer Flags on Free Motion Mavericks

Welcome! I hope that you're having a great week 🌞 The weather has been all over the place but I've enjoyed stitching in my backyard as much as possible. Let's get on with the fun stuff 😎

Prayer Flag production


Last week I showed you the "Thanks" Prayer Flag (see Related links below). Here are the rest - in various states of completion.

"Joie" Prayer Flag - completed and hanging outside in my backyard

I took this picture earlier in the day yesterday and left it outside. It's rained in the evening but since it's going to be outside for the rest of the summer, I guess it got it's first dunking.

"Paix" (Peace) Prayer Flag - ready to be dyed

The "Paix" (Peace) Prayer Flag was bundled up with a big iron nail that came from the land around Arbor Gallery, as well as other small rusty pieces. 

"Paix" (Peace) Prayer Flag - bundled up for dying

This time I used 4 black tea bags and found a taller glass container to let it sit. It was outside in partial sun for the last two days. This morning I removed the bundle and squeezed some of the liquid. It's now drying in the back yard. Since it's now rather cool, it could take a couple of days. I'll bring it in if there's any rain!

"Paix" (Peace) Prayer Flag - in the
very strong black tea solution

"Paix" (Peace) Prayer Flag bundle drying outside this morning

Did you notice that wonderful antique metal milk can in the background? My artist friend Lyne painted it for me. I just absolutely love it! I've been wanting to take picture to post for a while but need to get the background plants looking their best....yeah, one day! This is the Spring side. I'll show you the other side later this summer 😍. Thanks Lyne!!!

Here is my last Prayer Flag  "Health". It's for Health of body, mind and soul.

The "Health" Prayer Flag just needs embellishment and a tea bath

To Do List


Sorry for repeating myself but here's what's left to do! 😊 I will be installing the work on July 3rd July 2nd (in 2 weeks less than 1 week) and I still have lots of work left to do. 
  • "Raining Pink Petals"
    • Stitch the bunny and butterflies in place
    • Prepare the dowel for hanging
    • Create a label
  • "Essence of Leaves"
    • Finish FMQ the background ✔
    • Fix the hanging sleeve ✔ and prepare the dowel for hanging
    • Create a label
  • Create one more fence art piece called "Squirrel!" 
  • "Thanks" Prayer Flag and Create 3 or 4 more Prayer Flags ✔
    • Finish embroidering and embellishing "Health" 
    • Dry and clean up the rust from "Paix" (Peace)
    • Dye and dry "Health"
    • Prepare for hanging once they are all done
    • Create a label for the series
  • Outdoor hanging sculpture
    • Make another fluffy blue cloud
    • Make one or more birds

What I learned
  • I've been putting quite a few hours slow stitching the Prayer Flags. I've worked it in a series so that they all have roughly the same size and feature some of the same fabric and embellishment.
  • I'm finding it hard to make the "Health" Prayer Flag different. I've just been inspired... I'm going to add empty tea bags to the piece and depict body, mind and soul. I just thought of this while I was preparing the post. 😁
  • I've figured out how to make the other fluffy blue cloud more efficiently. We'll see where that takes me.
  • I finished the FMQ (Free Motion Quilting) on the Essence of Leaves garden fence piece. I love it and will soon take an outdoor picture to share.
  • I've prepared all of the written information that was required for the exhibition and had to make a few decisions. So, my garden fence pieces now have a theme - they are Seasonal. 
  • "Raining Pink Petals" represents Spring, "Essence of Leaves" is Fall while "Squirrel!" will be Summer.
  • I'm basing my "Squirrel!" garden fence piece on the hoop that I made during a workshop with Bethany Duffy through TextileArtist.org Stitch Club (August 2022). You will probably recognize it!
  • I taught the journal making playdate on Monday for Out of the Box (OOTB). It was a hot, busy but fun time! I'm looking forward to sharing pictures if the participants send me pictures.
My inspiration for a second Squirrel! piece 😊

Related links
Linking parties
I'll be linking up to many fun linking parties. Why not check them out and remember to link up below.


Free Motion Mavericks


Welcome to Week 487 of Free Motion Mavericks. Thank you for linking up! Here are the projects from last week that included FMQ, ruler work or walking foot quilting. 

Kat of Scrap Box Quilts finished another baby quilt, this one based on a panel. It's so cute 😊. She FMQ around the quilt and the shapes.

Kat made up this cute baby panel quilt

Sally of Painted Thread participated in the 2 Colours Mystery Quilt Challenge with Joanne the Canuck Quilter. She adapted the quilt to make a headboard for her mother's bed. What a job! She stitched around the stars and straight-lines along the stripes to quilt it, then made a headboard and attached it! If you want more details, check out Sally's post!

Sally's 2 Colours Mystery Quilt 


Here is the finished headboard on the bed!

It's now your turn!

You are invited to the Inlinkz link party!

Click here to enter

Thursday, April 20, 2023

Fibre Fling and Free Motion Mavericks

Welcome to week 427 of Free Motion Mavericks. This week I'm busy getting ready for the annual Out of the Box (OOTB) Fibre Artists Group show. It's been virtual for the last two years so it's wonderful and a lot more work, now that it's live again.

Fibre Fling 2023


Fibre Fling 2023 is this week in Ottawa

See you at Fibre Fling 2023!

I have two pieced in the show this year, one of them you've seen a few times on the blog.

This first piece is still my favourite - Let Them Flourish. This was created through a workshop with Kate Tune for TextileArtists.org It has been exhibited but never at Fibre Fling.

Let Them Flourish

Let Them Flourish
details of the owl and French knots!

I finished this second piece with minutes to spare 😊. I must love living dangerously! This is the third embroidery that I made based on TextileArtist.org's workshop with Bethany Duffy. The other two embroideries were seascape. I loved the technique so much that I used a half-nut instead of a seashell. I just LOVE that adorable squirrel - he looks so mischievous (or stunned - either works for me!). 

Squirrel - finally finished 😊

I brought the unfinished piece to my last Fibre 15 group meeting and asked for advice on how to finish it. This is what it looked like at the time. I knew that something else was needed, or at least that there needed to be something in the top part. Everyone recommended that I extend the tree to cover most of the top. I really like it now.

The embroidery piece before fixing it


I finished it up this afternoon. There wasn't much work to do. I removed the "leaves", added a branch and more fabric on the tree bark for texture. I then added another section to the top of the tree. A few blades of grass helped to ground the tree. The squirrel and tree trunk hadn't been stitched, so I took out my lovely Kimono silk thread and finished it off 😊

Finished backing

The Light Beyond is in the Silent Auction, to raise funds for the Stephen Lewis Foundation and the Ottawa Food Bank. Hopefully it will do well.

The Light Beyond - to be auctioned


Update on Fibre Fling 2023

I spent most of the day at the exhibition. It was so good to see all of the art, the participants and talking with the attendees. 😊 Here are a few pictures to share.

So much beautiful textile art!

Doing a mindful stitching demo

Here's my Squirrel!


What I learned
  • Retirement has really messed with my perception of time.
  • I need to fill in my quilted calendar regularly because I was totally unprepared for Fibre Fling. I was sure that it was next week!
  • Even if I have blogged about a finished piece, it doesn't mean that it's ready for an exhibition. Labels, hanging sleeves or hooks and wire probably still need to be added. 
  • For instance, The Light Beyond, completed over a year ago, not only needed a label, hooks and a wire, it also needed to be permanently stapled to the frame. I had just used tacks! 
  • I have to admit that I'm supposed to have three pieces in the exhibition. This morning I sewed a hanging sleeve on my Courage piece (from Project Quilting 14-6). It was all ready....but I can't find it! Truly, I've looked everywhere in my studio and it's not here. I have no idea where it is, so it won't be in the show. Maybe I need to work on my mindfulness more.πŸ˜’
  • Update - the missing courage has been found....hanging on the front of my studio door, over my winter quilt....I now have 3 pieces in the show!
Lost but now found!

Related links
Linking parties

Free Motion Mavericks


Check out these two very different quilts from our last party. 

Gail made her crazy quilt as a quilt-as-you-go and used her many, many lovely machine stitches. She had so much fun that the quilt is called A Kid in a Candy Shop!

Quilting Gail's Crazy Quilt for Aurifil

Melva is still working on her client's quilts. Her diagonal quilting is perfect for the quilt and I'm sure that the family will be very happy with all of them.
 
Melva's quilting enhances the quilt!

It's now your turn!

You are invited to the Inlinkz link party!

Click here to enter

Friday, September 16, 2022

Embroideries in hoops

I've been doing some slow stitching in the last few weeks. It's always such a relaxing thing to do. 

Stitching a second seascape 

Last month, I wrote a post about Embroidering a seascape. It was based on TextileArtist.org's workshop with Bethany Duffy (see Related links below). I decided that I wanted to go further with this technique since it's a lot of fun and since I changed it up a little, was able to learn a new beading technique 😊!

A second seascape with a shell and sea glass

As you can see, it's still a work in progress (WIP). 

I used a piece of cotton for reinforcement and a hand-dyed piece as the background. On top of that, I added hand-dyed cheese cloth. I love the way that it looks like an old fishing net.

I attached the sea glass by making a beaded bezel. Since I had not way of attaching the sea glass, I treated it as a cabochon. I used Thom Atkins' book, Beading Artistry for Quilts. His explanations were great. It's obviously working since the sea glass is still attached after a couple of weeks!

Update: Here is a picture of the finished Seascape and Sea Glass 

Finished Seascape and Sea Glass (Dec 2022)

I love how it's turning out, so much so that I started another squirrel - literally 😊

Getting caught up in a Squirrel

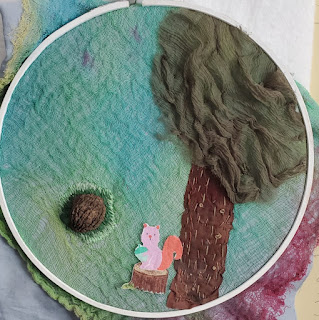
Here is my second WIP. I found a half nut shell that had holes inside, so why not use it too? With a nut comes a tree and a squirrel! I used a double layer of a blue-grey sheet as my base and added some of my own hand-dyed cheese cloth. I love the texture that it gives the piece. 

A tree, a nut shell and a Squirrel!

I started with a tree trunk (a scrap of brown batik) and then some kind of olive green voile (from an old skirt) for the top of the tree. I've added a few daisy stitches as leaves and I'll continue doing that. I haven't attached the squirrel on the log yet. The squirrel may move, depending on what else I add to the piece. 

It's far from finished but it makes me smile when I look at it. 

Meditation stitching


Last weekend I spent a couple of hours at the Out of the Box (OOTB) booth at Fibrefest in Almonte. I did some great shopping beforehand and at the booth worked on some meditation stitching. A little difficult to be mindful with people asking questions but it was enjoyable talking with like-minded people 😊

Wonky star mat and the meditation block

Practice wonky star block


Can you see the quarter of the practice wonky star block as the background to the meditation block? I love trapping bits of thread and yarn beneath the tulle. This tulle is nice and glittery. I just finished the block, so here it is!

The beginning of a meditation block
Finished meditation piece


What I learned

  • Learning how to create a beaded bezel was interesting. I'm surprised that I was able to follow it easily - the instructions were very well written. 
  • I should have used smaller seed beads as I went up and around the sea glass. I didn't even know that they made them smaller than size 11! I'll have to go to a beading store for those.
  • I don't think that I have much to do to finish the seascape embroidery, just tidy it up and finish the back.
  • I pierced a hole on the inside of the nut to attach it. It was tricky getting the needle through it. Now I know what a curved needle could be used for!
  • I will probably be working on the squirrel hoop for a bit - there is still lots to do.
  • I'm working on more meditation pieces since it looks like I'll be teaching this later in the fall. I want to create a few finished articles to show what can be done with these, other than my huge traveller's blanket.
  • Did you notice the lovely polar bear pin cushion that Turid sent me last year? I love it 😍

Related links

Linking parties 

I'll be linking up to many fun linking parties. Let's see what's going on around the quilty world! Put Your Foot Down, Off The Wall Friday, Peacock Party, Slow Sunday Stitching, Finished or Not Finished Friday, Oh Scrap!, Patchwork & Quilts, Monday Making, Design Wall Monday, Midweek MakerDrEAMi!


Monday, August 22, 2022

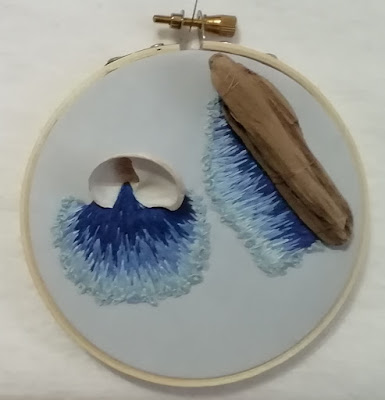
Embroidering a seascape

I've finally gone back to TextileArtist.org's stitch club. There are so many new wonderful workshops and never enough time 😊

Stitching a seascape

The latest workshop is with Bethany Duffy. Her workshop is about using seashells (or other found objects) and incorporating them into an embroidery. I really love her work (see Related links below).

By the sea

I started with two pieces of light blue hand-dyed fabric and a 4" embroidery hoop. The shells that we use need to have a hole in them to stitch through. That was actually difficult to find! I searched through all of my shells and found two since we generally collect unbroken shells.

My collection of shells in my hand-made bag.

After finding the perfect shell, I added three layers of padding using left-over batting. This helps give it a cascading effect. Then I started stitching, and stitching! There are a lot of long and short stitches. I ended up using two dark blue embroidery floss, then two light blue and finally a very light blue-green for the edge.

Adding padding to the shell

Once I finished stitching the first shell with short and long stitches, I added loopy French knots at the edge, like sea foam.

Finished stitching on the shell

Since there was still a lot of space left in the loop, I thought of adding another shell but then remembered the small bag of sea treasures that my niece and sister-in-law brought back from Prince-Edward Island this summer. There was a perfect little piece of driftwood that would be a great addition.

I added the padding in front of the driftwood but only attached the driftwood once the stitching was completed. You can faintly see the brown silk thread that I used to attach it. I was going to add glue under it, but it seems secure enough.


Driftwood attached with brown silk thread

What I learned

  • It was so enjoyable stitching the sea through the shell. 
  • I'm really glad that the driftwood seems to be quite secure.
  • I learned that adding padding in embroidery is called stumpwork. It gives it a 3D look.
  • I want to learn shisha mirror embroidery since my sea treasures were mostly pieces of sea glass. I would love to add this to my next piece....yes, I really hope to make many more of these 😊
  • I was hoping to give this first piece to my niece who is now studying in Denmark. I didn't get it done on time, so maybe she'll have many to choose from when she's back at Christmas.

Related links

Linking parties

I'll be linking up to many fun linking parties this week. You may want to check them out! Monday Making, Design Wall Monday, Free Motion Mavericks with Muv this week, Patchwork & Quilts, Off The Wall Friday,  Put your foot down with True Blue QuiltsPeacock Party

Project details


By the sea
4" embroidery hoop
Materials: hoop, shell, driftwood, hand-dyed fabric, batting, embroidery floss and silk thread.
Techniques: stumpwork embroidery, long and short stitches and French knots