Showing posts with label Superior Threads. Show all posts

Tuesday, March 01, 2022

Learning from old quilt books

Hi, welcome to the first day of the Blog Hop, "Dust off a Quilt Book". This event is hosted by Beaquilter. Thanks Bea for organising this fun blog hop, and for Frédérique for offering to make it a linking party!  

Trying out a new technique

It took me over a month to decide what book and what project to do - and even then, it didn't turn out as planned. I sure did learn a lot 😊. When I was in University, a few years ago (lol), I had a poster that said: "Experience is what you get, when you didn't get what you wanted" So, this project was an Experience! This post is about how I got there.

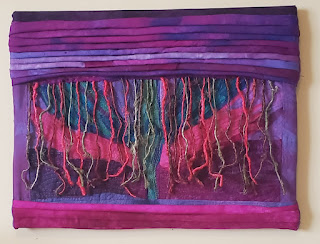
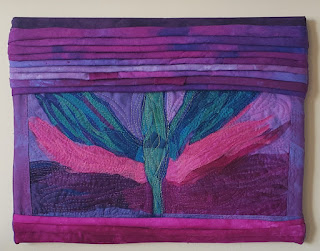
Update: As the piece was on my wall, it finally came to me what I could do to actually like it! Here is the final version. More below.

The Light Beyond 


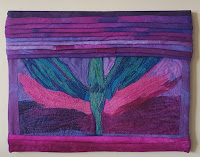
Light (before the change)


The books

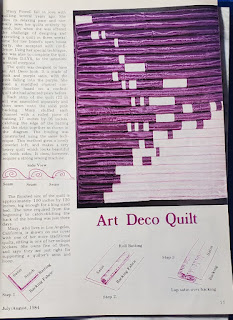
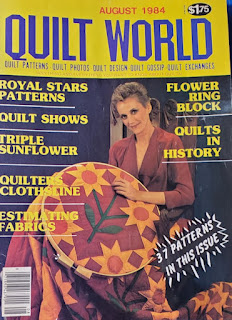
I really wanted to choose an OLD book and rummaged through my mother's quilting magazines and books. I knew that I didn't want to make anything traditional - so there were few options. I did find Missy Powell's Art Deco Quilt - a king size quilt that Missy made in 3 DAYS!

Art Deco Quilt made by Missy Powell
Quilt World August 1984
Front Cover - Missy Powell working on 
a traditional quilt


The Art of Manipulating Fabric by
Colette Wolff 


I had a difficult time understanding the instructions, so I found this technique in another relatively old book: The Art of Manipulating Fabric by Colette Wolff (1996). It's an excellent book and I found what I was looking for under Filled Reliefs - Stuffing - Connected Rolls. 


The fabrics and the plan


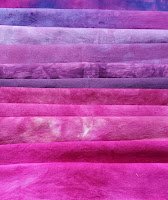
My artist friend, Elaine Quehl gave me a huge bag of her hand-dyed fabric scraps. As you can imagine, the day I got these I felt like a kid, playing, looking and touching all of this fine fabric. Elaine use to bring these fabrics to her classes for students to use, so there were bigger and smaller pieces. Yum! 😊

This is the colour palette that I chose when I started the project. The plan was to make rolls in some kind of gradation.

Original colour palette
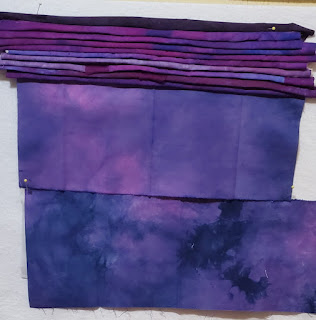
Giving up after making 10 connected rolls


As you can see, I started with darker fabrics and was going to make my way to lighter ones when I decided that making connected rolls was not my idea of fun!!!


Alternate idea


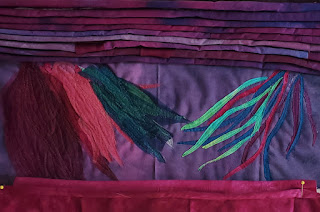
So now what? Well, it sort of looked like a sky. Should I make a sun set or maybe some northern lights? I decided that the northern lights would be great on this background. At this point, I really should have started looking a photos of northern lights, but I didn't 😞. I started playing around with some fabric that I thought would look like the northern lights.

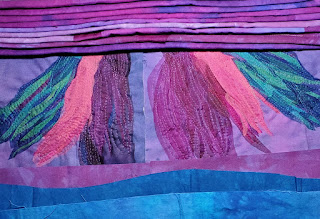
From this picture, you can see how the idea evolved. I started off with wisps of fabric, sewed them down and then, on the other side, covered them with my hand-dyed silk organza....one wisp at a time! The bottom two rolls in this image was part of my original plan, to go from the dark to the lighter colours. 

Not sea weed but lights 😞

When I got to covering the second set of wispy fabrics, I just covered the whole area with the organza. 

No longer looking like sea weed but
not really northern lights...

This is where I was when my son and his girlfriend, Sarah, came for supper Sunday evening. I told them about my project and asked them to see if they had any ideas. They both agreed that it didn't really look like northern lights. When I told her that one way or another I would finish it, and probably just cut it up later to make something else, Sarah suggested that I might want to cut it up now and re-arrange it. 

Before cutting it up, I cropped the photo into two and put it back together in PowerPoint (I don't have any fancy software, but it did the trick). I wasn't sure that it would work, but at this point, I had nothing to loose.

Re-arranging the puzzle


I played with it like a puzzle. This was what we had originally thought - not so great.

First try

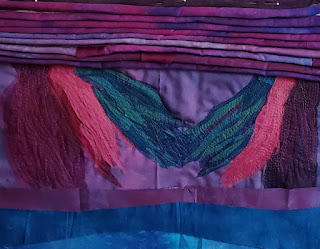
Then I turned them upside down. I wasn't thrilled but this was the best that I could do. I did look at some images of the northern lights and this was starting to resemble them...a little bit.

Turning the pieces upside down

So that was my new technique experience! It's not at all what I envisioned but it's done. I added borders and attached it to a 14" x 11" canvas.

Previous version of "Light"

I am rarely really disappointed in a piece - but I really didn't like this one. As I was looking at it today (the day of the post being published), for some reason I got a flash of insight - "beyond the vail".  For me, that's how my intuition and my creativity works. I don't always listen...but this time I did, and I'm very happy with the final result.


The Light Beyond 

My curtain of sari silk strands are perfect for creating an aura of mystery to the lights behind it. I hope that you like this version better. I know that I do!


What I learned
  • This was an interesting experience! It would have helped a lot if I had looked at images of northern lights before starting to play with wisps of fabric.😊
  • It was a great exercise in problem solving. It wasn't a piece that I even liked but I am glad that I persevered. The irony is that I didn't plan enough for this project, but the other project that I was going to do, a sewing machine cover, was planned so much that I didn't feel like making it.
  • There is a lot to be learned about undertaking a project when I'm not in a good place - I couldn't make up my mind, and my decision making skills were far from optimal. 
  • It is amazing fabric and I am very grateful to Elaine for giving them to me. 
  • I'm so glad that my intuition came to me...and not too long after the posting of this blog post. I'm leaving you in a much happier state.

Related links

Linking parties & blog hop schedule
I'm linking up this post to Kathleen's Tips and Tutorials on the 22nd 

As well, here is the list and links to the blog hop participants:

Tuesday March 1st 
Quilting & Learning - What a Combo   (You are here!)


Project details


The Light Beyond
Attached to a 14" x 11" canvas
Materials: hand-dyed cotton and organza, sari silk yarn, Kimono Silk Thread, cotton batting
Techniques: Stuffed connected rolls, Free Motion Quilting (FMQ) 


Monday, December 06, 2021

Traveller's Blanket Update

I've been doing a lot of slow stitching, mostly on my Traveller's Blanket and then posting on Instagram. There have been lots and lots of hours pleasantly spent stitching and now quilting it.

Quilting the Traveller's Blanket

The last update on my Traveller's Blanket was October 11, 2021. I was showing you my daily stitching on the #100dayschallenge on Instagram. At the time I was up to day 37/100. On Day 39, I started quilting the background of the right top corner of the piece. This picture was taken about a week ago.

Slowly quilting around each piece 

Here is a close-up that was taken a few days after.

Stitched top-right corner

I'm doing all of the quilting with sewing or quilting thread. Most of them are King Tut Superior variegated thread. I love the look of it although you can mostly see the changes in colour when you're up-close.

It turns out that I have lots of this type of thread 😊


At one point I got bored of making straight-ish lines, so I quilted a swirl. Because the centre was puffing up, I added a few French Knots. 

A quilted swirl and French Knots

Right now I'm working beneath the hexie, which is at the right bottom corner of the piece. 

Stitching the bottom right corner

Here is the difference between looking at the thread colour from the front of the hand-dyed fabric, vs the back of the quilt on white fabric. The pictures above and below were today's (Day 64/100) Instagram post.

This is the back of the blanket, with the
variegated thread against the white background

What I learned
  • I'm really enjoying the quilting part and I usually listen to an audiobook at the same time. Last week I listened to many of them. It was very Zen.
  • Of course I did get bored and did some stitching in a swirl. It went well but since there is so much going on in the piece, I don't think that I should do that too often. 😊
  • It's also difficult to post just plain stitching on Instagram so I try to include the shapes around it. They are quite popular - it must be all that yummy colour :-)
Related links
Linking parties
I'll be linking up to many fun linking parties (now that my WIFI is up again!) Check them out and see what's happening out there in quilt land😊 Patchwork & Quilts, Monday Making, Design Wall MondaysPut Your Foot DownNeedle and Thread ThursdayOff the Wall FridayCan I Get A Whoop Whoop?,  Peacock Party, Slow Sunday Stitching


Tuesday, November 23, 2021

Best and Worst of Times

It's finally finished! My fabric concertina book, Best and Worst of Times is done. The workshop with Mandy Pattullo through TextileArtist.org was held in July 2020. Considering the amount of stitching in the book, a year and a quarter is not that long! lol

Fabric Concertina Book

The book is the story of the last two years. It goes from being full of fear to eventually finding joy. It's also bilingual (English and French) except for the title and end pages.

The front page is written in chain stitch on one of my first hand-dyed gray fabrics.

Best and Worst of Times, concertina fabric book

The first and second pages illustrate the beginning of the pandemic. Everywhere there was fear. No one knew what was going one and it really felt like time was standing still, especially at the beginning of that first lockdown.  I used tulle, cheesecloth and lots of dark colours. The running stitches in the background are black and prominent.

Fear (peur) is in the air

The third and fourth pages express how I escaped the gloom. In English it's called escape but in French it's called dreaming (rêver). It's about escaping in books, to the seaside, on a hot air balloon. It's also about nature, which mostly benefited from the lack of human activity that affect the rivers, oceans, forests, etc. Colours are back and there is a sliver of optimism. 

Escape (rever) - finding a way to cope

The fifth and sixth pages are about hope (espoir) and creating (faire). It's what I did after my escape time. For me, hope and creating are represented by finishing UFOs, playing with hexies, thinking about spirit, and mostly by playing with scraps and making. It's about trying new things and I did that through the workshops offered by the TextileArtist.org Stitch Club. 

Hope (espoir) and create (faire) - to make the best of it

The last two pages are about the happy ending...has it come? Well sometimes it's here fleetingly. It's about finding joy (joie) and laughing again (rire). It's full of bold, strong colours that I love.

Joy (joie) and laugh (rire) - finding the joy in life again.

The last page is made of some pinky-orange fabric that I hand-dyed. I love the top and bottom fabric which is what you get when you dye white-on-white fabric. Isn't that fun? You can see larger versions of all of these photos by clicking on them 😊

The End? or The beginning....

Making my first YouTube video

If you're interested, I've also uploaded a short video on YouTube (my first one!) of the entire fabric concertina book, Best and Worst of Times. I hope that you like it. You can click on the link below the image to take you there.

Best and Worst of Times

What I learned

  • In my first post in July 2020, I wrote that I was missing that second layer to stitch through. Since I've been doing a lot more hand-stitching, it's not really an issue any more.
  • I also wrote..."Hand stitching is called slow stitching for a reason - the concertina book may end up being a longer term project since it's demanding a lot of stitching." Famous last words....see, 16 months is medium to long term!😊 
  • This project sat for a long time until I needed things to stitch for my #100dayschallenge on Instagram. It was great working on the book. I used a lot of variegated Superior Threads. It was a lot of fun.
  • I just realised that I didn't make a label for the concertina book - I'll have to tuck in my name and the date somewhere!
  • At work this last year, I've learned to manipulate videos. This served me well for the recording of the video.

Related links

Tools that I used to manipulate my video 
  • I downloaded a Video Convertor to my phone so that I could compress my original video enough to send it to my email. After that I used
  • Kapwing, which has a free online version that is great to trim video, add images, text, etc.

Linking parties

I'll be linking to many fun linking parties. Let's check them out! Put your foot down, Patchwork & Quilts, Monday Making, Design Wall Monday, 15 Minutes to Stitch 2021, Wondering Camera, Free Motion Mavericks with Muv, Midweek Makers, Off the Wall Friday, Peacock Party, Oh Scrap!, Slow Sunday Stitching, Mosaic Monday

Project details

Best and Worst of Times, fabric concertina book

Size: 6½" x 5¾" by 45"

Materials: hand-dyed cotton, tulle, thread and cheese cloth; buttons, hexies, commercial fabrics, 

Techniques: appliqué, ruching, embroidery, free motion stitching

Thursday, April 29, 2021

An Out of this World Finish on Free Motion Mavericks

Welcome to Free Motion Mavericks, week 329. After making the Pinwheels and Stars blocks years ago, putting them together to make a baby quilt and then using it as my free motion quilting (FMQ) project for almost a year, it's now finished!  

Pinwheels and Stars baby quilt

It's finally over 😊. Although not technically perfect, I really love how this quilt came out.

Pinwheels & Stars  baby quilt finished!

The picture on the chair pose


Chevy's turn


As I mentioned in my #AtoZchallenge2021Quilt (Art) post this weekend, (under U for UFO), I added some swirls, loops and stars. I did it all in white Omni Thread from Superior Threads and my regular lilac WonderFil Konfetti in the bobbin. I did take the time to make sure that these threads worked well together...and they did!

Free Motion Quilting between space related objects

Free Motion Quilting between space related objects

If I'm a little late publishing this post, it's because it's too late to get good pictures of the finished quilt tonight and this is too important of a finish to settle for night pictures. I'm not sure that tomorrow will be much better with all the rain in the forecast, but at least there will be daylight.

Just to recap this project:

  • I introduced the Pinwheels & Stars Baby Quilt on May 13 of last year - so almost a year ago!
  • I drew some pinwheel FMQ designs that I found on the Internet and started quilting the next week.
  • On July 8 I finished FMQ the pinwheel blocks

    image of 7 FMQ designs for pinwheel blocks
    Seven FMQ designs for pinwheel blocks

  • By the end of July, I had found some star FMQ designs and started the quilting in August.
  • By the end of November, with a few weeks off for other projects, I finished FMQ the star blocks and started making plans for all of that yummy negative space.
image of 6 FMQ designs for star blocks
Six FMQ designs for star blocks
This was the original flexible plan.

Drawing of a possible FMQ plan for the negative space

  • I then started doing research and practiced drawing the important elements like the Earth and the Moon.
  • I also discovered on the NASA and the Canadian Space Agency websites, information about the Artemis Project. I practiced drawing and then in January, started FMQ and added the Earth, the Moon and these to the quilt. If you want to learn more, you'll have to go to the original posts (see Related links).
  • The Sun was added in March and then things got productive after that. In April I added all of the other planets of our Solar System as well as some funky and fun stars, nebula and even a UFO! 
Our Universe....so far

What I learned
  • It's been an amazing journey. I found some great designs to FMQ the pinwheels and stars. 
  • Then came all of the space journey - Wow! 
  • The FMQ filler between the space objects was fast and furious. I loved it! I actually did slow down so that my tension would be ok but I just zipped along which was really nice after working so hard on coming up with different motifs for the rest of the quilt.
  • I wasn't sure how it would all look before I added the background quilting but I am so, so happy with it. 😁 It's exactly what it needed. 
  • I had a bit of a stressful moment when I realised that I didn't have any more backing fabric, which I was going to use for the binding. So I contacted my local quilt shop, Quilty Pleasures, and told the salesperson what I wanted - a very, very light mauve or purple, either solid or close to it. She had exactly what I needed. I ordered it online and picked it up that afternoon.

Related links

Here are the links that I mentioned, in the same order:

Linking parties

This is my April One Monthly Goal...Yeah it's done!!! I will also be linking up to all of those fun finished parties that I don't often link to 😊. Before you check them out, make sure to link up your own project to Free Motion Mavericks below. Put Your Foot Down, Needle & Thread Thursday, Finished or Not Finished Friday, TGIFF!. Brag About Your Beauties, Let's Make Baby Quilts!, Favorite Finish Monthly Linkup, Off The Wall Friday, Can I Get A Whoop Whoop?, Peacock Party, Patchwork & Quilts, Monday Making

Very cool news! I was featured on Kelly's Needle & Thread Thursday (NTT) 😊

Free Motion Mavericks

Thanks to those who joined us last time. It was really great to see the SAHRR (Stay At Home Round Robin) Parade Finale at Quilting Gail's. I wish I had joined them in this very cool project, but I did hear that there should be another one next winter, so I'm going to try to plan around that! If you didn't see the great quilts, including Gail's lovely here, do check them out!

Quilting Gail's finish for the SAHRR

It's your turn!

You are invited to the Inlinkz link party!

Click here to enter


Sunday, February 09, 2020

I heart Project Quilting

This week on Project Quilting, Challenge 11-3 was "Put a 💖 on it!"

Scrappy Heart Journal Cover

For those who read my blog, you will have noticed that I'm on a free motion quilted (FMQ) journal cover kick! My last post was about " A production of quilted journal covers". Since I'm on a roll, I thought that I would try out a few things on my latest journal cover.

What do you get when you:
  • Make scrappy fabric
  • Free motion quilt it to an inch of it's life
  • Using variegated thread
To make a FMQ journal cover?
You get this....
A FMQ Scrappy Heart Journal Cover!
It figures that this very scrappy FMQ journal cover is my best one yet, construction wise - just not design wise. I did learn a lot from this one!
The back of the scrappy journal cover
Scrappy quilt cover with elastic


I even used some scrappy pieces to make the inside of the cover. I love it!

Scrappy even on the inside!
What I learned
  • In hindsight, I should have done ONE of the three things (scrappy, or densely FMQ, or used variegated thread). Using all three was just too much since they all add a lot visually to the piece. 
  • FMQ on scrappy fabric calls for either one overall design or a FMQ design that is simple and follows the fabric.
  • Variegated thread adds a lot to a piece. It really wasn't needed here - it's too much!
Related links
Linking parties
I will be linking up, with a couple of hours to spare, to Project Quilting, Put a Heart on It - Challenge 11-3. Let's go see what quilters have put a heart on! Can I Get A Whoop Whoop?, Oh Scrap!, Monday Making, Design Wall Monday, Midweek Makers, Can I Get A Whoop Whoop?, Finished or Not Finished Friday,  TGIFF, Beauties Pageant, Peacock Party,


Friday, January 31, 2020

Finishing up One Monthly Goal - OMG

I can't believe that it's the end of January. It was pretty intense quilting wise. I finished my two Project Quilting and the Winter Blues project with very little time to spare. That's how I live dangerously. 😊

January's OMG 
A journal cover for my quilting agenda

My only other goal for January was my One Monthly Goal - to make a journal cover for my quilting agenda/notebook. As I'm writing this, I'm still not sure that it will get done in time. You'll find out by the end of the post (which has to be linked to the OMG linky party by tonight at Elm Street Quilts), or it will be my February OMG. Find out what happens....Can I write most of this post, go sew up the journal cover within 9 hours???

My FMQ piece for a journal cover
It took me a few days to find the fabric that I wanted to use for my journal cover. So many choices.... When I looked into my box of hand-dyed fabrics (mine and stuff that I've bought), I decided that these would be perfect for FMQ a journal cover. Most of the pieces are fairly small so they could be used for art quilts, but this is a nice alternative.

This first piece is so much fun. It was hand painted, printed and or dyed by Gunnel Hag of Colour Vie (see Related links below). Gunnel is an amazing fibre artist who gave a talk to the Out of the Box Fabric Artists Group a couple of years ago. I bought some of her fabric paint as well as a few beautiful pieces of fabric. This is the funkiest one.

Of course I forgot to take a picture of the fabric before I started FMQ, but you can see most of it here, as I started quilting it. I just love that there are many things going on that I could work around. It helped to separate the fabric into quilting areas.

The fabric by Gunnel Hag, before it got totally FMQ
The threads I used were all variegated - from Superior Threads, King Tut and Rainbows and from  Wonderfil, Konfetti. The fabric was a joy to quilt and I got to use a bunch of different designs.

I started off doing spirals around the circles (above) and then slowly moved towards the left image. Since it was more structured, I used boxes within boxes and triangles.

Adding more structured designs
I added triangles around the triangles and then pebbles around the word "Red". It was fun changing threads and seeing the different effects.
Triangles and pebbles around the word "Red"
In the un-quilted fabric, you can see a faint image of ferns or maybe spruce leaves. I went a little nuts with these. I started by just outlining the larger one but then kept on adding thread. For the other two, I restrained my enthusiasm (I got bored!)
Adding colour to the ferns
Faint outline of ferns


I added small swirls around the ferns to try to emphasize them. It might have been more effective if the thread had matched the fabric!


It was then time to outline the word "Yellow". By then I wanted to use simpler designs. I used wavy horizontal lines around the word "Yellow". In the pink above I used a design that I don't know the name of - I call them j's and f's because that's what the motion feels like when I make them. Finally on the left side I made some meandering swirly flowers. I considered using matching thread when I got out of the yellow section but it was lovely to see the effect of the yellow thread on the green fabric.

Yellow and pink at the top
A finished agenda cover

Yes, I just made it. With only 5 hours before the OMG linking party closes, I'm now showing you the finished product. 😊

This is the third journal cover that I've done, and it would seem that practice makes things much easier. I followed Christina Cameli's class on BluPrint and made lots of footnotes.  

The finished front of the agenda cover

The back of the cover

The back and front of the cover
Agenda cover with fancy fold-over elastic
For this cover, I even added a ribbon to keep my place.
My quilting agenda and notebook

What I learned
Cutting the fabric was the most difficult part!
  • It took me 4 hours to FMQ this fabric piece and only one hour to make the journal cover - and things went without problems.
  • I made tons of notes for myself so that I can keep making these journal covers easily.
  • I had to cut some of the FMQ fabric - it was difficult. I like what I chose but I'm sorry that I didn't keep more yellow and pink in the final piece.
  • I would also have liked to have the back of the cover be the front, but the word "Red" would have been upside down.
  • I never throw these extra quilted pieces out, so one day, you may see that lovely yellow incorporated into another piece.
  • Do you know if there's something I can do to make the ribbon a little stiffer? Would coating it with ModPodge work? If you have any ideas, please let me know.
Related links
Linking parties
I'm linking up to Elm Street Quilts' One Monthly Goal Finish for January. It looks like I made it 😊 I will also be linking up to Free Motion Mavericks with Muv since it's her week to host the party. Make sure that you go link up too! Midweek Makers, Colour and Inspiration TuesdayPut Your Foot Down, Needle & Thread Thursday, Off the Wall Friday, Finished or Not Finished Friday, Friday Foto Fun, Can I Get A Whoop Whoop?, Beauties Pageant, TGIFF, Peacock Party,

Dione scored a rainbow for her Outback Weather Bingo with this project! Check it out at Colour and Inspiration Tuesday

Project details


FMQ agenda cover
Pattern and instructions by Christina Cameli
8½" x 6"
Techniques: FMQ, sewing
Material: hand painted, printed and or dyed cotton by Gunnel Hag, fold-over elastic, agenda