Showing posts with label silk organza. Show all posts

Tuesday, March 01, 2022

Learning from old quilt books

Hi, welcome to the first day of the Blog Hop, "Dust off a Quilt Book". This event is hosted by Beaquilter. Thanks Bea for organising this fun blog hop, and for Frédérique for offering to make it a linking party!  

Trying out a new technique

It took me over a month to decide what book and what project to do - and even then, it didn't turn out as planned. I sure did learn a lot 😊. When I was in University, a few years ago (lol), I had a poster that said: "Experience is what you get, when you didn't get what you wanted" So, this project was an Experience! This post is about how I got there.

Update: As the piece was on my wall, it finally came to me what I could do to actually like it! Here is the final version. More below.

The Light Beyond 


Light (before the change)


The books

I really wanted to choose an OLD book and rummaged through my mother's quilting magazines and books. I knew that I didn't want to make anything traditional - so there were few options. I did find Missy Powell's Art Deco Quilt - a king size quilt that Missy made in 3 DAYS!

Art Deco Quilt made by Missy Powell
Quilt World August 1984
Front Cover - Missy Powell working on 
a traditional quilt


The Art of Manipulating Fabric by
Colette Wolff 


I had a difficult time understanding the instructions, so I found this technique in another relatively old book: The Art of Manipulating Fabric by Colette Wolff (1996). It's an excellent book and I found what I was looking for under Filled Reliefs - Stuffing - Connected Rolls. 


The fabrics and the plan


My artist friend, Elaine Quehl gave me a huge bag of her hand-dyed fabric scraps. As you can imagine, the day I got these I felt like a kid, playing, looking and touching all of this fine fabric. Elaine use to bring these fabrics to her classes for students to use, so there were bigger and smaller pieces. Yum! 😊

This is the colour palette that I chose when I started the project. The plan was to make rolls in some kind of gradation.

Original colour palette
Giving up after making 10 connected rolls


As you can see, I started with darker fabrics and was going to make my way to lighter ones when I decided that making connected rolls was not my idea of fun!!!


Alternate idea


So now what? Well, it sort of looked like a sky. Should I make a sun set or maybe some northern lights? I decided that the northern lights would be great on this background. At this point, I really should have started looking a photos of northern lights, but I didn't 😞. I started playing around with some fabric that I thought would look like the northern lights.

From this picture, you can see how the idea evolved. I started off with wisps of fabric, sewed them down and then, on the other side, covered them with my hand-dyed silk organza....one wisp at a time! The bottom two rolls in this image was part of my original plan, to go from the dark to the lighter colours. 

Not sea weed but lights 😞

When I got to covering the second set of wispy fabrics, I just covered the whole area with the organza. 

No longer looking like sea weed but
not really northern lights...

This is where I was when my son and his girlfriend, Sarah, came for supper Sunday evening. I told them about my project and asked them to see if they had any ideas. They both agreed that it didn't really look like northern lights. When I told her that one way or another I would finish it, and probably just cut it up later to make something else, Sarah suggested that I might want to cut it up now and re-arrange it. 

Before cutting it up, I cropped the photo into two and put it back together in PowerPoint (I don't have any fancy software, but it did the trick). I wasn't sure that it would work, but at this point, I had nothing to loose.

Re-arranging the puzzle


I played with it like a puzzle. This was what we had originally thought - not so great.

First try

Then I turned them upside down. I wasn't thrilled but this was the best that I could do. I did look at some images of the northern lights and this was starting to resemble them...a little bit.

Turning the pieces upside down

So that was my new technique experience! It's not at all what I envisioned but it's done. I added borders and attached it to a 14" x 11" canvas.

Previous version of "Light"

I am rarely really disappointed in a piece - but I really didn't like this one. As I was looking at it today (the day of the post being published), for some reason I got a flash of insight - "beyond the vail".  For me, that's how my intuition and my creativity works. I don't always listen...but this time I did, and I'm very happy with the final result.


The Light Beyond 

My curtain of sari silk strands are perfect for creating an aura of mystery to the lights behind it. I hope that you like this version better. I know that I do!


What I learned
  • This was an interesting experience! It would have helped a lot if I had looked at images of northern lights before starting to play with wisps of fabric.😊
  • It was a great exercise in problem solving. It wasn't a piece that I even liked but I am glad that I persevered. The irony is that I didn't plan enough for this project, but the other project that I was going to do, a sewing machine cover, was planned so much that I didn't feel like making it.
  • There is a lot to be learned about undertaking a project when I'm not in a good place - I couldn't make up my mind, and my decision making skills were far from optimal. 
  • It is amazing fabric and I am very grateful to Elaine for giving them to me. 
  • I'm so glad that my intuition came to me...and not too long after the posting of this blog post. I'm leaving you in a much happier state.

Related links

Linking parties & blog hop schedule
I'm linking up this post to Kathleen's Tips and Tutorials on the 22nd 

As well, here is the list and links to the blog hop participants:

Tuesday March 1st 
Quilting & Learning - What a Combo   (You are here!)


Project details


The Light Beyond
Attached to a 14" x 11" canvas
Materials: hand-dyed cotton and organza, sari silk yarn, Kimono Silk Thread, cotton batting
Techniques: Stuffed connected rolls, Free Motion Quilting (FMQ) 


Thursday, October 28, 2021

Trying for something different and Free Motion Mavericks

Welcome! I do have some free motion quilting (FMQ) to show you, but not on my son's quilt...my Jag is getting a long overdue tune-up and it could take a few weeks.

Creating an improv quilt during a playdate 

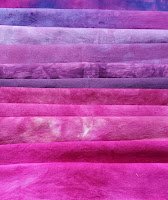
The Out of the Box Fibre Artist Group had a playdate which I attended, since at the last minute, I had decided to take the day off work. Our playdate host, one of our members, did a great job of introducing us to improv piecing and stripes. Who knew that there was anything to say about stripes other than wide, thin, horizontal and vertical!😁

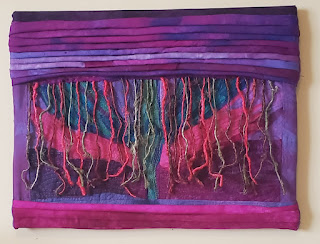
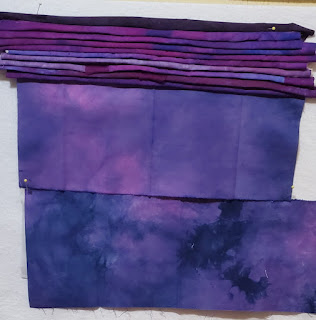
Improv piece with Shadow Stripes

I don't have any pictures until I got to this stage. With the FMQ, I wanted to try different effects on the solid fabrics. In the end, since I wasn't sure what to do next, I put it on my design wall and took pictures. 

I liked the piece but it was just ordinary. What can I say...as I've started hand stitching, everything is calling out to be embellished somehow, and this piece was no exception.

Adding embellishments

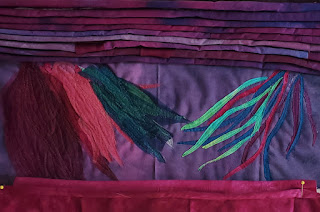
The first thing I did was add this bright pink ribbon in one corner and then embroider fly stitches and stars. The ribbon is fun because it's translucent and has wire within the edges to give it body.

Pink ribbon and stitching off the quilt

After this beautiful embellishment, I had no idea what to do. So, I started thinking about what I wanted the piece to represent and made a mind-map to get me going.

The improv shadow striped piece is now called "Glimpses of Joy". I want it to represent life, the messiness and the joys, since I don't think that we can have one without the other. The background improv piecing depicts the messiness of life where lines don't necessarily join evenly, but they are beautiful despite this.

I started thinking about some of the things that bring me joy. There is a whole list, but I'll explore these one at a time as I make something to depict it on the quilt. The first one is the Sun.

The Sun - source of life
I had lots of fun making the sun. I wanted to use some yellow hand-dyed silk organza as well as cheese cloth. Since I collect absolutely everything for my art, I though of using these plastic discs that are at the bottom of Keurig coffee pods. They have these lovely holes to stitch through.

Covering up the disk with fabric

Stitching the fabric to the disk 


The rays of the sun are made from a silk scarf that I bought on our trip to China. 

The wonky heart is filled with all kinds of stuff - love, hope, fears, pain, gratitude, envy, etc. There are so many things that fill our hearts. I'm probably not finished with this one yet, but we'll see.

The next piece is from one of my eco-prints. I embroidered it and then attached it to the piece. There is so much in nature that brings me joy, as well as learning new things such as eco-printing and stitching😊
Embroidering on eco-printed linen


Wonky heart full of so much stuff!


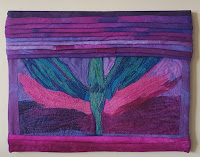
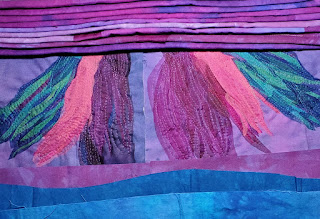
This is what "Glimpses of Joy" looks like so far.

It's coming along

What I learned
  • A lot of the art quilting that I do start off intuitively. However, sometimes intuition only takes me so far, and then I need to think about the details of design.
  • I learned years ago how to create a mind-map. I mostly use it to help me think things through, and to keep me organised when I have guests over for a meal. This is one of the things that really stresses me out - so having all of the steps and considerations needed to get things done on a mind-map is my life-boat.
  • I'm still posting on Instagram. The wonky heart today was Day 45/100. Tomorrow's post will be the leaf. I'm enjoy the process of posting - not daily but about 5 times/week. It's encouraging me to keep stitching but it doesn't stress me out if I miss a day or two. 

Related links

Linking parties

Free Motion Mavericks

This is week 353. I hope that you had time go see Muv's post, Very Newly Wed, with her daughter in her wedding dress. It looks like it was a wonderful event! 

Last time, if you didn't catch Karin's FMQ with rulers, go visit. It's well worth it! 

Patience Corner Quilt Finished by Karin

Thanks for visiting - it's now your turn!

You are invited to the Inlinkz link party!

Click here to enter

Saturday, January 23, 2021

Map making

Hi, I've been hibernating for a bit. It's always good to get back to creating art and blogging. I hope that you're surviving the winter so far. 😊

Map of another childhood place

Valerie S. Goodwin is the guest artist for TextileArtist.org's Stitch Club. Valerie is a retired architect and college professor, and a well know artist who creates wonderful textile maps (see Related links below).

For years I've been wanting to make a project based on maps and buildings of my childhood places. The last project that I made in the Stitch Club workshop was a hand-stitched piece of the Toburn Mine, part of the Mile of Gold in Kirkland Lake Ontario. I mentioned that this might be the first piece in Glimpses of Childhood Places. Well, it looks like I've made the second piece.

My grandparents' place in Kenogami Ontario

This is just outside of the area since it's in Kenogami Ontario, about 20 minutes north-west of Kirkland Lake. I was in my teens when my grandfather retired from working in the mines. He and my grandmother moved to a small trailer park just off the highway, next to the river and tons of trails. My grandfather spent a lot of time fishing while my grandmother had a small garden, hiked and cross-country skied behind the park. You can see my grandmother's garden and my grandfather fishing in the river.

The trailer park and my grandfather fishing

Google Map - Kenogami ON
Making a map

I started by finding the map in Google Map and then drawing the area that I wanted to work on.

Valerie suggested that we paint silk organza to use as layers for the map. Since I had already dyed a dark blue piece of silk organza, I painted one piece with Tulip Fabric spray paint (Hawaiian Fizz) and used a dropper to add slightly watered down Pébéo Setacolor (turquoise) on the other.

Drawing of the map
with notes

The turquoise was lovely but much lighter than I wanted, so I place a piece of dark green batik under it. This lightened the batik and added soft lovely colour around it.

I drew the map onto a piece of Ricky Tims' Stable Stuff and then started covering it with fabric backed with a fusible web. I didn't want to work directly on the stable stuff since it was too white. I added strips of off-white batik on most of the background except for the river.


I placed the dark green batik to the forest background and then added some of the painted organza over and around it. 

Adding free motion stitching
I used some slightly darker brown fabric for the trailer lots and then some very light yellow for the highway and a darker batik for the road to the park.

For the river, I placed the darker blue hand-dyed silk organza at the bottom and then added the painted, lighter blue on top.

I then free motion stitched everything down. I was going to keep it simple but when I got to the trees I got carried away - so I added more free motion stitching to the water.

Adding embroidery stitches

I used a variety of stitches in the project: backstitch, running stitch, blanket stitch, chain stitch and French knots. Most of it was done with Perle cotton. 

What I learned

  • I had a really hard time deciding on what to use for my map. There was an area around our home that would have been great, but I wanted it to be during the winter. Then I got into all kinds of technical considerations like how to illustrate a hockey rink or a tobogganing hill without adding people or having enough colour when everything is covered in snow. It was just getting too complicated, so I found another spot to illustrate.
  • I bought Valerie Goodwin's book, Art Quilt Maps. It's been on my wish list for a long time, so it was time to get it. It's really great and I look forward to making more maps in the future with Valerie guiding me through her book!
  • Large kraft paper journal to hold on-going projects
    I didn't think that I would be making another piece of my childhood place so quickly, but when the opportunity presented itself, I just had to embrace it!
  • I've created a big journal with kraft paper to hold some of my work-in-progress. This is perfect for my Memories of Childhood Places pieces as well as some of the larger embroideries that I'm working on.
  • I'm not sure how I'll finish this project, but it's probably best to wait until more pieces are done so that I can have a bit of consistency. 


Related links

Linking parties
I'll be linking this post to many fun linking parties, including Free Motion Maverick which is hosted by Muv this week. Put Your Foot Down, Off The Wall Friday, Finished or Not Finished Friday, Can I Get A Whoop Whoop?, Beauties Pageant, TGIFF, Peacock Party, Patchwork & Quilts, Slow Sunday Stitching, Oh Scrap!, 15 Minutes to Stitch 2021


Sunday, November 01, 2020

Translucent meanderings

I can't say enough about how much I've enjoyed playing with fabrics with TextileArtist.org's Stitch Challenge 2020. As you saw from my last post, I have even used free motion quilting (FMQ) in some of these projects. 

Using sheers on my abstract template

This is the first piece that I did based on Sabine Kaner's workshop. She showed us how to make an abstract template by crumpling a piece of paper and then drawing along the ridges of the lines. You can read more about it in my last post which is in Related links below. For this first piece, I used a regular sheet of printing paper, which resulted in lots of lines!

My first impression was of a map of a country or a continent, but I kept it abstract as I put things together. Sabine Kaner's art is abstract but she doesn't use sheer fabrics. It's almost all recycled fabrics with lots of heavier textiles like wool, with lots of texture. I love the look of her work but I had just finished Vinny Stapley's workshop where she works mostly with sheers. I just didn't want to stop working with sheers, so I interpreted Sabine's workshop in translucent fabrics. It made for a very different project.

Working again with sheer fabrics

Here is my crumpled paper pattern placed over the light box. There were some really small sections that would have been impossible for me to applique with different fabrics, so I placed sheer fabrics over a couple of areas, but embroidered them to reflect the small sections within them.
Abstract paper template

This is what the piece looks like when it isn't in front of a window. The colours are much more vibrant.

Translucent Meanderings

As I looked closely, there is something really cool that happens to the stitching when the piece is in front of a window as opposed to against the wall. You can see both here.
Stitches seen against the wall
Stitches seen through the light


As I was writing this post, I had the piece in front of me, leaning on the window. I observed those cool stitches at the very top of the piece and was wondering how I got that effect. They look almost like a chain stitch - but upon closer inspection, I saw that they were a blanket stitch - that I could see both the front and back of!!!! How cool is that?😊

You can also see this kind of effect in the pink piece on the top right of the piece. Against the wall, they are just ordinary seed stitches, but against the window, they are meandering all over the place. Even the running stitches appear as one solid line against the light.
Sheer remnants - what lovely colours :-)
The sheer fabrics that make up the piece are from all over the place. The backing is from a sheer pair of curtains that I purchased at Ikea (I have great plans for them!). I used some very fine silk from a scarf that I picked up in China, a black lace camisole that was my mother's, on fabric that I attempted to sew into a skirt for my daughter and another from a rather useless see-through bathing suit cover! Last month I dyed some silk organza and a little bit made it into this piece. The flower at the top of the piece is from a piece of commercial lace. I also used all kinds of thread and embroidery floss in the piece, including some couched yarn.   

As you may imagine, I am now on the lookout for all kinds of sheer fabrics and I plan on dyeing more silk organza. I believe that these last two projects with sheer fabrics are the beginning of some great fun and adventure!😊

What I learned

  • I find that hand-stitching sheer fabrics is a lot easier than machine-stitching them.
  • It looks like I'm going to be collecting more than just quilting cottons! There are so many kinds of sheer fabrics - from old curtains to some lovely sheers and tulles of all colours. 
  • I also love dyeing silk organza. The colours are so rich. So far I have some amazing fuchsia, violet and dark purple. It's going to be a lot of fun playing with the different dyes!
Related links
Linking parties

Project details

    Translucent Meanderings

    10¼ " x 10¼ " 

    Materials: sheer fabrics (silk, silk organza, tulle etc.),
    embroidery floss, sewing thread and yarn

    Techniques: applique, embroidery, couching