Showing posts with label FMQ journal. Show all posts

Thursday, March 13, 2025

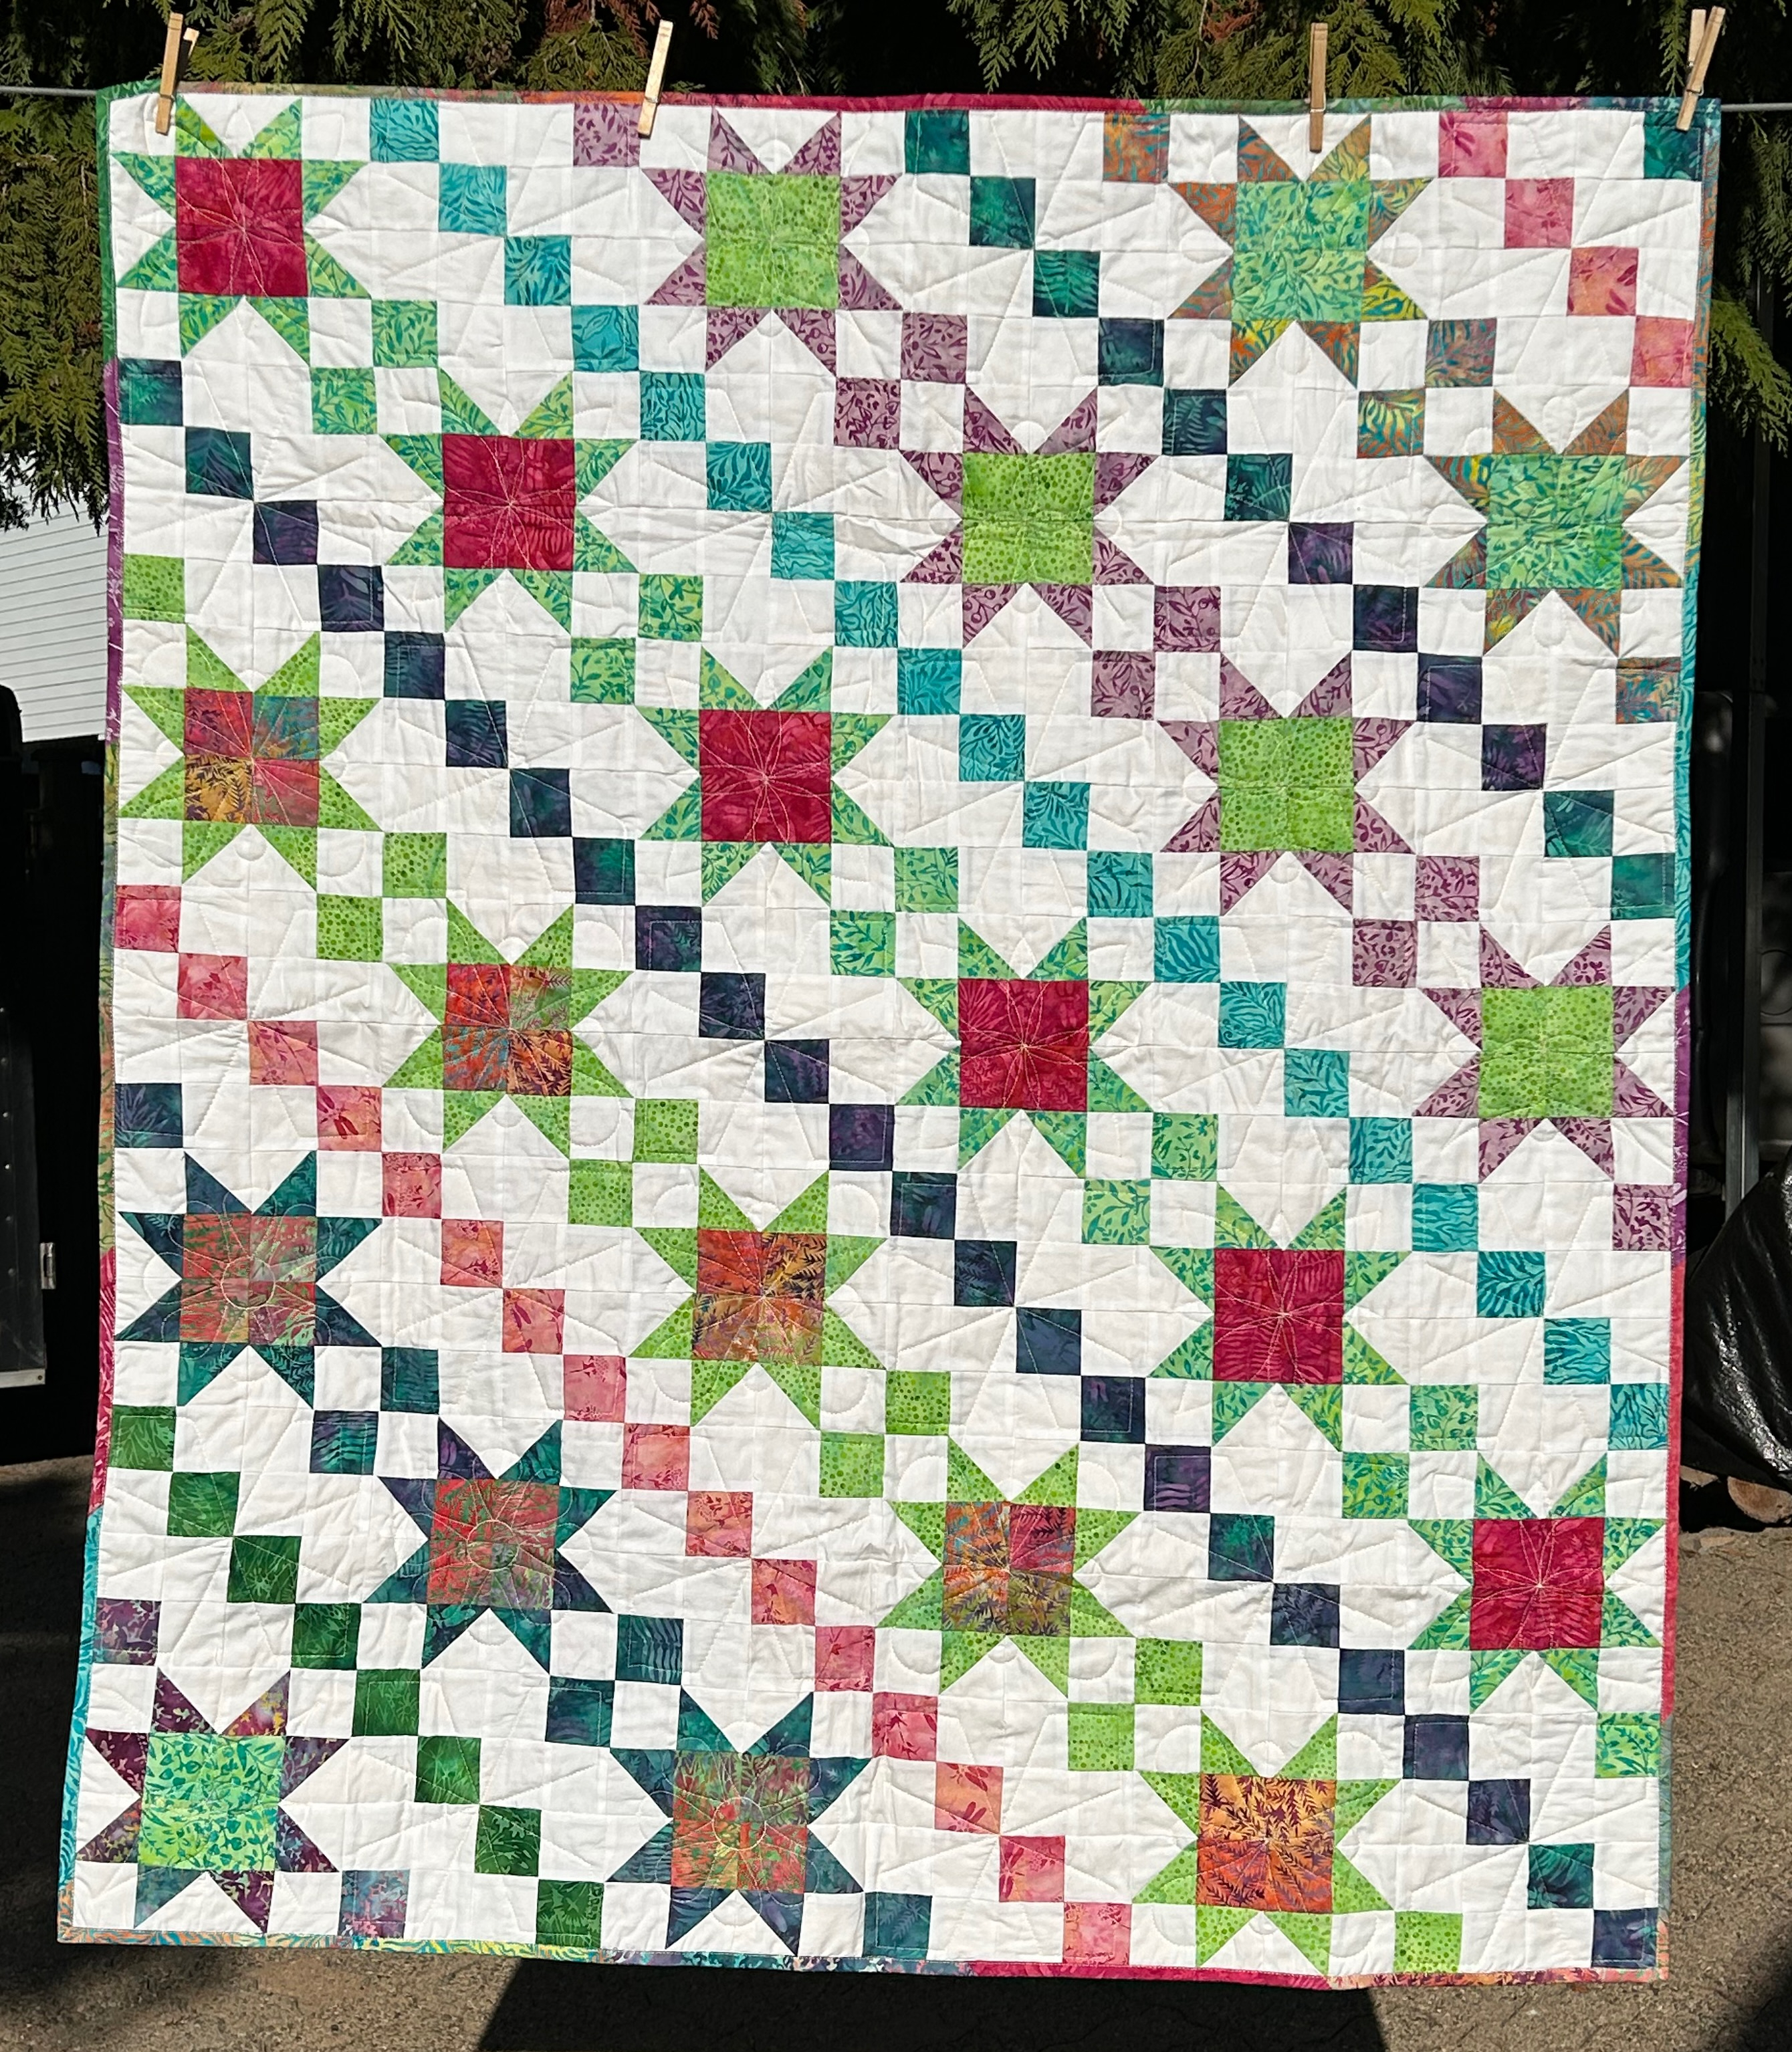
Progress on the Small Blue Scrappy Quilt

Hi and welcome. I didn't spend much time in my studio but I did finish FMQ (free motion quilting) my child-size blue scrappy quilt. It had been a while and I had forgotten how much I love FMQ! 😍 

FMQ a scrappy quilt


I started this quilt in mid-February and it was my blue February Table Scraps Challenge quilt. Now it's my March One Monthly Goal (OMG) and it will be finished! Just the binding left to hand-stitch. I don't have a picture of the fully quilted quilt - I FMQ the scrappy columns and then the blue fabric strips at the bottom. So, you'll have something to see other than the binding on 😁

Blue scrappy quilt on the snow!

In a child's quilt, I didn't think that there should be birds without heads, so I FMQ the heads of the birds at the top of the fabric strip!

Birds with their heads stitched on!

Below you can see some of the FMQ designs. I was really trying to keep the designs flowing, so as many wavy designs as possible. In the background between the two bottom strips, I FMQ a flower, a bird (possibly a chicken!) and feathers. You can also see on the bottom edge that I FMQ circles, apples and pencils (the only non-curvy design). I drew a line with a FriXion pen an inch from the edge and then FMQ the designs. I'm happy to say that where I did that, you can see the full design even with the binding on.

The bottom FMQ background has trees, a car, a race car, more trees and a house.

FMQ fun designs in the background

In the image below, you can see the vertical stitching in the two background pieces.

Details of FMQ

I just thought that I would show you a close-up of the chicken and how the colour of the quilt changes with the inside light. The actual colour is between the outside and indoor pictures. It's a teal.

Close-up of the chicken, flower and feather


Kawandi-style mat

There is progress on my Kawandi-style mat. As I may have mentioned, I sewed the scrappy fabrics together before stitching it. I took this picture last week on the train to Toronto for my semi-annual eye exam. I'm happy to say that all is good. 😊

Kawandi-style mat,  now about 2/3 finished!

I wanted to share these gorgeous tulips that hubby bought me...well, I picked them up with the groceries but he paid for them, so he bought them!😉 Today it feels like Spring might be coming. I am always hopeful and it helps when the sun is shining and the snow is melting.

Tulips....maybe Spring will come one day?

And since I'm Poppy sitting, here she is! Of course I'm disturbing her eating for a photo and she's not amused!

Poppy - interrupted in her eating

What I learned
  • When it's been a while that I FMQ, I tend to forget which designs I can do and use. I have a FMQ journal with most of the designs that I've used. It comes in very handy. All I have to do is practice them a couple of times on paper (sometimes more!) and I'm usually ready to quilt.
  • I also looked in my PDF quilting books. I've included Lori Kennedy's book in the Related links but I didn't need to refer to her book since most of her designs are in my FMQ journal! 
  • I wanted to take an outdoor picture of the back of the quilt, but it had wet spots from the snow after I took the photos of the front! I'll try to remember that for the next time.
  • The Kawandi style mat has even kept me busy when we went back to emergency to get the results of my hubby's MRI. It's good to have something to keep busy. We're waiting to hear from a specialist but hubby is feeling a little better.
Related links
Linking parties
I'll be linking up to these fun linking parties. You might want to check some out! Monday Musings, Design Wall Monday, Sew & Tell, Put your foot down, Needle & Thread Thursday, Off The Wall Friday, Finished (Or Not) Friday, Patchwork & Quilts,


Free Motion Mavericks


Welcome to week 522 of Free Motion Mavericks! It was a productive two weeks! Thanks for linking up while I was away. Here are the projects from the last two weeks that included FMQ, ruler work or walking foot quilting. 

Pat of Scrapbox Quilts finished two Bear Hug quilts. # 5 is blue and yellow and quilted using a Natalia Bonners orange peel template while #2 is pink and brown FMQ with very large swirls. They are so gorgeous😊

Pat's blue and yellow quilt with orange peel quilting
 
Kat's pink and brown quilt with large swirls

Sharon from Ms. P Designs shared with us a colourful Star Party Sampler quilt. If you go on their website, you can see how each block was FMQ. 

Sharon's Star Party Sampler quilt

Next we have Kat of Scrapbox Quilts who re-did the binding after trying a new technique that didn't quite work out. She originally FMQ her Mod Flower quilt and also used rulers.  

Kat's Mod Flower quilt 

Here is Melva's finished Hanna-land quilt for her grandchildren. It's a wonderful quilt and a mat for playing a game. That should be well loved!

Melva's Hanna-land quilt

Preeti linked up with her Miracle Fish quilt which she made as part of the Sunlit Garden Blog Hop. The quilt looks wonderful in the kids' playground!
. 
Preeti's Miracle Fish quilt in the playground

It's now your turn.

You are invited to the Inlinkz link party!

Click here to enter

Wednesday, December 13, 2023

Back to FMQ the T-shirt Quilt on Free Motion Mavericks

Welcome to week 460 of Free Motion Mavericks. I have been able to do free motion quilting (FMQ) this week. It felt good to be back home and at my Jag (my sewing machine) 😁 

FMQ the T-shirts


I started quilting the outlines of the hearts on this lovely t-shirt. Once I finished the hearts, I added the row of ruffle to the top of the block. Isn't it cute? 😍 I'll come back and do the sashing when I have blue thread in the machine. 

Lovely heart t-shirt with a ruffle

I then FMQ some of the t-shirts whose sashing I had previously quilted. In this case, I just wanted to keep it simple. They are mostly wavy lines.

The three high school t-shirts ✔

I just FMQ around the people and outlined the letters. After adding the photo to this post, I decided that it needed a little more quilting.

Outlining the group and name

Adding more swirls in white


I then started another t-shirt block. On this one I fudged improvised the sashing a lot because the t-shirt had to be cut at odd angles. I FMQ linked squares and rectangles and then went around the letters. I didn't want to stitch over the image too much because it's rubbery, but I went around the hat and it seems ok. I love the sentiment of this t-shirt...I guess my niece and I have that in common 😊

Linked squares and rectangles in the sashing

Here are a couple more blocks. I had fun with the Bridge t-shirt. I FMQ clouds in the sky, then water below, with fish and a sailboat. It's not obvious but it will be a fun discovery 😊 I'll be FMQ the border when that navy blue thread comes out!

Bridge t-shirt with FMQ landscape elements 

For this t-shirt block, I used some dot-to-dot type FMQ for the sashing. The sides have rather rough diamonds, the bottom is covered with echoed paisley and the top is another variation from the dot-to-dot design. On the t-shirt itself, I quilted a row of meandering flowers at the bottom and then some swirls. I also outlined the girl. Isn't she precious? She reminds me of my niece when she was young!

Dot-to-dot variations in the sashing

For this next t-shirt, I had a dilemma. I FMQ the Anna Canada t-shirt following the very faint lines that are in the t-shirt fabric, and I outlined the numbers. However, you can probably see the extra t-shirt fabric on one side. It's more than a little pucker and it will be vulnerable to ripping so I went back and sewed it down by giving it a slight tuck. It took quite a few lines of stitches but it's better than a huge pucker. 

Puckers stitched down
A dilemma that
needed to be fixed


The emoji t-shirt was FMQ with a kind of flowing algae design with white thread. It's much better than what I usually do, which is to circle around each element. 

I went back to the music t-shirt and added more looped filling within the t-shirt. As I cropped the image, I realise that I'd be going back once more to put a few lines between the locations at the back of the t-shirt. That has flatten it out well.
Additional lines of FMQ to flatten the t-shirt

The back of the t-shirt 


Here is the t-shirt that I was working on when I ran out of bobbin thread and called it a day. I have to eventually publish this post! For this pink t-shirt, I'm FMQ some allover large echoed flowers. It's a lot of fun but is time consuming.  

FMQ allover large echoed flowers

What I learned
  • The FMQ goes quickly when I know what design I'm going to use. It always slows down when I have to think of something new to use.
  • I spent a few hours looking for and drawing out some fun designs. This time, I went back to Leah Day's 365 Free Motion Quilting Designs. I drew then out and added them to my FMQ journal to keep track of.
  • It turns out that even if there is no batting, I still need to quilt all over or there will be loose fabric that can get caught, as I showed you. 
  • Considering how accuracy challenged I am, I'm pleasantly surprised that there haven't been more problems.
  • I did manage to cut the backing too much at the top of the high school t-shirts. I left the top sashing unquilted for now, so that I can add a couple of inches of backing. 😒
  • Of the 25 t-shirt blocks, I have 7 more blocks to complete, 1 t-shirt only to FMQ (not the sashing) and I've almost finished the pink all-over block.
  • All of this, including the binding needs to be finished by next Wednesday. It will be done ✔
Related links
Linking parties

Free Motion Mavericks


There were no link ups last week. I don't think there were issues with InLinkz. If there are, please let me know in the comments. Thanks.


You are invited to the Inlinkz link party!

Click here to enter

Thursday, October 19, 2023

FMQ Journal Covers at Free Motion Mavericks

Welcome to week 452 of Free Motion Mavericks. I have finally done some Free Motion Quilting (FMQ), but not on my niece's quilt yet. These were fun squirrels that I pursued for the upcoming Fall Fling marketplace with Out Of The Box (OOTB) Fibre Artists.

Making Journal Covers


The Fall Fling is like our Spring Fibre Fling except that everything on exhibit is for sale. I've been slowly getting ready for this event and am finally ready. Here are my first two finished journal covers.

Blue and Green Journal Covers

The fabric for these first two covers is made by Gunnel Hag, a Canadian textile artist. Every once in a while, I go to her Etsy shop and treat myself to a couple of pieces of fabric. They are always colourful and fun. 

I also bought very thick journals to go in the journal covers. They are as close to a hand-made look as it gets and have lovely scalloped page edges. I also love the fabric that I used for the lining. If they don't sell, I will be very happy to keep them, although I have so many journals already 😁

The inside of the blue journal with one of my favourite fabrics

The inside fabric of this journal is a green ombre with purple, pink and blue dots. I used the dark green part for the lining.

The fun ombre fabric lining with purple, pink and blue dots.

Here are photos that show the FMQ on the journal covers.

The blue fabric was very difficult to FMQ and I should have listened to my intuition when it told me that I shouldn't follow the lines of the diamonds. It's a good thing that I started on one end so that when it didn't work out, I moved over and quilted in a spiral. It also helped that I used dark blue thread, so it doesn't show up much.

FMQ the diamond patterns in a spiral shape

Front of the journal cover

Back of the journal cover

I did, more or less, follow the shapes in this crazy ribbon shaped fabric. I started with a turquoise/brown variegated thread that looked quite good. About halfway through, I stitched around the brighter yellow/green with a bright lime green thread. I then finished up with the original variegated thread. 

The FMQ on the green journal cover

The front FMQ of the journal cover

FMQ the pink journal covers


For the next two journal covers, I chose one of my own hand-dyed pink fabric. 

Two pink journal covers

For the first journal cover, I FMQ it with just the top fabric and batting. I've done this before without an issue, but this time, there was a huge drag. I even checked to make sure that I had lowered the feed dogs. Yup, they were down, so for the second cover, I added a backing fabric. That really helped.

FMQ pink fabric with a meandering flower

FMQ with the batting at the back

For something different on the second journal, I did some vertical FMQ. In the image, you can see my practice page. I went through my FMQ journal to find some designs that would be easy to do vertically.

Vertical FMQ designs with practice sheet

Here are my two FMQ journal covers.

First pink journal cover with Meandering Flowers

Second pink journal cover with vertical designs

When I did my second pink journal cover, I remembered to stitch my label before I put the whole thing together. I was so proud of myself, until I realised that I had sewn it inside the journal cover! It's a good thing that I was able to fold and sew it back out. 😓Aren't the lining fabrics gorgeous?

I was able to stitch the label again so that it peaks out!

Poster for Fall Fling 2023 Marketplace

I have a total of 11 pieces for sale in Fall Fling. Most of them you've seen before, but I will show more of them on Instagram. I'll check to see if I've blogged about each of them. If not, I'll include them soon in a post.

What I learned
  • Making a quilted journal cover is always a little tricky because most journals are not the same size. It's not complicated, but since I am accuracy challenged, I really have to be extra careful.
  • My first journal cover, the blue one, was a little tight because of the thickness of the journal. I thought that I had added extra space for that, but not quite enough. It looks fine, but the green one fits the journal much better.
  • For the pink fabric, I knew that the fabric would be tight, but it did work out. At least this journal is thin, so no extra fabric needed for that!
  • For the FMQ, as I mentioned earlier, I knew that I shouldn't try following the diamonds, but I just couldn't help it. After a few inches, I knew that I needed a plan B - so a spiral it was. It's always a great go-to when you want movement in your design. I balanced the wonky diamonds by adding a few on the other side of the fabric. I was lucky that I had more than enough fabric, so only an inch or so shows up on the journal cover.
  • I'm also lucky that I used a navy thread that blended in well.
  • I feel like I should explain my bizarre thread choice for the green journal cover. I ended up using a turquoise/brown variegated thread because the top of the fabric has some subtle turquoise where the green and blue paint has blended. After making the first journal cover with the blending thread, I wanted a little bit of pop. Adding the bright lime green thread in areas was a good idea.
  • I was so proud of myself for finally remembering to add my label before I sewed the journal cover together. I could have pulled it out, but since the label is quite long, I was able to fold it and stitch it down so that it shows.
  • I love my choices of lining fabric. I believe that it adds a lot to the look of the journal cover.
  • I was also surprised that FMQ without a backing cause so much drag. Adding a piece of fabric as a backing for the second pink journal cover did the trick!
Related links
Linking parties

Free Motion Mavericks


Last week Donnalee's oldest daughter came for a visit and some quilting lessons and practice. How wonderful that mother and daughter have the same passion! Here are a couple of her finished projects.

Table topper and runner by Donnalee's daughter

Gail has been busy pattern testing this lovely quilt for her friend. If you go to the original post, there is a link to the pattern.

Starry Path made by Gail

It's now your turn!

You are invited to the Inlinkz link party!

Click here to enter

Sunday, April 10, 2022

Journal Cover for Quilting Agenda

Hi! This project is a Squirrel as well as a useful way to procrastinate. More about the procrastination later 😊 

Mark Making 

I'm always nervous about working with paint but the few times that I've painted on fabric, the results were interesting and relatively successful for a beginner. I've been using Colour Vie pigment system which was created for Gunnel Hag, a amazing artist who became allergic to the paints she needed to create her surface designed fabrics. She's a Canadian artist who spoke at one of our Out Of The Box Textile Artists' group a few years ago. I've bought a few pieces of her fabric and made my last agenda journal cover with one of those pieces. When I saw that she had a couple of online courses, I tried out the "Make your mark" course.

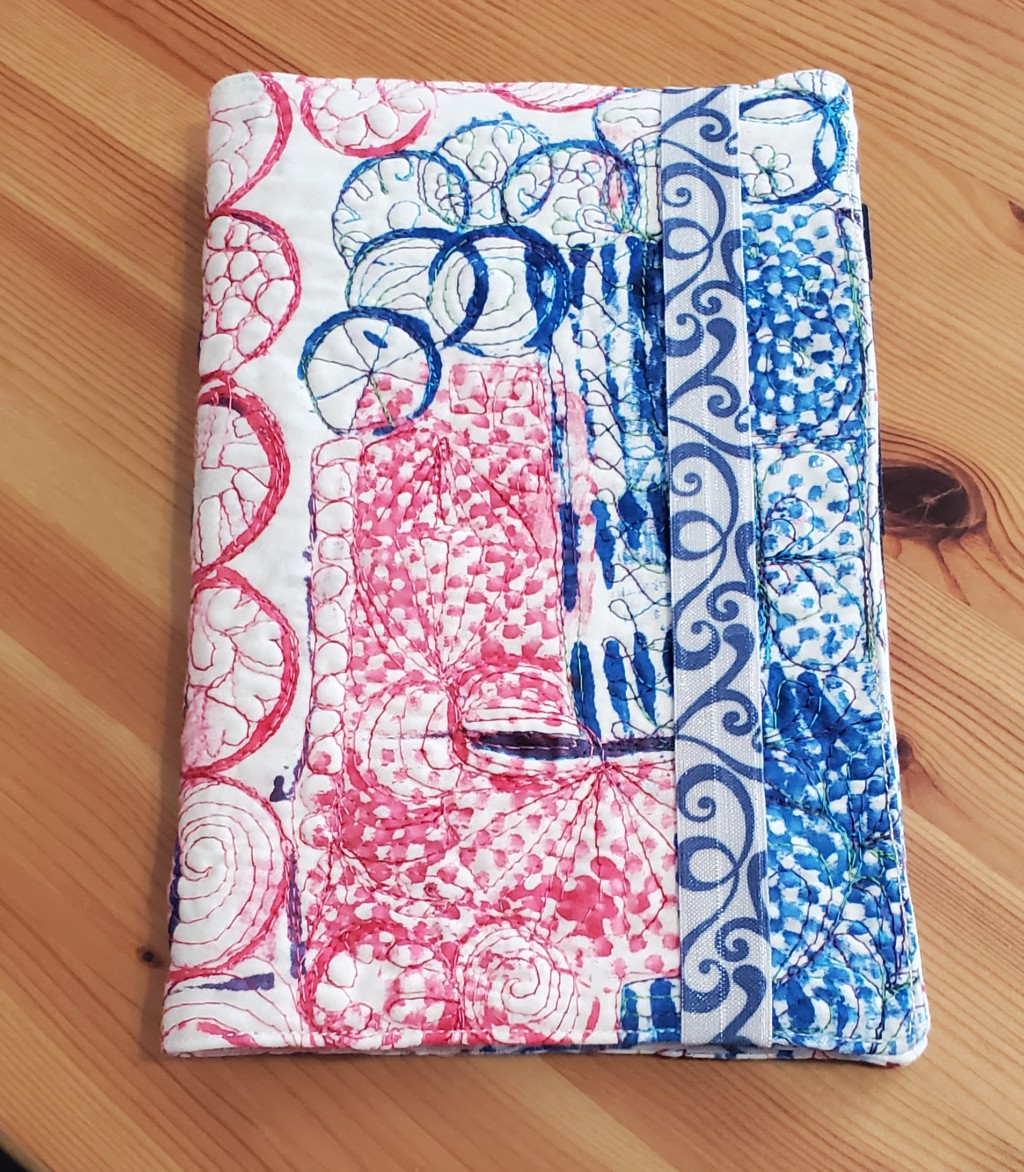
Finished agenda cover

I started by painting the first piece of fabric. I was hoping to get some nice purple where the blue and red meet but that didn't work out so well. Once it had dried a little bit, I added marks on top. 

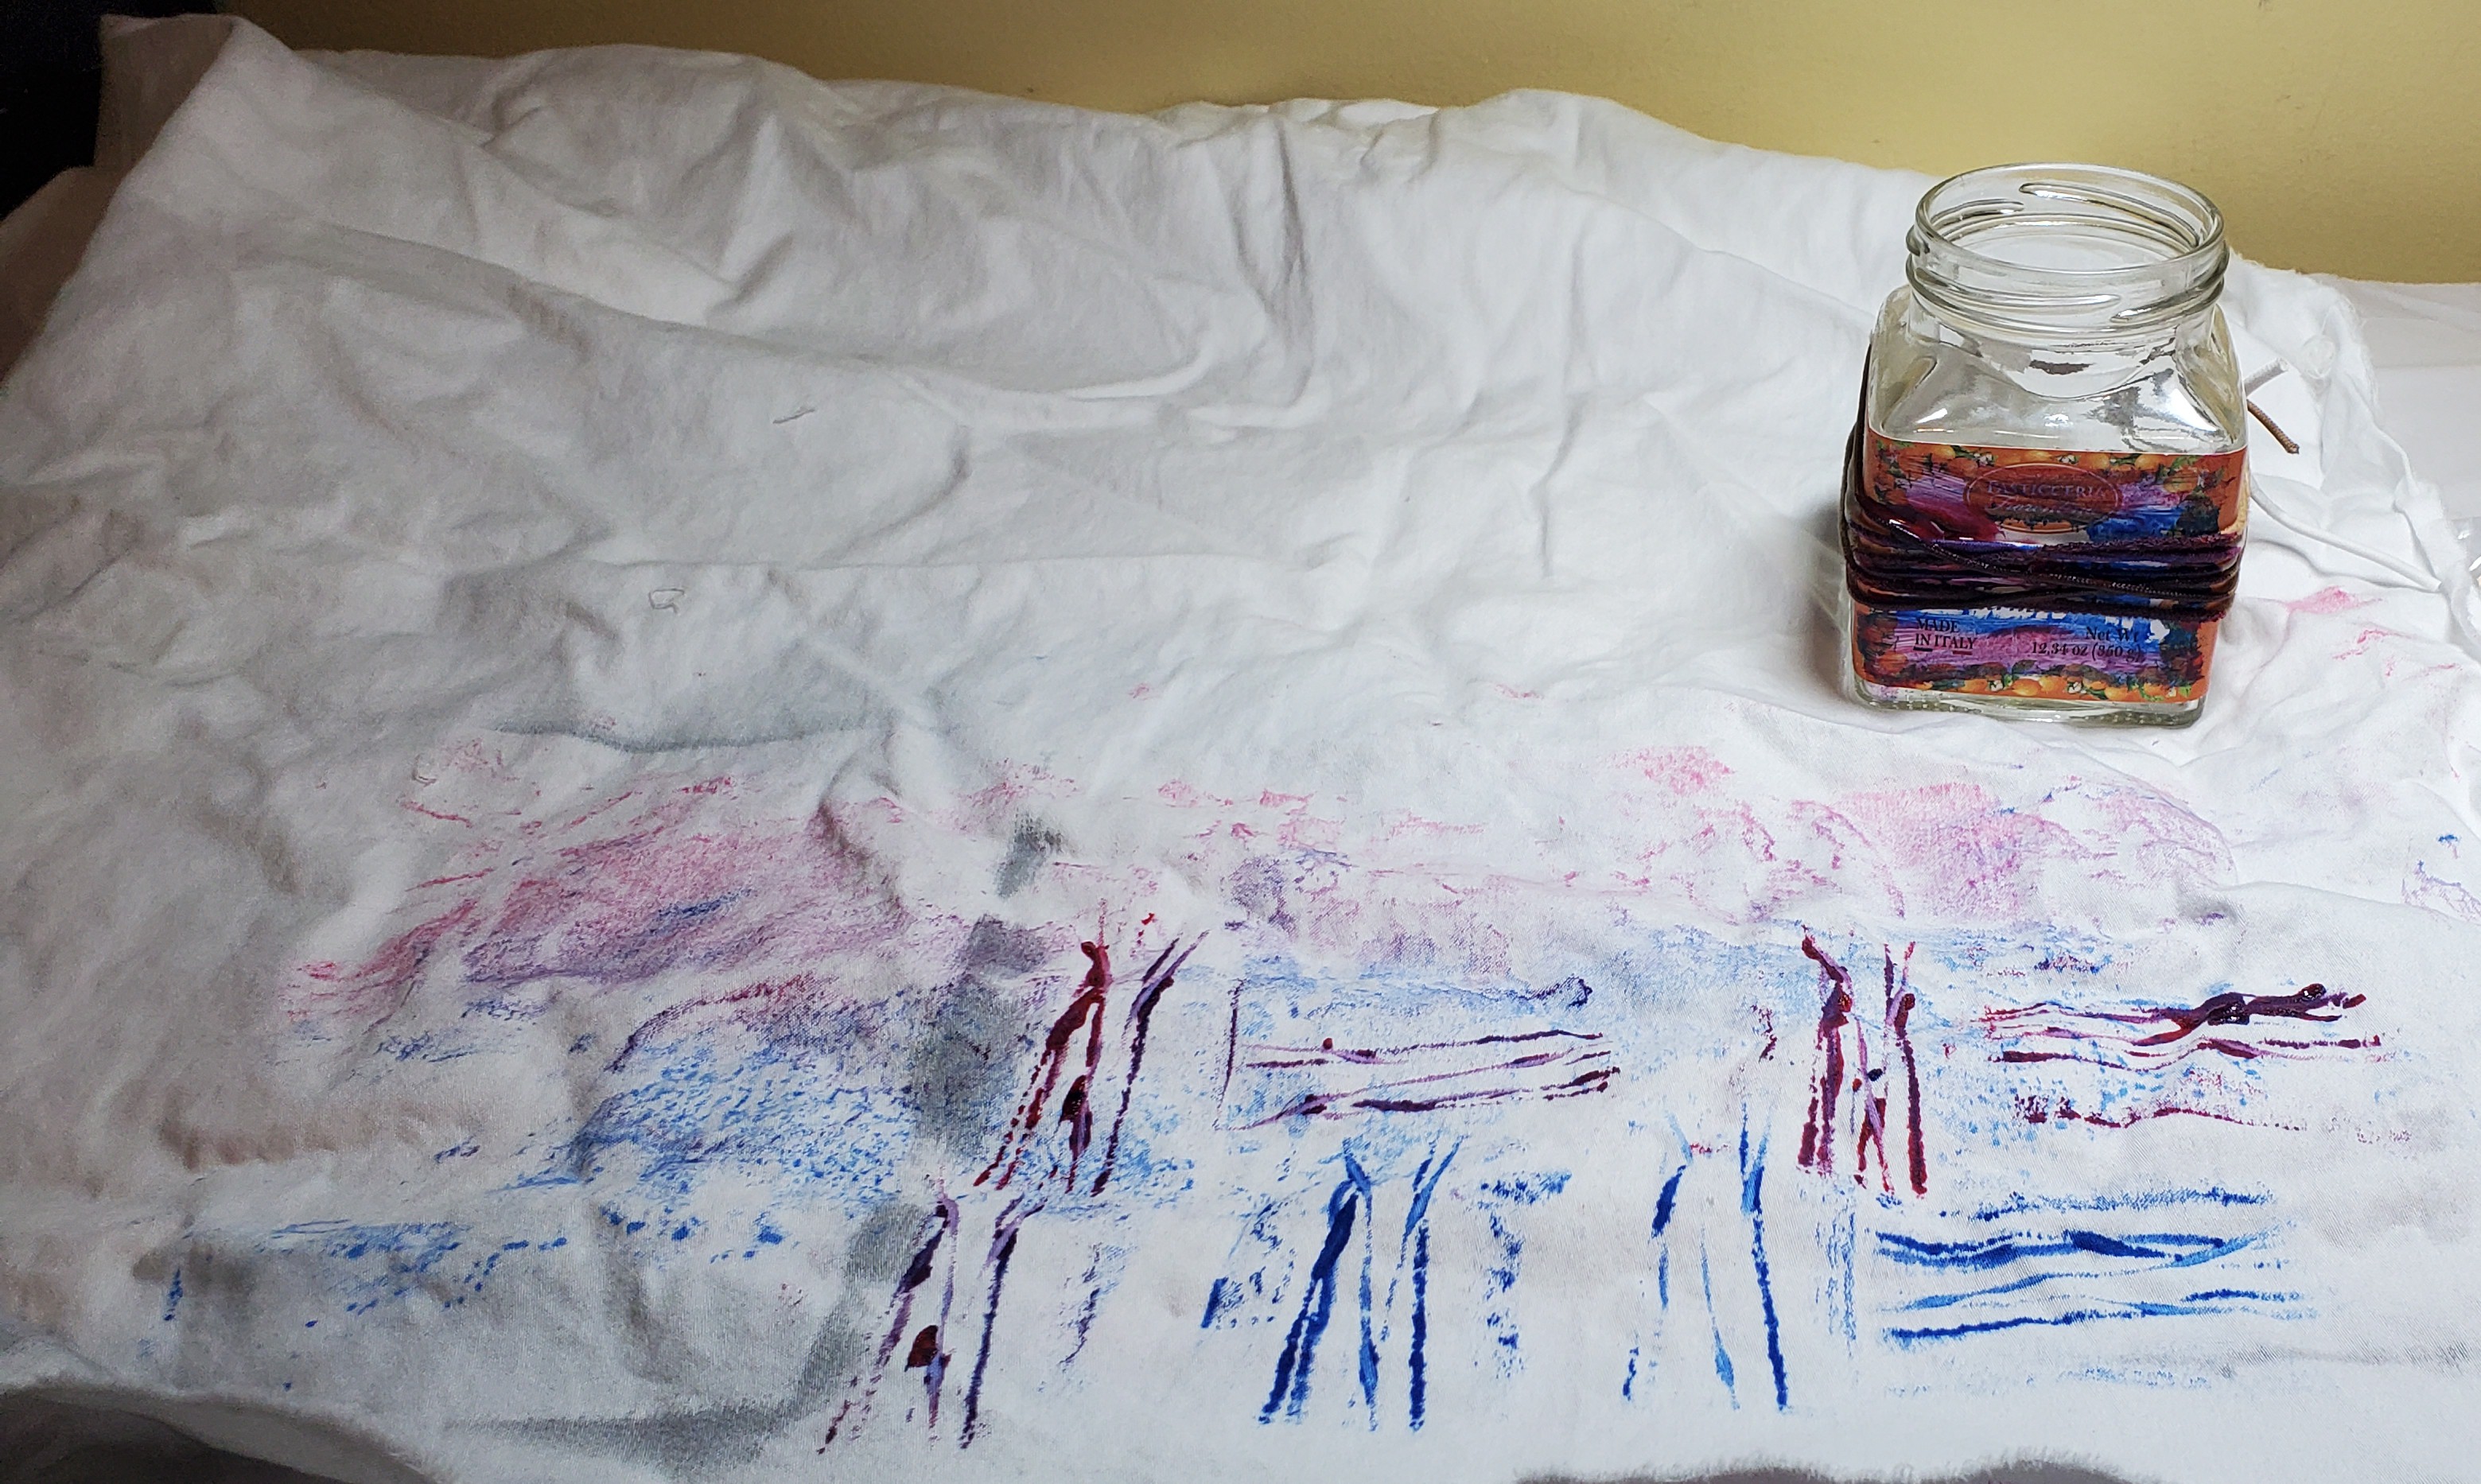
There was a bit of paint on the plastic underneath the fabric, so I imprinted the next piece of fabric with it and then started making various marks. You can see below a square jar that has elastics and cord around it. Those are the marks on the fabric.

Paint and marks
Making marks using the jar wrapped with cord


This was my second piece. I used an assortment of items to make the marks - a fork, a potato masher, the bottom of a plastic container, lids etc. I did figure out a few things that will make my next practice pieces better.

Marks on the fabric

Adding stitches

I've been using a perpetual agenda since January 2020 but I was running out of pages. Here it is, made from Gunnel Hag's fabric. 

Agenda cover made from Gunnel Hag's fabric

You can understand why I was reluctant to switch agenda's. I could have re-used the cover but I want to keep the agenda the way it is. It seems to be an integral part of it and was used a great deal in the last two years.

I wondered if I should over-paint the piece but decided to see what adding thread would do. Instead of free motion quilting (FMQ) the whole panel, I only quilted what I needed and was able to use the extra pieces for the inside of the cover.

FMQ fabric

I used four different variegated threads to quilt it. I looked through my FMQ journal to find designs to play with. It was great re-visiting the designs - some of which I haven't used in quite a while.

I measured many times and the journal cover came together without any issues. I used Christina Cameli's Free Motion Quilted Gifts on Craftsy. 

Front of the Agenda

The sides of the cover are made with the extra fabric that wasn't FMQ

Back of the cover

You can see the whole agenda cover here.

Front of the agenda with the elastic

I really love it. It went from a simple design on the fabric to something much more complex. That is a very good lesson to learn! 😊

Procrastinating

My first procrastination is in writing this post instead of starting to fill in my new 2022 quilting agenda. I'm almost afraid to see everything that I have going on in the next two months. That is why I made the cover....but it's going to be hectic!

My second procrastination is from working on my next slow stitching project that will be in the ArtPontiac show. I think that it's been over a year since I last worked on it. This is the last photo that I found of it, but there is more done (thank goodness!) More about this piece soon I hope!

Beaded and embroidered piece on biodiversity
 

What I learned

  • As I mentioned, adding the FMQ was essentially over-painting with thread. That means that making simple designs with paint can lead to some lovely, more complex fabrics.
  • When I added the paint to the mark-making items, I should have used a brayer or some other way of adding an even layer of paint on the objects. There's nothing wrong with uneven marks but it might look more professional if it was even. This would be especially good for items like the potato masher.
  • It would be great to make another journal cover, but this time to actually plan where the marks would go. I wish that I could have put the large circles at the front of the cover, although they are interesting on the spine.

Related links

Linking parties
I'll be linking up to many fun parties. Let's see what's going on! Patchwork & Quilts, Slow Sunday Stitching, Off the Wall Friday, Put Your Foot Down, Beauties Pageant, Peacock Party, Monday Making,

Project details


2022 Quilting Agenda cover
5¾" x 8½"
Materials: Fabric marked with Colour Vie, variegated thread
Techniques: mark making, FMQ and sewing