Sunday, November 15, 2020

Creating a stitcher's journal with paper and fabric

I'm back to making hand-stitched projects based on our latest workshop at TextileArtist.org's 2020 Stitch Club. This week's teacher is Ali Ferguson who showed us how to make a stitcher's sketchbook or journal with paper, and then to cover and embellish it with fabrics.

Making the Journal

This is the first workshop that I finished the project only a few days after it had started. I was hooked! I couldn't leave it. 

My new stitching journal

For my paper, I chose some printing paper (one with a gardening motif that I bought years ago, some brightly coloured paper, as well as the normal white stuff). I also found some lovely writing paper that I got as a gift when I was in my teens. It has my name (maiden back then) printed at the top. It was smaller than the other papers but I added them in separately and adjusted the holes. My book is made up of 4 signatures - those are the folded sheets of paper that make up each section. Once the signatures are complete, they are bound into the journal.

For the front cover, I used part of a panel that I created during Gregory T. Wilkins' workshop in July (see Related links below). For the back piece, I used fabric that I painted using a plastic fork and blue Colour Vie paint. The book spine tabs were printed using a print block that I made during a virtual workshop with Christine Chester, as part of the Birmingham Quilt Festival. I just coloured them using Sharpie markers and then sewed on some fun buttons.

Printing block made with
Häagen-Dazs sticks
Making marks with a plastic fork


The fun really started when I embellished the journal.

I started by using only batik fabrics, but then I got even more creative and took out all of those sheer scraps from making my last two sheer projects.

One the inside cover, I covered up the button stitches by gluing on some pieces from a cute scrapbooking sheet. I stitched a diagonal border on the opposite page and stitched the bottom of the page to the next one to create a pouch. I even attached an upside down label 😊.

Inside cover with a pouch for keepsakes

My journal has 58 pages, so I won't show you pictures of each one of them! All of the pages have some stitching on them, but I will show you my favourites.

I made this one this morning. I stitched the fish to the background fabric with a running stitch and then added some French knots. I practiced my "writing" skills based on Joanne Sharpe's The Art of Whimsical Lettering book. I haven't practiced this in a long while but I now have an excuse if I write in this book!

"So long, and thanks for all the fish" Douglas Adams quote
with stitched fish

The fish (above) and the purple batik and organza piece below are on the back of my personalized writing paper. You can see the printing flower paper on the other side.

Using batik and silk organza scraps. They are attached
using embroidery stitches

This is one of my favourite pages. I drew around an oak leaf from my neighbour's yard and then stitched it with this amazing yarn made from Tencel (some type of pulp fibre). The colours are amazing and it's made locally by Trail Head Yarns (see Related links). 


Oak leaf outline with stitching using Tencel yarn.

For one of the signatures, I used a piece of scrapbook paper instead of my personalized writing paper. It's just too cute!
Adding scrapbooking paper in one of the signatures.

My first embellishments were rather simple but as I got going, they became more layered and creative. 

Starting to get the hang of layered embellishments.

As I mentioned, I made the fish this morning as well as this one. I love adding the sheer fabrics. This one has lots of texture which may get flattened a bit when the journal is closed, but that's fine. 😊

Adding more stitching and using sheer fabrics

What I learned
  • In this journal, I want to experiment with stitched layers and then place the pieces in the journal. I would like to use more interesting embroidery stitches but this needs to be done separately and then attached to the journal. 
  • You may have noticed in the image above that the page is getting pretty crumpled. That's what happens when the paper is handled too much. I've figured out that the best way to add the stitching is to put the piece together first and then stitch it on or even better just tack it on with a few stitches.
  • I tried to do the button hole stitch on the paper but just couldn't hold the paper properly. 
  • In the end though, the crumpled paper won't show since I'll be filling this journal up with lots of pretty stitched pieces!
  • BTW, I've actually finished my Marks & Stitches piece - it's even framed! I'll write a post soon...
Related links
Linking parties

I will be linking up to all kinds of fun stitching and quilting link-ups. Let's see what's happening in Blog Land! Colour & Inspiration TuesdayPatchwork & QuiltsOff The Wall Friday, Beauties Pageant, Slow Sunday Stitching, Oh Scrap!Monday Making, Midweek Makers, TGIFF with Storied Quilts, Free Motion Mavericks with Muv, Needle & Thread Thursday, Put Your Foot Down, Finished or Not Finished Friday, Can I Get A Whoop Whoop?

I'm also linking up to Meadow Mist Designs' Favorite Finish Monthly linkup as well as Sandra of mmm quilts' DrEAMi - if this isn't a squirrel, nothing is!

Thursday, November 12, 2020

Stars with Swirl Hooks & Flames on Free Motion Mavericks

Welcome to Free Motion Mavericks, week 306. It's been a month since I last free motion quilted (FMQ) a star. Today I'm going to show you the last two star blocks on the Pinwheels and Stars Baby Quilt. 

Swirl Hook Star

The first star today is the Swirl Hook Star based on Angela Walter's 4 Ways To Machine Quilt Star Blocks (see Related links below). 

In the last star post, I mentioned that I had been practicing my Swirl Hook. Of course I hadn't practiced it since then, but as soon as I started drawing it, the Swirl Hook came right back. It's amazing how the hand remembers the motions! 

Swirl Hook Star based on Angela Walter's design

Original design

Swirl Hook Star with pinwheel neighbours


Star with Flames

This next star is based on a mix of Leah Day's flame designs. 

Star with Flames

I practiced the flame designs and thought that it would work well in the star. When I started FMQ it, the flames were taking more space than I anticipated, so I ended up putting a large flame in every second point of the star and then making smaller flames in the alternate 4 points. Since the middle was a sort of spiral, I was able to use it to get back and forth to each flame.

You can see the FMQ better on the back of the quilt. Click on the image to enlarge it.

The back of the Star with Flames design

I also added a flame in each corner of the block.

Star with Flames and some pinwheels

What I learned
  • Practicing a design by drawing it is incredibly important to FMQ it correctly. I was pleasantly surprised that my hand still remembered how to draw the Swirl Hood design.
  • I didn't expect that my flames to be so large, however since I had practiced using Leah Day's tutorial (see Related links below) I had practiced making flames of different sizes, so it was easy to find my way out of a possible mess.
  • It would take a lot of practice to get consistent designs but I'm very happy with my results.
  • In my next Free Motion Mavericks post, I'll write a summary of the star blocks and start planning out the middle of the quilt!
Related links
Linking parties

Free Motion Mavericks


We are still getting a lot of Free Motion Mavericks joining our linking party! Thank you so much for coming by and posting, and leaving comments. It's great to be learning from each other and looking at the eye candy 😊

Today I would like to share Avril's new jacket. Sandra of mmm quilts finally made a cover for her longarm, Avril. She quilted a series of panels on beautiful Island Batik fabrics and then sewed them together to make the cover. There are over 49 designs from the quilting world's best-known teachers. If you didn't see her post, check it out!

A peak at Avril's new jacket by Sandra at mmm quilts

It's your turn now!

You are invited to the Inlinkz link party!

Click here to enter

Sunday, November 01, 2020

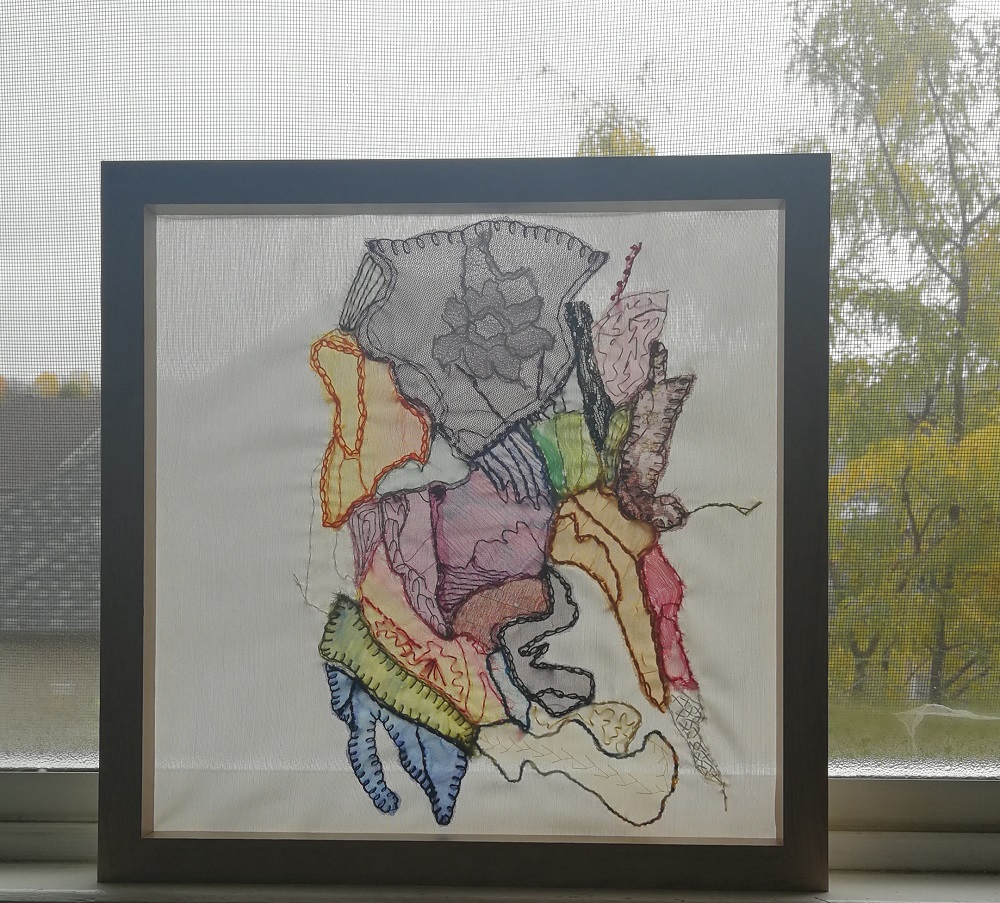
Translucent meanderings

I can't say enough about how much I've enjoyed playing with fabrics with TextileArtist.org's Stitch Challenge 2020. As you saw from my last post, I have even used free motion quilting (FMQ) in some of these projects. 

Using sheers on my abstract template

This is the first piece that I did based on Sabine Kaner's workshop. She showed us how to make an abstract template by crumpling a piece of paper and then drawing along the ridges of the lines. You can read more about it in my last post which is in Related links below. For this first piece, I used a regular sheet of printing paper, which resulted in lots of lines!

My first impression was of a map of a country or a continent, but I kept it abstract as I put things together. Sabine Kaner's art is abstract but she doesn't use sheer fabrics. It's almost all recycled fabrics with lots of heavier textiles like wool, with lots of texture. I love the look of her work but I had just finished Vinny Stapley's workshop where she works mostly with sheers. I just didn't want to stop working with sheers, so I interpreted Sabine's workshop in translucent fabrics. It made for a very different project.

Working again with sheer fabrics

Here is my crumpled paper pattern placed over the light box. There were some really small sections that would have been impossible for me to applique with different fabrics, so I placed sheer fabrics over a couple of areas, but embroidered them to reflect the small sections within them.
Abstract paper template

This is what the piece looks like when it isn't in front of a window. The colours are much more vibrant.

Translucent Meanderings

As I looked closely, there is something really cool that happens to the stitching when the piece is in front of a window as opposed to against the wall. You can see both here.
Stitches seen against the wall
Stitches seen through the light


As I was writing this post, I had the piece in front of me, leaning on the window. I observed those cool stitches at the very top of the piece and was wondering how I got that effect. They look almost like a chain stitch - but upon closer inspection, I saw that they were a blanket stitch - that I could see both the front and back of!!!! How cool is that?😊

You can also see this kind of effect in the pink piece on the top right of the piece. Against the wall, they are just ordinary seed stitches, but against the window, they are meandering all over the place. Even the running stitches appear as one solid line against the light.
Sheer remnants - what lovely colours :-)
The sheer fabrics that make up the piece are from all over the place. The backing is from a sheer pair of curtains that I purchased at Ikea (I have great plans for them!). I used some very fine silk from a scarf that I picked up in China, a black lace camisole that was my mother's, on fabric that I attempted to sew into a skirt for my daughter and another from a rather useless see-through bathing suit cover! Last month I dyed some silk organza and a little bit made it into this piece. The flower at the top of the piece is from a piece of commercial lace. I also used all kinds of thread and embroidery floss in the piece, including some couched yarn.   

As you may imagine, I am now on the lookout for all kinds of sheer fabrics and I plan on dyeing more silk organza. I believe that these last two projects with sheer fabrics are the beginning of some great fun and adventure!😊

What I learned

  • I find that hand-stitching sheer fabrics is a lot easier than machine-stitching them.
  • It looks like I'm going to be collecting more than just quilting cottons! There are so many kinds of sheer fabrics - from old curtains to some lovely sheers and tulles of all colours. 
  • I also love dyeing silk organza. The colours are so rich. So far I have some amazing fuchsia, violet and dark purple. It's going to be a lot of fun playing with the different dyes!
Related links
Linking parties

Project details

    Translucent Meanderings

    10¼ " x 10¼ " 

    Materials: sheer fabrics (silk, silk organza, tulle etc.),
    embroidery floss, sewing thread and yarn

    Techniques: applique, embroidery, couching

Wednesday, October 28, 2020

FMQ using an abstract template on Free Motion Mavericks

Welcome to another Free Motion Mavericks linking party (Week 304). Last week I learned how to create an abstract piece using paper and then adding free motion quilting (FMQ). 

Creating an abstract template

As you may know, I've been fully immersed in TextileArtist.org's Stitch Club 2020. We've had some amazing teachers and workshops. Last week's teacher was Sabine Kaner. To help us create an abstract piece, she had us crumple up a piece of paper and then draw the lines that the crumpling had made to create an abstract piece. 

FMQ with variegated thread in each of the sections

I made two pieces, but in this post I'll tell you about my second project. For this piece, I used a brown paper bag which is a rigid paper that created larger sections when it was crumpled.

Creating the abstract template
using a brown paper bag

After making the template with the paper bag, I used a marker to enhance the lines and then transferred the pattern to some white fabric using a light box. 

I had an idea and tried to applique fabric in the sections but it was a mess, so I ripped it all out (I almost never do that but the alternative was putting it in the garbage - which I did but I took it out the next day!)

I just wanted to make something interesting but easy. My first piece was a lot of work and I didn't want to spend all that time making a second piece. Since I still had the FMQ or darning foot on the machine, I thought that I would at least sew around the lines. I attached a sheet of Ricky Tim's Stable Stuff Poly on the back and then started FMQ.

Close-up of the stitching

As I was looking for different threads to use, I realised that I had quite a few variegated threads that I hadn't used yet and didn't really know what they looked like when stitched. So, I decided to use these threads to stitch each section, while also practicing different FMQ designs.

Another close-up of the stitching
As I was changing threads, I kept track of each thread I used in each section.

List of threads used
in each section
FMQ Journal


Template, list and practice piece
attached in my FMQ Journal


A great FMQ resource
What I learned
  • After having made my first project, I had little patience for that second project, even if I had loved making the first one.
  • I'm glad that I literally took the project out of the garbage to remove the applique and continue in a different way.
  • It's a very useful guide of both the variegated threads that I have as well as some FMQ designs.
  • I found one thread that I hadn't used before that is absolutely beautiful. I'm looking forward to using it again!
  • This project used only one aspect of Sabine Kaner's technique. My first piece, that I will post later this week is a little more in line with her work. Here's a sneak peek! Come back on the weekend to check it out 😊
My first project,
Translucent Meanderings
Related links
Linking parties
I will be linking up this post to many fun linking parties. Let's check out what's happening around the quilting blog world! Colour & Inspiration Tuesday, Monday Making, Design Wall Monday, Midweek Makers, Needle & Thread Thursday, Patchwork & Quilting, Off the Wall Friday, Beauties Pageant, Peacock Party, 15 Minutes to Stitch 2020
This piece was a bit of a squirrel since I don't usually make 2 projects from one workshop. I'm linking up to DrEAMi! with Sandra at mmmQuilts.

Free Motion Mavericks

What a great turn out we had last time. Thanks so much for linking up and sharing your lovely projects. This week I thought that I would feature A Bloom Finish by Leanne at Devoted Quilter. Leanne started quilting it one way and when she wasn't happy, very resourcefully changed tactics. She also had to do some troubleshooting when she couldn't see her thread as she was stippling the background. She ended up quilting the background from the back, since she could see the bright thread on her white backing. If you didn't see it, take a look at A Bloom Finish. Way to go Leanne!

A Bloom Finish by Leanne at Devoted Quilter

Now it's your turn!

You are invited to the Inlinkz link party!

Click here to enter

Monday, October 19, 2020

Playing with sheer fabrics

Have I told you how much I love playing with textiles lately? It would seem that I'm smitten! As you may know, I've been taking part in the TextileArtist.org's Stitch Club 2020 since it first started this spring. It has brought stitchers together with amazing workshops by guest textile artists. 

TextileArtist.org's Stitch Club 2020

Flower Impressions - pink campion 

The platform has really evolved since its creation - from having 3 workshops in a row with one week off, to now having workshops that last 2 weeks each.  At the beginning of the week, there is a first video by the guest teacher, with a beautiful workbook and an inspiration book of the artist's other work. At the end of the first week, the artist records her answers to questions that are asked by the students. This is always wonderfully rich with information. Then at the beginning of week 2, there is a short video on how to take the techniques further, and then more Q&A at the end of the second week. During the two weeks, the teacher is there to guide the student and give feedback. A lot of students post their work and it's always wonderful to see all of the different takes on the same exercise. 

TextileArtist.org

It's been such an amazing learning experience. I've done many of the workshops and have learned so much from them all. Some techniques I loved while others I may eventually use. There is always something to learn - and we can access those videos later if we wish to go back to complete some of the workshops that we've skipped.

Last week's workshop was with Vinny Stapley. I had read an article about her work on the TextileArtist.org site and fell in love with her work. I was thinking that it would be so lovely to be able to have her as a teacher....well it turns out that she was our teacher for the next two weeks. Her work is mostly on very light, sheer fabrics. I think that it's all very stunning (her website is in Related links below).

Pink Campion flowers
Pink Campion
Here are the pictures of the flowers that inspired my project. These are pink campions. They are self-seeding and used to move around the garden but for the last few years they always come back to the same spot.


Here is the process for creating this sheer piece.

Elements pinned in place

I created a background starting with a sheer but relatively firm piece of fabric. On top of that, I added one narrow strip of very colourful sheer fabric with a few more pieces of more solid sheers next to it.

I then made a template of the pink campion flower and cut three from different sheer fabrics. One was the colourful sheer and the others were grey and blue.

After deciding on the layout, I pinned them down and began to stitch them. I used my hand-dyed gray perle cotton for the gray flower, and then green and blue floss for the other two flowers.

Stitching the leaves and stems

Close-up of the different flowers


You can see the stitching here. The stem of the colourful flower was accidentally cut but was eventually stitched back. Once the leaves and the stems were stitched down, it was time to add the flowers. For this, I used my pink hand-dyed perle cotton - it was just perfect for it!

Slowly the flowers and buds came to life. Each flower was stitched differently so that I could try out different techniques.

Adding the flowers and the buds


The colours look quite different depending on where the pictures were taken. My neighbour's siding probably gives the best background but they did look good overlooking the garden.

Hanging from a side window overlooking
the neighbour's siding

Hanging from the dining room window,
looking out into the back garden

In the first image at the top as well as in this one, the wall hanging is on my studio wall. The window was open and it was lightly blowing in the breeze.

Blowing slightly in the breeze from the window

What I learned

  • Since I love the look of the sheers, I'm thrilled to say that I really liked working with them. I have machine sewn sheers and didn't particularly like that but this is different - nothing needs to be straight. It's stitched however I want to.😊
  • The work that Vinney Stapley does is not stitched down as much - it just didn't feel finished without the stitching. That must be the quilter in me. Less stitching would have made it slightly more free but I don't think that the stitching takes away from the light, breezy look of the piece.
  • I would love to hang it in a window but all of my windows get too much sun - I wouldn't want it bleached by the sun. With the window opened in my studio, the piece was slightly blowing in the wind. It was lovely!
  • I've now started the next workshop by Sabine Kaner. Since I really wanted to continue working with sheers, my first piece in this workshop uses sheers again - and I absolutely love it. It should be ready next week. I want to make two pieces for this workshop - the second one will be with traditional quilting cottons and other heavier textiles. I can't wait to see the difference.

Related links

Linking parties


Thursday, October 15, 2020

FMQ a simple star on Free Motion Mavericks

Welcome to week 302 of Free Motion Mavericks. It was a wonderful 300th celebration and I want to thank everyone who came by, left comments and of course posted their favourite Free Motion Quilted (FMQ) projects.

Simple FMQ Star

This is probably the simplest star to quilt although when it's simple there is also the expectation of accuracy...which is expected of other quilters and sometimes achieved be me 😊. 

Simple intersecting lines within the star
and outside echoing 
Here is the original pattern which is a combination of one of the AQS blog - 25 Ohio Star Quilting Designs (see link below) and my own design.
The design idea for this star

I used my walking foot to quilt this star. Since these were all straight lines, I wanted to practice using the walking foot. I will blame some of my accuracy problems on my walking foot, since it doesn't have very good measuring capabilities. There are only a couple of obvious points to follow and anything else is not very accurate.

The design does look great on the back of the quilt.
A lovely, crisp design at the back of the quilt
What I learned
  • I've really come to appreciate my walking foot, but I think that I'm going to have to invest in another foot that has better measuring capabilities. I need all the help I can get.
  • I FMQ this star on the same evening that I quilted the Sparkling Star, about a month ago. I am so, so glad that I had a star ready for this post. I hope that I can do this again 😊
  • I did practice drawing my next star, the Swirl Hook by Angela Walters. With this practice, I should have my own spin on another lovely star in a fortnight. I've included the link to Angela's video, in case anyone is curious.
Related links
Linking parties
I will be linking up to many fun linking parties this week. Let's see what everyone is up to! Let's Make Baby Quilts!, Monday Making, Colour & Inspiration Tuesday, Long Arm Learning, Midweek Makers, Needle & Thread Thursday, Peacock Party, Patchwork & QuiltsMonday Making

Free Motion Mavericks


Thank you for taking part in our wonderful 300th linking party. It was so nice to see everyone's posts. Wow, there was a record 24 link-ups, how wonderful!!! So how am I supposed to highlight all of these delights? Well, for those of you who linked up 3 posts, I will be featuring my favourite one today. 

From Denise at For The Love of Geese, here is my favourite because you know how much I love hexies - and such a different way of presenting them.

Hexie flowers by Denise at
For The Love of Geese
In December 2012, Rebecca Grace FMQ an amazing FMQ Border Challenge. I chose this quilt because I think that it would make the most amazing border for an art quilt.
FMQ Border Challenge by Rebecca Grace
I saw the progress that Frédérique of Quilting Patchwork Appliqué made on her Australis quilt, but I managed to miss the finale. How terrific it is!
Australis quilt by Frédérique of
Quilting Patchwork Appliqué
It's now time for Dione's lovely prize-winning piece, Crazed Diamonds. Dione of Clever Chameleon Quilting made this for the Island Batik's Vintage Reimagined Challenge. I couldn't resist using a close-up of her FMQ.
Crazed Diamonds by Dione
of 
Clever Chameleon Quilting
Next we have Vasudha of Storied Quilts with her Winding River quilt made for an Island Batik Blog Hop. It's pretty amazing what she can do with the good old log cabin block.  
 Winding River quilt by Vasudha of Storied Quilts
Finally, there is my partner for this great linking party adventure. Muv of Lizzie Lenard Vintage Sewing, made two of these tea cozies, one for herself and the other for Bonnie Hunter who was teaching in Bath. I think that this is a great finale for our 300th post tea party.
Tea cozy for Bonnie by Muv of 
Lizzie Lenard Vintage Sewing

Wasn't that amazing? Well, we may have set a record at the party but I sure hope that you will all keep posting - no pressure 😊. So it's now your turn.

You are invited to the Inlinkz link party!

Click here to enter

Friday, October 09, 2020

FMQ moose panel finished

Hi! I want to share this UFO finish before it goes to its new home!

FMQ a lovely moose panel

I started Free Motion Quilting (FMQ) the moose panel for my brother's cottage in July of last year. 

FMQ Moose panel ready for its new home

What a difference FMQ adds to the panel. Here is the image of the panel when it was barely quilted. I admit that the lighting isn't as good, but you can see that the fabric is very flat. Now that it's quilted, there is so much more texture.

Moose panel with a bit of FMQ

I had fun taking pictures on our fence - the perfect background next to the burning bush. The only way it could have been better was if I had taken these pictures at my brother's cottage!

Moose posing next to the burning bush

A close-up of the woodgrain FMQ

What I learned

  • As I mentioned in the What I learned from my last post of this project, this panel was very forgiving. It would have been difficult to mess it up.
  • When I left the project in July, I really didn't know how I was going to FMQ the water and sky, or how I was going to finish it.
  • It seems that I had the foresight to put some wooden panel fabric away with this project so that I didn't have to dig around for it when I decided to finish this project. I'm sure I did this because I only had a little bit of the fabric left and didn't want to take the chance to use it all up before finishing this project. Good thinking 😊 (As my son would say, my present self is very proud of my past self!)
  • I still didn't know what to do with the sky, so, as usual, I just jumped in and swirls it was! If I had paid attention, the swirls would have all gone in the same direction but we can blame it on the wind patterns at different altitudes!
  • I am also very happy with the woodgrain FMQ that I did in the white section of the frame. I followed Lori Kennedy's tutorial.

Related links

Linking parties

I'll be linking up to Free Motion Mavericks with Muv this week. Check out the 301st post! This project is also a UFO - so that's one down! I will be linking this one to PHD in 2020, when the next party opens, as well as many other fun link-ups. Let's see what's happening in the wonderful virtual world of quilting 😊. Colour & Inspiration Tuesday, Midweek Makers, Put Your Foot Down, Needle & Thread Thursday, Needle & Thread Thursday, Off the Wall Friday, Finished or Not Finished Friday, Peacock Party, Beauties Pageant, Can I Get A Whoop Whoop?, TGIFF, Monday Making, Design Wall Monday,

I'm also linking this post to Sarah Goer's Show Me Something That's a Gift

Project details


FMQ Moose panel
19¾" x 22¾"
Materials: commercial panel and lots of thread!
Techniques: free motion quilting