Showing posts with label Sabine Kaner. Show all posts

Sunday, November 01, 2020

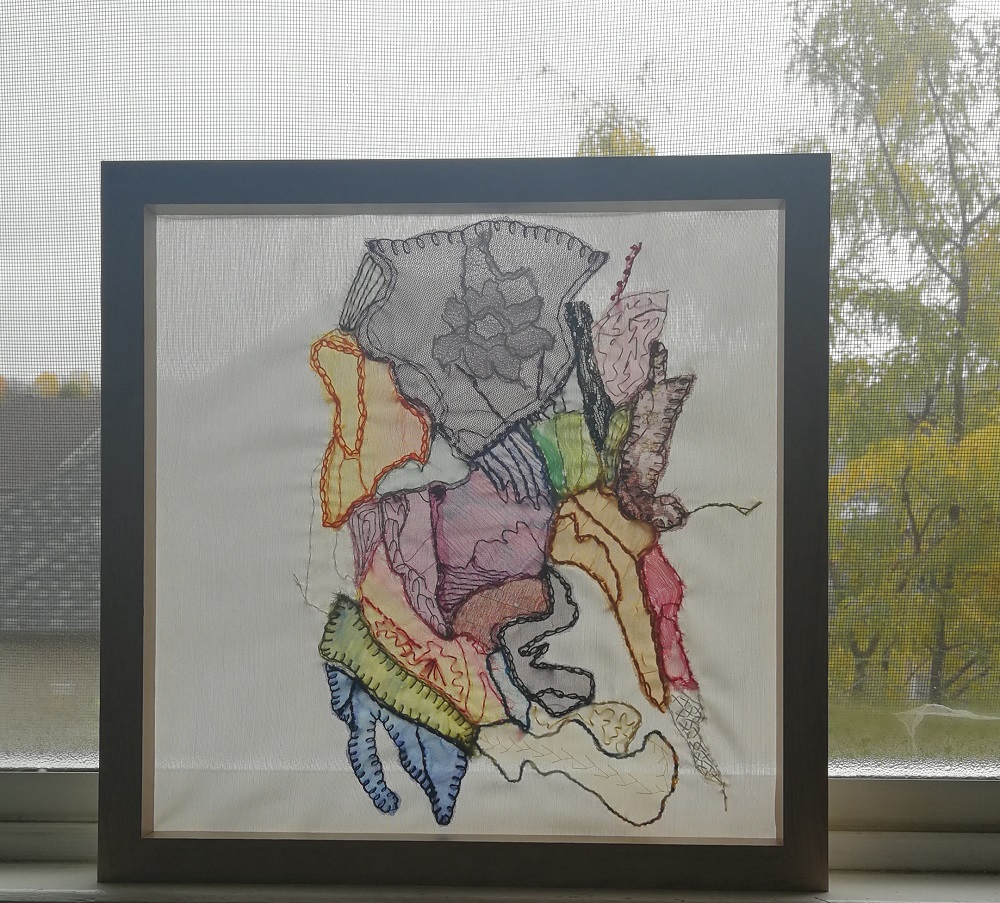
Translucent meanderings

I can't say enough about how much I've enjoyed playing with fabrics with TextileArtist.org's Stitch Challenge 2020. As you saw from my last post, I have even used free motion quilting (FMQ) in some of these projects. 

Using sheers on my abstract template

This is the first piece that I did based on Sabine Kaner's workshop. She showed us how to make an abstract template by crumpling a piece of paper and then drawing along the ridges of the lines. You can read more about it in my last post which is in Related links below. For this first piece, I used a regular sheet of printing paper, which resulted in lots of lines!

My first impression was of a map of a country or a continent, but I kept it abstract as I put things together. Sabine Kaner's art is abstract but she doesn't use sheer fabrics. It's almost all recycled fabrics with lots of heavier textiles like wool, with lots of texture. I love the look of her work but I had just finished Vinny Stapley's workshop where she works mostly with sheers. I just didn't want to stop working with sheers, so I interpreted Sabine's workshop in translucent fabrics. It made for a very different project.

Working again with sheer fabrics

Here is my crumpled paper pattern placed over the light box. There were some really small sections that would have been impossible for me to applique with different fabrics, so I placed sheer fabrics over a couple of areas, but embroidered them to reflect the small sections within them.
Abstract paper template

This is what the piece looks like when it isn't in front of a window. The colours are much more vibrant.

Translucent Meanderings

As I looked closely, there is something really cool that happens to the stitching when the piece is in front of a window as opposed to against the wall. You can see both here.
Stitches seen against the wall
Stitches seen through the light


As I was writing this post, I had the piece in front of me, leaning on the window. I observed those cool stitches at the very top of the piece and was wondering how I got that effect. They look almost like a chain stitch - but upon closer inspection, I saw that they were a blanket stitch - that I could see both the front and back of!!!! How cool is that?😊

You can also see this kind of effect in the pink piece on the top right of the piece. Against the wall, they are just ordinary seed stitches, but against the window, they are meandering all over the place. Even the running stitches appear as one solid line against the light.
Sheer remnants - what lovely colours :-)
The sheer fabrics that make up the piece are from all over the place. The backing is from a sheer pair of curtains that I purchased at Ikea (I have great plans for them!). I used some very fine silk from a scarf that I picked up in China, a black lace camisole that was my mother's, on fabric that I attempted to sew into a skirt for my daughter and another from a rather useless see-through bathing suit cover! Last month I dyed some silk organza and a little bit made it into this piece. The flower at the top of the piece is from a piece of commercial lace. I also used all kinds of thread and embroidery floss in the piece, including some couched yarn.   

As you may imagine, I am now on the lookout for all kinds of sheer fabrics and I plan on dyeing more silk organza. I believe that these last two projects with sheer fabrics are the beginning of some great fun and adventure!😊

What I learned

  • I find that hand-stitching sheer fabrics is a lot easier than machine-stitching them.
  • It looks like I'm going to be collecting more than just quilting cottons! There are so many kinds of sheer fabrics - from old curtains to some lovely sheers and tulles of all colours. 
  • I also love dyeing silk organza. The colours are so rich. So far I have some amazing fuchsia, violet and dark purple. It's going to be a lot of fun playing with the different dyes!
Related links
Linking parties

Project details

    Translucent Meanderings

    10¼ " x 10¼ " 

    Materials: sheer fabrics (silk, silk organza, tulle etc.),
    embroidery floss, sewing thread and yarn

    Techniques: applique, embroidery, couching

Wednesday, October 28, 2020

FMQ using an abstract template on Free Motion Mavericks

Welcome to another Free Motion Mavericks linking party (Week 304). Last week I learned how to create an abstract piece using paper and then adding free motion quilting (FMQ). 

Creating an abstract template

As you may know, I've been fully immersed in TextileArtist.org's Stitch Club 2020. We've had some amazing teachers and workshops. Last week's teacher was Sabine Kaner. To help us create an abstract piece, she had us crumple up a piece of paper and then draw the lines that the crumpling had made to create an abstract piece. 

FMQ with variegated thread in each of the sections

I made two pieces, but in this post I'll tell you about my second project. For this piece, I used a brown paper bag which is a rigid paper that created larger sections when it was crumpled.

Creating the abstract template
using a brown paper bag

After making the template with the paper bag, I used a marker to enhance the lines and then transferred the pattern to some white fabric using a light box. 

I had an idea and tried to applique fabric in the sections but it was a mess, so I ripped it all out (I almost never do that but the alternative was putting it in the garbage - which I did but I took it out the next day!)

I just wanted to make something interesting but easy. My first piece was a lot of work and I didn't want to spend all that time making a second piece. Since I still had the FMQ or darning foot on the machine, I thought that I would at least sew around the lines. I attached a sheet of Ricky Tim's Stable Stuff Poly on the back and then started FMQ.

Close-up of the stitching

As I was looking for different threads to use, I realised that I had quite a few variegated threads that I hadn't used yet and didn't really know what they looked like when stitched. So, I decided to use these threads to stitch each section, while also practicing different FMQ designs.

Another close-up of the stitching
As I was changing threads, I kept track of each thread I used in each section.

List of threads used
in each section
FMQ Journal


Template, list and practice piece
attached in my FMQ Journal


A great FMQ resource
What I learned
  • After having made my first project, I had little patience for that second project, even if I had loved making the first one.
  • I'm glad that I literally took the project out of the garbage to remove the applique and continue in a different way.
  • It's a very useful guide of both the variegated threads that I have as well as some FMQ designs.
  • I found one thread that I hadn't used before that is absolutely beautiful. I'm looking forward to using it again!
  • This project used only one aspect of Sabine Kaner's technique. My first piece, that I will post later this week is a little more in line with her work. Here's a sneak peek! Come back on the weekend to check it out 😊
My first project,
Translucent Meanderings
Related links
Linking parties
I will be linking up this post to many fun linking parties. Let's check out what's happening around the quilting blog world! Colour & Inspiration Tuesday, Monday Making, Design Wall Monday, Midweek Makers, Needle & Thread Thursday, Patchwork & Quilting, Off the Wall Friday, Beauties Pageant, Peacock Party, 15 Minutes to Stitch 2020
This piece was a bit of a squirrel since I don't usually make 2 projects from one workshop. I'm linking up to DrEAMi! with Sandra at mmmQuilts.

Free Motion Mavericks

What a great turn out we had last time. Thanks so much for linking up and sharing your lovely projects. This week I thought that I would feature A Bloom Finish by Leanne at Devoted Quilter. Leanne started quilting it one way and when she wasn't happy, very resourcefully changed tactics. She also had to do some troubleshooting when she couldn't see her thread as she was stippling the background. She ended up quilting the background from the back, since she could see the bright thread on her white backing. If you didn't see it, take a look at A Bloom Finish. Way to go Leanne!

A Bloom Finish by Leanne at Devoted Quilter

Now it's your turn!

You are invited to the Inlinkz link party!

Click here to enter