Have I told you how much I love playing with textiles lately? It would seem that I'm smitten! As you may know, I've been taking part in the TextileArtist.org's Stitch Club 2020 since it first started this spring. It has brought stitchers together with amazing workshops by guest textile artists.
TextileArtist.org's Stitch Club 2020
 |
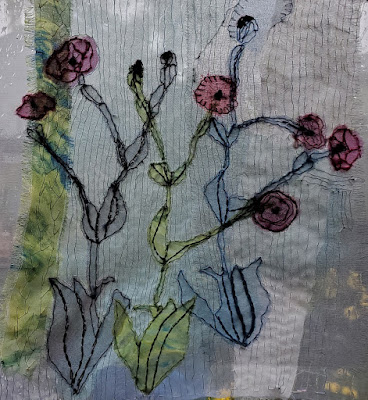
| Flower Impressions - pink campion |
The platform has really evolved since its creation - from having 3 workshops in a row with one week off, to now having workshops that last 2 weeks each. At the beginning of the week, there is a first video by the guest teacher, with a beautiful workbook and an inspiration book of the artist's other work. At the end of the first week, the artist records her answers to questions that are asked by the students. This is always wonderfully rich with information. Then at the beginning of week 2, there is a short video on how to take the techniques further, and then more Q&A at the end of the second week. During the two weeks, the teacher is there to guide the student and give feedback. A lot of students post their work and it's always wonderful to see all of the different takes on the same exercise.
It's been such an amazing learning experience. I've done many of the workshops and have learned so much from them all. Some techniques I loved while others I may eventually use. There is always something to learn - and we can access those videos later if we wish to go back to complete some of the workshops that we've skipped.
Last week's workshop was with Vinny Stapley. I had read an article about her work on the TextileArtist.org site and fell in love with her work. I was thinking that it would be so lovely to be able to have her as a teacher....well it turns out that she was our teacher for the next two weeks. Her work is mostly on very light, sheer fabrics. I think that it's all very stunning (her website is in Related links below).
 |
Pink Campion flowers
|
 |
Pink Campion
|
Here are the pictures of the flowers that inspired my project. These are pink campions. They are self-seeding and used to move around the garden but for the last few years they always come back to the same spot.
Here is the process for creating this sheer piece.
 |
Elements pinned in place
|
I created a background starting with a sheer but relatively firm piece of fabric. On top of that, I added one narrow strip of very colourful sheer fabric with a few more pieces of more solid sheers next to it.
I then made a template of the pink campion flower and cut three from different sheer fabrics. One was the colourful sheer and the others were grey and blue.
After deciding on the layout, I pinned them down and began to stitch them. I used my hand-dyed gray perle cotton for the gray flower, and then green and blue floss for the other two flowers.
 |
Stitching the leaves and stems
 | Close-up of the different flowers
|
|
You can see the stitching here. The stem of the colourful flower was accidentally cut but was eventually stitched back. Once the leaves and the stems were stitched down, it was time to add the flowers. For this, I used my pink hand-dyed perle cotton - it was just perfect for it!
Slowly the flowers and buds came to life. Each flower was stitched differently so that I could try out different techniques.
 |
Adding the flowers and the buds
|
The colours look quite different depending on where the pictures were taken. My neighbour's siding probably gives the best background but they did look good overlooking the garden.
 |
Hanging from a side window overlooking
the neighbour's siding |
 |
Hanging from the dining room window,
looking out into the back garden
|
In the first image at the top as well as in this one, the wall hanging is on my studio wall. The window was open and it was lightly blowing in the breeze.
 |
Blowing slightly in the breeze from the window
|
What I learned
- Since I love the look of the sheers, I'm thrilled to say that I really liked working with them. I have machine sewn sheers and didn't particularly like that but this is different - nothing needs to be straight. It's stitched however I want to.😊
- The work that Vinney Stapley does is not stitched down as much - it just didn't feel finished without the stitching. That must be the quilter in me. Less stitching would have made it slightly more free but I don't think that the stitching takes away from the light, breezy look of the piece.
- I would love to hang it in a window but all of my windows get too much sun - I wouldn't want it bleached by the sun. With the window opened in my studio, the piece was slightly blowing in the wind. It was lovely!
- I've now started the next workshop by Sabine Kaner. Since I really wanted to continue working with sheers, my first piece in this workshop uses sheers again - and I absolutely love it. It should be ready next week. I want to make two pieces for this workshop - the second one will be with traditional quilting cottons and other heavier textiles. I can't wait to see the difference.
Related links
Linking parties
I will be linking up to many great linking parties, including
Free Motion Mavericks with Muv. Come and check them out with me!
Slow Sunday Stitching,
Peacock Party,
Patchwork & Quilts,
Design Wall Monday,
Monday Making,
Colour & Inspiration Tuesday,
Put Your Foot Down,
Off the Wall Friday,
Finished or Not Friday,
Can I Get A Whoop Whoop?,
Beauties Pageant, and
Favorite Finishes Monthly Linking Up for October with Meadow Mist Designs


