Showing posts with label Free Motion Framework. Show all posts

Friday, January 09, 2026

Project Quilting 17.1 Challenge - A Clean Slate

 Hi and welcome to the first challenge of Project Quilting for the year. The theme is a clean slate and should probably include some white. 

Here is my thinking process - a clean slate reminded me of a blank page - nothing on it yet, full of possibilities. However for many artists, a blank page is not always a good thing. It can lead to tension and indecision - what to do? how to do it? where to start?

Filling the blank page


I was going through my email (to get rid of some of those 100s of unread email) and went down a rabbit hole of free motion quilting (FMQ). What's a blank stitching area? How to fill it? What to make? 

Filling the blank page starts with some tentative white on white FMQ. This slowly opens up to a light pink - nothing too bold, just making marks. Eventually it leads to more colour. In this case, a light variegated thread that flourishes into bold feathers. 

Filling the blank page

I was inspired by the book Free-Motion Framework by Jen Eskridge. I drew circles and triangles on white fabric with a FriXion pen. I then started filling the blank page. To be honest, I was going to do much more of the white-on-white but I couldn't see what I was stitching - so it became pink more quickly than I had planned 😉

Filling the blank page with thread

From a blank page


Thanks to both Kim and Trish for this interesting start to season 17. Looking forward to more challenges.

What I learned
  • It took me a while to go from a clean slate to a blank page. After that, it was a question of what to do on that blank page. As I mentioned an email from Jen Eskridge took me to her book and that was that!
  • I'm very happy to say that I used cotton thread and that my tension was fine. However, that was probably because I went slowly and my FMQ was small. It's when I expand to larger designs that I get tension problems. 
  • It was a fun FMQ exercise and I've prepared a couple for blank pages to practice on. However no white-on-white is allowed!
  • Practicing every few months when a quilt is ready to FMQ isn't really enough if you want to get better. I'd like to work on that this year, at least a little bit.
Related links
Linking parties
I'll be linking up to many fun linking parties, including PQ Challenge 17.1 and I Quilted This!. You may want to check some out. Put your foot downOff The Wall FridayFinished (Or Not) Friday, TGIFF, Monday MusingNeedle & Thread Thursday


Wednesday, September 13, 2023

Update on T-shirt quilt at Free Motion Mavericks

Welcome to week 447 of Free Motion Mavericks. I've started putting together the t-shirt quilt. After doing all of the prep work, I'm finally having fun putting these t-shirts together. A couple more weeks and there'll be some free motion quilting (FMQ) happening. 😊

4 T-shirt blocks made


It's been a slow start. In May, I went through all of the t-shirts and started cutting. My May and June One Monthly Goals (OMG) were to have the t-shirts cut and the fusible interfacing ironed to the back. That didn't happen until a few days ago. 

Anna's Quilt - blocks 1 to 4 

On the weekend, I added the interfacing to all of the t-shirts. It was a long and tedious job, but I was well organised (see What I learned), so it went quite smoothly. This morning, I decided that it was the day!!!  No more procrastination. 😁

Anna's t-shirts

T-shirts getting prepped

This spring, I bought some dark teal Kona solid to use for the quilt. This morning, as I lay the t-shirts down on the fabric, I realised that it wasn't a great colour choice. I went through my Kona stash and found quite a few darker colours that would be much better suited. The Kona fabric used will depend on the t-shirt's colour. I don't have a lot of some colours, but I had enough of the dark pink for my first two blocks.

First block - a signed t-shirt and
the sleeve with the team name

Next I made the second dark pink block. This t-shirt includes the store's logo in the bottom sashing. I used a brown Kona for the next block - it matches the background in the decal.

Second and third block -
with different coloured sashing

This fourth block was interesting. I had to cut around the sleeves, so I ended up adding some fabric in the top corners. They're not the same but it looks fine. The front of the t-shirt in at the bottom and then the shoulder patches are attached next to that. I did forget to add sashing to the front piece at the bottom, so I'll have to figure that out when I attach the t-shirts together.

Fourth block includes the front,
back and sleeve patches.

With 4 t-shirts block done, I have 9 more trimmed blocks to add borders to. Most of these are very straight forward. After that, I have 10 more t-shirts that I could trim down if I need to make them fit with the others. This is where I'll have to figure out the layout of the quilt. I'll be doing these last and I can add borders/sashing as required to make things fit.

All of these will be done by the end of September, so in 17 days. That means an average of 2 blocks per day with a week or so to put everything together. When broken down, it seems quite reasonable. 😓

What I learned
  • I really don't like prepping anything, but I knew that already 😁
  • For the fusible interfacing, I bought a package of Stabili-tee from Connecting Threads. The package contains a 60" x 72" piece of fusible interfacing. This will probably be enough, although I do have some other t-shirt stabilizer from my previous projects. This product is wonderful and I highly recommend it.
  • To make the prepping of the t-shirts a little easier, I first cut all of the t-shirts and figured out what to use on the quilt.
  • After cutting a few of the t-shirts, I figured out that I might want to keep more fabric on the t-shirt and cut away any excess later. It's so hard to tell if I'll have enough t-shirts for a queen sized quilt.
  • Once the t-shirts were roughly cut with scissors, I went back with my rotary cutter and evened everything out.
  • When I started adding the fusible interfacing, I cut a couple of pieces of interfacing and then ironed them on. This proved to be rather inefficient.
  • I decided to cut all of the interfacing to roughly the size of the t-shirts and then lay the t-shirt and interfacing aside in a pile. 
  • This weekend I ironed all of the interfacing to the t-shirts in a few very sweaty sessions. Rough but finally done!
  • I've decided to use a variety of Kona solids for a 2" sashing. 
  • I'll have to decide what to do when I start piecing them together, but for now, I'm concentrating on the t-shirts that can't be trimmed further. They'll get an all-round border that can always be trimmed down. I have 9 more of those to do. 
  • After these, there are 10 more t-shirts that can be trimmed, as well as a few odd and ends. I'll prepare these as I figure out the layout.
Related links
  • Stabili-tee from Connecting Threads
  • I've made two t-shirt quilts to date. Here are the links:
  • Planning 2019 and finishing Charlotte's quilt, December 31, 2018
Linking parties


Free Motion Mavericks

Melva worked on a couple of pieces. The first one is a cover for her husband's table and was quilted with diamond grids. The second one is the beginning of a feather.

Melva's table topper quilted in a diamond grid

The back of the fabric - Melva FMQ a feather
It's now your turn!

You are invited to the Inlinkz link party!

Click here to enter

Thursday, February 16, 2023

FMQ Wild Hexies and Making Flying Geese

Hi, welcome to week 420 of Free Motion Mavericks. I have a free motion quilting (FMQ) project to share as well as the flying geese for Round 4 of the SAHRR. I'm glad that you can join me today.

FMQ Wild Hexies, a Mystery UFO


I called this a mystery UFO in my July 2021 post because when I wrote the post, I had a partially made quilt on my design wall with extra fabric in a project box, but no pattern! Since I had been inspired to make the quilt by seeing a finished version on someone's blog, I asked if any of my readers could help me. Wendy of Pieceful Wendy found the post for me - Nancy of Grace and Peace Quilting had made the quilt. I couldn't find the pattern because it was in one of my digital quilting books! Thank you Wendy and Nancy 😊

Mystery UFO is finally getting FMQ

The pattern is called Strip Lash from Stripology 2 by GE Quilt Designs. You can read about my making adventures in my previous post (see Related links).

I stitched-in-the-ditch around the hexies and then each row of hexies. Then I started FMQ the top and bottom partial hexies with some of my favourites - elongated loops (I call them cursive l's), twist (j's and l's) and then some triangle dot-to-dot patterns.

FMQ the top and bottom triangles or partial hexies


FMQ elongated loops (cursive l's), twist (j's and l's) 
and triangle dot-to-dot patterns

This is not a great picture but you can see my Swirling Stars in the top row. The next row of hexies contain a sun, clouds, and snowflakes.

FMQ the partial hexies and the first 2 rows

You can see glimpses of the sun, clouds and snowflakes in the image below.

Glimpses of the sun, clouds and
snowflakes designs

Next came a row of trees.

FMQ a row of trees

Finally some houses.

A row of houses

If these look familiar it's because I FMQ them in the Places and Communities section of my son's Version 2.0 quilt. The designs are from Lori Kennedy's book, Free Motion Machine Quilting 1-2-3.

Round 4 of SAHRR


This week we got to add flying geese to our quilt. I wasn't sure what method to use, but I was inspired by Denise of The Quiltery - For the love of geese, to make some foundation paper pieced flying geese. I checked out one of her patterns and drafted my own pattern.

Round 4 - a top row of flying geese was added

Here is a close up of the 5 flying geese that I made using my own foundation paper piecing pattern. 

Close-up of flying geese and wonky stars

You may notice that my pattern below is for 6 flying geese. Let's just say that I made every mistake possible, which included cutting my pattern while trimming. I'm very lucky that it happened on the 5th goose! I took it as a sign that 5 was plenty 😊

My foundation paper piecing pattern

Extra flying geese blocks

After I finished the top row and attached it to the quilt, I decided to see how else I could make these blocks. I vaguely remember that they weren't that difficult to make. I found a post in Simply Handmade Everyday by Kristin Esser with a tutorial on making flying geese blocks 5 ways. Her 5 ways didn't include foundation paper piecing! 

I ended up using the Oversized Stitch and Flip method since I'm accuracy challenged! They worked out very well. I now have 5 extra flying geese on the design wall and have fabric to make a few more. I'm going to see what Round 6 brings before I add them to the quilt.


What I learned
  • For my FMQ, I should have spent more time practicing my Swirling Stars design. The fabric is so busy that looks fine.
  • I love Lori Kennedy's pictural designs and am looking forward to making cars, pencils, apples, etc.
  • I actually know who the baby quilt is going to, so I'm going to have to figure out how to quilt a teddy bear!
  • I considered using the No Waste method that makes 4 flying geese blocks at a time, but those blocks all have the same middle piece. I wanted them to be different, so that method was out.
  • For my SAHRR quilt, I ended up re-doing the bottom row. I had added fabric to make it fit, but I ended up not really liking what I had done. I was also surprised that the hourglasses in the bottom row really didn't show up. The fabric with the multi-coloured dots just faded away. I added two bright hourglass blocks and then re-did the corner blocks. I like it much better.
  • I'm not sure if I have enough fabric to make a much larger quilt. I would rather incorporate the extra flying geese blocks into the next row if it makes sense. I guess I'll figure that out on Monday!
Related links

Linking parties
I'll be linking up the SAHRR quilt at Anja Quilts. Let's go see how everyone is doing on their quilt! Put your foot down, Sew & Tell, Midweek Makers, Needle & Thread ThursdayFinished (or Not) FridayCan I Get A Whoop Whoop?Peacock Party, Patchwork & Quilts

Free Motion Mavericks


We've had some lovely FMQ last time! 
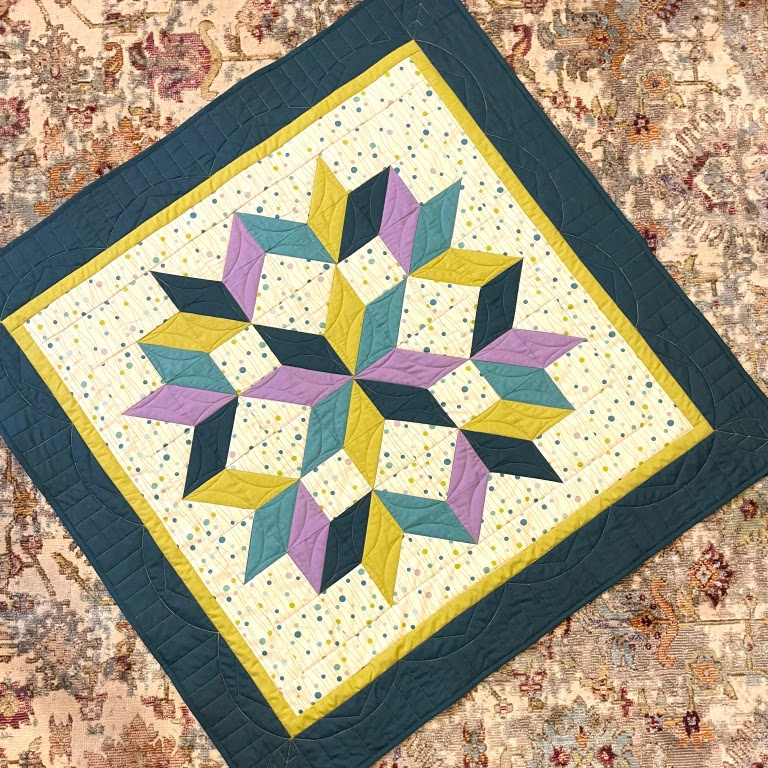
Chris from Chrisknitssews made this lovely Carpenter Star baby quilt. She quilted it with gentle curves and lines. What a lucky baby!
Carpenter Star baby quilt by Chris

Melva is carefully quilting a quilt for a client. It needed some work, but she's doing a great job (I peaked to a later post!)

Melva carefully quilting a quilt

Gail made a second fabulous Lone Star quilt in some beautiful Island Batik pre-cuts and dark green. She FMQ it with small arcs in the diamonds and fake feathers on the grey. 

Gail's fabulous Lone Star quilt

Frédérique of Quilting Patchwork Appliqué made a baby quilt for the neonatal care unit. She FMQ the centre diamond densely and then added light curves for a soft and smooth quilt.

baby quilt for the neonatal care unit by Frédérique

It's now your turn 😊

You are invited to the Inlinkz link party!

Click here to enter

Thursday, October 20, 2022

Places & Communities on Free Motion Mavericks

Hi and welcome to week 403 of Free Motion Mavericks. I hope that you are all well. Tonight I free motion quilted (FMQ) a large area of the Version 2.0 quilt using Lori Kennedy's book and website. It was a lot of fun.😊

FMQ Places


Tuesday night before falling asleep, I was thinking of the FMQ that needed to be done on Wednesday. I knew that it needed to be fairly simple. I got inspired (I love it when that happens!) I decided to FMQ all of the places that Stéphane has lived or that are special to him. Here is the list: Timmins, Kirkland Lake, Sudbury, North Bay, Crystal Falls, Ottawa, Orléans, Matachewan, Cornwall and Barrie. These are mostly in Northern and Eastern Ontario. I also added Ontario and Canada.

Part of the Places and Communities section of the quilt
(click to see larger image)

For reference, here is the outlined section on the quilt that I completed.

Outlined in white is the Places and Communities section

As you can glimpse from the first image, the space is surrounded by place names. I then made the sun and an airplane. The only template that I made was for the sun since I have trouble getting that right. I just used a white chalk pencil to outline it. All of the ideas for the images come from Lori Kennedy and were adapted as needed. See the links in Related links below.

Place names, the sun and an airplane

Once I drew out the images, I was ready to FMQ them. As you can see, the sun is the one that I had the most trouble with.

Drawing out the images

I then worked on the bottom section adding what is essentially a cabin in the woods. Then came the line of cars and trucks and finally a neighbourhood with homes and trees.

Cabin in the woods, cars and a neighbourhood


You can see the FMQ better on the back, except that the places are backwards 😊


A better view of the FMQ from the back

Another image from the back

What I learned
  • It was so much fun finding the designs to include in this area. After deciding on the places, it came to me that I could FMQ things about community.
  • Lori Kennedy has some great posts for all of these. I did start with her book (see Related links below).
  • The angles of the triangles always mess me up when I try to do the sun. I'll have to practice that (a lot!) to get comfortable FMQ it.
  • I can't wait to show you a picture of the whole quilt in progress. It will have to be next time - my helper is in bed with Covid 😦. So far I've managed to avoid it. 🤞 
  • Breaking News: Only one week before my retirement😁 I can't wait to be on permanent play mode!!!😎

Related links
Linking parties

I linked up this post on Cheryl's Favourite Finish Monthly link up
This is also my OMG for October - I'm thrilled that I kept quilting. I'll be linking up to the November OMG to get this baby finished!

Free Motion Mavericks

I hope that you will have something to post below. Here is my last Version 2.0 post with birds.

Bird on a branch

It's your turn!

You are invited to the Inlinkz link party!

Click here to enter

Thursday, December 05, 2019

More practice at Free Motion Mavericks

Welcome to Free Motion Mavericks (week 258). I'm doing double duty today, so here's the link to December's Throwback Thursday.

Practicing my free motion quilting (FMQ)

Free Motion Framework
by Jen Eskridge
After finishing up a big project (the Epic Neutral Bow Tie Quilt) and a DrEAMi! (the fabric basket) last week, it's now time to play. Of course, I couldn't resist the Black Friday sale at C&T Publishing last week and bought myself the digital copy of Free Motion Framework by Jen Eskridge.

This book is essentially about making whole cloth quilts to learn or advance your FMQ skills. I actually love making whole cloth quilts, but there is so much more potential to the book.

Since I'm not in the mood to embark on a project right now, I was going through the book and was intrigued to find on page 21, five ways of quilting feathers within a cat's eye shape.

Practicing feather shapes in a cat's eye shape

I just happened to have some fabric that sort of had this shape on it. I used a technique that I learned from Cindy Needham in her Craftsy course, Machine Quilting Wholecloth Quilts. It's called Large Print Wholecloth Quilt. Essentially it involves FMQ using the backing fabric as a template to create a wholecloth quilt in the front, on a solid fabric.

Here's what I mean.
This is the fabric that I quilted on, but the result is on the solid fabric.
This is the side that I quilted on,
but is the back of the piece


Practicing FMQ on the
patterned fabric


This is the back while quilting, but
the front of the piece when done.
In the two flowers above, I practiced the techniques that the author suggested for the feathers within the shape. Each shape has a different technique.

After that, I used the same technique on all of the shapes in the flower to see how it would look.

This is the shape with the feathers on the outside

The feathers are now on the inside of the shape.

These are feathers without a border around the shape.
What I learned
  • By the end of this practice, my feathers were actually getting worse - it was past the time to stop.
  • The point of the quilting was to see how the different feathers within the same shape would look. It was an interesting exercise.  
  • I want to learn more feather techniques - and since I have a couple of books and classes on Bluprint (Craftsy), I will see what I can do. The fun part about learning new designs is that it's mostly a matter of doodling them, a lot!
  • I'm very impressed with Jen Eskridge's book, Free Motion Framework. I really hope to use it more like she suggests. Having a framework for FMQ on a solid fabric would certainly be easier than trying to piece a quilt. 😊 If you're interested, I highly recommend that you watch her video about her book.
Related links
December's OMG - to
make another FMQ fabric basket
Linking parties and OMG
For the December One Monthly Goal (OMG) I will be making another FMQ fabric basket as a Christmas gift. You can see my first FMQ fabric basket here.

I'll be linking this post up to several great linky parties. Why not see what's happening? Put your foot downNeedle & Thread Thursday, Colour and Inspiration Tuesday, Midweek MakersOff the Wall FridayFinished or Not Finished FridayFriday Foto FunCan I Get A Whoop Whoop?,  Peacock Party, What I Made Monday, Design Wall Monday

Free Motion Mavericks Link Up

Thanks to everyone who linked up last time. I'm really sorry for being so late replying to comments but I am hoping to get caught up....one day :-) If you haven't seen it, go see Denise's quilt at For the love of geese. It really is a beautiful batik quilt!


You are invited to the Inlinkz link party!
Click here to enter