Showing posts with label embroidery floss. Show all posts

Monday, July 28, 2025

Bloomers SAL and Hexies

Bonjour and welcome! Since I actually have some stitching updates, I thought that I would write this extra post. I don't want to overextend my welcome, so two posts per week, except around the holidays, is the most that you'll hear from me. I hope that you're enjoying the end of July - we'll soon be between the Summer and Fall equinox (Lammas Day). Summer is in full bloom but it's only a matter of time that the dog days of summer will be followed by cooler weather 😎.

Bloomers SAL - the First Appliqué


I finally got started on Denise's (A Quiltery) Bloomers Sew Along. I couldn't decide on what fabric to use as background, or what size to make it. I haven't made all of the decisions yet but I'm using the solid pink fabric from the backing of the Scrappy Purple BB Quilt. I've also decided to try making EPP hexie flowers to replace the hexies in the pattern. 

Bloomers' first appliqué

I haven't worked with my batik fabric in a while and I was happy to find that I had a nice container of scraps to start this project off. When it came to the flower stem, I embroidered it using a chain stitch in a variegated green perle cotton. I also used a stem stitch for the lines in the flowers. These were stitched with lovely linen and cotton thread.


Not a great picture but it works for linking up 


I made the background a little longer at the top with the hope of adding a hexie flower above each appliquéd piece. I'll make a few, and if it doesn't work out, we'll just go to plan B, or C...😉

Playing with Hexies


I spent the morning outside in the backyard with my coffee and breakfast, playing with ¾" hexies. I used the scraps that I used in July to make a baby quilt flimsy. I haven't quilted it yet - hopefully in August!

Enjoying the morning outside

Hexie flower in the making

A double flower with the outside hexies
from the baby quilt scraps

The scraps are from the baby quilt flimsy that I made at the beginning of July.

Baby quilt flimsy with the same scraps

What I learned
  • Once I had decided on batiks for the appliqué in Bloomers, it was easy to find the right scraps. I really enjoyed the process and my zig-zag stitches around the appliqués are getting better.
  • I'm looking forward to making the second appliqué set as well as some batik hexie flowers.
  • It seems that some of my creativity and energy is back. I'm really enjoying playing with hexies and no matter what I'm working on, I want to ensure that I'm not over doing it. Slow & steady is my mantra these days.
Related links
Linking parties
I'll be linking up to many fun linking parties - you might want to check some out!

Thursday, December 26, 2024

Christmas Updates and Finishes on Free Motion Mavericks

Allô and welcome🎄 I hope that you had a lovely Christmas. We had a terrific time with all of the kids and Poppy, great food, and gifts! It's now Boxing Day and very quiet. Time to get this post done and then do some more embroidery. 😊

Snow Happens wall hanging


The last time I shared this embroidery was last January in my 2024 planning post and then again in a slow stitching post a few days later. I'm afraid not much happened after that. I picked it up in December again and it's slowly coming along. Instead of giving myself another year to finish it (we know how that worked out!😁), I'm aiming for the end of January. At least it's a winter piece, so it won't have to be put away with the Christmas stuff.

The first two snow people, almost finished!

Here are the other snow people.

Some progress on the snow people

The last one hasn't been started
except for the bird house

Metal Christmas Ornament 

Do you remember the trees embroidered on metal? They have great potential but we'll call this version a sample. I did learn a lot making and putting it together. I'm not sure if I'll make more but if I do, I'll have good notes below! 

Christmas tree ornament - lots of potential

Not great but learned lots!

Kawandi style Christmas mat

For November's Table Scraps Challenge, I put together a little Kawandi style mat made of old fashion Christmas fabric. I finished it in December. I just love it and I think that my DL likes it too! As I mentioned in a previous post, I sewed the fabrics down by machine. This was so much easier than wrestling with pins and bits of fabric as I stitched it by hand. I will probably keep making them this way. My favourite part about making them is the slow running stitch.

Finished Kawandi style Christmas mat

Doesn't it go great with the Grinch card? The fabrics
are probably from the same era.

It's quiet here today. Poppy is spending a few days. I'm so happy.😍

Poppy checking out the yard!

Poppy coming in from the snow

What I learned
  • The Snow Happens embroidery is coming along. It's weird to be following a commercial pattern.
  • The piece is supposed to be in blue but I just can't do that - so the embroidery thread is all kinds of values of blue. It makes things more interesting to stitch!
  • The metal Christmas tree ornament was a disappointment. I now know not to use fuzzy thread.
  • The most frustrating part was stitching them together. I just don't like how I finished the edges. It only occurred to me a few days later that I could have backed them with felt. I think that this would be better and much easier. At least if I make these again, I'll have notes to follow!
Related links
Linking parties

Free Motion Mavericks


Welcome to week 512 of Free Motion Mavericks! I think many quilters were busy getting ready for the holidays. Thanks for linking up. Here are the projects from last week that included FMQ, ruler work or walking foot quilting. 

Deb from a Scrappy Quilter quilted six Irish Chain quilts. Two have been donated while the others will hang around for the special occasion. 

Kat quilted this one with a diamond grid

Six lovely quilts finished by Kat

Quilting Gail finished her Floral Fusion, based on Denise's sew along. What a beauty. 

Gail's finished Floral Fusion

Gail outlined the flowers and FMQ swirls in the background

Brenda from Songbird Designs made this beauty for the Island Batik's It's All Up to You Challenge. You'll want to check out her post to read how she made it. She quilted it using some lovely sparkling thread. 

Check out Brenda's lovely Christmas tree!

It's now your turn.

You are invited to the Inlinkz link party!

Click here to enter

Wednesday, December 04, 2024

It's that time of the year again!

Hi and welcome! Ottawa has finally gotten some snow. Is it here to stay? Who knows, but it should last at least a few days. Just enough to get us thinking about snow tires, shovels and winter boots!⛄❄ 

Seasonal Stuff!


I'm not sure what's happening to my brain, but I seem to be on Squirrel alert! I think about something and oops, there I go! All that to say that I have new projects to share with you.

More embroidery on metal

After making the flower last week, I thought that it would be fun to make a little Christmas tree ornament. I made a template of a Christmas tree and embossed the pattern on two pieces of metal. I made the holes around the tree using what I had learned previously 😊. 

First tree - my favourite

Second tree

Both embroidered trees, ready to be stitched together

The next step will be to add a star at the top of the first tree so that its shape will match the second one. I'll then very carefully cut about a ¼" from the embroidery. I was considering adding lace between the layers on the edges. I'm not sure if that will work. Eventually I have to stitch each treer, wrong sides together and add a little something to hang them.

Kawandi style stitching

I've been wanting to make another Kawandi style piece for a while. I got an attack of the Squirrel today and thought that I could make one for Christmas for my son and his fiancé. There is not way that I can do it all by hand before Christmas, so I've attached all of the pieces with the sewing machine. This made it so much easier. Now I'll start stitching it with various colours of perle cotton. There is nothing as relaxing as embroidering a running stitch. 

A lovely Christmas Kawandi style mat ready to stitch

Back of the piece

An assortment of perle cotton for stitching 

This is also my November Table Scraps Challenge. The colours were anything goes and the theme was a tree. There are some trees in there.

What I learned
  • I have to stop playing with squirrels! It's becoming almost obsessive!
  • I have so many projects that I want to work on. I thought that being retired would give me all this extra time, but somehow it's never enough.
  • I'm going to keep this short since I want lo link up to the November Table Scraps Challenge and I only have minutes to link up! It's OK, I came back to finish the post.
  • I did learn a few things while making the Christmas tree on metal. It turns out that fancy embroidery thread doesn't appreciate going through holes in metal! I wanted to use a red mouliné thread to decorate the tree. There was no way to get them through the holes! Instead, I used a red metallic rayon thread. I ended up putting the thread through the hole at the beginning, then going around the back stitches of the embroidered tree instead of the holes in the metal. It did let me go through the hole at the end to be secured! 
Related links
  • Finished embroidering on metal, November 29, 2024
  • Embroidering on metal and Free Motion Mavericks, November 28, 2024
  • Kawandi style quilting
    • Stitching and FMQ on Free Motion Mavericks, July 25, 2024
    • Alaska and a Quilt Show on Free Motion Mavericks, June 14, 2024
Linking parties

Free Motion Mavericks


Welcome to week 509 of Free Motion Mavericks. Thanks so much for linking up. Here are the projects from last week that included FMQ, ruler work or walking foot quilting. 

Gail had two wonderful finishes this month. Here is her Jelly Roll Mystery Quilt, done with a strip set and background fabrics from Island Batik. 

Gail's Jelly Roll Mystery Quilt

Gail quilted it on her domestic machine and used Silly Moon's Rocket and Beanie rulers. 

Close-up of Gail's quilted Jelly Roll Mystery Quilt

Preeti, of Sew Preeti Quilts published a new pattern, Fireworks. It really is lovely!

Preeti's Fireworks pattern is now available

Close up of Preeti's Fireworks quilt

Kat from Scrapbox Quilts finished quilting her Calico Gold 3 Yd quilt. What lovely colours. Kat quilted it using free motion / ruler quilting with overlapping circles. 

Kat's Calico Gold 3 Yd quilt

Close-up of the quilting of Calico Gold 3 Yd quilt

It's your turn!


You are invited to the Inlinkz link party!

Click here to enter

Friday, November 29, 2024

Finished embroidering on metal

Hi and welcome - just a quick post to share my finish. It was a great workshop by Emma Pannell. You can read more about it in my previous post.

Finished Flower 


I wanted to share this finish before next Thursday. Here is the finished project.

Flower embroidered on metal is finished

As you can see, once I finished embroidering, I embossed the rest of the metal to give it a little something special. A few of the other students from the workshop had done some amazing embossing on their pieces. As usual, I just went for it. I used my free motion quilting (FMQ) designs but embossing wasn't like drawing or FMQ. The curves were much more difficult to make. 

Close-up of the embroidered flower

I used a compass to emboss on the metal. The square end might have affected the smoothness of the embossing. I'll have to experiment with just using an old pen - which is how I originally embossed the flower. However, the end of the compass did make nice additional holes when I was stitching the leaves.

Using the end of the compass

Here is a progress photo of stitching the leaves. It was more difficult that stitching the petals since there was so much floss to deal with as well as the extra holes that I added. You can see those extra holes on the first leaf that I stitched.

Progress photo of the first leaf

What I learned
  • To make the densely embroidered leaves, I should have arranged the holes more closely and evenly. You can do that when you plan your project 😁
  • The compass worked really well to make the holes but wasn't great for embossing.
  • For some reason, I outlined the second leaf with a backstitch before embroidering it. I knew that I shouldn't but did it anyway. I guess if my stubbornness needs to come out, it may as well be on something as innocuous as embroidery! 
  • I realised that I didn't add any more French Knots in the centre of the flower. I guess that I just wanted it done.
  • I hope to use this in my needle punch project. That would mean trimming the metal around the flower. Until I use it, I have a pretty piece to look at. 😊
Related links
Linking parties
I'll be linking up to Free Motion Mavericks and November's Favourite Finish as well as many other fun linking parties. Why not check them out? Off The Wall FridayNeedle & Thread ThursdayPut your foot downBeauties PageantTGIFFPatchwork & Quilts, Slow Sunday Stitching

My finished flower was featured on Put your foot down. Thanks Denise!

Project details
Flower embroidered on metal 
made in a workshop with Emma Pannell

Size: 8" x 3"
Flower size: 2½" x 3"
Materials: aluminum can, embroidery floss
Techniques: embossing, embroidery


Thursday, November 28, 2024

Embroidering on metal and Free Motion Mavericks

Hi and welcome! For my American readers - Happy Thanksgiving! I hope that you get some time to stitch after all of that eating and visiting family 😋. I didn't have much to share (remember those very SLOW stitching projects!) so yesterday I worked on a little project so that I would have something to show.

Embroidering on metal


Yes, you read it right.... my background for this piece is the inside of an aluminum can! Years ago I played a little bit with burnished aluminum in an art quilt after a workshop with Hillary Rice, but I haven't since (see Related links). Aluminum is very pliable and easy to cut and pierce. Our latest Textileartist.org course is with Emma Pannell. She does some amazing embroidery on metal.

Embroidering on metal - so far

I wanted to make something very simple and small that I can eventually add to my punch needle piece. I settled on a flower, something that I can draw without tracing. Here is my template. 

Drawing of the flower with leaves

I cut the can open with my old scissors and then cut the edges to make sure that they were smooth. The scissors do a great job on aluminum. I taped the template onto the can and embossed it by tracing the image with an old pen. I then used my journal making awl to pierce the holes, following the embossed line. 

At first, the metal was directly on the mat when I made holes with the awl. That made holes in the mat, so I placed the piece of craft foam board between the metal and the mat. It may have made larger holes than I wanted, so I'll have to experiment with that. Our instructor uses a pottery needle to make the holes - these might be a little smaller.

Tools used to cut and pierce the metal

I used three strands of embroidery floss for the base of the petals, using a variation of the cross stitch. After all the petals were stitched, I added a lighter coloured thread of two strands to add some dimension.

Embroidering the petals with 3 strands of cotton.

Petals all embroidered using a variation on the cross stitch

Stitching with 2 strands of lighter cotton

It was only after finishing the first petal with the lighter cotton that I realised that I probably should have stitched them from the centre of the flower. I didn't want to start over, so I stitched three alternating petals in that direction, then I had the next three going the other way.

Finishing the petals and outlining them

I finished the petals by outlining them with a back stitch. After outlining the centre of the flower using 4 strands of embroidery floss, I added a hole in the centre and stitched the area. Over the middle hole, I added a French Knot.

Metal in an art piece

As I mentioned, I used metal in my Canada 150 art piece in 2017. Here is the piece and you can see below the burnished metal that has been stitched by machine and embossed. 

Canada 150 art piece

Cut, embossed and stitched burnished metal


What I learned
  • It's easy to cut the aluminum can but not so easy to keep it flat. I thought that I could place it under heavy books to flatten it (like my journal pages) but that didn't really help. 
  • Keeping the aluminum flat is important if you want to frame your piece. I'm hoping that it won't make a big difference when I trim the flower and stitch it onto my punch needle piece.
  • Stitching on the metal is very much like stitching on cardboard or paper. The holes need to be punched from the front to get the best effect.
  • My holes may be a little big, so I'll experiment with that next time. I think that using more strands of thread to outline each section might also help fill in those holes.
  • It got pretty difficult to find the holes when there was a lot of stitching. Instead of trying to find the hole from the back, I placed my needle in the hole from the front, without going right through. I could then see the needle sticking out of the back and knew where to stitch from the back. 
  • I like the French Knot in the middle of the centre and I think that adding many more would be very effective - hopefully I'll feel like it!😁
  • I'm going to use another stitching technique on the leaves - in theory they will be and look denser. 
  • In my workshop with Hillary Rice, we had used a big propane torch to burnish the aluminum. That created lovely colours, including gold. Apparently you can also use copper which already had a lovely gold colour. 
  • I don't think that I'm going to work with metal a lot but it is fun to discover new techniques and material.
Related links
Linking parties
I'll be linking up to many fun linking parties. Why not check some out, after you've linked up below? Monday Musings, Sew & Tell, Midweek Makers, Off The Wall Friday


Free Motion Mavericks


Welcome to week 508 of Free Motion Mavericks! It was a very productive week - thanks for linking up! Here are the projects from last week that included FMQ, ruler work or walking foot quilting. 

Sandra from mmm quilts made this very lovely Goose Dance quilt. She FMQ it with her favourite fat flowers design with loops and added swirls with hooks as well. She also quilted in 3 ghost geese. It looks great! 

Sandra's FMQ Goose Dance quilt.

Preeti from Sew Preeti Quilts finished her LION quilt for the Island Batik Dresden Challenge and Blog Hop. Doesn't her signature wavy stitch quilting look great on her Grandmother's Fans quilt?

Preeti's lovely LION quilt with Grandmother's Fans

It's now your turn 😉

You are invited to the Inlinkz link party!

Click here to enter

Tuesday, February 21, 2023

Off the Grid Sampler is finished

Welcome! I'm very happy to share this finish with you 😊 It's been a fun project but it's nice to see it finished so that I now have a few less projects on the go, or I can start another one! 😁

Finishing up "Off the Grid"


Since I kept track of all of my different stitches, I can tell you that there were 44 different area to stitch. In some of those areas, I even managed to use a combination of more than one stitch.

"Off the Grid" Sampler finished and mounted

I don't usually track all of this but a sampler that doesn't include a record of the stitches used is difficult to learn from. Sometimes I can tell which stitches I used, but at other time, I don't have a clue!

This is my sampler - I did miss two areas, between 23 and 24, and then on the other side of 23. 

A drawing of the sampler

These are the stitches that I used the most, in several places: 
In case you're interested, I linked the stitches above to Sharon Boggon's Pentangle Stitch Dictionary. 

Here are a few more images of stitches.

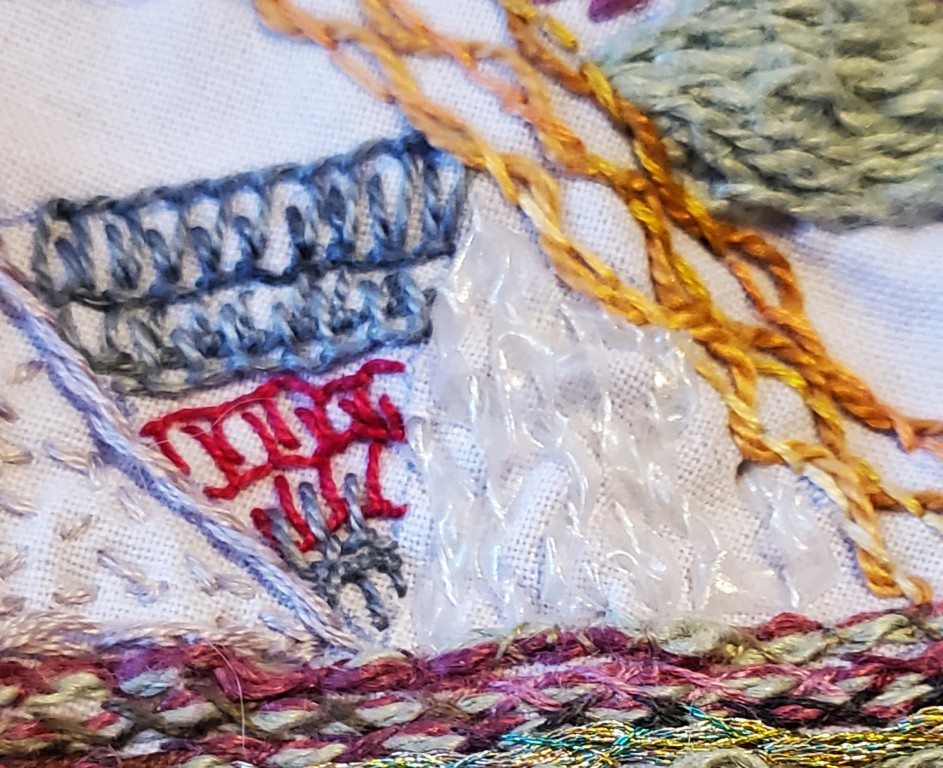
Raised band herringbone stitch, a row of chain stitch,
lots of French Knots, random fly and feather stitches,
and outlined satin stitch


from left, clockwise
Seed stitch, stem stitch, buttonhole stitch, double buttonhole
and battlement stitch, threaded running stitch (with transparent elastic),
threaded backstitch and couching stitch (at bottom)


I finished my sampler by mounting it on a canvas board.

Off the Grid Sampler

What I learned
  • As I typed out my notes about the stitches, I realised that they weren't very good - better than nothing but not consistent or detailed enough.
  • Using variegated thread for almost any stitch adds colour and interest.
  • My least successful stitches were in not very straight rows. 
  • In doing couching stitches, if you want them to show up, they need to be very contrasting and use more than one thread. 
  • I had given up on making the sampler pretty and used many more colours than I usually do. I'm not really sure why it works but it does look good. I did try to repeat the colours, so that may have helped.
  • I really like using the Mouliné étoile embroidery thread by DMC for French Knots. They are slightly fluffy and look great.
  • I love trying out different yarns for embroidery. Another fun yarn is Tencel Pearl. I've linked to the company, Trail Head Yarns, below.
  • I also discovered that you can buy linen at the yarn store for embroidery. I got 3 colours of the BC Garn Lino for Christmas. What beautiful linen and perfect for embroidery. Buying a skein of linen is economical considering how much linen it contains. It's going to last many years 😊

Related links
Linking parties
I'll be linking up this post to many fun linking parties. Let's see what's going on out there! Patchwork & Appliqué, Design Wall Monday, Sew & Tell, Midweek Makers, 

Project detail


Off the Grid sampler
Based on a workshop with Sue Stone, TextileArtist.org
Size: 8" x 6"
Material: Kona cotton, embroidery floss, metallic thread, Mouliné étoile, Tencel Pearl, perle cotton, transparent elastic, etc.
Techniques: embroidery (see post for stitches)