Showing posts with label stained glass window. Show all posts

Wednesday, December 29, 2021

Christmas Tree Window Hanging

I've just finished a genuine Squirrel! Saw the project online, found the pattern maker, bought the pattern December 12 and finished it today, December 28! Getting a whole project done that quickly is not something I do often 😊  

Learning a modern version of Pojagi

In the rabbit hole that is the internet, I found Elizabeth DeCroos. She is an Island Batik Ambassador (which is how I found her). She also has developed some great project patterns and videos about using a modern version of pojagi to make what look like stained glass window hangings. They are absolutely stunning!

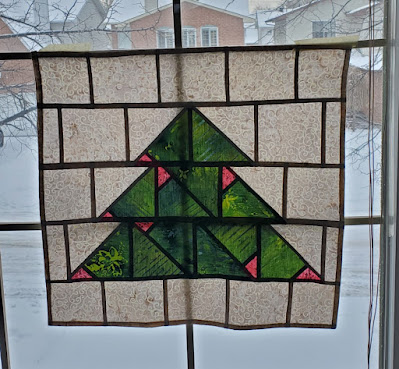
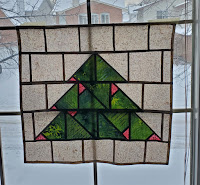
Finished Christmas Tree Window Hanging

After some research, I got pretty confused. The terms pojagi and jogakbo are sometimes used interchangeably. Pojagi is a traditional Korean wrapping cloth made from scraps of left-over fabrics. From the Victoria and Albert museum, it sounds like jogakbo is a patchwork pojagi. There were many websites and YouTube videos of some stunning examples of pojagi and jogakbo. I've included a few of these in Related links below.

I took a workshop last year that used translucent fabrics (silk organza) that are sewn by hand to make a light catcher. I never actually made one because the videos were available for a very short time and sewing silk organza by hand seemed beyond me at the time. 

When I found Elizabeth DeCroos' website and saw that she made pojagi using a sewing machine and batik fabric, I was totally intrigued. I bought her Christmas Tree Window Hanging pattern and actually chose my fabrics and started cutting them that same night. 

Fabric cut and half-square triangles made and pieced

I started by watching her Question and Answer video on YouTube, "Getting started making stained glass window hangings (all the FAQs)". This was very informative and gave me the confidence to jump right in. I then watched her "Modern Pojagi Simple Seam Tutorial". From there, I was able to start piecing the half-square triangles and the squares together. Once I had watched her video, I was then able to refer to her pattern to refresh my memory.

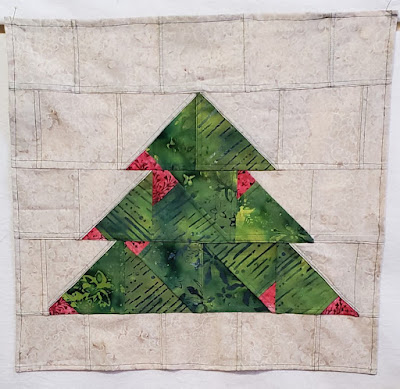
Attaching all of the squares together in rows

To attach the rows together, Elizabeth suggests using the "regular pojagi seam". I watched the tutorial and then was able to easily refer to her explanations on the pattern when I managed to forget what I had just done!😊


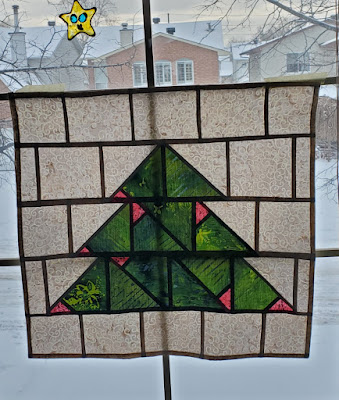
The finished Christmas Tree Window Hanging using 
modern pojagi simple seams and the regular pojagi seams

I would love to show you what it looks like with the sun streaming through it but it's been cloudy for the last two days. As soon as the sun peaks through, I'll take another picture and add it below!

Hanging in the window
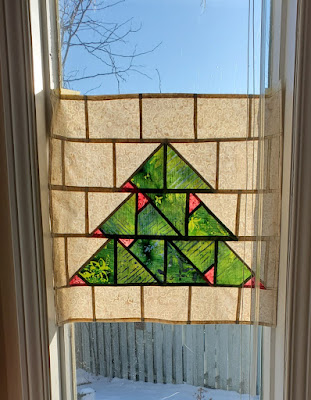
Update: It took a while but here is an image of the Christmas Tree Window Hanging with sun coming through it. Isn't it a beauty?
The sun is shining! 


What I learned
  • This was an easy technique to learn. Elizabeth has other patterns that look more complicated but I really love the simplicity of these squares and half triangles.
  • When I first tried both of the pojagi seam techniques, I followed all of the steps. I used my ¼" ruler to check my seams throughout the whole process. However, after making a few seams, I was able to leave out all of the ironing. Batik holds its fold well and I didn't need to press the seam once I was used to the process.  
  • To make the regular pojagi seam, I used my walking foot for the last stitched part over all of the fabric. It worked wonderfully. 
  • In her first Q&A video, Elizabeth warns us to let go and have fun. The beauty of the work is in it's uniqueness and that perfection is not needed. She says that if we really must have all of the single and double stitched lines together, to have our seam rippers handy. She's totally right and it was great not to worry about these details. In the end, when the hanging is in the window, you don't see the seams. You just see the beauty of the fabrics.
  • Elizabeth also has instructions for the traditional hand stitch used in traditional pojagi. I will probably try that at some point.
  • When I did my research to write this post, I found some amazing art done with the jogakbo or pojagi technique. They are listed below in Related links. They are short and well worth looking at.
Related links
  • Elizabeth DeCroos, Epida Studio
  • Great videos on YouTube of jogakbo, or patchwork pojagi art
    • Pojagi + Beyond: a wintersession course in Korean textiles (2008) YouTube
    • Making Bojagi with Artist Youngmin Lee on YouTube
    • Chunghie Lee: 'Pojagi and Beyond' at the 2009 Festival of Quilts, England YouTube
Linking parties
I'm linking up to Sandra's mmm quilts DrEAMi!

Project details


Christmas Tree Window Hanging
Pattern by Elizabeth DeCroos at Epida Studio
Size: 20" x 19½"
Materials: Batik fabrics
Techniques: Modern pojagi simple seam and Regular pojagi seam


Wednesday, December 27, 2017

Final Learning QAL Sum Up

I haven't had a very productive month as far as quilting goes. December started out well, quilting wise, but I didn't end up making much progress. On the other hand, I've had a great Christmas and started getting used to relaxing and minimizing my obligations. All is well 😊

I've enjoyed putting on the Learning Quilt-A-Long but as I mentioned, there were very few link-ups so it's not really worth continuing. This is, therefore, my last Learning QAL Sum Up. I will, however, continue my learning journey but with less pressure!

For my December learning goal, I wanted to continue adding colour to my wholecloth quilt.

December Learning Sum Up

I only spent a few hours working on it, but it is slowly coming along. It's taking longer than I thought, mostly because I'm trying to think of different things to do within the pattern. Below you will see what I mean.  I've done some lines within the flower in the middle (sort of a cross hatching) and I've done some echoing within the leaf, in two different colours.
Trying new FMQ techniques within the pattern
Here is the overall piece. It doesn't look like much progress but it was a few hours of FMQ.

FMQ Progress on the wholecloth quilt

A few more leaves now have colour

December One Monthly Goal (OMG) Finish

For my One Monthly Goal for December (OMG), I was hoping to start playing and creating an art quilt based on Jacobean embroidery of gardens. Instead of working on a garden, I found myself using some of the same techniques using Christmas fabrics from the bag of scraps that I brought up for the Christmas EPP.

I just built a background with strips and then started adding appliqué. I used the Crafty Appliqué technique for most of the appliqué. These worked out better than the large cardinal appliqué that was done without using that technique!

The beginning of a fun Christmas art quilt
I will be adding the embroidery and embellishment, once I've done the free motion quilting (FMQ). It is a great trial piece for my future art quilt based on Jacobean embroidery of gardens...that will come eventually.

Getting ready to travel

I'm going away for almost three weeks. I really, really dislike packing, especially when it comes to packing my hand-work. What to bring, how much, etc. It's always a pain because I want to get it right! I have to bring something with me other than books!

This embroidery is definitely coming with me. I've got another one started and will probably bring at least one solid fat quarter in case I decide to start others. I have visions of sketching what I see and embroidering it. Who knows, it could happen!

Packing a few embroidery pieces
For my last big trip, which was to China, I had packed some orange peels and appliquéd them onto blocks.
Orange peels project for my China trip

Appliquéd orange peel blocks


Appliquéing on the Yangtze River


This time, the trip is mostly to Spain. We start off in Barcelona.

I'm thrilled that I'll get to see the Sagrada Familia Cathedral again. It's an amazing building and its stained glass windows were the inspiration for my Art with Fabric in the fall of 2016.
Sagrada Familia stained-glass windows
Sagrada Familia Cathedral


Art with Fabric - stained-glass windows


What I learned

  • I'm happy that I put on the Learning QAL. It was a good idea and pushed me to learn so much more that I would have without it.
  • I also learned that it's a lot of work - not just writing the posts, but actually doing something!
  • I'm very grateful for those who put on QAL, Blog Hops and Linking Parties. I know how much work it is, but it's also rewarding and a great way to meet other quilters.

Related Links

Linking Parties: I will be linking up to the December One Monthly Goal Finish Link-up. I will also link up to as many linking parties as I can before I leave :-) Check out what everyone else has done! Linky TuesdayLet's Bee Social, Oh Scrap!Midweek Makers, Finished or Not Friday, Can I Get a Whoop Whoop?


Thursday, October 13, 2016

Art with Fabric - Stained-glass window

Art with Fabric blog hop
Welcome to the Art with Fabric blog hop. My art quilt is based on the stained-glass windows of Gaudì's Sagrada Familia church in Barcelona, Spain.

The windows within the Sagrada Familia are a beautiful progression of colours from blue, green and yellow, to orange, red and purple. My piece is a depiction of the colours found in these windows.

Stained-glass windows
of the Sagrada Familia


The stained-glass windows were created by Joan Vila-Grau based on architect Antoni Gaudi's plans. The shapes of the glass pieces are a mixture of curves and lines. Since Gaudi's designs were greatly influenced by elements in nature, I created my stained-glass to represent parts of nature based on the colours used.
Stained-glass of the Sagrada Familia
My interpretation of the stained-glass window of the Sagrada Familia
White depicting the clear
textured glass
The straight lines and green of trees
The first row of the stained-glass represents the white light of the Creator. In the Sagrada Familia, the windows of the upper portion of the transept are made of clear textured glass that shimmer onto the vaults. In the art quilt, I used white-on-white fabric that I thread sketched based on their designs.

The second row begins with purple that links it to the last row of the window. The blue that follows represents the sky and rain. These shapes are more circular than the green shapes at the end of the row. These have straighter, more angular lines that depict the forests and majestic trees.
The yellow of the sun

I used all kinds of thread sketching designs, and tried to use the same design on all of the pieces of the same colour. This was sometimes difficult to do since some fabrics were only slightly different and I wasn't always able to match them.

Continuation of green
in the third row
The third row continues with blue flowing from the second row; goes to yellow in the middle; and then continues with the green from the second row. The shapes continue to represent elements such as curves and long vertical pieces of blue for rain; a sun and diamonds of yellow and more angular trees in green.

In the fourth row, the blue turns to green and then transitions to yellow and orange. In the yellow and orange section, I have tried to depict the setting sun - circular for the sun with rays streaming down. The bright orange and yellow of this section stand out in the window.
Yellow and orange of the setting sun
Brown, red and purple of the
earth and rocks


The fifth and last row represent the grasses in green, as well as the earth and rocks ranging from brown, red to purple. The purple also links the beginning of the window to the end.


What I learned:
  • This was by far the most ambitious and difficult piece I've worked on. Unfortunately, I don't think that I was quite ready for it.
  • As much as I love the picture of the stained-glass window, the real project was not a success. It's not easy to admit that I made a lot of mistakes - but after my initial disappointment I have to say that I learned a lot and will hopefully be wiser for it.
 What went wrong?
  • I used the freezer paper to cut each piece and then sewed them together using raw edge
    Raw edge applique and freezer paper
    Raw edge applique and freezer paper
    applique. This technique requires a level of sewing precision that I don't have, and am not particularly striving for. I had briefly considered adjusting the pattern to foundation paper piecing. I'm sorry that I didn't do this. It would have changed the pattern somewhat, but since it was mine to make up, I'm sure it would have been fine. It would have taken a lot longer to create but would have resulted in precise piecing, easily covered with "lead cane" or ribbon. It would also have eliminated the need for a bonding agent (see next point).
  • Using Heat and Bond light behind the glass pieces was necessary, as I discovered while piecing the first row. I also didn't cover the full piece with the bonding agent. If I had free motion quilted (FMQ) each piece instead of thread sketching them, they might have turned out better. But since I didn't, many of the pieces came out lumpy.
  • After completing the lead cane with ribbon, I made the sides based on the design around some of the windows in the Sagrada Familia. The fabric I used was too dark and took away from the focus of the window. If the stained-glass window had worked out, the background could have been fixed. But since there is no way to fix the window, it's not worth the effort to change the background.

Although it was a tough piece to work on, I am very happy with my design of the colours and shapes of the stained-glass window. I'm not sure that I will ever come back to this piece, but I might be able to pull it off if I used foundation paper piecing. That could be an interesting challenge, especially if it didn't involve a deadline! Thanks for taking this learning journey with me. You can read the whole adventure in the following posts:
On the very bright side, I now have an amazing collection of solids and silk thread. There's got to be a few wonderful projects resulting from these!

Don't forget to see the creations of the other participating art quilters. See the entire schedule here.


Thank you Alida for organizing this wonderful blog hop. Next time I'm going to try to be a little less ambitious!

Thursday, October 06, 2016

Blog hop almost here

Art with Fabric blog hop button
Art with Fabric blog hop
It's almost that time already! Fibre artists from around the globe will show their creations based on art, architecture, books or music. If last spring was an indicator, it's going to be awesome. What a treat to see everyone's creations.

The Art with Fabric bog hop is almost here - and I'm sort of, almost ready. I will definitely have something to post, it just might not be the absolute final version. There are ways of creating an art piece that will be presentable but that will then have a second section added to it shortly after. At least that's my working theory. We'll see if I can pull it off :-)

I have been working as hard as I can on this, and if I had a super power, I would still choose the ability to stop and restart time. Imagine what I could do in that pause! But, since I haven't acquired that particular power yet, here's what I've been doing without adding pauses.

When I left that wonderful quilting retreat where I worked between 8 and 10 hours a day, except for Sunday, the picture below shows what I had accomplished. I had finished rows one to four of the stained glass window. I'm very happy to say that, to date, it's come out better than I expected.

Rows 1 to 4 of the window

Getting the pattern ready for row 5

I resumed work on the window a few days after my retreat. This was the first (and last time I hope), that I've had to rest after a retreat. I followed the same process at home and it went well.
Final row has been attached and is ready to be sewn


After finishing the final row, it was time for the free motion quilting, which technically was more paint sketching, since there was no batting and therefor no quilting involved.

That's what I did last weekend. I wanted each piece with the same colour to have the same pattern. This was the most challenging part because some of the colours are almost, but not quite, identical. I really enjoyed the thread sketching and finding different patterns to stitch.

I took the picture below to see what my window would look like if it wasn't quilted and had light coming through it. It just might be worth making something like this in the future.
Light coming through the thread sketched window
The window is now pieced. Here's what's next:

  • Add panels to the sides and top of the window;
  • Quilt; and
  • Add the lead cane (ribbon) between each piece of glass!!! 

For the side panels, I've consulted my photos, countless images on the web as well as the book below, The Colours of Light, that I bought at the Sagrada Familia the last time I was there. Although Gaudi designed the church and left specific instructions for the work to take place after his death, the master behind creating the stained glass windows is Joan Vila Grau. If you want to learn more, this link will take you to an interview with Joan Vila Grau about his work.

The Colours of Light
Now you know my plans for this weekend (which is Thanksgiving in Canada).

Finishing these tasks should result in the first part of my project. I'm afraid that you'll have to come back to see the results of both Part 1 and 2.

What I've learned:

  • Sometimes there are not enough hours in a day to get everything done. That's when we have to be flexible and come up with plan B (or C, or D, etc.)
  • I went shopping last night for the lead cane (aka ribbon) for my window. I am hoping that I found the perfect ribbon, that I will be able to machine stitch it onto the quilt and that it will look great. This is my favourite outcome!
  • I'll be sending poor, frazzled Alida, who is organising this blog hop, a picture as soon as I can.

My post within the Art with Fabric blog hop will be next Friday, October 14, 2016.

Please join all of the artists who will be participating in this blog hop next week. I know that they have worked hard on their creation. Let's encourage them.

I am linking this post to the following linky parties: Needle & Thread Thursday, Off the Wall Friday, Monday Making, Main Crush Monday, Fabric Tuesday, Let's Bee Social,


Thursday, September 22, 2016

Finally over the procrastination and planning

My favourite quilting retreat space
Life is good! I spent the first evening of my quilting retreat, starting this post while sipping a gin and tonic, and enjoying the rewards of a day spent working on my Art with Fabric piece.

In last week's post, I was procrastinating by planning my project. Although it was procrastination, it was well worth it. I was able to figure out roughly how to tackle this project.
Art with Fabric blog hop


I received all of the fabrics that I ordered. Look at these beautiful colours! If you want to enhance your stash, try making a multi-coloured stained glass window! I got the Kona cottons from Mad About Patchwork and some lovely Whisper Whites - Ultra Whites from Flare Fabrics. After washing everything, I had no excuses left!

This fabric rainbow makes me happy :-)


It was time to start. I brought my supplies downstairs to the kitchen table and made my calculations for the project based on my submission to the Colour Unboxed fibre art exhibition. The final size will be 30" by 40" (ish). Bigger than my usual art quilts but small enough to be manageable on my machine. Anything bigger and I'll need a large studio!

Supplies for drafting the window

I started drafting the stained glass window on freezer paper; the circular part at the top of the window and then the next four rows of colour. It took me a few hours but since I had practiced drawing and colouring it, this part went fairly quickly.

The first two rows drafter onto freezer paper


Once finished, I hung the draft in front of our French windows to photograph. I sent the entire plan to my girlfriend who is a stained glass artist. I'm happy to say that there was only one minor adjustment to make. Of course, I'm adjusting as I'm making the quilt, but at least I know that I'm following proper stained glass principles.

Draft of the stained glass window pattern on freezer paper
If you're not familiar with the properties of freezer paper, let me enlighten you! I imagine it must be good in the freezer, but it's amazing for quilting. You draw on the flat side, cut out the image from the freezer paper and the iron the shiny side to your fabric. This project would be much more difficult without freezer paper!

I started by numbering all of the pieces in the first section and then cutting them. Before ironing the pieces to the fabric, I take a picture so that I can put the puzzle back together again.

The pieces are cut and will eventually be ironed to the fabrics

The pieces are put back in order 
I completed the top circular part of the window before leaving for the retreat. Since I want the background to represent the sandstone wall, I added the brown behind the circular piece before placing the stained glass pieces. The sides will be easy to add because they're straight, but I really didn't want to add the circular part afterwards. It's important to keep the potential complications to a minimum!

Choosing, cutting and placing the fabrics
I continued the process with the second row, learning as I went along (you can read about this below). At the retreat, I have a small table where I cut and piece my fabrics. You can see my IPod in the background. That were I check to make sure that I'm putting the puzzle back together properly.


I work in sections. Now all the pieces have been cut and are ready to be placed.

When I finished sections 1 and 2, I took out the ruler to make sure that I'm still on track. Yikes - it looks like I have some minor adjustments to make at the bottom of row 2. It's OK if the pieces are too long since they can be clipped or covered, but too short is not an option.

Rows 1 and 2 
Since I'm making this up as I go along, I just kept at it. Now my stained glass has two new pieces.

What I learned:

  • I was thrilled when I stopped procrastinating and finally started the project. Why, oh why do I keep doing this?
  • The quilting retreat was a last minute thing. The Universe provided when I needed it! Thank you. I am very grateful :-)
  • For the first circular row I just placed and sewed the fabric directly on my background. I found it slightly hard to manage.
  • For the beginning of the second row, I put a little bit of Heat and Bond Light at the back of my fabric. That helped but I needed more of it.
  • By the end of the second row, I was on a roll. I still don't cover my entire piece with Heat and Bond Light but I put more on and this definitely helps.
  • At about the middle of the second row, I realized that my pieces were getting bigger because I was adding an eight to a quarter of an inch but not butting the pieces together. Good thing I figured that out before I ironed them all down.
  • It's tricky putting these together because you don't want to have spaces between the pieces but you don't want too much overlap. I'm now cutting the left side on the pattern line but adding the extra fabric to the right side so that the next piece will overlap. I just have to adjust this occasionally because the pieces are all different shapes.
  • I'm finding it hard not to make the pieces all perfect and attacking the fraying threads. I need to remind myself often that I will be covering the seams with something to represent the lead cane. Since I still have a lot of work to do on this quilt, the fraying will get worse....so just leave it!!!

I have to get back to the third row now. I hope to post something in the next few days on my progress.

Check out what everyone is doing through these linky parties: Let's Bee Social, Midweek Makers, Needle and Thread Thursday, MOP Monday, Off the Wall Friday, Can I get a Whoop Whoop? Main Crush Monday, Linky Tuesday, Fabric Tuesday,