Welcome to Free Motion Mavericks, week 408. You may be tired of seeing Swirling Leaves 2 on this blog, but it's finally finished! I'll be dropping it off at the Parks Canada mailroom on Friday, one week before the deadline of the silent auction for the GCWCC (Government of Canada Workplace Charitable Campaign).
Swirling Leaves 2 - a Finish
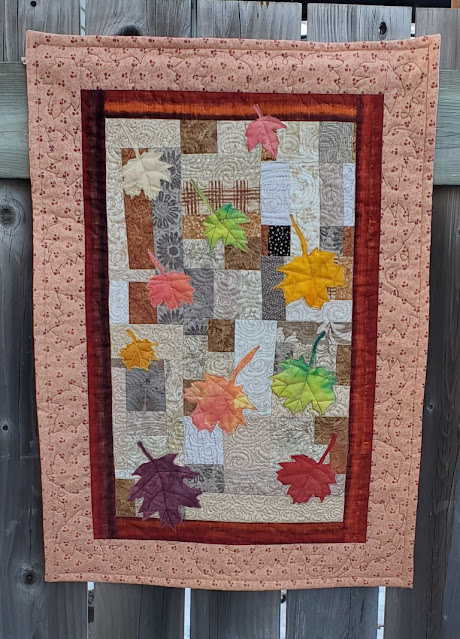
Here it is, in all of its glory 😊
 |
| Swirling Leaves 2 |
Yesterday was the first day since my retirement that I spent the whole day in the studio. What a treat! I was as tired as if I had worked, but it was with so much joy and a sense of accomplishment! I know that I'm going to be able to get used to this.😊
After doing all of those swirls, I hadn't settled on a design for the borders. Should I treat the two borders separately or as one? I knew that I wanted leaves in the outer border...but which ones? I looked in a couple of my FMQ books and tried out a few designs, but it was obvious that I couldn't quilt them without some kind of pattern. So, if I had to use a pattern, I might as well choose one of the quilt's leaf templates.
Once I chose a medium leaf pattern that was slightly larger than the outer border, I drew two leaves on the borders, facing each other, and then linking them up with loops. Repeat that several times around the border et voila!
 |
A close up of the border
|
Finishing the wall hanging
If you quilt, you know that the quilt is not done once it's FMQ. I was happy not to have to bind the quilt since the edge of the front was longer than the batting and backing and was just turned under and machine stitched. I did hand stitch the corners to make them more even and then added the hanging sleeve at the top and the label at the bottom.
 |
| The back of the quilt |
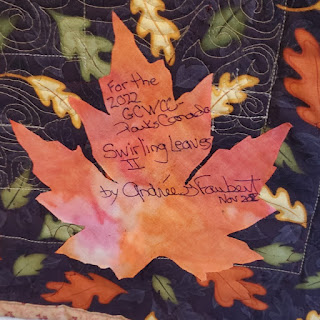
For the label, I used a leaf that I wasn't able to use on the front because it was too large. It was a great way to use it since the fabric is wonderful. I added an iron on adhesive to the back of the large leaf, wrote the message with a permanent marker and then ironed the leaf onto the back of the quilt. I was even able to add one of my small printed labels on the side, where the finished edge was wider.
 |
| Label on the wall hanging |
What I learned
- I was nervous about the FMQ border because the thread that I used was a dark cabernet colour which shows up almost as black on the red background. I didn't want the border leaves to be more prominent than the actual leaves on the piece, which is why I decided against adding veins to those leaves. With just the outline of the leaves, I think that it looks great!
- I used a blue Frixion pen to mark the leaves on the red border (the pink didn't stand out enough) and then used the chalk pen when the leaf went into the inside border. It worked very well. It was great that the quilt wasn't huge so that I could turn the quilt around when I couldn't see the pattern.
- I'm very happy to say that I did most of this during the day yesterday, but at around 3:30 pm, I was tired and took a break! I went back to the studio later in the evening, after a refreshing break and didn't make any mistakes. See, I can learn! 😁
- I was thrilled not to have to add binding since the border included the binding. I really love this technique - it's great for quilts that won't be washed, and therefore don't need a double folded binding.
- This was the second Swirling Leaves wall hanging, so you could say that it's the beginning of a series! I'm really glad that I took the time to re-think the border choices. Although I love the first quilt, I think that this one is even better!
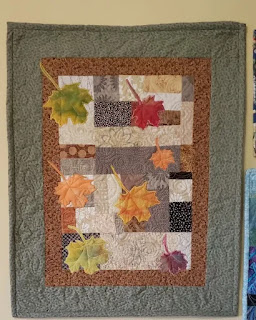
- Can I have your opinion? Do you think that if the background, under the leaves, was mostly off-white and beige, that it would look better? These two quilts have some darker brown and even dark grey in the backgrounds. Do you think that it's too much? Please feel free to add a comment if you have an opinion. Maybe I'll just have to make a third quilt eventually to test this out!
Here's a look at the first and second Swirling Leaves so that you can see the differences for yourself.
 |
| Swirling Leaves |
 |
| Swirling Leaves 2 |
Related links
- FMQ Swirling Leaves 2 on Free Motion Mavericks, November 16, 2022
- Swirling Leaves at Free Motion Mavericks, November 3, 2022
- Swirling Leaves 2 coming together, October 31, 2022
- Playing in isolation, October 23, 2022
- Swirling Leaves for Hello Fall Blog Hop, September 23, 2020
Linking partiesI'll be linking up to many fun linking parties. Why not check them out...after you link up below 😊
Put your foot down,
Midweek Maker,
Off The Wall Friday,
Finished or Not Finished Friday,
Can I Get A Whoop Whoop?,
Beauties Pageant,
Peacock Party,
TGIFF,
15 Minutes to Stitch 2022,
Patchwork & Quilts,
Oh Scrap!,
Needle & Thread Thursday,
Wonderful news! Susan at
Midweek Makers has featured my quilt. Thanks Susan!
Project details
Swirling Leaves 2
Size: 20" x 28"
Materials: commercial and hand-dyed cotton fabrics
Techniques: improv piecing, appliqué, stitch-in-the-ditch with walking foot, free motion quilting
Free Motion Mavericks
Thank you so much for following along and for linking up, whether you have FMQ done or not. I really appreciate your encouragement and will keep going as long as you are linking up! 😊
Amazingly enough we had three FMQ projects link up last week. That is very exciting. For that reason, here they are:
Melva had a variety of FMQ on her
Lily Clara Bridal Veil piece. She had leaves in the border, cross hatching in the background and then stippling around her embroidery. Thanks for sharing this with us Melva!
From Quilting Gail, we saw several lovely versions of
Travel Posts. Gail made a sample quilt for the class, her two students each made very different quilts and then Gail made another version using Island Batik fabrics. She FMQ it with swirls and did some ruler work using the Kite ruler from Silly Moon. The FMQ designs are perfect for the horizontal stripes in the quilt! Thanks for sharing your students and your quilts Gail!
Finally, after two years of doing incredible quilting on her computerized longarm, Rebecca of Rebecca Grace Quilting practiced her FMQ on her longarm. Apparently it's very different from FMQ on a domestic sewing machine, but after an hour of practice, she got into the grove! Here is
her practice piece. I'm really looking forward to seeing her own Jingle Christmas quilt FMQ. Thanks for sharing all that you learned Rebecca!
Now it's your turn!


Wow, great work. I think the thread choice was right on.
ReplyDeleteThanks! I am very relieved that it worked out :-)
DeleteCongratulations on your first full retirement day quilting! I like the soft colors you used on this one. I really like the deep autumn fall colors but this one still says autumn with more subdued shades. I like it! Thanks for sharing.
ReplyDeleteThanks so much Pamela. I really love it, and sort of sorry to see it go but at this point, if I want to put anything more on my walls, something has to come down, so it's just as well. At least we have the blog posts :-)
DeleteThanks for the feature. <3 Happy Thanksgiving!
ReplyDeleteYou're quite welcome Melva. Hope you had a good Thanksgiving too!
DeleteGorgeous finish, Andree!!
ReplyDeleteHi Joy, thanks so much for your comment - it reminded me that I needed to link up to the Table Scraps challenge. :-)
DeleteLove the fmq, and the leaf on the back for the name is perfect.
ReplyDeleteThank you so much Karen!
DeleteBeautiful Finish!! It's been interesting to watch your progress on this :-) I see I have just six minutes left to join the linky but my post is only half written...so it will be ready for the next one!
ReplyDeleteThanks Raewyn. Yes, please feel free to link up this week - I was a little late but the post is now up :-) Looking forward to seeing what you made!
DeleteCongratulations on a beautiful finish. I retired in October and have yet to spend a whole day in the sewing room, you give me hope I'll get there. Your leaves are bright enough that the darker colors in the background don't detract, but sticking with just lighter or all darker fabrics would probably make the leaves stand out more.
ReplyDeleteThanks Kate, and congratulations on your retirement! I'm slowly spending more time playing :-) It was hard at first, I really felt off kilter but I'm slowly getting used to it...and absolutely loving it. I still don't know where time goes but I think that's not unusual (so I've been told). All the best. Going over to visit you now.
DeleteI forgot to say thanks for the feedback on the background colours. I think that it could be very fun to try that out.
Delete