Showing posts sorted by relevance for query table scraps challenge. Sort by date Show all posts

Sunday, November 03, 2024

Table Scraps Challenge - light & dark brown

Allô and welcome 😎 to my short and sweet post for the October Table Scraps Challenge 2024. Today is the deadline for posting - so here it is! Almost everyone in my family had a scrappy placemat made during a Table Scraps Challenge except my son. Since he wanted a neutral placemat, he had to wait until now😁 

Light and Dark Brown Scrappy Placemat


I'm happy to present my last scrappy placemat for a family member... and it even had a cat😺, which was the October theme. 

Scrappy brown placemat in the leaves

Other side of the scrappy brown placemat

Cat hiding in the placemat 

Since I had many brown scraps, I made the placemat double-sided. The top side was quilted with bright  variegated King Tut thread while the bobbin thread had variegated brown and yellow thread. I finished the placemat using the pillowcase method. It worked beautifully.

Family Scrappy Placemats


I've been making scrappy family placemats since 2023. Finally I have all 5 done!

Family scrappy placemats since 2023

Here's the latest happening in my back yard.

Squirrel!

I haven't been doing any eco-printing but nature does it's own thing - I just wish that I could use it!

Eco-printed leaves on the car 😍


What I learned
  • I'm glad that I've finished my last family scrappy placemat. The table sure will look good with all of these wonderful placemats!
  • I've been wondering if I could use the pillowcase method for finishing a placemat. Well, I now know that I can. It was so easy and since they don't get used that much, I'm sure that a lack of binding won't make a difference.
  • I just had to FMQ the cat - I don't think my son cares about cats but it was the theme, so it's on!
Related links
Linking parties


Saturday, July 01, 2023

Little Library and Table Scraps Challenges

Hi! June was almost over when I started this post and it's now over! I'm not sure where the time goes 😊! I have a couple of challenges to share with you.

Little Library Challenge


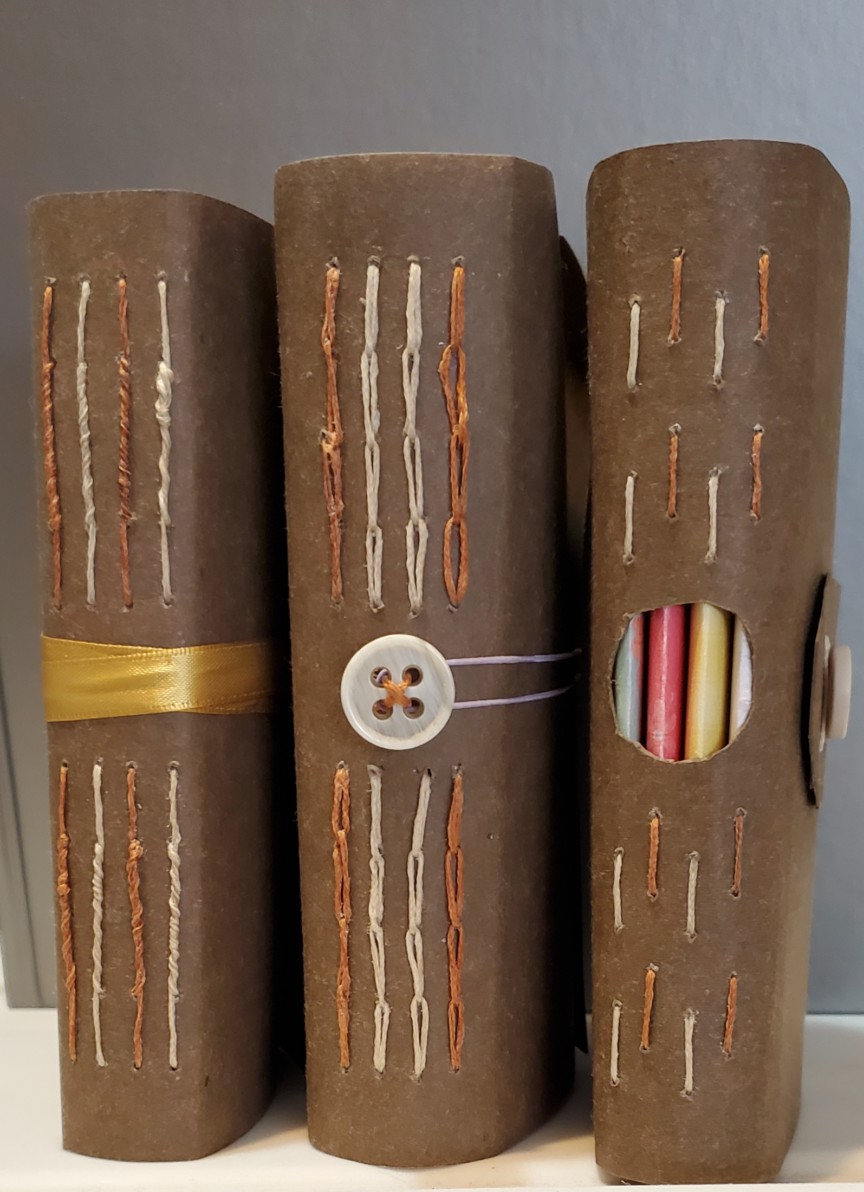
In May, the Handmade Book Club hosted a wonderful Little Library Challenge. In 5 days we made 3 lovely books. I wasn't able to participate until a week later - which wasn't a problem because all of the videos were available. These are the cute books that I made. What fun 😀

Three handmade books from the Little Library Challenge

I don't have many process pictures since, for the most part, it was the usual way of making a handmade book. However, this was the first time that I used Kraft-tex and I loved it. 

Kraft-tex cover and signatures

I did learn a better way of making the holes in the signatures. An old book acts as a cradle so that the signatures are still at an angle. Below you see the old book, the signature and the template that I'm using for the holes. I've been using an awl to make the holes - a must-have if making lots of hand-made books!
 
The old book acts as a cradle 
for making holes in the signatures

If you're an embroiderer, you may be interested in knowing that the spine of each book uses an embroidery stitch. You may recognise the middle book as having four lines of chain stitches. The book to the right uses on running stitch while the book to the left was made of a running stitch that we went back into and twisted the thread around the running stitch.

Embroidery stitches used for the spine of the books

Each book also used a different closing technique. The middle book in the above photo has a button stitched on the spine with an elastic fitted from the overlap closure of the book.

Each book has a different closing method

Above, the book on the left had a clasp attached to the overlap with the button attached to the front of the book. The book on the right has the button affixed to the overlap, and then a ribbon goes around the book and the button. I attached the ribbon behind the lovely moose button.

My girlfriend brought me back the buttons made from moose antlers when she went on a cruise to Alaska. They are wonderful. I used one for the book and the other for my summer purse. Thanks so much Lise!

Summer purse closed with a moose button
 (no I didn't make the purse)

June's Table Scraps Challenge


Since the link up to the ABC Table Scraps Challenge 2023 starts late and finishes in July, I was able to finish my challenge piece. The colour for June was blue and the letters D and I. I'm going for D is for Dots!

June's Table Scraps Challenge - Blue and "Dots"

I've decided that I would really like more placemats. I made a dozen years ago and they still look great but I'm getting tired of them. This blue placemat will be the first one! We are now only three at home so at the very least, I'll make three, hopefully in the next few months as challenge pieces.

I've been pretty stressed trying to get my Rainbow Neighbourhood QAL quilt done. Once I knew that I wasn't going to FMQ before the deadline and the quilt top was done, I have myself permission to play. I just love the slightly mindlessness of stitching scraps together. I had no idea what I was going to do, but in the end had enough 6" blocks to trim them to 6" square. The placemat is therefore, more or less, 17" x 12". 

A lot of these blue scraps are new to me. The dots fabric come from Elaine's scraps while others were in a bag of scraps on the give-away table at one of the guild meetings.

Some great new-to-me scraps

I was lucky to have the perfect piece of batting ready for this. I also took from my stash a cute piece of fabric that I'm not sure where I'll use it. Since I had a yard, I still have lots - it would be cute in a collage type art quilt.

Very colourful and fun backing

I was finally able to FMQ it yesterday. I just love following the fabric to come up with different designs. You can see them quite well in this picture below. I started using a darker blue cotton thread to stitch-in-the-ditch each block. I then decided to use the blue Bottom Line thread that I received this week. I'll be using it for the Rainbow Neighbourhood quilt, so it was a great chance to try it out.  It came out beautifully. 

Free motion quilted with Bottom Line thread

I used the placemat this morning to have my coffee 😍It will do quite well. 

Perfect for this morning's coffee

It also looks good with my blue dishes.

It even goes with the dishes!


What I learned
  • I really liked working with the Kraft-Tex. I hope to use it again to make more books.
  • Using the old book as a cradle to make the holes in the signatures is a great idea. 
  • It's great to feel more confident about making hand-made books. I'm hoping to make a few for the Fall sale event with the Out Of The Box group.
  • As you can imagine, I had a great time FMQ the placemat. I even found a perfect scrap of binding to finish it with. 
  • I'll be linking up to Slow Sunday Stitching since I always finish the binding by hand.

Related links
Here is the link to May's Table Scraps Challenge. It was finished in mid-June, too late for the linking party.

Linking parties
I'll be linking this post up to many fun linking parties, including the June ABC Table Scraps Challenge 2023. They always make great things - you may want to check them out! Slow Sunday Stitching, Off The Wall Friday, Patchwork & Quilts, Oh Scrap!, Midweek Makers, Sew & Tell, TGIFF, Peacock Party, Can I Get A Whoop Whoop?, Finished (or Not) Friday, Put your foot down, 


Monday, July 29, 2024

Table Scraps and Quilting with Rulers

Hi and welcome! I've finished my July Table Scraps Challenge and took out my quilting rulers to see what I could do. It was interesting and productive 😊 Let me share this weekend's learning with you.

July's Table Scraps Challenge


You may have seen a few preview pictures of my quilting in the last post. It turns out that July's colour was aqua, not teal, although teal is just the darker form of aqua. Anyway there is a little bit of aqua in this piece as well as lots of teal. The theme was butterfly and this was the highlight of the "Butterflies Table Topper".

Butterflies Table Topper

Notice in the image below, the milk can that my girlfriend's painted for me. The fall side matches this month's Butterflies Table Topper.

Butterflies Table Topper matches the fall side of the milk can

For the binding, I used a print of small colourful butterflies on a white background. I wouldn't normally use a light fabric but I'm glad that I did. Yes, a darker aqua fabric would blend in but this is cute and fanciful, just like the runner. Yay for doing something outside of my comfort zone!😁

Butterflies Table Topper and phlox

Here are a couple of detail views of the quilting. This was done with rulers and free motion quilting (FMQ)

Some of the ruler and FMQ

The three butterflies

Quilting with Rulers


As I mentioned in the last post, I knew that I had done some quilting with rulers and taken a course with Silly Moon. I had never posted it. When I found my practice pieces, I remembered why. Although the course was very good, I had problems with the universal darning foot that I had used with the rulers. If you don't get it just right, the tension can be off, which is what had happened. I had also used spray adhesive on my quilting samples and it had left stains. After these trials, I just put everything away!

However, after quilting with the rulers on the Butterflies Table Topper, I did figure out how to adjust the darning foot so that it worked fine. I watched a video on YouTube that suggested that I use a credit card underneath the foot to make sure that it was adjusted properly. The credit card has to slide easily under the foot. It worked!

Adjusting the tension of the darning
foot with an old credit card


Here are some of the samples that I quilted with the Silly Moon Eggie rulers.

Overlapping one Eggie ruler

Using the straight Eggie 6 ruler

Using various Eggie rulers

You can see in the image below some of the ruler work. 
  • At the top, I used a large Eggie (oval) ruler to make two lines and then stitch pebbles between them.
  • Underneath the first butterfly, you can see the overlapping semi-circles and the straight lines over them. I used different sizes of the Eggie rulers and then the straight ruler at the top.
  • For the bottom butterfly, I used the straight ruler to make some of the straight "V" lines. 
  • Finally, to the right of the bottom butterfly, the larger Eggie ruler was used to make overlapping curves. 
FMQ and ruler work in the Butterflies Table Topper 

While looking for my sandwich pieces, I found these four samplers that I made in 2017 as part of the Learning Quilt-A-Long I hosted. For the month of October that year, I made four scrappy samplers and used different batting for each of them. I then quilted, bound them and washed them. It turns out that on these small samplers, there wasn't much difference between them except for the silk/polyester batting, which was so much thinner but fine to quilt on. If you want to read more about this experiment, the links are below.

Four samplers now being used as placemats


What I learned
  • Looking at my sampler placemats, I noticed that my FMQ was possibly better than it is now, several years later. I would attribute that to taking my time back then, as opposed to just doing it now! I do tend to just go for it instead of preparing properly and FMQ carefully. I think that I need to learn to slow my FMQ down.
  • I never thought of using my square samplers as placemats because in my mind, placemats are rectangular. Since joining in the Table Scraps Challenge, I noticed that a few people make their placemats square - so now I have four lovely new placemats. 😊
  • I'm glad that I played with quilting with the rulers. It really is great for straight lines (so I'll keep them handy) but I'm really not sure what else to do with them except for those ovals and curved lines. I suspect that I won't be investing in many more rulers, unless I figure out what else to do with them. If you have any ideas, please let me know!
Related links
Linking parties
I'll be linking up to many fun linking parties, including Free Motion Mavericks and July's Table Scraps Challenge. Why not check some of them out? Monday Musings, Design Wall Monday, Sew & Tell, Oh Scrap!, Patchwork & Quilts, Midweek Makers, Needle & Thread Thursday, TGIFF,

Project details

"Butterflies Table Topper"
made for the 2024 Table Scraps Challenge
Materials: commercial fabric scraps
Techniques: scrappy improv piecing, appliqué, FMQ and quilting with rulers

Thursday, June 22, 2023

Daisy Beauty on Free Motion Mavericks

Welcome to week 436 of Free Motion Mavericks. Happy Solstice 😊 I actually have a finish with free motion quilting (FMQ) for you today. Yeah!

May's Table Scraps Challenge done ✔


It's a tad late, but it's done well and I love it 😍. May's Challenge colour was orange and the letters were F and L. The scrappy log cabin block was quickly finished and the gorgeous yellow daisy batik Flowers were attached...but something was missing. I hoped to add lace for my "L" but I wasn't happy with what I tried. 

Sometimes a project needs to percolate before it talks to me or I find that perfect thing that will make it sing.

Daisy Beauty - May's Table Scraps Challenge

This is where it sat for a while. I did post this image on Instagram and linked it up to the May Table Scraps Challenge link-up. 

 Where it sat - simmering

I tried a few pieces of lace but couldn't find anything I liked. Finally, looking for something else, I found this crochet lace - perfect! 

I found the lace - now what?

I didn't know how I wanted to finish it. Do I add stems and/or leaves? Finally today it came to me - FMQ daisies so that there is an impression of lots more daisies. I think of them as shadow daisies. 

I did add a second echo around the yellow daisies and then I started the shadow daisies. I only quilted the first one with yellow thread. I wanted the daisies to recede, so I used variegated threads in pink and yellow, and light and dark pink.

More daisies and a line of small leaves

First daisy with an echo


I moved the lace out of the way - at that point it was only attached at the binding - to FMQ a daisy underneath it.

Once the daisies were quilted, I added a continuous line of small leaves around everything, including the binding.

Here is the back - you can see the FMQ better from there.

FMQ as seen from the back

Daisy Beauty label

Since I had the fusible web handy, I made the label right away.


What I learned
  • You can see in the image where the project was percolating, that I had left an extra large backing. I was hoping to just turn the backing to finish the quilt, but when I trimmed it, I cut through it. So the piece has a regular binging.
  • I actually added the binding before the FMQ. On such a small piece, it really doesn't make a difference, and it's so nice to have a finished piece once it's quilted!
  • These hand-dyed fabric scraps come from my friend Elaine Quehl's extras. I absolutely love those orange-pinks and have used them quite a bit. I may have to dye some myself eventually!
  • We had a presentation at our last guild meeting by someone who has studied the judging of quilts. She gave us many tips. I was extra careful when I FMQ the curves - going slower than usual and it paid off - no eyelashes (that's when the back tension is off in a curve, because the quilter is going too fast!)
  • I also followed my own advice about bindings and it came out really well.
  • Before adding the label, I attached the lace with a few stitches. It doesn't show except in the back, when it's not covered by the label.
  • I don't want to be so finicky about my quilts that it won't be any fun to make them, but these small steps make for a better piece, and are really not any more work. I just have to remember them 😁
Related link
  • Tips for adding a binding - see What I learned: An Agenda Cover and Update on Free Motion Mavericks, January 05, 2023
  • Posts for this year's #Table Scraps Challenge 2023
Linking parties
This project was a squirrel - I made the deadline for DrEAMi! Yeah!

Free Motion Mavericks

Welcome and thanks to everyone who linked up 😊

Brenda from Songbird Designs has FMQ a beautiful flying geese quilt in the Island Batik Challenge. She used feathers, diagonal lines and block within a block in the middle of her stars! Click on the image on her page to get a close-up.

Come Fly Away With Me by Brenda of Songbird Designs

Donnalee had some left over fabric from a quilt kit and was able to make a lovely runner and a mini. So cute! Aren't small project fun to make?

A mini wall hanging by Donnalee

Melva finished a Dresden quilt for a client last week. I love these pink and red fabrics.

A finished Dresden quilt for a client by Melva

Gail hosted TGIFF last week with her finished quilt. She used Graffiti and Wild quilting designs. This week we'll be seeing the back of her quilt since she made if following Kelly Young's “Perfectly Pieced Backs” book.

Gail's quilt with Graffiti and Wild quilting

Margo of MY Quilts and Crafts got terrific news - two quilts, 'Modern Time' and 'Inside Lines', were accepted in the International Quilt Festival Houston 2023. Congrats!

Margo's quilts, 'Modern Time' and 'Inside Lines' will be at the 
 International Quilt Festival Houston 2023

It's now your turn!

You are invited to the Inlinkz link party!

Click here to enter

Sunday, January 29, 2023

Blue and Crazy for January's Table Scraps Challenge

It's a good thing that I was catching up on my blog reading or I would not have remembered the January Table Scraps Challenge! 😮 There's nothing more fun than whipping up a wee little scrappy project...and even learning something at the same time!

Blue Scraps for a Crazy Quilt Topper


This month the colour was dark and/or bright blue and the prompt comes from the letters C, R. or J. My prompt is therefore C for Crazy quilt. I started by sewing blue scraps together. Blue is always easy to do because I have a whole basket just with blue scraps! I tried to use triangular shapes because scrappy quilts are not just squares and rectangles.

Blue and Crazy table topper

Once the top was finished, I decided to quilt it using some of the stitches on my machine. It's a good quick alternative and I finally got to try out stitches other than straight and zigzag! One day I would love to make a real crazy quilt but not today! 😊

Here are some of the stitches

Fancy Stitches on my machine

There are card symbols: diamonds, hearts,
clubs and spades

More interesting stitches

Harder to see but still impressive stitches

Newly added: Blue and Crazy is now in the kitchen
keeping the counter somewhat clean 😊

What I learned
  • I just love sewing pieces of fabric together. Improv piecing with scraps makes my happy 😊
  • I didn't worry about bright or dark - anything blue was added, with one scrappy fabric that included a few subtle colours for contrast.
  • I was reading the stitch diagram wrong on my machine. After a few tries I figured it out!
  • There are some really fun stitches that I will have to use again. It's not FMQ but it's still cool!😎 
  • I sewed on the binding using the lessons that I had learned in December (see link below). They worked out really well. 
  • I tried to use a fancy stitch to sew down the binding but it was too thick, even with the walking foot. Next time I'll try a simpler stitch.

Related links

Linking parties

Project details


Blue and Crazy Table Topper
Made for the Table Scraps Challenge 2023
10¼" x 10¾"
Material: blue cotton scraps
Technique: improv piecing and quilted using fancy machine stitches


Thursday, December 28, 2023

Table Scraps Challenge on Free Motion Mavericks

Welcome to week 462 of Free Motion Mavericks - our last linking party for 2023. This week, if you don't have anything new to link up, why not link up a favourite post or quilt? It doesn't have to be free motion quilted, just a excuse to join in the fun 🍷🍾🎄🥳

A colourful scrappy mug rug


December's colour for the challenge is rainbow and the letters are S, H, and E.

Do you remember the teal scrappy improv runner that I made for my brother's birthday? Well I had pieced a mug rug with the same fabric but never got it finished....so here it is. To add something special to it, I used some of my Jag's fancy stitches. I added them to my sampler page and quilted up the mug rug with different stitches and variegated thread.

Colourful scrappy mug rug

You can really see the stitches clearly from the back. That was a lot of fun 😊

Back of the mug rug - what fun stitches!

There's not much to say about the construction except that I stitched it and then removed the batting from the edges. That left me with some backing fabric that I then trimmed and sewed down to make the binding.

Stitched mug rug

I had originally decided to cut the binding to one inch, but that was too wide. I ended up cutting it to ¾" and then folding it twice and stitching it down. 

Batting removed to make the binding

You can see the different stitches that I used (click the image for a closer view). My binding is really not great but it will stay together!

Rug mug stitched with fancy machine stitches

This is the stitch sampler page that I added to while I played with the stitches. I made several pages like this at one time, but got bored! At least I'm adding to it when I play with stitches....and when I'm really feeling smart, I'll even sample the stitch before I use it 😃. The two complete rows on the left were made before I stitched the binding on my niece's t-shirt quilt last week.

Stitch samples

For the holiday season, I bought some Twining's Gingerbread Tea. It's black tea with ginger and cinnamon. I'm not a huge tea drinker, but it's really good with maple syrup! 😋

Mug rug, tea and chocolate. Yeah! 

I wrote a post yesterday about the Best of 2023. I took the opportunity to go through the year's projects to see what I accomplished. For the 2023 ABC Table Scraps Challenge, I have one WIP (work in progress - Swirling Leaves 3) and there is a mug rug that was for February but was finished in October and never blogged about. Unfortunately the December mug rug is missing, but I'm not redoing this photo.  

This year's 2023 ABC Table Scraps Challenge

What I learned
  • Using the fancy stitches wasn't difficult, unless you have to stop and start over. Depending on the stitch used, that can be pretty tricky.
  • Trust me when I say that you do not want to have to pick these stitches out!!!!
  • I used one of the stitches for the t-shirt quilt. The first corner was difficult because the machine got stuck, but the others went well. I though that it would be the same here, but I didn't realise that working on a much narrower binding wasn't the same. The corners were harder to fold on this smaller quilt and binding.
  • I'm happy with my mug rug and I'm sure that my brother will like it. It was a Scrappy, Happy Endeavor
Related links
Linking parties
I'll be linking up to many linking parties. Why not check them out, after you link up below? I'll be linking up to the Joyful Quilter's December 2023 ABC Table Scraps Challenge when it opens, as well as Midweek Makers, Sew & Tell, Put your foot down, Beauties Pageant, TGIFF, Patchwork & Quilts, Finished (or Not) Friday,

Project details

Colourful scrappy mug rug
Made for the December 2023 ABC Table Scraps Challenge
Size: 7" x 8"
Material: commercial cotton scraps, variegated thread
Technique: improv piecing, quilted using fancy machine stitches


Free Motion Mavericks


Gail reminded us that the 2024 Stay At Home Round Robbin is happening again soon. Here is one of the quilts that she has made during the challenge. Check out her post if you're interested in participating this year!

One of Gail's previous SAHRR quilt


Thank you Melva for linking up to the party. Here is Melva's mini, Star of Wonder. 

Melva's mini, Star of Wonder


It's now your turn!


You are invited to the Inlinkz link party!

Click here to enter