
Welcome to week 461 of Free Motion Mavericks. I delivered the quilt to my nephew last night at 10:30 so that he could pack it up to bring to Denmark. He lives down the street so it wasn't a long journey. He and his roommate are tall men, so they helped me take a few quick pictures of the quilt. Thanks guys!😊
A Finished T-shirt Quilt
It's done and since I drove my nephew to the airport... I know that it's way to Copenhagen ✈
 |
| A finished queen size t-shirt quilt |
I'm not going to go through all of the blocks, mostly because since I don't have the quilt with me, I can't really see from the pictures what I quilted on them! 😎 Here are just a few highlights.
I had quilted stars in the sashing of this t-shirt but wasn't sure what or with what thread to quilt the t-shirt. In the image below this one, you can see the threads that I used. I FMQ with the neon orange while I originally used the variegated thread to zig-zag stitch the "14" panel from the back of the shirt to the front.
 |
| Free Motion Quilting (FMQ) the bright orange t-shirt |
 |
| Threads used to stitch the t-shirt |
On the next two Ottawa Lions t-shirts, I FMQ the sashing with some dot-to-dot diamonds and other designs within the squares and rectangles. It was good to do something different.
 |
| Using dot-to-dot FMQ in the sashing |
 |
| More dot-to-dot FMQ |
The last t-shirt quilted was the New York one. For part of the sashing, I FMQ some lightning bolt designs. I then quilted the contour of the buildings, signs and statue. I used a pink thread to fill in the sky.
 |
| FMQ the New York t-shirt |
FMQ the Border
I wasn't sure what to FMQ in the two side borders. I knew that it had to fill in the space quickly without being too fiddly. I found the design in Angela Walter's second book, Shape by Shape Collection 2. She calls it the Serpentine Clusters. It has three serpentine lines and then a row of feathers.
 |
| Angela Walter's Serpentine Clusters design in the two borders |
Squaring the Quilt
 |
| Straightening the border sides |
The quilt didn't past the folding or wonky test. Since these are just the borders, I knew that I could adjust them as required.
 |
| Folding the quilt lengthwise |
 |
| Trimming the edges |
I put together strips of the Kona Solids that I had used for sashing in the quilt. I was lucky that the sashing also used 2½" strips. I was able to use many of them for the binding and didn't have to do too much cutting.
 |
| Cutting strips after squaring the quilt |
 |
| Strips of binding ready to be sewn together |
I then used Quilting Jet Girl's Tips for Making / Planning a Scrappy Binding. It was very useful (see Related links below). I needed the binding colour used around the quilt to be a different colour from the fabric it was going to be attached to. Otherwise, the binding tends to recede and looks like there is no binding.
I put the quilt on our king size bed and placed each strip down where I wanted. Then I very carefully stitched them in the correct order and side. It was then time to attach the binding strip to the back of the quilt.
 |
| Attaching the binding strip to the back of the quilt |
 |
| Stitching down the binding with a fancy stitch |
Here's a couple more pictures of the finished quilt. I hope that my niece will take some so that I can post them.
 |
| Part of the finished quilt |
 |
| The best pictures I could get of the finished quilt |
What I learned
- FMQ a quilt that did not have batting was different. There is no doubt that the quilt would have been too heavy for my niece with batting.
- The FMQ went well. I only had issues with tension a couple of times. I'm not sure what happened but when I re-threaded the machine, everything was fine.
- All of the thread used for FMQ was polyester. The bobbin thread was Superior Thread's Bottom Line (60wt). I used two more colours of Bottom Line. There was also 4 colours of Madeira polyneon, 6 colours of Glide polyester thread and then the neon Orange polyester thread from Coats (I think). They also needed the same tension, so that was great.
- As I mentioned, I used Quilting Jet Girl's Tips for Making / Planning a Scrappy Binding. I know that the colour of the binding needs to be a different colour from the fabric that it's attached to, otherwise the binding tends to recede and it ends up looking like there is no binding.
- I knew that I wouldn't have time to hand-stitch the binding so I found a video, "How To Bind a Quilt on a Sewing Machine with Jenny Doan of Missouri Star". It taught me what I needed to know and except for one corner, the stitching went really well.
- I decided to use the wavy stitch from my machine since I knew that a straight stitch line would not be straight. I also wanted something a little bit wide to attach the binding well.
- Now that my niece's t-shirt quilt is done, I can focus on Christmas 🎄🎅 and other projects.
- I'm also looking forward in participating in the usual end-of-year blogging posts. See you then!
Related links
- How To Bind a Quilt on a Sewing Machine with Jenny Doan of Missouri Star
- Tips for Making / Planning a Scrappy Binding with Yvonne, the Quilting Jet Girl
- Angela Walters, Shape by Shape Collection 2 preview
- T-shirt Quilt posts:
- Back to FMQ the T-shirt Quilt on Free Motion Mavericks, December 13, 2023
- T-shirt Quilt FMQ on Free Motion Mavericks, November 22, 2023
- Updates on Free Motion Mavericks, November 17, 2023
- FMQ the T-shirt Quilt on Free Motion Mavericks, November 09, 2023
- T-shirt quilt top done on Free Motion Mavericks, October 05, 2023
- Secret FMQ and T-shirt Quilt Update on Free Motion Mavericks, September 21, 2023
- Update on T-shirt quilt at Free Motion Mavericks, September 13, 2023
Linking parties
I'll be linking up to many fun linking parties. Why not link below before checking these out? This quilt was my December OMG. I'll link up when the party opens! Put your foot down (at the Quiltery), Midweek Makers, Design Wall Monday, Sew & Tell, Patchwork & Quilts, Beauties Pageant, TGIFF with Anja,
I'm linking this post up to Tips and Tutorials on the 22nd.
I hope that you have a wonderful Christmas and Holiday Season!
 |
| Christmas Tree Window Hanging |
Free Motion Mavericks
What wonderful quilts we had last week. I haven't visited everyone yet, but I will! 😊
Denise of the Quiltery (Love of Geese) made this really lovely Christmas hanging for both the Virtual Cookie Exchange and the Island Batik Ambassador Celebration Challenge.
 |
| Christmas tree and gift wall hanging by Denise |
Donnalee finished her first fabric collage piece based on mushrooms that she saw on a trip to New Zealand. What a great finish!
 |
| Mushroom fabric collage piece by Donnalee |
Melva of Melva Loves Scraps, finished her customer's t-shirt quilt and it's been delivered. It really looks great with the sashing and border fabrics.
 |
| Melva's finished customer's t-shirt quilt |
Quilting Gail participated in the monthly Classic Car Colour Challenge hosted by Jen @ Patterns by Jen. What a great quilt! I especially like the border piecing. Gail did “Wild” or “Graffiti” quilting in the centre. The outside was quilted using Silly Moon’s Rocket ruler.
 |
| Gail's Classic Car Colour Challenge finish |
Sandra of mmm quilts made a Christmas tree farm quilt for her daughter. What a wonderful finish! My feathers sure don't look like that! 😀
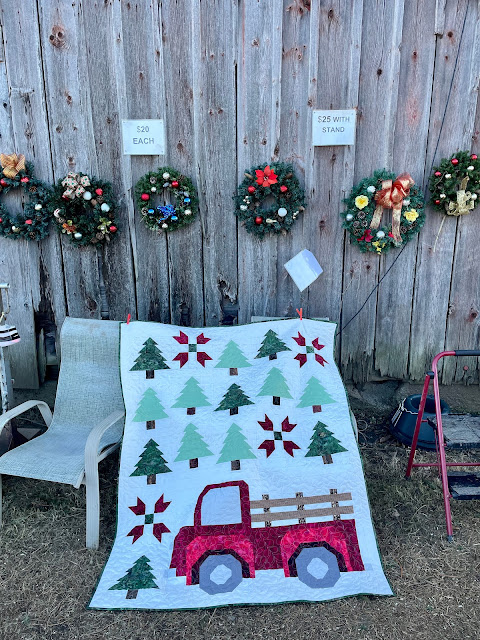 |
| Sandra's Christmas tree farm quilt |
Thanks so much for participating! It's now your turn.
Your fancy stitching looks great on the binding, and I'm so glad my scrappy binding tips were helpful. :) Congratulations on the fun finish!
ReplyDeleteThanks Yvonne. Your tips were very useful. I've made scrappy binding before, but never so well or with such confidence :-)
DeleteYay! You got the quilt finished. It looks great and I like your color progression for the binding.
ReplyDeleteThanks so much Anne-Marie. I don't have an OMG for January but will put it into my new agenda so that I remember :-) Happy New Year!
DeleteBravo pour ce superbe quilt terminé à temps ! J'aime particulièrement la finition, très très jolie !
ReplyDeleteMerci pour le partage ;)
Merci beaucoup Frédérique!
DeleteLove the fancy stitch you used on the binding, Andree!!!
ReplyDeleteThanks Nancy, I hope to do that again. It was a lot of fun!
Delete