Saturday, September 10, 2022

Blue Wonky Star Mat

I had originally planned to just read today but then I went down the rabbit hole of quilting blogs 😊. This is a squirrel and a blue wonky star mat for the 2022 Tables Scraps Challenge. A quilter who is doing the RSC-22 challenge is making some very lovely wonky star blocks. I got intrigued and a few hours later, my mat was done! 

Learning to make wonky stars

Wonky star mat for September's 2022 Table Scraps Challenge

September's colour is light blue and the theme is pumpkins. Sorry, don't go looking for the pumpkin - it's not part of the mat.

I found a tutorial on YouTube by Jenny Doan of Missouri Star (see links below). It really took me a while to get the hang of making the wonky star. I kept wanting to place the second leg of the star backwards. 

I did a quick practice block to see if I could make a wonky star. I did it, but realised that the fabric colours were all wrong. Since I'm going to Almonte on Sunday to demonstrate meditation stitching at the Out of the Box booth at Fibrefest, I'm going to cut this block up and see what I can do with it. 

Practice wonky star block

Once I knew what I was doing, I cut up a bunch of 1½" squares and made a small wonky star block. I then sewed the other squares together. 

Wonky star block surrounded by blue squares

I sewed the block to the batting using the walking foot. To make sure that I learned from my experience, I re-read my blog post of the Happy Hexie Mug Rugs. I'm glad to say that I didn't make the same mistakes...just some new ones 😁.

Getting ready to attach the back

I just realized as I'm writing this that I forgot to stitch-in-the-ditch on one side....oh well.

I stitched the front to the back and then in the opening, turned the mat out. Once the opening was stitched up, I sewed around the edges with the walking foot.

Glamour shot :-)

I found a pumpkin!

Blue Wonky Star Mat with Pumpkin 😊

What I learned
  • I should know better than to work with tiny square pieces of fabric. They don't hide the fact that I'm accuracy challenged. I did quite well on the wonky star block but the other square pieces aren't great. I know that I shouldn't worry about the quilting police but somehow it's ingrained in me!
  • I ended up cutting the back fabric the same size as the front but it didn't give me much fabric to close up the opening.
  • I sewed the front and back using a seam allowance that was too small. I had to go back and fix one area that hadn't been stitched properly. A generous ¼" would have been good.
Related links
  • Check out Ivani's orange Wonky Star block - I love it!
  • Make a "Tiny Wonky Stars" quilt with Jenny Doan of Missouri Star (Video Tutorial)
  • Happy hexie flower mug rugs, July 25, 2022
Linking parties
I'll be linking up to many fun linking parties. I'll be linking up to the 2022 Table Scraps Challenge as soon as it opens at the end of the month! Let's see what others are up to! Put your foot down, Peacock Party, Off The Wall Friday, Patchwork & Quilts, Oh Scrap!, Monday Making, Beauties Pageant, Needle & Thread Thursday, Finished or Not Finished Friday, Free Motion Mavericks with Muv, DrEAMi!, 


Project details

Blue Wonky Star Mat
Made for the September 2022 Table Scraps Challenge
8" x 5¾"
Materials: commercial fabric scraps
Technique: stitch-in-the-ditch quilting with a walking foot


Thursday, September 08, 2022

Wildflower Vest on Free Motion Mavericks

Welcome to week 398 of Free Motion Mavericks. I hope that you've had a chance to play this week. I did 😊 

Dynamic Wildflowers in Stitch Workshop

I've been wanting to free motion quilt (FMQ) the wildflowers in Jo Hill's July workshop on TextileArtist.org's Stitch Club. Since I wasn't up to tackling Version 2.0 this week, I thought that this would be a quick FMQ project - and it was!

The back of my Wildflower Vest

The first step was cutting up shaped for the flowers. I decided to use some bright batik scraps. You essentially cut up large circles for the large flower (red), some elongated triangles (green), cut up some strips (purple) and some small circles (light blue).

Placing the batik fabrics

After placing some Heat & Bond Ultra Hold at the back of the batik, I cut everything up and then placed these on the back of a old denim vest. I actually used the back of the red batik because it was a little less bright! 

After ironing these down, I used some regular black cotton thread for the FMQ. I did use a larger needle (a topstitch 100) and it went very well. I mostly followed Jo's sample to piece and quilt the flowers. I wanted to see how it would turn out before I started experimenting.

Fun FMQ with black thread

I really love how the black thread looks against the batiks and the denim. I was thinking of adding either different coloured thread or embroidery but I think that I'll leave the back as is. I can always experiment with the front.

What I learned

  • Since I had the ultra hold of the Heat and Bond, I thought that I would try it on the denim. That was probably a good idea.
  • It was great to use some lovely batik scraps for this project. 
  • I might consider using a thicker thread next time - I have some nice stuff, somewhere...
  • I'm looking forward to FMQ the front of the vest. There is less space since there are pockets, but the long vertical space could be cool!😎
  • I've also been thinking about other jackets and such that I could use this technique with. That would be a lot of fun!
  • If you like this style, check out Jo Hill's website (see below). She has really lovely work. She also offers some FMQ courses online that look interesting. She is a great teacher.

Related links

Linking parties

I'll be linking up to many fun linking parties. Why not check them out, after you've linked up your project below! Midweek Makers, Put your foot down, Needle & Thread Thursday, TGIFF, Peacock Party, Off The Wall Friday, Finished or Not Finished Friday, Patchwork & Quilts, Oh Scrap!, Monday Making, Design Wall Monday, 


Free Motion Mavericks

Did you see Sandra's lovely Grapefruit Pizzazz quilt last time? I so love those colours - they look good enough to eat!

Grapefruit Pizzazz quilt by Sandra at mmm quilts

It's now your turn!


You are invited to the Inlinkz link party!

Click here to enter

Monday, September 05, 2022

More books with fabric

I seem to be flitting around these days with many short, fun projects. Here are a couple more 😊 

Book with a woven binding

I used to weave, many moons ago, so when I saw this project in the easy section of the Handmade Book Club, I couldn't resist. Anything woven catches my interest.

Hand-made book with woven binding

If you follow my blog, you will have seen a few posts on accordion books since July. I bought the accordion book challenge and made three of them (a fourth one is partially finished). Making books won't become my next passion but it's been amazing to learn and play with fun paper and fabric.

I did sign up for the Handmade Book Club. For a monthly fee, you have access to all of their many years' worth of archives. The videos are very well made and everything is super organised. I'm hoping, at least for the next few months to keep playing and learning to make books.

I wanted funky fabric on my cover. These two fabrics are from a former colleague's mom's stash. Thanks Judy, these are great!

I was so engrossed in making this book that I forgot to take pictures 😮. Here is the back of the book.

Back of the book with the woven binding 

I did have quite a few learning moments making this one but I'm thrilled with how it came out! 

Fabric Meditation Book in progress

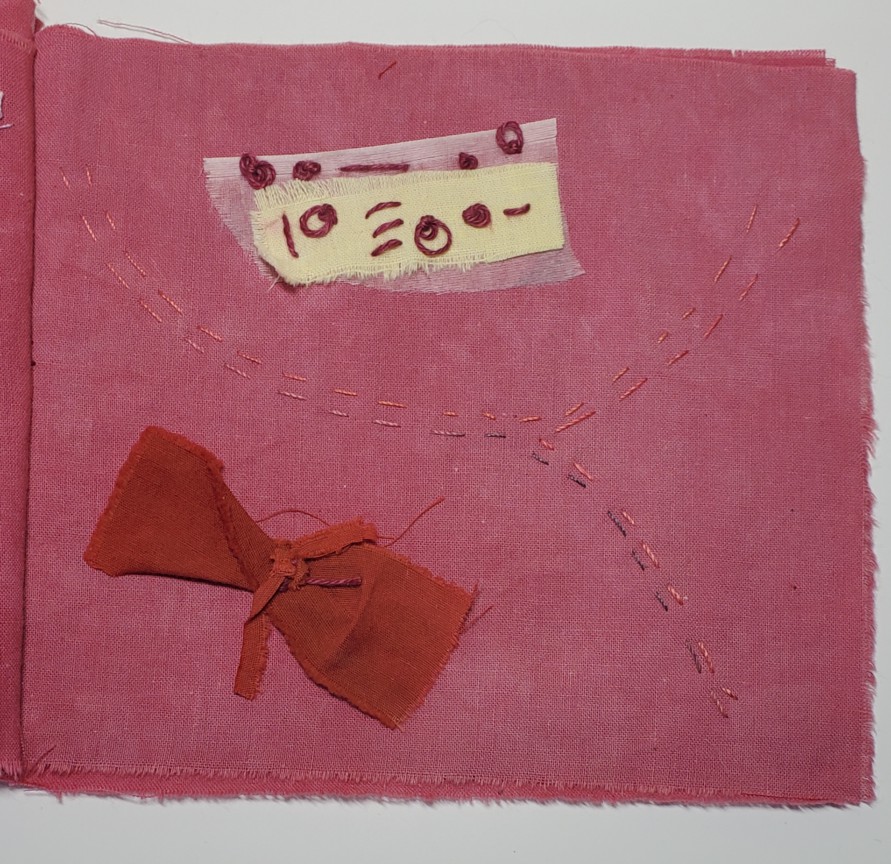
This project is from a Handmade Book Club workshop with Emma Freeman. Since I've been doing lots of meditation stitching I had to check it out! The whole book is made of fabric pieces and made in the traditional Japanese aesthetics of wabi-sabi. I'll be reading up on this and will share at a late date.


Couching on the front of my fabric meditation book

I ripped up 5 pieces of hand-dyed fabric from the scraps that my friend Elaine gifted me. The ripping adds such lovely texture.  There really isn't any rules for making these books except to try to make them in a slow, mindful manner. The front page has couched strands of some sari yarn.

Keeping the pages simple is probably my biggest challenge. I'm not sure that I won't go back and add a little something but it won't be my usual more is best. 😊 The second page has some organic slow stitching using some of Mirjam Gielen's embroidery techniques. 

Organic stitching

This next page has a wonderful small piece of embroidery that I cut out. I'm not sure what my plans were for it but since I only got this far, I ripped the embroidered piece out to attach here. I also love pieces from the selvage edge.

Repurposing a small piece of embroidery

I'm also working with layers. This one has a piece of organza topped with a tiny scrap of hand-dyed fabric. I love the marks here - they almost look like their own language. Below it is another tiny piece of fabric that is folded like a bow.
Layering and stitching

I still have one final blank page. Maybe it's actually finished and the last page represents future possibilities! 😊

Thanks so much for accompanying me on my crazy learning journey. Here is what I learned from these wonderful projects.

What I learned
  • The pages in the book are called signatures. I learned the hard way that we are supposed to trim the pages before you bind them....yup, makes lots of sense in hindsight 😊
  • I had watched the video on making the signatures but I should have watched it a second time. You may wonder why the back fabric isn't the front since it's so "me" but the pages sticking out of the bottom will give you a clue.
  • It's fun trying different aesthetics - from in your face colourful to subtle. I'm rather surprised that the calm, minimalist stitching of the fabric book really appeals to me!

September's OMG
I really need to spend some time free motion quilting (FMQ) on Version 2.0 My One Monthly goal will be to complete two more areas of Stéphane's quilt. It's going to get cold soon and he'll need his quilt to keep him warm 😊

Related links

Linking parties

I'll be linking up to many fun parties this week. Why not check them out...and remember to visit Muv on Free Motion Mavericks! You can also come back on Thursday for my turn at Free Motion Mavericks! September's OMG, Slow Stitching Sunday, Design Wall Mondays, Oh Scrap!, Patchwork and Quilts, Off The Wall Friday, Put Your Foot Down, TGIFF, Peacock Party, Beauties Pageant,  


Friday, August 26, 2022

Oranges and Lemons on Free Motion Mavericks

Welcome to week 396 of Free Motion Mavericks. Sorry for the delay. I guess I'm more ready for the weekend than I thought! 😁

Playing with Oranges and Lemons!


This month on the Table Scraps Challenge, the colour is orange and the theme is Embroidery.

Oranges and Lemons runner 🍊🍋

I started, as I usually do, with a look at my scrap containers. I found these in the scrap bag for English Paper Piecing (EPP) hexies. There are still lots, so it shouldn't affect my hexies supply much 😀

I was trying out my mother's Kenmore sewing machine to make sure that it was ready to give to my son - it made four patches just fine! I attached those to the larger squares and Voilà! It was then time to add an inside border and then the oranges and lemons outside border.

Orange scraps with oranges and lemons border
ready to FMQ

I stitched-in-the-ditch around the borders. I didn't bother with the inside blocks. I then FMQ the oranges and lemons outside border. My FMQ got more elaborate as I went along 😊

FMQ the runner

Finally it was time to FQM the centre blocks. I had just watched Lea Day's video on the Quilting Daily newsletter. She has a series called "Quilted & Bound: Quilting Ideas to Finish Your Quilt Tops Fast and Easy!"  For a scrappy quilt, Leah used the undulation design in all-over style. She had some good tips to share, so if you're interested, you may want to check out her Episode 1 video (see Related links below).

The centre blocks are FMQ using the undulation design in all-over style

I had some lovely light orange yardage that I used for the binding. I believe that the backing fabric comes from an old cotton tablecloth that I mother had. I love the Mediterranean vibes.

Hand-stitching the binding

Since the theme for August is embroidery, I just added a running stitch line of Perle cotton through the border.
Running stitch line of Perle cotton through the border

I shot the finished photos at my son's place last night after finishing the border. They had lovely sunflowers. 

Finished Oranges and Lemons runner with sunflowers
 

What I learned

  • I had several small squares of orange fabric scraps that I was able to use for the 4 patch.
  • I was worried that the centre blocks would be too much but since they're surrounded by the outside border, it frames them well and the overall effect isn't "too much"!
  • I was going to embroider the border with more than the running stitch, but since I ended up making it quite narrow, I decided for just a thin line of running stitch. I didn't stitch through all of the layers since I would have needed a thimble and didn't have one with me. 
  • I loved FMQ those lemon, orange, lemon and lime slices!😊

Related links

Linking parties

I'll be linking up to the August 2022 Table Scraps Challenge as well as other fun linking parties. Why not check some of these out, after you've linked up below! Midweek Makers, Needle & Thread Thursday, Put your foot down - this week with True Blue Quilts, Off The Wall Friday TGIFF, Finished or Not Finished Friday, Peacock Party, DrEAMi!, Design Wall Monday, 

Project details

Oranges and Lemons table runner
Size: 
Materials: commercial fabric scraps, perle cotton
Techniques: 4 patch blocks, FMQ, embroidery


Free Motion Mavericks

Welcome! Last time Nancy of Grace and Peace Quilting shared with us her "Bring the Love" mini quilts. If you didn't get a chance to look at these, you may want to check them out now after you link up!

"Bring the Love" mini quilts by Nancy of Grace and Peace Quilting

It's now your turn to link up!

You are invited to the Inlinkz link party!

Click here to enter

Monday, August 22, 2022

Embroidering a seascape

I've finally gone back to TextileArtist.org's stitch club. There are so many new wonderful workshops and never enough time 😊

Stitching a seascape

The latest workshop is with Bethany Duffy. Her workshop is about using seashells (or other found objects) and incorporating them into an embroidery. I really love her work (see Related links below).

By the sea

I started with two pieces of light blue hand-dyed fabric and a 4" embroidery hoop. The shells that we use need to have a hole in them to stitch through. That was actually difficult to find! I searched through all of my shells and found two since we generally collect unbroken shells.

My collection of shells in my hand-made bag.

After finding the perfect shell, I added three layers of padding using left-over batting. This helps give it a cascading effect. Then I started stitching, and stitching! There are a lot of long and short stitches. I ended up using two dark blue embroidery floss, then two light blue and finally a very light blue-green for the edge.

Adding padding to the shell

Once I finished stitching the first shell with short and long stitches, I added loopy French knots at the edge, like sea foam.

Finished stitching on the shell

Since there was still a lot of space left in the loop, I thought of adding another shell but then remembered the small bag of sea treasures that my niece and sister-in-law brought back from Prince-Edward Island this summer. There was a perfect little piece of driftwood that would be a great addition.

I added the padding in front of the driftwood but only attached the driftwood once the stitching was completed. You can faintly see the brown silk thread that I used to attach it. I was going to add glue under it, but it seems secure enough.


Driftwood attached with brown silk thread

What I learned

  • It was so enjoyable stitching the sea through the shell. 
  • I'm really glad that the driftwood seems to be quite secure.
  • I learned that adding padding in embroidery is called stumpwork. It gives it a 3D look.
  • I want to learn shisha mirror embroidery since my sea treasures were mostly pieces of sea glass. I would love to add this to my next piece....yes, I really hope to make many more of these 😊
  • I was hoping to give this first piece to my niece who is now studying in Denmark. I didn't get it done on time, so maybe she'll have many to choose from when she's back at Christmas.

Related links

Linking parties

I'll be linking up to many fun linking parties this week. You may want to check them out! Monday Making, Design Wall Monday, Free Motion Mavericks with Muv this week, Patchwork & Quilts, Off The Wall Friday,  Put your foot down with True Blue Quilts, Peacock Party, 

Project details


By the sea
4" embroidery hoop
Materials: hoop, shell, driftwood, hand-dyed fabric, batting, embroidery floss and silk thread.
Techniques: stumpwork embroidery, long and short stitches and French knots


Thursday, August 11, 2022

Planning a quilt and Free Motion Mavericks

Welcome to Free Motion Mavericks, week 394. I  don't have any new free motion quilting (FMQ) to show you this time. It's been busy but I have made time to play with paper, fabric and thread - of the slow kind 😲. That's a good thing since it keeps me somewhat grounded and calm 😊.

Planning and making a special book

Although I didn't do any FMQ, I am very slowly working on my daughter's Paddington Bear quilt. You may have seen the accordion books that I made a short while back. I decided to embellish and use the accordion book with a flap to record the planning and making of this quilt. 

Accordion book with flap - now featuring Paddington Bear

Isn't it gorgeous? I attached the image that I used to make the medallion appliqué, to the front of the book. The flap was sort of in the way so it's a good thing that I had a second copy of the image to make adjustments.

Book with the flap open

Inside the book I added the fabrics that I used for the appliqué as well as the other Paddington Bear fabric that I have and will incorporate into the quilt. The funny looking Paddington Bear image is made up of the hand-dyed fabrics that I used on the appliqué. I added a pocket to include the pattern that I am creating. 

Fabric swatches and pattern

The next page includes more of the lovely fabric that I was able to accumulate. Like Paddington, a lot of the fabric travelled from far to get to my home.

More great Paddington Bear fabrics

FMQ design inspiration

As I was dog-sitting at my son's apartment, I took a few pictures of a London towel that they have (as well as pictures of Poppy of course)! I'll be using the images on the towel as inspiration for the FMQ that I'll use on this quilt. A few years ago, there was tons of fabric like this featuring London. I sure wish that I had bought some!

Great images of London to base some FMQ designs on

Here is the Paddington Bear appliqué that I made for the centre medallion of the quilt. 

Paddington Bear appliqué

My daughter and I have decided on a variety of gray Kona Cotton for the background of the quilt. I can't wait to go on a road trip to pick some up. I do want to figure out what other Kona colours that I could use on this since it will have real quilted blocks 😲. Yes, I know, I'll be making real blocks....that's how much I love my daughter!
The wonderful Poppy


What I learned
  • I really wanted to buy some of that London fabric but didn't clue in about where I could use it. The worst part is that I was already planning this quilt at the time!!!
  • My mother made my son a book with the designs that she used when she made his quilt. I think that it's a wonderful keepsake. As I make more books, it would be a great opportunity to record these quilty ideas and give the book to the person who gets the quilt. This will be my first one.
  • I adapted my Paddington Bear book by adding a pocket and some extra pages. I'm sure that my technique will get better as I make more books!
  • I've discovered "good" paper (stuff other than photocopy paper). That could get as addictive as fabric 😍

Related links
  • Accordion book with 4 panels and flap
  • Version 2.0 duo-tang
  • Paddington Bear quilt
Linking parties
I'll be linking up to many fun linking parties. I hope that you'll check them out and also take the time to link up your projects below. It doesn't have to be FMQ related 😎 Needle & Thread Thursday, Put your foot down with Andi, Off The Wall Friday, Peacock Party, Slow Sunday Stitching, Patchwork & Quilts, Monday Making, Design Wall Monday, Midweek Makers, 

Free Motion Mavericks

Welcome! Did you get to check out Angie in SoCal of the Quilting Reader's Garden blog's finish? She made a table topper for the July Table Scraps Challenge and FMQ it. Way to go Angie!

July table topper by Angie in SoCal

It's now your turn!

You are invited to the Inlinkz link party!

Click here to enter

Tuesday, August 09, 2022

Sun printing and Post 500

Hi, I hope that you are all doing well and enjoying whatever weather happens to be going on in your part of this wonderful planet 😊. Discussing the weather is a very Canadian thing to do. Is it part of your culture also? In Ottawa, the heatwave has finally lifted and we now have rain and cooler weather. Yeah! I'm sure that the heat will be back, but I'm going to enjoy this lovely break.

Sun printing

Last week I was able to do some sun printing. My results were so-so but I did enjoy the process and look forward to learning more and doing better. I also read an article about over-printing so I'm going to touch up some of my fabrics eventually.

My first attempt at sun printing this year

Some interesting plants from my yard

Mixing up the colours

Results of sun printing


This first piece (at the bottom of the first image) was the first that I did. I was really nervous and trying to get the first two done at the same time. 
  • A couple of the dandelion leaves on the left came out. 
  • The fern in the middle was not touching the fabric enough to get a good print. I think that I needed more paint. 
  • Next to it was a bunch of clover. It didn't adhere enough, but the two clover leaves at the top are great. 
  • The individual leaves didn't do too badly. 

Interesting results

I love the clover at the top edge of the first piece

The second piece was not very successful. There are faint images of ferns but not much else. I suspect that there wasn't enough paint and the plants were not touching the fabric enough. This piece will probably be much better with some over printing.

Not very successful sun printing

Faint outline of ferns

The little blue piece was not successful but I did better on my last two pieces. By then I was doing only one piece at a time, and was getting the hang of it.

I was hoping that the red would lighten up with more water - I would love to have gotten some pink in there. I think that I needed more paint (again) but the leaves did stick to the fabric so that the outlines, although pretty subtle, are better.

Green and red with some leaves outlined


Lovely violet leaves

This orange and yellow piece is my most successful as far as the sun print goes. Most of them are quite clear. Next time, I'll have to work on my composition 😊

Much better outlines of the leaves

Finally a pretty good image of a fern leaf.

What I learned

  • Sun printing is done with diluted transparent paint. I used Pébéo Setacolor light or transparent fabric paint but I think that I should have applied more paint to the fabric.
  • Also, since the paint dries fairly quickly outside in the sun, I should have done one piece at a time. I did spritz some water onto the fabric to keep it wet so that the image could transfer.
  • Plants that you can lie flat against the fabric work best. Some of the fern leaves I used were too rigid and didn't lie flat.
  • It's also important to work on the composition part so that if the sun prints work, that they will look nice together.
  • I've just found a tutorial on YouTube using the plant as a stencil to make plant prints. I've listed it below because I think that it would be great to use that technique also.
  • Finally, I found some articles by Lynda Heines. I've included the link below.
  • This is my 500th post! Youppi!!! I've been blogging for over 10 years, since March 2012. Wow, what a learning journey. I hope that it goes on for a long, long time 😎

Related links

Linking parties

I'll be linking up to many fun linking parties. Let's go see what's happening out there! Muv is hosting Free Motion Mavericks until tomorrow. Remember to go link up! Patchwork and Quilts, Monday Making, Design Wall Monday, Midweek Maker, Put your foot down (hosted by Andi this week), Needle & Thread Thursday, Off The Wall Friday, Finished or Not Finished Friday, Peacock Party, 

I have linked this post to Tips and Tutorials on the 22nd.