Making a seashell container
I've enrolled in the TextileArtist.org Stitch Club. It's essentially the same concept as their original Stitch Challenge, but for a fee. After all that they have given to the stitching community this spring, I wanted to keep playing and learning as well as support their great initiative.
The first artist, at the end of May, was Debbie Lyddon. She makes very cool textile art. Since she lives near the sea, a lot of her imagery and techniques come from there. For example, she adds grommets to a lot of her work. These are hand done and are used a lot in sailing boats. Our assignment was to make three containers to hold something special to us or our environment.
I'm going to start with the second container that I made since it's much more like the work that Debbie showed us how to make.
 |
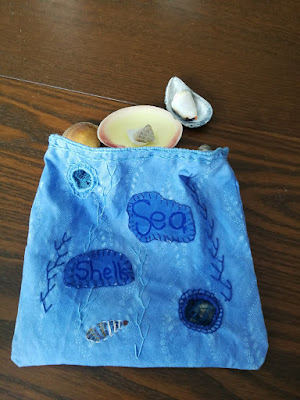
Hand-stitched seashell container |
I started by painting the fabric, a white on white cotton that came out really well. For this second container, I learned from the Q & A sessions at the end of the week that Debbie dilutes her acrylic paint quite a bit. I hadn't done that for the first piece and so the fabric was very stiff and a little difficult to sew by hand. The darker blue fabric pieces that have Sea and Shells written on them (with markers) are from the first batch of fabric. I could never have embroidered the words on there 😊
 |
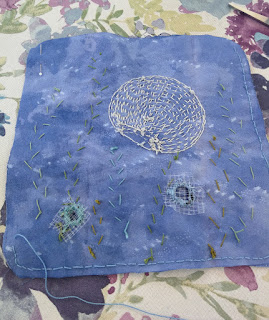
| Other side of the seashell container |
I embroidered the bag before I stitched it together. I love using the feather stitch when I don't have to be accurate and follow a line. This stitch is perfect for making sea weeds.
On this side, you can see that the grommets are smaller. I actually used half of a twist tie to make each of them. On the back of the fabric, I drew the circle around the twist tie. I then cut into the hole, leaving most of the fabric there and stitched very densely around the tie. I used a buttonhole wheel stitch to highlight the grommets. Inside of the small grommets, I stitched a small piece of netting - the stuff that comes from a bag of potatoes.
For the side of the bag with the large grommets (top image), I used a whole twist tie for each grommet. I did it the same way as the small ones but removed some of the excess fabric from the middle. I then put a layer of blue hand-dyed cheese cloth over the holes - one dark and the other lighter blue.
 |
| A peak inside! |
For the top of the container, I stitched down a long piece of wire (that I use for hanging frames). I had about ½" of fabric on the inside so I added a row of stem stitching right under the stitching for the wire and then about a ¼" from there, a row of chain stitch keeps the seam down on the inside.
A container to display an arrowhead
 |
| This container is used to display rather than contain |
This was the first container that I made. It was much more complicated than my second one since I wanted to use it to display rather than contain the arrowhead within it.
 |
| The prototype for the bottom of the container |
I started by painting the fabrics and then made a prototype for the bottom of the container. Since it worked out, I ended up painting it instead of making another one. After that, I sewed three different fabrics together, the brown, green and blue and then stitched them into a tube. My fabric was stiff but not stiff enough to hold the arrowhead, so I inserted a roll of toilet paper inside to strengthen it.
 |
| Displaying the arrowhead on a shelf |
The arrowhead comes from Northern Ontario. I found it near the swamp at the cottage where I spent all of my summers when growing up. This was probably part of the hunting territory of my husband's community. I only realised this as I was making this display container. On the outside, I used markers to draw the tree with deep roots, and birds. Around the top, I stitched on some beads and feather charms in the four directions.
Inside the container I added a stone from the area as well as cedar, sweet grass and sage. These are not the traditional things that you would put inside a pouch but I didn't have any tobacco. I made this container for my children, who are also part of this community.
What I learned
- I am really enjoying learning about all of these techniques, but more importantly, I love expanding my knowledge and appreciation of textile art. Some of it can be pretty out there - and I may not be quite there yet, but I'm loving the journey.
- The art that the other participants are making is sometimes quite intimidating. However, I'm not letting myself be too hard on my work - I haven't been doing this for very long and we all have our paths to work on. I make sure to save many of the work that I would like to learn from. Sometimes it's just a little detail that I might never have thought about but that's how we expand as artists and makers.
- I used Perle Cotton size 8 for all of the stitching in these projects. I hadn't used it much previously and really love it.
- The arrowhead container was quite difficult to make because I had no idea what I was doing!😊 I'm really happy with the way both of them came out.
Related links
- Debbie Lyddon's website and blog
- I use Sharon Boggon's website - Pintangle's Stitch dictionary for most of my stitches.
Linking parties


I love this! A fun way to play with stitches and collect shells - perfection in my book.
ReplyDeleteThanks Kathleen. It was so much fun to make that I'm just going to have to make more! Take care.
DeleteThese are great Andrée; grommets fascinate me, and yours are beautiful. I like the arrow container, but my favourite is the blue one (how'd you guess).
ReplyDeleteThanks Sandra - yes the blue is lovely - I haven't made anything in blue in a long time. I think that it's over due. Take care.
DeleteWhat a lovely collection. I especially love the 'other side' of the sea shell bag. Your stitching is beautiful :)
ReplyDeleteThanks so much Janine. I love it when it looks good and was actually a pleasure to make! Take care.
DeleteYour new skills are fabulous, and I love watching your journey and learning a few things along the way from you. Great grommets, and feather stitch does indeed make terrific seaweed. Thanks for sharing at the Chameleon's Colour & Inspiration party.
ReplyDeleteThanks Dione for hosting - I really took advantage of your last linking party! It's so much fun just flitting around, playing and learning new things:-) Take care.
Delete