Thursday, February 16, 2023

FMQ Wild Hexies and Making Flying Geese

Hi, welcome to week 420 of Free Motion Mavericks. I have a free motion quilting (FMQ) project to share as well as the flying geese for Round 4 of the SAHRR. I'm glad that you can join me today.

FMQ Wild Hexies, a Mystery UFO


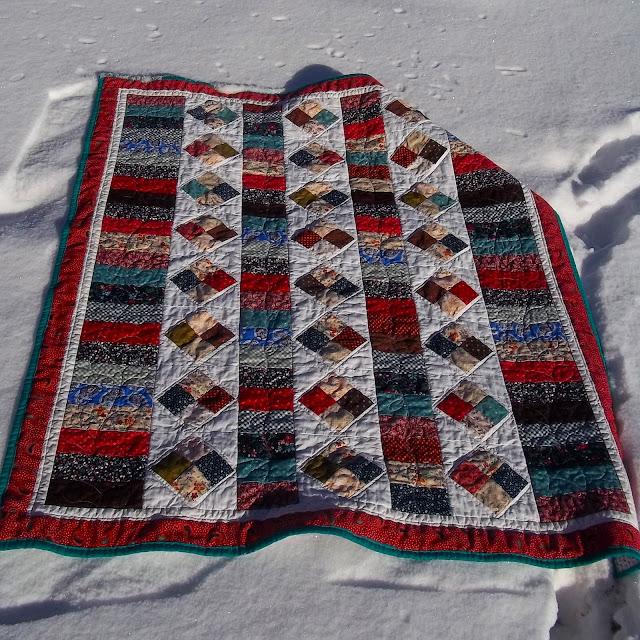
I called this a mystery UFO in my July 2021 post because when I wrote the post, I had a partially made quilt on my design wall with extra fabric in a project box, but no pattern! Since I had been inspired to make the quilt by seeing a finished version on someone's blog, I asked if any of my readers could help me. Wendy of Pieceful Wendy found the post for me - Nancy of Grace and Peace Quilting had made the quilt. I couldn't find the pattern because it was in one of my digital quilting books! Thank you Wendy and Nancy 😊

Mystery UFO is finally getting FMQ

The pattern is called Strip Lash from Stripology 2 by GE Quilt Designs. You can read about my making adventures in my previous post (see Related links).

I stitched-in-the-ditch around the hexies and then each row of hexies. Then I started FMQ the top and bottom partial hexies with some of my favourites - elongated loops (I call them cursive l's), twist (j's and l's) and then some triangle dot-to-dot patterns.

FMQ the top and bottom triangles or partial hexies


FMQ elongated loops (cursive l's), twist (j's and l's) 
and triangle dot-to-dot patterns

This is not a great picture but you can see my Swirling Stars in the top row. The next row of hexies contain a sun, clouds, and snowflakes.

FMQ the partial hexies and the first 2 rows

You can see glimpses of the sun, clouds and snowflakes in the image below.

Glimpses of the sun, clouds and
snowflakes designs

Next came a row of trees.

FMQ a row of trees

Finally some houses.

A row of houses

If these look familiar it's because I FMQ them in the Places and Communities section of my son's Version 2.0 quilt. The designs are from Lori Kennedy's book, Free Motion Machine Quilting 1-2-3.
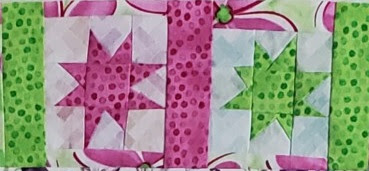
Round 4 of SAHRR


This week we got to add flying geese to our quilt. I wasn't sure what method to use, but I was inspired by Denise of The Quiltery - For the love of geese, to make some foundation paper pieced flying geese. I checked out one of her patterns and drafted my own pattern.

Round 4 - a top row of flying geese was added

Here is a close up of the 5 flying geese that I made using my own foundation paper piecing pattern. 

Close-up of flying geese and wonky stars

You may notice that my pattern below is for 6 flying geese. Let's just say that I made every mistake possible, which included cutting my pattern while trimming. I'm very lucky that it happened on the 5th goose! I took it as a sign that 5 was plenty 😊

My foundation paper piecing pattern

Extra flying geese blocks

After I finished the top row and attached it to the quilt, I decided to see how else I could make these blocks. I vaguely remember that they weren't that difficult to make. I found a post in Simply Handmade Everyday by Kristin Esser with a tutorial on making flying geese blocks 5 ways. Her 5 ways didn't include foundation paper piecing! 

I ended up using the Oversized Stitch and Flip method since I'm accuracy challenged! They worked out very well. I now have 5 extra flying geese on the design wall and have fabric to make a few more. I'm going to see what Round 6 brings before I add them to the quilt.


What I learned
  • For my FMQ, I should have spent more time practicing my Swirling Stars design. The fabric is so busy that looks fine.
  • I love Lori Kennedy's pictural designs and am looking forward to making cars, pencils, apples, etc.
  • I actually know who the baby quilt is going to, so I'm going to have to figure out how to quilt a teddy bear!
  • I considered using the No Waste method that makes 4 flying geese blocks at a time, but those blocks all have the same middle piece. I wanted them to be different, so that method was out.
  • For my SAHRR quilt, I ended up re-doing the bottom row. I had added fabric to make it fit, but I ended up not really liking what I had done. I was also surprised that the hourglasses in the bottom row really didn't show up. The fabric with the multi-coloured dots just faded away. I added two bright hourglass blocks and then re-did the corner blocks. I like it much better.
  • I'm not sure if I have enough fabric to make a much larger quilt. I would rather incorporate the extra flying geese blocks into the next row if it makes sense. I guess I'll figure that out on Monday!
Related links

Linking parties
I'll be linking up the SAHRR quilt at Anja Quilts. Let's go see how everyone is doing on their quilt! Put your foot down, Sew & Tell, Midweek Makers, Needle & Thread ThursdayFinished (or Not) FridayCan I Get A Whoop Whoop?Peacock Party, Patchwork & Quilts

Free Motion Mavericks


We've had some lovely FMQ last time! 
Chris from Chrisknitssews made this lovely Carpenter Star baby quilt. She quilted it with gentle curves and lines. What a lucky baby!
Carpenter Star baby quilt by Chris

Melva is carefully quilting a quilt for a client. It needed some work, but she's doing a great job (I peaked to a later post!)

Melva carefully quilting a quilt

Gail made a second fabulous Lone Star quilt in some beautiful Island Batik pre-cuts and dark green. She FMQ it with small arcs in the diamonds and fake feathers on the grey. 

Gail's fabulous Lone Star quilt

Frédérique of Quilting Patchwork Appliqué made a baby quilt for the neonatal care unit. She FMQ the centre diamond densely and then added light curves for a soft and smooth quilt.

baby quilt for the neonatal care unit by Frédérique

It's now your turn 😊

You are invited to the Inlinkz link party!

Click here to enter

Tuesday, February 14, 2023

So many projects on the go!

Welcome! Have you ever felt like your quilting life is out of control? Since finishing Version 2.0 I have been working on more and more projects. Some are classes, others are my usual TextileArtist.org workshops and then there are those squirrel projects from who knows where. 😃

2023 Stitch Camp


This year's Stitch Camp at TextileArtist.org was a revised version of the Gwen Hadley workshop from June 2021. Since I hadn't done the original workshop, I thought that I would give this version a go. TextileArtist.org does an amazing job with their workshop and Gwen Hadley is very popular. I just hadn't participated because I had tons of other projects on the go and it involved paint. I am getting more comfortable mark making with paint but it's not my favourite thing to do. I do like how it came out.

First cloth is heavily marked

The first cloth is heavily marked, half in one colour and the other half in the second colour. We added little bits of the "other" colour in each half. I used many tools for mark making, including the bottom of a plastic insert from an assorted box of crackers.  

Second cloth has more background showing

We used the same colours for the second cloth but applied the paint marks sparingly. I used many of the same tools but added a plastic fork as well as the end of a swimming noodle. For both pieces I used Pebeo Setacolor  - a shimmer opaque turquoise and a glitter tourmaline (purple/fuchsia). I figured that they would play nice together 😊

The next step is to cut these two cloths up and join then back together with stitches, appliqué, etc. The suggested project is to stitch together a long narrow band such as a snippet roll. For this project, I would rather make an art piece that I can attach to a canvas frame. 

Starting to put some stitches in to blend the pieces

I've put everything together (i.e. fabric, yarn, thread, etc.) to work on the project. This is the best way that I've found to keep ongoing projects. Every once in a while, if I find something that could be used for the project, I just add it to the bag.

My project so far.


Rocks, Pebbles & Stones, Oh My!


The Rocks, Pebbles & Stones, Oh My! workshop was taught by Ana Buzzalino, through the Craft Napa 2023 Uncorked at home (virtual). When I saw the images for the course, with those rocks attached to her art quilt, I was hooked.

Ana is a great teacher and her work is wonderful. We learned 3 techniques for making and attaching rocks to our work. The first is to use the background fabric to make the rock, sort of like trapunto. For me this was the easiest technique to use.  

My project so far

I found an amazing piece of painted fabric in my stash. In the picture above I've covered the top sections with different blue fabric since I want it to be more of a water and beach scene. 

Here are some of the photos of my trapunto-like process of making rocks and pebbles. For this technique, it was easiest to work with the padding and background fabric within an embroidery hoop, underneath the top fabric.

Adding the batting over the back

Stitching the first rock

Keeping the fabric as tight as possible and having as little gathering fabric as possible was difficult. To hide these pleats, I'll be adding beads after the rocks are finished. This covers up the pleats, looks like sand and gives a wonderful effect.

Pinning the fabric to stitch a second pebble

Three rocks or pebbles imbedded within the piece

We learned two other methods of making rocks or pebbles. The first is to create a flat stone using a cardboard  template while the other used more batting and stiff interfacing. These can then be attached by appliqué to the piece. Again the most difficult part is getting rid of pleats because rocks don't generally have them 😁

A collection of stones on a partly FMQ background


Card featuring a Meditation block


A couple of weeks ago I needed to send a card. Since I have lots of blank cards and envelopes in my stash, I though that it might be the time to see what I could make.

Hand-made card using a Meditation block

I attached my favourite meditation block with natural elements to make the card. I stitched the corners of the block into the paper to attach it. I really like how it turned out. This is a great way to use meditation blocks.

Card with natural elements


What I learned

Stitch Camp
  • I enjoyed the mark-making process in Gwen Hadley's workshop. 
  • There was also no pressure to make it look great since it would be cut up.
  • When cutting the fabric, I was nervous because the fabric's weave is quite open. I think that the paint kept it from fraying too much. Besides, I'm sure that I'll be adding some frayed bits for effect!😊
  • A week was not enough for me to get this workshop done but then I always take it further, and of course having all of these projects on the go isn't helping. 
  • I've arranged all of the materials in a lovely bag that I can grab at any time. This one is coming with me on holidays. I just need to ensure that I have some good contrasting thread and material so that things don't all blend into a puddle!
Rocks, Pebbles and Stones
  • The first thing that I learned is that I need to read course descriptions better before signing up! When I saw the images of Ana Buzzalino's art pieces, I had no idea that the stones were made of fabric - they are that good! So, I though that I was going to learn to attach stones to art quilts, not make the stones! 😁
  • I'm not sorry that I took the course. I did learn new techniques and the teacher was terrific, but it's going to require a lot of practice before my stones look like the real thing.
  • I'm not sure what I want to do as a finished piece. I will be adding shells and driftwood with embroidery, like I did in the Embroidered Seascape workshop (see link below). That would be very cool, but I'm not quite ready to tackle that yet. One day inspiration will crash into my consciousness!
Card featuring Meditation blocks
  • I'll be making more of these and playing with that concept!
  • I'm not sure how the card survived the postal service - I hope that the recipient didn't end up with a bunch of crumbled bits at the bottom of the envelope. I'll have to work on that if they are going to be mailed!

Related links
Linking parties


Project details


Card with Meditation block - Natural Elements
Meditation block made based on Claire de Waard's workshop
Card size: 5" x 6⅞"
Material: Meditation block made with fabric, sari yarn, painted fabric, thread, yarn and leaves and onion skins glued to paper; card is ivory with deckle on acid free paper
Techniques: embroidery and stitching


Thursday, February 09, 2023

Hourglass blocks at Free Motion Mavericks

Welcome to week 419 of the Free Motion Mavericks linking party. I hope that you are all enjoying what ever February is bringing 😊 We are expecting freezing rain this afternoon, so it's a perfect day for staying indoors and stitching!

HST and Hourglass blocks


I was so focused on making half square triangles (HST) that I was surprised that they didn't end up looking like hourglass blocks! Wow - I really do need to do more traditional piecing!😁 As always, Google to the rescue! I found Missouri Star's Hourglass Quilt Block video and was back in business (see Related links below).

Round 3 - Hourglass block

Since I needed to ensure that my centre block and first border didn't disappear after making the very colourful wonky star row in Round 2, I used more fabric from Round 1. It really does ground the quilt. At first, I only made one row of hourglass to make sure that I liked it. After I saw the results, I make more hourglass blocks and put the rest of the borders together.  

Round 3 - trying out the hourglass block on one side

I didn't take the time to think things through - so I did a lot of MacGyver(ing). Oh well, once it gets quilted (let me at it with some FMQ!), it will look just fine 😊. 

What I learned
  • I've been very scattered lately. This is fine for mindful embroidery (which I've been doing tons of!) but not very good for piecing blocks.
  • My second batch of hourglass blocks are not quite the same size as my first batch because I trimmed my HSTs and was wondering why they didn't look like hourglass blocks! I even cut through one HST thinking that I could turn it into an hourglass 😒. Turns out that really not how you make an hourglass block!!!
  • Thank goodness for Missouri Star videos. Unfortunately she didn't address how to sew these blocks together! It was only as I was finishing up my last row that I figured out that if I had ironed each block in a different direction, that they would have nested up. I really fought with a few of those blocks to get them sewn up!
  • Next week is supposed to be a quiet one, so I hope to take more time figuring out Round 4 and get this quilt squared up too!
  • I just been reminded of something that I know but didn't think about when I was having a hard time fitting my hourglass blocks into the rows. In her Round 3 post, Quilting Gail suggested that if you're not sure if the blocks will fit, to add a blank block or two to make it fit. That's what I did in Round 2 - I wish I had remembered this option. I'm writing this down here so that I will remember it! Thanks Gail!
  • Update: Feb 13 This weekend I was in a more focused and patient mood so I un-did my bottom row and put it back together again with new hourglass blocks. I also fixed my MacGyvered end blocks - it looks much better now. I'm going to post a picture on Instagram but you'll read all about it in my next post.
Related links
Linking party

Free Motion Mavericks


Did you get a chance to do some FMQ this week? I didn't, but if you did, I hope that you'll consider linking up! Last week Melva made a Colorado wall hanging. I love how she attached prairie points to make the mountains and then echoed them and added more mountains in the back. Very cool!

Melva's Colorado wall hanging

Sandra has been doing some great work for this year's Project Quilting. For the third challenge, she made a lovely baby quilt using the 54-40 or Fight block pattern. It was really interesting to read about what the block stood for and how the "54-40" line would have changed history had it gone ahead! As usual, Sandra did a wonderful job quilting it with flowers, leaves and loops! 

Sandra of mmm quilts and her Project Quilting 14.3 baby quilt

Gail made a lovely batik basket for her “One Gift a Month” 2023 Challenge. Those Island Batik fabric are just so yummy! 

Gail's lovely batik basket

It's now your turn to link up!

You are invited to the Inlinkz link party!

Click here to enter

Saturday, February 04, 2023

Wonky stars and a hand-made journal

Hi. I hope you are staying warm! Our cold spell is supposed to end by tomorrow - I don't remember being this cold in a very long time! 😮 This post is a little update on the Stay At Home Round Robin (SAHRR) and my latest home-made book.

Wonky Stars


The first thing I did when I learned that we had star blocks in our SAHRR quilt was to find my post on Wonky Stars. It gave me the link I needed and told me to be very careful because it was easy to get it wrong (which of course I managed to do!)

The baby quilt...so far

I love these wonky stars and the fabric that I used, but I'm a little concerned that it might over power the rest of the quilt. That's why I only made one border. I'll have to see what the next round brings us to figure it out.

Wonky stars with a lovely ombre background


Journal with a Butterfly Binding


It's been a while since I made a journal. I've missed it. Since I'm going to a birthday supper tonight, I thought that I would whip up a journal. It was a lot of fun 😊


Journal with a butterfly binding

I love how a slit of the binding shows between pages. 

Journal with binding showing between sections


I created a pocket with the inside of the front and back covers. I didn't want to glue it down but I'm not sure that washi tape is the answer. I'll have to work on that!

Back panel cut into a pocket

When people make a journal, they usually take a picture of the binding to show what it's like. This is a version of a butterfly binding. You may notice an embroidered "Off the Grid" sampler in the background 😁 It's finally done. I'll be writing a post about it soon!

Journal with butterfly binding showing
and a peek at the finished "Off the Grid" sampler


What I learned
  • I should have considered my very colourful fabric before I made the border. I thought that the centre block was colourful but it's very subdued compared to my top border. It's all very relative isn't it?
  • I may undo the border and use slightly less bright fabric around the wonky stars....I'll wait to see what the other rounds bring us.
  • I enjoyed making this journal. There is not enough time to do everything that I want. I know that I can prioritize things, but really, I want to make it ALL!!!!!
  • I really love how my "Off the Grid" sampler came out. For someone who didn't care what colours that I would use, they are all playing together well. I just noticed that it's upside down in the photo above. Oh well, more this piece in the eventual post!

Related links

Linking parties
I'll be linking to some fun linking parties, especially the SAHRR link up for this week! Patchwork & Quilts, Oh Scrap!, Design Wall Monday15 Minutes to Stitch 2023, Sew & Tell

Project details
 Hand-made journal with butterfly binding    
 6" x 8¼"
 Materials: scrap binding paper for cover, perle cotton thread, craft paper
 Technique: journal with butterfly binding


Thursday, February 02, 2023

A new art project with FMQ on Free Motion Mavericks

Hi! Welcome to another week of Free Motion Mavericks. Today I have some free motion quilting (FMQ) that will be enhanced with a lot of hand stitching. I'm still trying to figure out what to do exactly, but I have ideas 😊

FMQ an image transferred to fabric


This is the first panel of a project that includes photo transfers on fabric. The transfer came out OK (more about that in the What I learned section below), and was clear enough to FMQ. I did use a pencil to outline some of the less prominent sections and then added the FMQ on top.

FMQ on a black and white image of fish in
their habitat, transferred on fabric

Here is the original photo in colour.

Original photo of fish in their habitat.

I transferred only one colour photo. Here is the result. I love the soft colours of this one. It's actually a little brighter in real life.

A beautiful yellow and blue fish that I
 chased around to get a good picture.

Here is the original photo.

The illusive little guy kept darting in and out of other slower fish.
It took many tries before I got a decent photo!

Image transfer


This project is the latest TextileArtist.org's Stitch Club workshop. Our teacher is the wonderful Cas Holmes who showed us how to make an image transfer onto fabric using acrylic gel medium or acrylic paint. Depending on your image, you can get some pretty cool results. The process is like using photo transfer medium but I think that the finish is not as rubbery. 

Here is another photo that I printed in black and white and used the gel medium on to transfer.

Another photo of fish in their habitat

It's quite difficult to see but I used a light box to trace out the images. I did a tiny bit of FMQ but decided that I will embroider this one instead. 


Last photo image that worked

I have two other photo transfers that really didn't work well. I think that my photos didn't have enough contrast. I will be using those two to practice embroidering so that I don't mess up the images that did transfer better.

Update February 5, 2023

Embroidering the different pieces


What I learned
  • If you are transferring black and white images onto fabric in this way, I believe that you require a lot of contrast in your photo.
  • I have been wanting to make an art quilt about fish for a long time. I have some great fish fabric but most of the fabric are rather large scale so that I would have to make a large quilt. I'm not ready for that, so this is a great way to practice and see what I can do on a smaller scale.
  • I have some beautiful stones, beads and shells that I'll be able to incorporate into this piece.
  • I do have an amazing batik background that will be perfect (I hope) for this piece. I guess we'll find out eventually how perfect it is 😊
  • I'm glad that I have a couple of photo transfer to play with before I start stitching into the good ones. I'm a little nervous about this.
  • In case you're wondering, I took these photos at the Ripley's Aquarium of Canada in Toronto earlier this year. It's all great but there is a section that is truly beautiful. This is where I took most of the photos.
  • I'm still fascinated with photo transferring and have more techniques to try. I'm sure that you'll read about these eventually here 😉

Related links

Linking parties
I'll be linking up to many fun linking parties. Why not check them out after you've linked up below? Sew & TellPut your foot down, Needle & Thread Thursday, Off The Wall Friday, Finished (or Not) Friday, Can I Get A Whoop Whoop?, Peacock PartyPatchwork & Quilts, Slow Sunday Stitching


Free Motion Mavericks

Welcome to week 418 of Free Motion Mavericks. I'm really glad that you've been dropping by and linking up! We have four FMQ projects to share from last week. 

Melva finished her Ladders and Steppingstones and used FMQ outlining feathers and vines and leaves. It's such a lovely comfy looking quilt. If you didn't see it last week, you'll want to check it out!

Ladders and Steppingstones by Melva

Quilting Gail participated in the Shades of Blue blog hop. She made 3 runners and then used these to teach 3 different techniques on how to bind them in a class. She used different stitches on her machine to secure the binding. What a great way to participate in a blog hop and create a teaching aid!


Quilting Gail's runners for the Shades of Blue blog hop


Sandra of mmm quilts participated in the Fast and Fun Blog Hop with Villa Rosa Designs. She adapted one of the patterns and made a stunning quilt called The Art of Riding Thermals. The quilt looks so intricate but it's all the same block going in different directions. Sandra used a double loop meander and some straight lines in the quilting - it's really amazing. 

The Art of Riding Thermals by Sandra of mmm quilts

Dawn of Quilting by Dawn, took a class and made a lovely improv quilt. After the class, she added a border and quilted it with straight lines. It's a very effective way to quilt it and I love that she turned the piece on its side so that it looks like flames! She called her piece, Flame your Passions


Flame your Passions by Dawn

Thanks so much for joining us! Now it's your turn.

You are invited to the Inlinkz link party!

Click here to enter