
Hi and welcome. Spring is finally here after our last snow storm. The snow really encouraged the Spring bulbs to appear! What a wonderful sight! I've been appliquéing, quilting and making my 3D Spring Tulips piece. There sure is lots of learning going on here!😊
Spring Tulips - the background quilt
Although I was itching to start playing with the 3D part of this piece - I had to start with the background, which was to make quilted tulips. I make a sketch of some of the tulips because I find it hard to place tulips in front of each other (or anything else for that matter).
 |
| My first sketch - at least they look like tulips😁 |
 |
| Second sketch simplified to make templates |
 |
| Tulips modeling for the sketch! |
 |
| Tulip templates |
I didn't take any process pictures but I cut my hand-dyed pink fabric roughly based on the templates and then appliquéd them to my gray background fabric. I cut the leaves from dark green hand-dyed fabric.
 |
| Appliquéd tulips with a rough pattern of the vase |
Free Motion Quilting (FMQ) the tulips and leaves
I FMQ the tulips and leaves before attaching the vase to the background. The vase in this picture is attached with pins and is too narrow. That's why I decided to add side panels to it.
 |
| Trying out the vase before FMQ the tulips and leaves |
To make the vase, I used a piece of hand-dyed organza as the base, added some Solvy water soluble stabilizer, snippets of fabric and organza, some thread and finally a second layer of Solvy. The organza gives it a lovely translucent quality.
 |
| Vase made from organza, Solvy water soluble stabilizer, thread and snippets |
The vase wasn't quite wide enough to get the depth that I wanted, so I stitched up a side panel and then cut it in two vertically to apply to each side of the vase. While I was making the side panel, I seemed to be playing chicken - to see which of my thread, bobbin or spool, would run out first. The bobbin ran out first😉
 |
| Side panel with thread used |
 |
| Side panels cut |
Before attaching the vase, I FMQ the tulips in the background.
 |
| FMQ tulips and vase attached to background |
At this point, I've attached the sides of the vase to the background, but not the bottom. I'm hoping to make it straight but also tapered. That will be one of the last things that I'll do after making the tulips and FMQ the whole background.
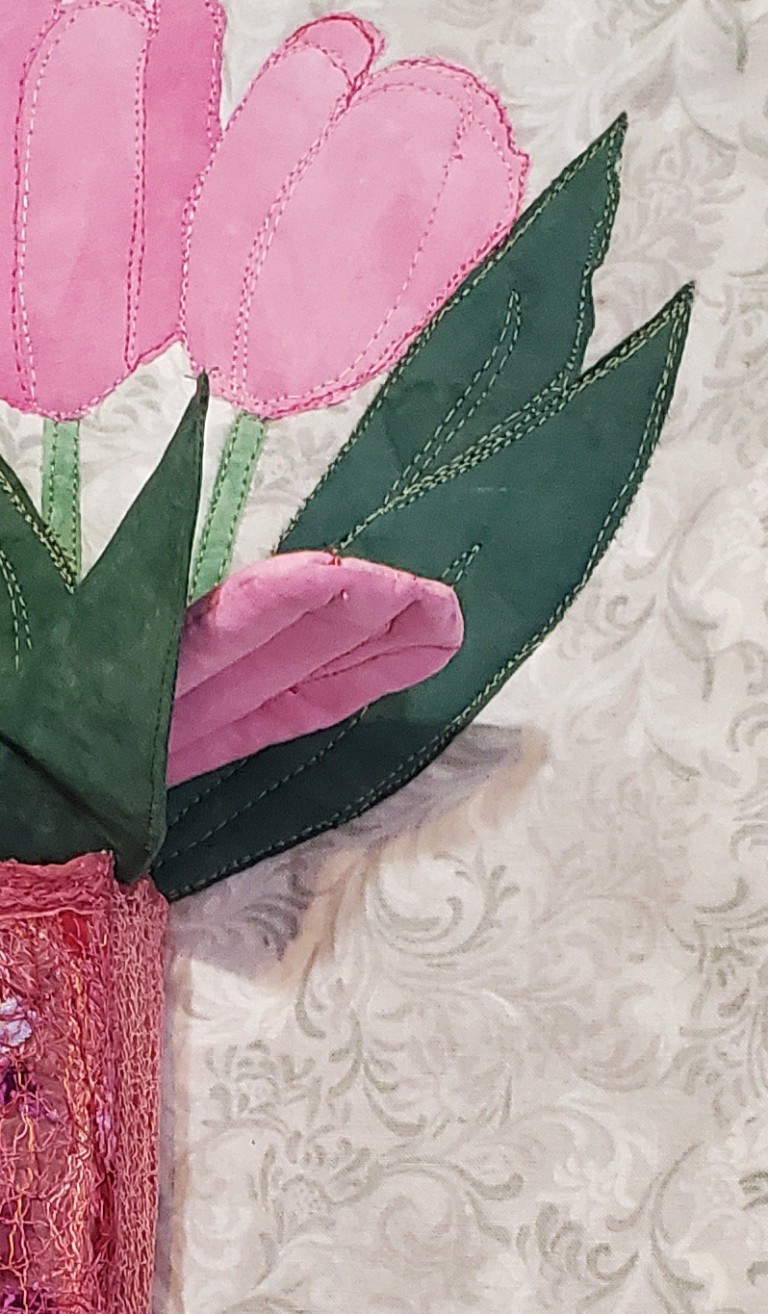
Making Fabric Tulips
I've been experimenting with making tulips with fabric. The first one was a bust, but I had to make it to figure out what I wanted or didn't want. It was just a flat but quilted version of the background tulips. Nice try but not round enough.
 |
| First tulip - too flat! |
I then made 3 thread tulip petals the same way that I made the vase. Much better 😊. I used a flat tulip as the centre and sewed it together to make it cylindrical. After that I attached the 3 thread petals by hand-stitching them around the centre. Once that's done, it's a matter of attaching the tulip to the stem and then add the leaf.
 |
| Second tulip - much better |
 |
| Close-up of the second tulip |
 |
| Tools and process for making the fabric tulips |
I did Google how to make fabric tulips. It's not really the look that I wanted but I have used the idea of the stem and the leaf from the tutorial. If you're interested in making easier fabric tulips, you may want to check out the tutorial in the Related links section.
What I learned
- I learned that with a little bit of practice and patience, I can draw a rough sketch of tulips. When you only want an idea of it as opposed to a great picture, sketching is doable.
- A photo is useful, but sketching makes you think about what comes first (in front vs. behind) and the shapes.
- Printing a bigger version of the second sketch helped me make those templates.
- For the first tulip that I created for the background, I cut up each individual pieces of the tulip. It was difficult to remember where to add an allowance so that pieces would overlap, and it didn't turn out any better than just cutting out the whole shape and FMQ the details. Thank goodness!
- As always, I enjoyed FMQ the tulips, the stems and leaves onto the background. I'll have to finish FMQ the rest of the background when this is mostly finished.
- I don't know if or how I should finish the vase - should I place a table under it or just make the piece end at the bottom of the vase? I know that a vase shouldn't just float in the background...but I'm not use how to handle that. Any suggestions would be appreciated.
- I really enjoyed using the pink organza as a background to the Solvy water soluble stabilizer. It gave it stability and make it translucent instead of partially transparent. I don't really want the stems and leaves to show up too much through the vase. I may have to stuff it a little to get some depth.
- I'll be making a batch of petals with the pink hand-dyed fabric since I don't really want to tulips to look too much like the vase. I'm not sure if that will make a difference but I'll know after I've finished one.
- I also need to remember that the thread could be visible on both sides, so I'll have to use darker thread (I used very pale pink thread in the bobbin and it looks white ).
- I was using a production line for making the stems - they are such a pain, but I am slowly getting the hang of it.
- Little bits of batting is great for stuffing the stems, so I'm glad that I kept some.
- For the first time, I sewed my batting pieces together with a zig-zag stitch instead of using the iron-on tape. It worked really well and is less expensive.
- Spring Tulips is my April One Monthly Goal (OMG). It's for Fibre Fling 2024.
- In Related links, I'm including 2 links for making different types of fabric tulips, in case you're interested.
Related links
- March Table Scraps Challenge finish and April's OMG, March 30, 2024
- How to Make Fabric Tulips | a Shabby Fabrics Craft, YouTube
- DIY Fabric tulips, YouTube
Linking parties
I'll be linking up to many fun linking parties. Why not check some out, after you've linked up below? Midweek Makers, Put your foot down, Needle & Thread Thursday, Off The Wall Friday, Finished (Or Not) Friday, Patchwork & Quilts, 15 Minutes to Stitch 2024, Oh Scrap!, Slow Sunday Stitching, and Tips and Tutorials on the 22nd.
Great news! I was featured on Needle & Thread Thursday 😁 Thanks Kelly!
Free Motion Mavericks
Welcome to week 477 of Free Motion Mavericks.
Last week Deb from A Scrappy Quilter was quilting the first of two charity quilts for her guild.
 |
| Deb quilted one of two charity quilts |
Frédérique, of Quilting Patchwork Appliqué is FMQ her Jardin de Corail (Coral Garden). It's really coming along 😍
 |
| Frédérique is FMQ her Jardin de Corail (Coral Garden). |
It's now your turn!
Your tulips are absolutely beautiful!!!
ReplyDeleteThanks so much Gail. I seem to have missed a whole bunch of comments! Sorry.
DeleteOhhh that is just so beautiful!! and how cool to bring a permanent tulip into your house!! Pink is so pretty too!
ReplyDeleteThanks so much Alycia. They do add a Spring loveliness in my studio :-)
DeleteElles sont très réussies tes tulipes ! J'aime beaucoup la 2e en 3D, mais quel travail !! Surtout les tiges, ce n'est pas facile de retourner des tubes étroits. Le vase est beau et élégant aussi. Pour éviter de faire un fond compliqué, tu peux ajouter un objet devant le vase, ou un chat peut-être ;D
ReplyDeleteMerci pour la mise en avant de Jardin de corail, il est terminé maintenant et je l'ai lié à ta link party. Merci pour cela !
Et merci pour le partage chez moi ;)
Merci beaucoup Frédérique.
DeleteYour tulips turned out beautifully. I like that you were able to fix as you went and didn't give up on getting the look that you wanted.
ReplyDeleteThanks Kate. I'm so glad that they came out well. I hope to do more 3D pieces, but they won't be flowers! lol
DeleteWow! I really like the dimensionality of your art.
ReplyDeleteThanks Anne-Marie. I'm so sorry for the lateness of this reply. They did come out well.
Delete