Saturday, February 20, 2021

Another Hexie Mania

I hope that February has been treating you well. Personally, I'm getting ready for Spring, whether Mother Nature cooperates or not 😊 Actually after some cold and lots of snow, they are predicting above freezing during the upcoming days. I'll take it!

Hexie Mania

Since the last few weeks have been about resting, I've been adding to my hexie collection. It's about as slow and mindless as it gets. 

Progress on my hexie blanket

This is what it looked like the last time I played with it. Generally the mass of hexies are from the 100 Hexies in 100 Days parties on Instagram (2018 and 2019) #100hexies100days2018 and #100hexies100days2019  You can find out more in Related link below.

Three hexie flowers on one edge

I won't bore you with a play-by-play but here are the highlights 😊

Adding large hexie flowers to the edge

Eight hexie flowers on the border


Adding the ninth hexie flower

My very loose plan is to add flower hexies around the borders and probably some white or beige hexies around those to finish it off.  I now have the width of the lap quilt, so it's a matter of adding to the height and then to keep adding flower hexies around the borders.

What I learned

  • I'm not going for beautiful but I hope that the flowers around the mass of bright fabric in the middle will help bring it together. Anyway it's too much work to give to anyone...this is my mass of bright fabric 😎
  • It's amazing how much this project has grown since the beginning of February. Doing hexies and listening to audio books has been a real treat. Very calm!
  • As I add to the middle puddle of hexies, I think that I'll sneak in a few odd shapes to keep it interesting. A diamond or two certainly can't hurt!

Related links

Linking parties

I'll be linking this post up to many fun linking parties. Why not check them out? Put Your Foot Down, Off The Wall Friday, Finished or Not Finished Friday, Can I Get A Whoop Whoop?, Oh Scrap!, Slow Sunday Stitching, Patchwork & Quilts, 15 Minutes to Stitch 2021, Monday Making, Design Wall Monday, Midweek Makers, 

Thursday, February 11, 2021

More Stitchers' Journals

Welcome to Free Motion Mavericks, Week 318. I'm afraid that this week's trip to Mars has been postponed. 😊 I hope to be back in a fortnight with Mars as a FMQ addition to the Pinwheels & Stars baby quilt. Until then, here are more journals that have not had their post yet! 

Stitcher's Journals

As I mentioned in my last post, I have made many Stitcher's Journals based on Ali Ferguson's workshop through TextileArtist.org's Stitch Club. Here are my latest two.

Nature Lover's Journal - Front

Nature Lover's Journal - Back


Nature Lover's Journal - open

This next journal was made using A3 Kraft paper. I wanted a large journal that could hold my in-progress pieces such as the pieces I've made for my Glimpses of Childhood Places project. I also have larger embroidered pieces that are 8" x 8", which are too big to keep in the smaller journals. This journal measured 11½" x 11½", which is really perfect for these slightly larger pieces.

I wanted to use some old embroidery pieces that I made a few years ago. For the front of the journal, I used a hand-dyed piece of fabric and reverse appliquéd the embroidery to it. Of course as I've been prone to do, I misjudged the size of the area I needed for the embroidery. Thank goodness that the embroidery still fit within it!😊 Below is the image before I stitched the pink border to the embroidery. I then cut and machine stitched the edges of the border.

Framed embroidery piece to add to the front

The journal is made like the smaller journals except that instead of folding the paper sheets in half, each large sheet of paper is taped to another. I ended up folding the Kraft paper about a half inch on the binding edge and then taping it with washi tape.

Front of the Large Stitcher's Journal

I reverse appliquéd the two smaller embroideries in the back - again with hand-dyed fabric. I really love how these came out. It's a great way to use up these lovely embroidered pieces.

Back of the Large Stitcher's Journal

Here is what the inside looks like.

Inside the Large Stitcher's Journal - two pieces made for the "Glimpses of Childhood Places" project

What I learned
  • These are so much fun to make. I did forget to place the cardboard piece on the backing of the front and page covers. I had to make a work-around but it turned out fine in the end.
  • All of these small mistakes creative changes are a symptom of my present mental and physical state - a small burnout. I've taken the month of February off from both work and most of my art. I need to learn to slow down, stay calm 😊 and pace myself. Something I had hoped to learn by now but it's never too late to learn....I am a work in progress!

Related links

Linking parties

I will be linking up to many fun linking parties. Let's go see what's going on in the Quilting World! Put Your Foot Down, Finished or Not Finished Friday, Off The Wall Friday, Can I Get A Whoop Whoop?, Beauty Pageant, Peacock Party, TGIFF with Slice of Pi Quilts, Oh Scrap!. Slow Sunday Stitching, Patchwork & Quilts, 15 Minutes to Stitch 2021, Colour & Inspiration Tuesday Monday Making, Design Wall Monday, Midweek Maker, 

Free Motion Mavericks

Welcome to Free Motion Mavericks, week 318. Last time we had a good number of link ups. Thanks so much for linking up your projects. They don't have to include Free Motion Quilting. 😊 I did want to highlight Sandra's Rainbow Way quilt. She played with all kinds of great FMQ designs and looks like she had lots of fun. She doesn't live that far away from me but you can see from her photos that they have a lot less snow than we do in the Ottawa Valley! 

Rainbow Way by Sandra of MMM quilts 

It's your turn!

You are invited to the Inlinkz link party!

Click here to enter

Monday, February 08, 2021

Catching up on posting projects

 Hi, I hope that February finds you well. I thought that I would take the time to write about projects that were completed recently but not posted.

Finishing a Journal Cover 

In the last few months I finished a special journal cover for a dear friend. 

Finished Japanese Journal Cover - Front
Here is a view of the back.
Finished Japanese Journal Cover - Back

You may remember the original fabric that I free motion quilted (FMQ) last March (see Related links below).

The piece was meant for a larger journal but when I came to make it, I did measure three times, only it was the wrong measurement! 😒 A few weeks later I found a smaller journal that it would fit - actually I think that this new journal is even better 😊. So the journal is made and will go to my friend when we are able to see each other again.

FMQ beautiful Japanese fabric

Making More Stitchers' Journals

In November, in the TextileArtist.org's Stitch Club, Ali Ferguson taught us how to make a stitcher's sketchbook or journal with paper, and then to cover and embellish it with fabrics. This has been one of my favourite projects since it's easy to make, practical and so very beautiful.

The first one

This is the first one that I made, with fabric made during a mark-making workshop with Gregory T. Wilkins. I wrote a post on this journal (see Related links).

My first Stitcher's Journal
using painted and stenciled fabric


Pages within my first journal


As you can glimpse from the inside of the journals, I used a wide assortment of paper. There is some garden printed paper, as well as coloured and white printed paper. I also used different sizes of fun scrap-booking paper. 

Gratitude Journal


For the Gratitude Journal, I used two of the cutest fabrics I have. My daughter loved it.

Pages inside of the
Gratitude Journal
Gratitude Journal - front


Open Gratitude Journal

Back of the Gratitude Journal

Quilted Stitcher's Journal


Front of the Quilted Stitcher's Journal
I made this journal from quilted fabric that I used a very long time ago to make a quilted jacket. I thought that this would be a perfect way to use up some of the scraps. I love it!

Open Quilted Stitcher's Journal


I use this journal to keep my Sashiko stitching samples.

Samples: Rice Stitch and
Rice Stitch Variation 2
Samples: Stacked Running Stitches and
Persimmon Flower


Samples: Zigzag Crosses and
Offset Crosses


What I learned

  • As I mentioned, this is my favourite project in the TextileArtist.org's Stitch Club. Ali Ferguson showed us many ways of making journals. Her journals were a little more organic than mine, but really there is no limit to what you can do.
  • I always have one or two in the process of being made. They are low effort and fun to make. 
  • I'm having problems with the thread that I've used to make these. It needs to be strong enough to pull tightly - something that I tend to over do (I'm always breaking my poor silk thread as I stitch hexies together!) It also needs to be thin enough to pull through a needle. I used a quilting thread for my first one and I think that I'll have to go back to it. It's the best thing that I've found so far. 

Related links

Linking parties
I'll be linking up to some fun linking parties, including Free Motion Mavericks with Muv. Come back on Thursday to link up your FMQ beauties. I'll be my turn to post😊 Monday Making, Design Wall Monday, Patchwork & Quilts, Oh Scrap!, Colour & Inspiration Tuesday, Midweek Makers, Finished or Not Finished Friday, Off The Wall Friday, Can I Get A Whoop Whoop?, Beauty Pageant, Peacock Party, TGIFF with Slice of Pi Quilts, 

Wonderful news! Frédérique of Patchwork & Quilts has featured my quilted journal! Merci beaucoup!

Thursday, January 28, 2021

Going to Space on Free Motion Mavericks

 I've taken a couple of days of vacation time this week since it doesn't look like we'll be going anywhere exotic or even local for a while. What a treat to sleep in and stay in my PJs for most of the day 😊 This is a laid-back holiday with just a few necessities to do, including some free motion quilting (FMQ) on my Pinwheels & Stars baby quilt and writing this post.

Rocket in the air

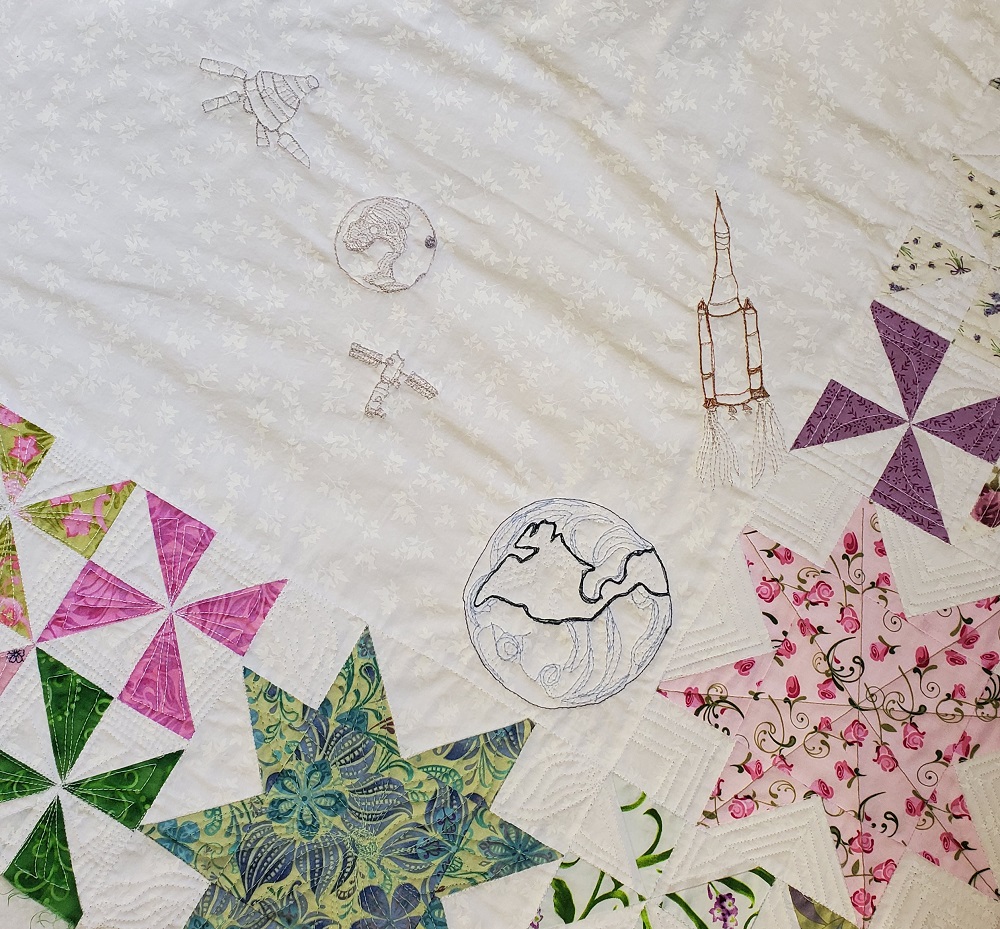
Since the worst part of my initial image was the rocket, I wanted to get it right. I started looking at NASA's and the Canadian Space Agency's websites for something interesting and easy to draw. Well, it seems that space travel has come a very long way since the original landing on the moon (which I remember vividly 😊). It turns out that they are planning another trip to the moon in 2024 - to eventually have a base from which to do deep space travel. How amazing is that?! The mission is called Artemis, who is the Greek Goddess of the Moon and the hunt. Love it! If you want to learn more, including how to draw the rocket, see Related links below.

Earth, Moon and Artemis Project

FMQ the Artemis Project

There are several parts to the Artemis project. There is the Space Launch System (SLS) Rocket, as well as the Orion Space Craft, which astronauts will use on missions from the Moon, and then the Gateway which is where the astronauts will live and work. In the image below, you can see my first pass at the moon. You can also see the Orion Space Craft at the top and the Gateway at the bottom. Both have been drawn on tracing paper. I FMQ the outline of all of these and then added the details once the paper was removed.

The outline of the Moon and the space
craft and gateway on tracing paper

Here is a close up of the FMQ Artemis Project.

Close-up of Artemis Project

In the last post, I wasn't sure what to do about the Earth. After finishing the Moon and the Artemis Project, I decided to add a little more definition to the Earth. I just went around the continents outline again in dark green and then on the outside I outlined the oceans in navy. It looks much better now.


Adding more definition to the Earth

I guess Mars and a few of the other planets in our solar system are next. I'll just have to do more research since I remember very little about the other planets. It would be nice to know more and be a somewhat accurate about our own system!😊

What I learned

  • When I FMQ the Moon from the tracing paper, I put too many details and had a hard time removing the tracing paper. After that, I just FMQ the outlines and added the details after taking the paper away. It worked really well.
  • I had a really great time researching the Artemis Project. NASA even has PDFs to learn to draw the various parts of the project. That was very helpful. 
  • My images are not as accurate as they could be and are probably totally out of proportion but then this quilt is for a baby - she can complain about it when she gets older!
Related links

Linking parties

I'll be lining up to many fun linking parties around the web. Let's see what's going on out there! Monday Making, Design Wall Monday, Off the Wall Friday, Patchwork & Quilts, Midweek Makers, Colour & Inspiration Tuesday, Put Your Foot Down, Needle & Thread Thursday, Finished or Not Finished Friday, Can I Get A Whoop Whoop?, Peacock Party, 

I'm late in linking up, so if you're looking for this week's Free Motion Mavericks, please see Muv's post here.

Free Motion Mavericks

Welcome to Free Motion Mavericks, week 316. Last time we had a good number of link ups. Thanks so much. It's really great to see the creative projects and the lovely quilts and quilting. I'm feeling particularly homey this week and so I'm featuring Sew Yummy's Scrappy Quilt. It made me want to just cuddle up under it 😊 It also made me want to start sewing my scraps together - but I have IOUs that I have to get done before I wonder off on more than just small projects! Hopefully in a few months (a girl can hope!).

See Scrappy Quilts make me Happy - Sew Yummy

It's now your turn!

You are invited to the Inlinkz link party!

Click here to enter

Saturday, January 23, 2021

Map making

Hi, I've been hibernating for a bit. It's always good to get back to creating art and blogging. I hope that you're surviving the winter so far. 😊

Map of another childhood place

Valerie S. Goodwin is the guest artist for TextileArtist.org's Stitch Club. Valerie is a retired architect and college professor, and a well know artist who creates wonderful textile maps (see Related links below).

For years I've been wanting to make a project based on maps and buildings of my childhood places. The last project that I made in the Stitch Club workshop was a hand-stitched piece of the Toburn Mine, part of the Mile of Gold in Kirkland Lake Ontario. I mentioned that this might be the first piece in Glimpses of Childhood Places. Well, it looks like I've made the second piece.

My grandparents' place in Kenogami Ontario

This is just outside of the area since it's in Kenogami Ontario, about 20 minutes north-west of Kirkland Lake. I was in my teens when my grandfather retired from working in the mines. He and my grandmother moved to a small trailer park just off the highway, next to the river and tons of trails. My grandfather spent a lot of time fishing while my grandmother had a small garden, hiked and cross-country skied behind the park. You can see my grandmother's garden and my grandfather fishing in the river.

The trailer park and my grandfather fishing

Google Map - Kenogami ON
Making a map

I started by finding the map in Google Map and then drawing the area that I wanted to work on.

Valerie suggested that we paint silk organza to use as layers for the map. Since I had already dyed a dark blue piece of silk organza, I painted one piece with Tulip Fabric spray paint (Hawaiian Fizz) and used a dropper to add slightly watered down Pébéo Setacolor (turquoise) on the other.

Drawing of the map
with notes

The turquoise was lovely but much lighter than I wanted, so I place a piece of dark green batik under it. This lightened the batik and added soft lovely colour around it.

I drew the map onto a piece of Ricky Tims' Stable Stuff and then started covering it with fabric backed with a fusible web. I didn't want to work directly on the stable stuff since it was too white. I added strips of off-white batik on most of the background except for the river.


I placed the dark green batik to the forest background and then added some of the painted organza over and around it. 

Adding free motion stitching
I used some slightly darker brown fabric for the trailer lots and then some very light yellow for the highway and a darker batik for the road to the park.

For the river, I placed the darker blue hand-dyed silk organza at the bottom and then added the painted, lighter blue on top.

I then free motion stitched everything down. I was going to keep it simple but when I got to the trees I got carried away - so I added more free motion stitching to the water.

Adding embroidery stitches

I used a variety of stitches in the project: backstitch, running stitch, blanket stitch, chain stitch and French knots. Most of it was done with Perle cotton. 

What I learned

  • I had a really hard time deciding on what to use for my map. There was an area around our home that would have been great, but I wanted it to be during the winter. Then I got into all kinds of technical considerations like how to illustrate a hockey rink or a tobogganing hill without adding people or having enough colour when everything is covered in snow. It was just getting too complicated, so I found another spot to illustrate.
  • I bought Valerie Goodwin's book, Art Quilt Maps. It's been on my wish list for a long time, so it was time to get it. It's really great and I look forward to making more maps in the future with Valerie guiding me through her book!
  • Large kraft paper journal to hold on-going projects
    I didn't think that I would be making another piece of my childhood place so quickly, but when the opportunity presented itself, I just had to embrace it!
  • I've created a big journal with kraft paper to hold some of my work-in-progress. This is perfect for my Memories of Childhood Places pieces as well as some of the larger embroideries that I'm working on.
  • I'm not sure how I'll finish this project, but it's probably best to wait until more pieces are done so that I can have a bit of consistency. 


Related links

Linking parties
I'll be linking this post to many fun linking parties, including Free Motion Maverick which is hosted by Muv this week. Put Your Foot Down, Off The Wall Friday, Finished or Not Finished Friday, Can I Get A Whoop Whoop?, Beauties Pageant, TGIFF, Peacock Party, Patchwork & Quilts, Slow Sunday Stitching, Oh Scrap!, 15 Minutes to Stitch 2021, 


Wednesday, January 13, 2021

FMQ the Earth on Free Motion Mavericks

Happy New Year and welcome to my first Free Motion Mavericks' linking party of the year (week 314). I hope that you are a doing well so far. I've been doing a lot of slow stitching but did find time to start work on the centre panel of the Pinwheels & Stars baby quilt.

Earth as seen from space

In late fall, I finished FMQ the pinwheels and stars on the baby quilt and the next step is to FMQ the centre panel - in colour! 😨😊

This is a very rough plan.

Out of this world plan for the centre panel

I found a lovely image of our world as seen from outer space and traced over it on tracing paper. Since there is no way to use a light box through a quilt, I FMQ over the tracing paper. It worked very well. 

FMQ on top of the tracing paper

I outlined the green parts of the Earth first. The rest is essentially water and clouds, so after quilting the land, I removed the tracing paper because the clouds could go anywhere. I FMQ the clouds that are over the earth in white and those over the ocean in blue. 

I don't think that it's finished yet, but there will be lots of time to play and add more stitching along the way, if that's what I decide to do. With a white background, it's difficult to really show the colours of the land and the amazing blue of the oceans. I feel that it might be better to wait to see what the rest of the centre looks like before adding more details to the Earth.

The outline of Earth

Since there isn't much to see in the centre yet, I'm going to let Chevy distract you from the quilt 😊


Chevy putting up with another picture

Next step

The next step will be to add the Moon and a rocket. I drew an image of the moon on some tracing paper and added shadows (based on an image in National Geographic). I think that it should probably be smaller, but what's the fun in that?

Moon drawing on tracing paper

What I learned
  • It's really too early to see if the image of the Earth will be ok, but I have to trust that with a whole bunch of other things in the centre, that it'll be fine - and if it isn't, I'll just add more stitching!
  • Stitching over the tracing paper worked very well. I highly recommend it!
  • I'll have to do my homework and find a rocket that I can draw. 
Related links
  • Last post on Pinwheels & Stars Baby Quilt
Linking parties
I will be linking up to many fun linking parties. Let's see what's going on out there! Monday Making, Colour & Inspiration Tuesday, Midweek Makers, Needle & Thread Thursday, 

Free Motion Mavericks

With a short break at Christmas, it's been a while since I last hosted Free Motion Mavericks. Considering it was posted on Christmas Eve and open through the holidays, we had a fair number of link-ups. Thank you!

I just have to highlight Rebecca's "My Mission Impossible Quilt" which was accepted to QuiltCon. What wonderful news just before the holidays! If you haven't see it yet, you really need to check it out!

Rebecca Grace Quilting

Now it's your turn.


You are invited to the Inlinkz link party!

Click here to enter

Sunday, January 10, 2021

Project Quilting 2021 - Grey and Yellow

I hope that 2021 has been good to you so far. I've been working away at this year's first challenge of Project Quilting: Illuminating (yellow) + Ultimate Gray. These are the Pantone colours of the year for 2021. I guess just having grey as the colour of the year could have been dull, so these are lovely colours together.

Project Quilting Challenge 12-1


I decided to keep it simple. As you may have read in my last post, my word of the year is calm. I took the opportunity to make myself of reminder of my word and intention.

Keep calm & stitch

It was a very straight forward piece. Find yellow and grey scraps and start sewing pieces together. I just had to go into my stash for a little more grey. I decided to keep it simple and created a log cabin improv block with the grey in the centre and yellow on the outside.

I put the block together in one evening but it took most of my free time this week to stitch it. There is no doubt that slow stitching is just that....slow! It did remind me to stay calm. 

Stitching in progress

After stitching most of the inside grey section, it was time to square off the piece. Lesson learned: if I don't do this before the piece is finished, I'm bound to stitch where the binding goes and cut off some of the stitches. At this point I prepared the scrappy binding and attached it. Then I finished stitching, knowing that I would now stay inside the lines!


Adding more stitching once the binding is on

Here are views of some of the details.


The grey was stitched mostly with running stitches

For Christmas, my son got me the paper copy of Sharon Boggon's Creative Stitches for Contemporary Embroidery. I used Sharon's book for inspiration. I didn't want to get too fancy with stitching but I used some of her ideas for the stitching layouts. 


Adding beads
and couching
Adding beads and 
trying out stitches


What I learned
  • Yesterday I got a little panicky about finishing the piece on time. So I took a deep breath and decided that it was no big deal if it wasn't finished by the deadline - I could just post it after the party. Problem solved, back to calmness. 😊
  • I absolutely love Sharon Boggon's new book. Sharon is the lady who hosts TAST or Take a Stitch Tuesday on her blog, Pintangle. If  you like embroidery, check her out (see Related links below).
  • Now that I have this new project out of my system, it's time to work on my son's quilt!
Related links

Linking parties

I will be linking this post to Project Quilting 12.1. Make sure that you check out what wonders others have created! 
I'll be linking up to many other fun linking parties. Let's see what's going on in quilting/stitching blog land! Sarah Goer has a new linking party - Show me something that's a challenge, that I've linked up to.
Oh Scrap!, Slow Sunday Stitching, Patchwork & Quilts, Colour & Inspiration Tuesday, Design Wall Monday, Monday Making, To-Do Tuesday, Needle & Thread Thursday, 


Project details

Keep calm & stitch
15" x 11"
Materials: grey and yellow scrap quilting cottons, beads, buttons, embroidery floss, perle cotton
Techniques: improv piecing, embroidery stitching, beading