Showing posts with label feathers. Show all posts

Thursday, January 12, 2023

Finishing up Version 2.0 on Free Motion Mavericks

Welcome to week 415 of Free Motion Mavericks. I hope that you are doing well and that getting back into your routine after the holiday season hasn't been too painful. I am thrilled to say that I finished the free motion quilting (FMQ) of Version 2.0. 😊

Travel Adventure


Before FMQ the borders with feathers, I had added the main images to the Travel Adventure section. I did a little bit of research and found some great things to add to that section. Do you know about Kokopelli, the Hopi fertility god, prankster and story teller? His image has been painted and carved on rocks in the American South-West for over 3000 years. You can read more about him in Related links below.

Depicting our South-West adventures, seen
from the back of the quilt


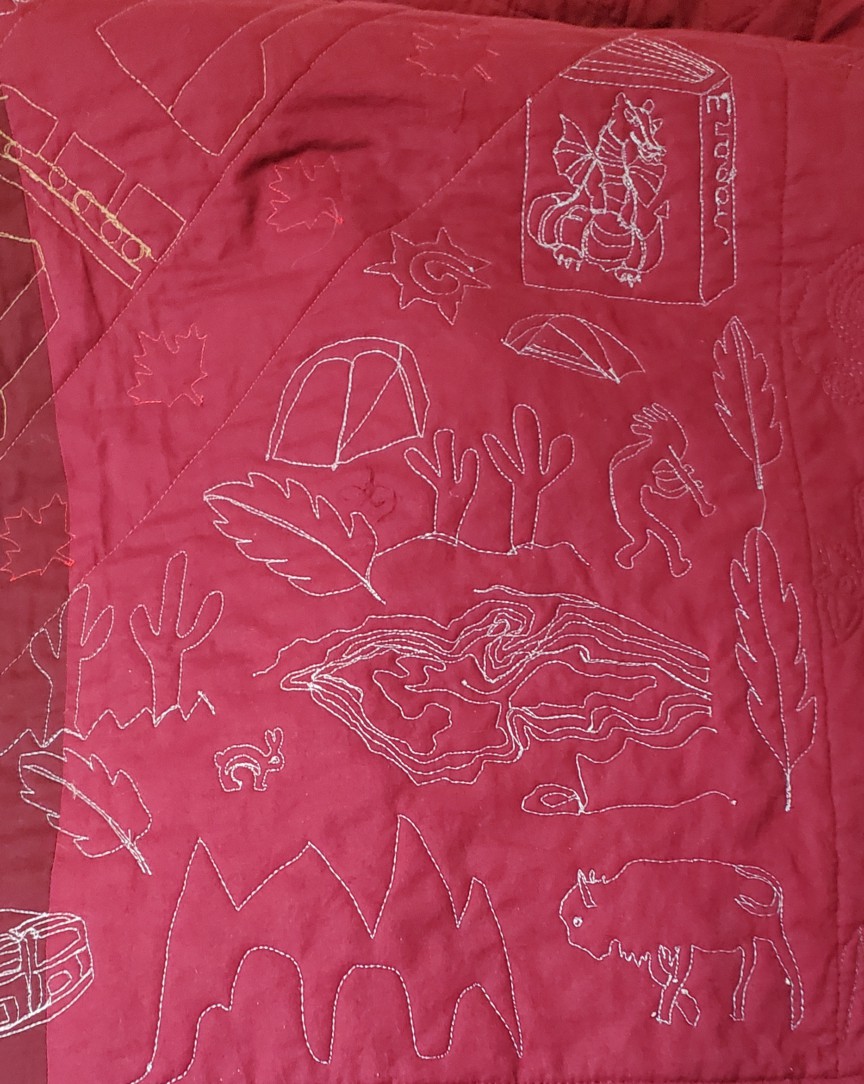
More of the Travel Adventure


Tapering Feather Heart


I had a small space that needed filling underneath the Sun section. It was perfect for a medium sized tapering feather heart.

I may have FMQ what seemed like miles of feathers in the borders, but this smaller heart required a lot more practice to get it looking good within that smaller space. I used Lee Cleland's "Feathers that Fly" book to guide me. I drew the feather heart about 4 times before I was ready to FMQ it. 

FMQ a tapering feather heart

I then wrote out my son and his girlfriend's name in the centre. For my first attempt I used a chalk pencil but I couldn't see it well enough to quilt. Finally a bright blue Frixion pen did the trick.

Stéphane & Sarah in the heart


Eastern Canada Scenes


By this afternoon, all that was left was to finish FMQ the tan stripe that contains Scenes of Canada. I had completed the West and North, but now needed to add the East.

I had about 26" of stripe to quilt and thought that I could include scenes of Ontario, Québec and the Maritime provinces but I seemed to have miscalculated! I started finding images and FMQ from the end of the Eastern section. I started by drawing a glacier and a whale. This was fun because I had started the Western section with a whale in the ocean.

A glacier and a whale

Then came a lighthouse since each Eastern province has a number of historic lighthouses. 

Lighthouse

I had to include some wildlife, and Newfoundland is famous for its puffins. 

A puffin on a rock

I found an amazing photo of houses on the cliffs on Newfoundland, so that was my next design.

Houses on the cliffs of Newfoundland

After finishing the houses, I looked at the stripe and realised that I only had about 8 inches to depict Ontario and Québec (2 of the largest provinces!). I choose the most iconic images possible 😊. As far as nature goes, Ontario is full of lakes, Canada geese, moose and my favourite white pine. 

Capturing the essence of Ontario and Québec nature

Next Steps


I've started hand-stitching the binding. It's a queen size quilt but I should be done tomorrow. It then gets washed and hopefully I'll take some great pictures before I give my son his quilt on Sunday. I'll be showing off the quilt in all of it's glory next week on Free Motion Mavericks. 

What I learned
  • It was so good to see the end of all this FMQ coming!
  • My FMQ was not at its best in the Canadian section and unfortunately I took a lot more space with the images than I had for the Western Section.
  • This section is the only one that has some puckering in it. It's not surprising considering how dense (and uneven) the stitching is.
  • I'm really happy with my Tapering feather.
  • The Travel Adventures section was quickly finished once I found Kokopelli's name and images. Google is pretty darn amazing!
  • The tips that I shared last week on binding (i.e. position and pressing) really helped. 
Related links
Linking parties

I'll be linking up to many fun linking parties. Why not check them out after you link up below 😊Design Wall Monday, Put your foot down, Finished or (Not) Friday, Off The Wall Friday, Can I Get A Whoop Whoop?, Peacock Party, Patchwork & Quilts

Free Motion Mavericks

Thanks so much for linking up! It's starting to look like a party here 😎

Frédérique of Quilting Patchwork Appliqué made a two sided cushion before Christmas. One side is a paper pieced Sapphire while the other side is a lovely bow. She FMQ around the bow to give it more definition. It looks great!

Bow side of the cushion by Frédérique

Sapphire side of the cushion by Frédérique

Sally of Painted Thread finished her Sea Glass quilt. I love those fabrics! It was a challenge to quilt, but her swirl and waves look great. I'm glad that you persevered! 

Sea glass quilt by Sally of Painted Thread

Sandra of mmm quilts had two finishes last week. Her Santa Power quilt is so cute. It's quilted very simply because that's exactly what it needs. You'll want to read her post to find out how it got that name 😁


I didn't realise that Project Quilting had started its new season last week until I read Sandra's post. The make up bag is stitched using one of Christina Cameli's textured quilting. It's very effective. You can check out her post and even buy it on Etsy if it's still there 😊

Sandra's make up bag with Christina Cameli's textured quilting

Now it's your turn!

You are invited to the Inlinkz link party!

Click here to enter

Thursday, December 29, 2022

Feathered Borders on Free Motion Mavericks

Hi! Welcome to the last Free Motion Mavericks linking party of the year! I hope that you have survived the Christmas/holiday festivities😊

FMQ Feathers


Yesterday I free motion quilted (FMQ) two side borders of the Version 2.0 quilt with feathers. I'm not really sure how it's usually done, but I'm going to quilt one huge feather all around the quilt (no start or finish lines). 

Here I am zooming back to quilt the feathers. I had to adjust my technique to suit the borders and the "one feather around the quilt" idea. For the first feather I marked the spine with a chalk pencil but I didn't bother doing that again since I didn't really follow it!😁

Zooming to create a large feather

For that first border I also marked a ½" from the edge of the quilt so that I wouldn't quilt inside the binding (which I always do!)

Here are a few pictures of some interesting variations (nothing complex that's for sure!)

Adding a swirly thing

Varying the size of the feathers

When I got near the end of the first border, I ran out of thread, so I left it there to link up to the top border eventually. On the second border, I managed to turn the corner before having to stop.

Making the corner before stopping

What I learned
  • I didn't practice my FMQ before starting but I did draw some feathers within a 5" area to get the feel of the scale of the feathers. I believe that these are the largest feathers that I've FMQ so far. 
  • It took me a while to get the hang of quilting near the edge of the fabric. That was the hardest thing to get used to.
  • Eventually I got into a rhythm. I would FMQ the spine a few inches ahead, then come back and stitch the right and the left sides as I went.
  • This is very different from my usual quilting of feathers. I usually stitch the spine, come back and then quilt one side and then the other. I'm happy to say that varying my technique wasn't as daunting as I expected. 
  • As I got more comfortable, I started focusing on my stitch length since I tend to make larger stitches on the underside of the feather.
  • I did take a break between sides but when I got near the end of the second side, I skipped a stitch and just stitched over the feather. Then I got to the top, where again it skipped a stitch, and then my hand went numb! I think that's as good a sign as any that it's time to stop 😊
  • I'm hoping that the couple of skipped stitches are due to fatigue (mine and my Jag) and not the need for a new needle, since it is a new titanium needle.
  • My One Monthly Goal for December was to finish the FMQ on the Version 2.0 quilt. It might get done - but the quilt won't be finished since I don't have enough Kona fabric (we had agreed on burgundy) for the binding. Since most of the local quilt shops open January 3rd, I'll be picking some up then. 

Related links

Linking parties
I'll be linking up to many fun linking parties. Check them out after you've linked up below! Design Wall Monday, Patchwork & Quilts, Finished (or Not) Friday, Peacock Party,  

Free Motion Mavericks


Welcome to week 413 of Free Motion Mavericks. Thanks so much for linking up - you really make my day! 😎

Here are the Free Motion Quilting projects from last time. Karin is using Golden Thread paper to copy the quilt design to then FMQ it. What a great way to stitch a design and keep it the same all over the quilt. Here is her lovely Charm Square quilt.

Karin FMQ her Charm Square quilt

Next we have Gail with her beautiful tree skirt that she made for Island Batik’s Fall/Winter ’21 catalogue. Her loops look great on those gorgeous fabrics!

Quilting Gail's tree skirt

Finally Nanette Chopin Cook finished FMQ a couple of quilts. This is her Bunny Quilt.

Nanette's Bunny Quilt

It's now your turn!

You are invited to the Inlinkz link party!

Click here to enter

Wednesday, July 08, 2020

Finished pinwheels and Free Motion Mavericks

Welcome to Free Motion Mavericks, Week 288. This week I tried out different free motion quilting (FMQ) designs on the rest of the pinwheel blocks in the Pinwheels and Stars Baby Quilt.

FMQ the last three pinwheel blocks

Here are the final three pinwheel blocks. I didn't realise until I added the images here that all three blocks have FMQ in both the background and patterned fabrics.

Adding feathers 

Close-up of the FMQ feathers


FMQ echoed leaves

FMQ three lines within each triangle

You may remember that I drew 10 different possible FMQ designs for these pinwheel blocks. Before deciding on the last FMQ design to use, I reviewed the designs that I had used so far. Not surprisingly, most of them where more curvy than angular. To even it up a bit, I made this last one using lines. You can see that I marked one block in red. After that I just drew a dot at roughly each ¼" on the edge to aim for.
Pinwheel FMQ designs used
For the sixth design, I used a curvy variation - echoed leaves instead of echoed diamonds. Finally, for the seventh design, I added the lines to both the background and printed fabrics.

What I learned
  • I've really enjoyed working from a list of already prepared possible designs. I'm usually not that organised but it was worth the effort of finding FMQ designs on the internet and books, and then sketching them out. 
  • There are so many FMQ possibilities. Do you have a favourite? Click on the image to see the details.

Related links
Linking parties
Here are some of the fun parties that I will be linking up to. As well, make sure to link up below at Free Motion Mavericks - your post doesn't have to be FMQ related. Colour & Inspiration Tuesday, Midweek Makers, Put Your Foot Down, Needle & Thread Thursday, Finished or Not Finished Friday, Friday Foto Fun, Can I Get A Whoop Whoop?, Peacock PartyOh Scrap!Monday Making, TGIFF (since Gail said that not finished was fine!)

Free Motion Mavericks

We had a respectable turn out for our last party here - thanks for linking up! If you didn't see them, we had two link-ups by participants of the Stitching Sunshine Blog Hop. 
Denise of For the Love of Geese, made her sun and two flowers using Dresden plates. Her sun is absolutely stunning! Here's a link to her post if you didn't visit it yet. 

Using Dresden plates - Denise of For the Love of Geese

For something totally different, read about Totally Irrational, the striking quilt made by Vasudha of Storied Quilts.

Totally Irrational - Vasudha of Storied Quilts
Now it's your turn!

You are invited to the Inlinkz link party!

Click here to enter

Monday, June 08, 2020

More hand-stitching fun

As you may  have read previously, I've been doing a lot of slower stitching - hand stitching, mediation stitching, embroidery and other fun stuff. I'm having a blast and learning so much.

Making a seashell container


I've enrolled in the TextileArtist.org Stitch Club. It's essentially the same concept as their original Stitch Challenge, but for a fee. After all that they have given to the stitching community this spring, I wanted to keep playing and learning as well as support their great initiative.

The first artist, at the end of May, was Debbie Lyddon. She makes very cool textile art. Since she lives near the sea, a lot of her imagery and techniques come from there. For example, she adds grommets to a lot of her work. These are hand done and are used a lot in sailing boats. Our assignment was to make three containers to hold something special to us or our environment.

I'm going to start with the second container that I made since it's much more like the work that Debbie showed us how to make.

Embroidered sea shell container
Hand-stitched seashell container 

I started by painting the fabric, a white on white cotton that came out really well. For this second container, I learned from the Q & A sessions at the end of the week that Debbie dilutes her acrylic paint quite a bit. I hadn't done that for the first piece and so the fabric was very stiff and a little difficult to sew by hand. The darker blue fabric pieces that have Sea and Shells written on them (with markers) are from the first batch of fabric. I could never have embroidered the words on there 😊

Seashell container with lots of embroidery
Other side of the seashell container

I embroidered the bag before I stitched it together. I love using the feather stitch when I don't have to be accurate and follow a line. This stitch is perfect for making sea weeds.

On this side, you can see that the grommets are smaller. I actually used half of a twist tie to make each of them. On the back of the fabric, I drew the circle around the twist tie. I then cut into the hole, leaving most of the fabric there and stitched very densely around the tie. I used a buttonhole wheel stitch to  highlight the grommets. Inside of the small grommets, I stitched a small piece of netting - the stuff that comes from a bag of potatoes.  
stitching on the inside the bag
One the inside with the cheese
 cloth covering the grommets

On the inside of the bag, with the
netting over the small grommets


For the side of the bag with the large grommets (top image), I used a whole twist tie for each grommet. I did it the same way as the small ones but removed some of the excess fabric from the middle. I then put a layer of blue hand-dyed cheese cloth over the holes - one dark and the other lighter blue.


Open bag with seashells
A peak inside!

For the top of the container, I stitched down a long piece of wire (that I use for hanging frames). I had about ½" of fabric on the inside so I added a row of stem stitching right under the stitching for the wire and then about a ¼" from there, a row of chain stitch keeps the seam down on the inside.

A container to display an arrowhead 


container displaying an arrow head
This container is used to display
rather than contain

This was the first container that I made. It was much more complicated than my second one since I wanted to use it to display rather than contain the arrowhead within it.

The prototype for the bottom of the container

I started by painting the fabrics and then made a prototype for the bottom of the container. Since it worked out, I ended up painting it instead of making another one. After that, I sewed three different fabrics together, the brown, green and blue and then stitched them into a tube. My fabric was stiff but not stiff enough to hold the arrowhead, so I inserted a roll of toilet paper inside to strengthen it.

container displaying the arrowhead
Displaying the arrowhead on a shelf

The arrowhead comes from Northern Ontario. I found it near the swamp at the cottage where I spent all of my summers when growing up. This was probably part of the hunting territory of my husband's community. I only realised this as I was making this display container. On the outside, I used markers to draw the tree with deep roots, and birds. Around the top, I stitched on some beads and feather charms in the four directions.

Inside the container I added a stone from the area as well as cedar, sweet grass and sage. These are not the traditional things that you would put inside a pouch but I didn't have any tobacco. I made this container for my children, who are also part of this community.  

What I learned
  • I am really enjoying learning about all of these techniques, but more importantly, I love expanding my knowledge and appreciation of textile art. Some of it can be pretty out there - and I may not be quite there yet, but I'm loving the journey.
  • The art that the other participants are making is sometimes quite intimidating. However, I'm not letting myself be too hard on my work - I haven't been doing this for very long and we all have our paths to work on. I make sure to save many of the work that I would like to learn from. Sometimes it's just a little detail that I might never have thought about but that's how we expand as artists and makers.
  • I used Perle Cotton size 8 for all of the stitching in these projects. I hadn't used it much previously and really love it.
  • The arrowhead container was quite difficult to make because I had no idea what I was doing!😊 I'm really happy with the way both of them came out.
Related links
Linking parties
I'll be linking up to many fun linking parties. I hope that you'll join me to see what else is going on out there! Monday Making, What I Made Monday, Design Wall MondayColour & Inspiration TuesdayMidweek MakersNeedle & Thread Thursday Off the Wall Friday, Friday Foto Fun, Beauties Pageant, Oh Scrap!, Favorite Finish - June 2020 

Saturday, December 14, 2019

Making a journal cover with practice piece

Don't you love practicing on something and then being able to use that practice piece to make a finished, usable project? That's what happened to my practice piece from last week's Free Motion Mavericks.

FMQ my practice piece

My piece went from this very bright poinsettia fabric to these "cat's eye" shapes with different types of feathers within and outside of the shapes.

FMQ using the leaves as templates
The pink bobbin thread produced this flower.


Finally, adding FMQ filler between the flowers, in white thread, resulted in this!

Adding swirls, paisleys and
echoes between the flowers


A close up of the free motion quitling


It was really great to be adding this filler FMQ between the flowers because I hadn't really done that in a very long time. It's so fun to just stitch and let the quilting do what it wants. 😊

Making a journal cover with the FMQ fabric

When I showed a friend what the quilted fabric looked like, I got such a great response that I decided to make her a journal cover!

I used Christina Cameli's Free-Motion Quilted Gifts course to make the journal cover. This is the same BluPrint (Craftsy) course that I used to make the fabric basket a couple of weeks ago.

This is the front of the journal, with the elastic keeping it closed

Back of the FMQ journal cover

The FMQ journal - front and back


Journal with replaceable booklets

Inside the journal


 What I learned
  • As usual, Christina's instructions and explanations were great. I had to re-do a part, but that was my mistake. 
  • I should have measured where to stitch the elastic - I was able to "fix" it but next time I'll measure!
  • I discovered fold-over elastics. I didn't have any, so I used a plain white elastic, but I'll be looking out for these.😊
  • I really want to make more of these journal covers. I bought a package of three booklets at Winners and will send my friend the replacement booklets with her journal cover. Now I have to go stock up on these.
  • This course has been amazing. I haven't made the zipper bag yet, but it's definitely going to get done...eventually. It's so hard to not get sidetracked from the stuff that I've actually committed to making! So many squirrels - so little time!
Related links
Linking parties
I'll be linking up to Free Motion Mavericks with Muv this week, as well as many other fun linky parties. Let's see what everyone is making! Colour and Inspiration Tuesday, Put your foot down, Off the Wall Friday, Friday Foto Fun, Finished or Not Finished Friday, Can I Get A Whoop Whoop?, Beauties Pageant, TGIFF, Peacock Party, Monday Making, Design Wall Monday, What I Made Monday

Project details

Free Motion Quilted Journal Cover
8½" x 6"
Techniques: free motion quilting, Large Print Wholecloth Quilt,
Materials: cotton, elastic, journal


Saturday, April 14, 2018

Free Motion Challenge Quilt Along update

I've got a lot of projects on the go, but they're not really at a stage to include in a post yet. So here's one update:

Free Motion Challenge Quilt Along with Angela Walters

I've really enjoyed the weekly videos that Angela produces, even if I haven't watched them or practiced them in order. Since I'm behind anyway, I've decided to start with the ones I like.

From Week 7 I did both the Swirl and the Feather Meanders

Swirl FMQ pattern

Feather Meanders FMQ pattern

Feather Meanders from the back 

As I got near the end of the Feather Meanders, I could feel myself getting into a grove. That's why I'm quilting my friend's batik quilt with Feather Meanders. I love it!

Week 8 was Clam shells.

Angela just drew the horizontal lines to make the different rows even but I drew in the first row of clam shells to make sure that they would be relatively even. As you can see, I tried a few variations based on both Angela's tutorial and her eye candy.

Clam shells and a few variations

From Week 6, I practiced the Serpentine. That was tough, even if I practiced a lot with pen on paper. I've always had problems with "S" curves. I seem to have a flair for curls more than "S" curves!

"S" curves or serpentine
What I learned
  • I thought that it would be a great idea to work on sandwiched blocks instead of a whole quilt. In theory it sounds great, but it gets really difficult when you FMQ near the edge of the block.
  • I liked the swirls a lot. If they were a little longer and elongated, they would be perfect for a windy sky.
  • I really liked the idea of clam shells within clam shells (the top right).  
  • My cathedral windows didn't really come out well because the original clam shells were more long than wide. I think that it's best if it's worked within a square, like a grid.  
  • My "S" curves or Serpentine stitch may not be individually great, but when there's a whole wack of them, it's not quite as bad. I think that as long as you don't make something really wildly off, it will probably end up blending in. I don't think that I'll be making rows of Serpentine again but I do like them in smaller areas within a quilt.
  • If you want to practice your FMQ, this is a great way to do it. However, when FMQ on real quilts with fabric that isn't a solid, and using thread that blends, FMQ is very forgiving - thank goodness. 😊 
Related links
Linking parties