Rug Hooking
I met a lovely lady, Robin Whitford of Hooking Outside the Lines, who teaches rug hooking. I must admit that it suited me better to take a virtual class rather than going to the store as it is usually taught. For an introduction course to rug hooking, it wasn't really necessary to be next to the teacher. The technique is really not very complicated. Like anything else, practice makes it easier. That's not to say that it can't get complicated, but for an introduction - it was perfect.
 |
| A rug hooked Echoed Heart |
 |
| Making a practice rectangle and then pulling it out |
One of the things that I like best about rug hooking is that I can just pull on the wool to take it all out. If you don't like it, it's relatively easy to just start over. Of course that also depends on the type of yarn and the backing that you use. Burlap and the wool I used were very forgiving so that it's possible to just start over with the same wool, in the same place on the burlap.
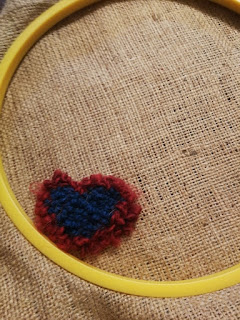
After the class, I wanted to keep practicing because the hardest part it getting the wool hooked on the other side of the hoop. Once your fingers figure this out, the rest is fairly simple. So I started making a shape in the blue yarn. It sort of looked like a heart, so I continued with that shape. Then I got bored and added the red yarn around it (an echo in quilting terms 😊).
 |
| Echoing the heart in red |
 |
| Making a heart shape with blue wool |
Since I want to learn rug hooking to use in my textile art, I knew that I would want to make smaller pieces. I removed the burlap from the hoop and then zigzag stitched around the heart. I also zigzagged around the piece of burlap so that I could continue to use it without it un-raveling.
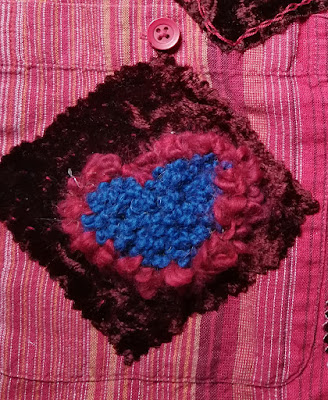
I was very happy with this first piece and incorporated it into one of the art quilts that I'm working on. I used a square of red velour, cut out the shape of the heart from the centre and then reverse appliquéd the heart onto my piece. It was easy to attach because the wool of the heart extends over the edge.
 |
| Reverse appliquéd the heart to my art piece |
The next day, I decided to make a small landscape - nothing like diving right in!
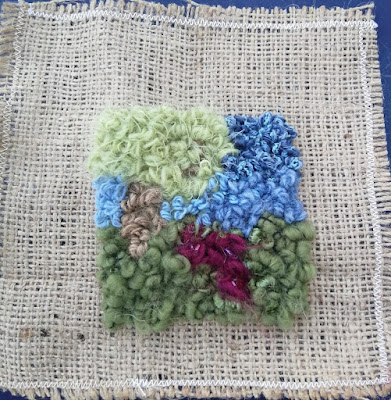
It's wonderful that I can use most of the lovely novelty yarn that I've been accumulating in the last few years. It's great to see how a yarn translates to rug hooking. Some keep their shapes while others end up splitting or getting quite shaggy (like the top of the tree).
 |
| Small rug hooked landscape |
 |
| Close up of rug hooked landscape |
 |
| In progress picture - it needed help. |
My son helped me by suggesting a longer trunk for the tree. It also helped when I added blue yarn for the sky on both sides of the tree. You can see the improvement from the progress image, which mostly looked like a big clump of fuzzy green. I used three different yarns for the sky.
I added some beads to the flowers, hoping to make them look more like flowers.
What I learned
- Rug hooking is very cool. Not too difficult to learn the basics but has so much potential.
- My teacher, Robin Whitford, is very experimental and doesn't follow the rules - my kind of artist!
- I really loved how the different fibres and yarns looked after they have been hooked on.
- The bark was particularly interesting because I used pieces of twine that one of my favourite restaurants uses to tie the paper that wraps their sandwiches. If the twine has never been used, it comes out in distinct curls but once it's been used and pulled out, it became all fluffy.
- I used the hoop to learn, practice and make the first heart shape. After that, I just did the rug hooking without the hoop. That's also how I do a lot of my embroidery unless it's a really precise piece.
- I'm not sure how I will be using rug hooking in my art, but it's great to think of the potential. I do want to experiment with other types of backing. I have some cotton and linen pieces that I would like to experiment on. Actually, wouldn't it be cool to hand-dye the backing material and then add rug hooking to it, leaving some of the spaces empty? Oh the possibilities 😊
- I highly recommend my teacher: Robin Whitford of Hooking Outside the Lines
I will be linking this post up to Free Motion Mavericks which is hosted by Muv right now. I'll be hosting on Thursday so remember to come by. Let's see what's going on and join in the fun! Monday Making, Design Wall Monday, What I Made Monday, Colour & Inspiration Tuesday Midweek Makers, Needle & Thread Thursday, Put Your Foot Down, Off the Wall Friday, Finished or Not Finished Friday, Friday Foto Fun, Can I Get A Whoop Whoop?, Peacock Party, Oh Scrap!, Slow Sunday Stitching,

Wow - so cool! I used to love to do the kits at the stores but this looks so much cooler and more technical!!
ReplyDeleteThanks Alycia, I used to do the latch rug hooking kits too, many moons ago. This is slightly different but I think it's better because you can use any wool and you don't have to cut it up. It's really easy to do the basic stuff, so if you ever get a chance, you might want to try it!
DeleteAnother skill in your repertoire. I think your rug hooking pretties look fabulous.
ReplyDeleteThanks so much Kim. I think that it will be a lot of fun to play with this!
DeleteGreat - I m also a rug hooker. I use wool strips and make on the floor rugs which I love doing
ReplyDeleteHi Maggie, I just went to your post and saw your Cleveland and Poinsettia rugs. Love them both! I'm afraid that before I started this course, I had never really paid attention to rug hooking. It's great that there is a whole new fibre art world out there that I can now understand a little better. Are you working on a rug at this time?
DeleteYou always amaze me with your creative ideas and the skills under your belt. Thank you again for linking up last week.
ReplyDeleteThanks Denise. My favourite thing is learning new things and then putting them together with what I already know. I guess that I'm best at making links between things and asking what if? As always, thanks so much for hosting the link up!
DeleteThat is very fun and a great way to use up bits of yarn!
ReplyDeleteEnjoy your hand stitching!
Thanks Kathy - yes, using bits of yarn and buying more :-)
DeleteThis looks very fun and at risk of becoming addictive :) We wouldn't expect any less from you than a complete dive into the deep end from the very beginning! Thanks for sharing at the Chameleon's Colour & Inspiration Party.
ReplyDeleteThanks Dione, it could become addictive once I have more time to play. Take care :-)
DeleteA very fun way to use your practice pieces. It's nice to stop and learn new skills. Looking forward to seeing what else you decide to make.
ReplyDelete