Monday, December 24, 2018

Christmas Cheer

T'was the night before Christmas and mom is still cleaning, shopping, wrapping and blogging!

I helped decorate my colleague's and my office before leaving for Venice. At least that was done when I came back to Canada! I had one week to get ready for the holidays, and I spent most of it in bed or helping my daughter who was even sicker than I. Oh well, I'm sort of rested and at least we weren't sick during our trip 😊.

Office decorations & hexies

If I'm writing a post, it's probably because there are textiles or fibre involved :-)

My office decorations
My colleague's
decorated office

I created these two hangings years ago. They are both made of wool roving on hand-woven backgrounds.

Snowman hanging

I used to use the hangings to display the Christmas cards....do you remember those days when we sent and received lots of Christmas cards? That was essentially before the internet and social media. Things have changed.

I've kept the prettiest or most sentimental of the Christmas cards. They are great for decorating or making other things.

The office plant is decorated with a double-woven decoration.
Decorating the office plant
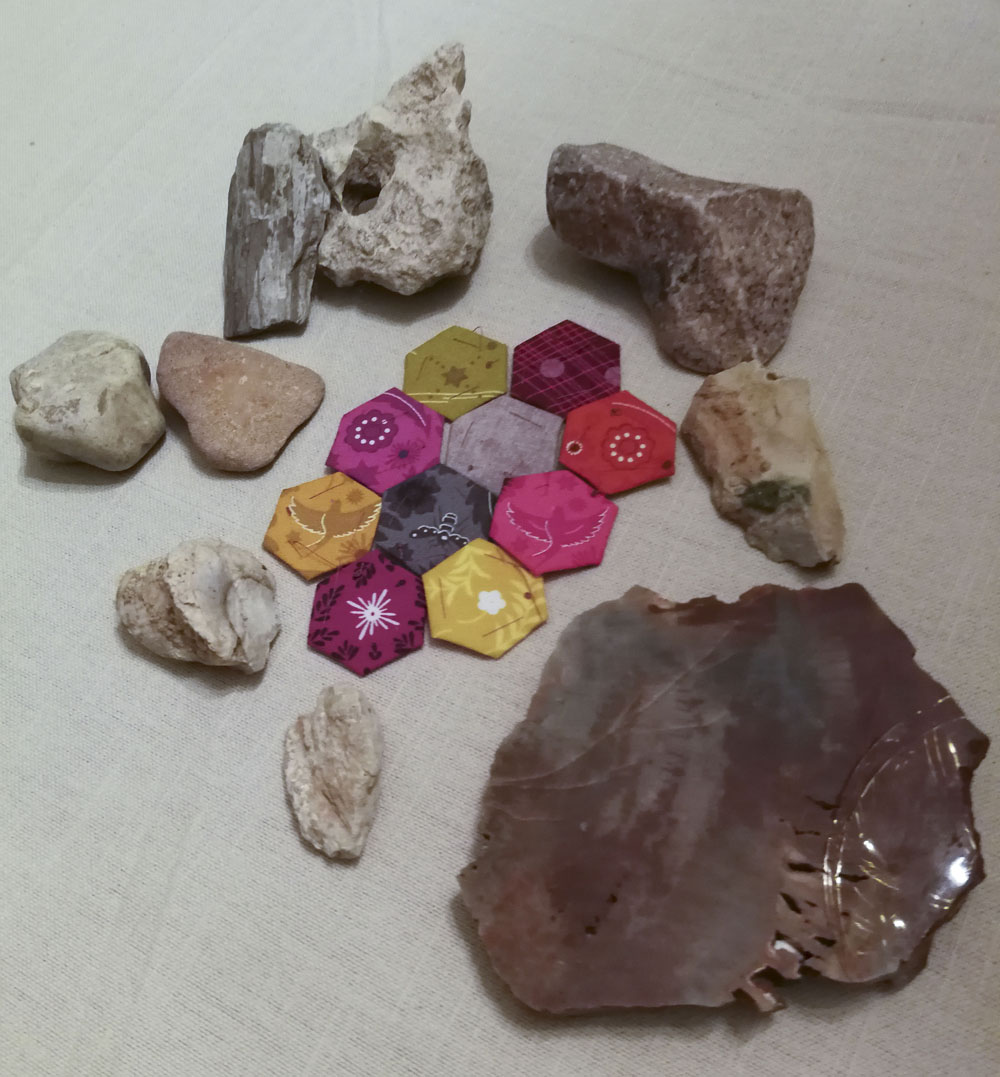
This is the second Christmas hanging with brand new Christmas hexies - made last night!
Christmas hexies
This year I've only taken out a couple of bags of Christmas fabric scraps. I don't have that much Christmas fabric but I knew that I wouldn't be making anything significant this year, so the scraps were fine.

I found enough red fabric to make one hexie and then fussy cut other fabrics for two more hexies. I'll be adding these to the piece I'm making with the #100hexies100days2018.
Light Christmas themed hexies

Dark Christmas themed hexies
Christmas Runner

A couple of years ago I made this Christmas runner for a friend but, of course, forgot to take pictures. Her kids like snowmen, so I added a couple of snowman blocks at each end, with star block in between. I'll look into my Christmas quilting magazine stash to see where it comes from and add it later.

Snowman Christmas runner

Snowman Christmas runner


The back of the Snowman Christmas runner


Season Wishes

I wish you a wonderful holiday season. It's not always an easy time of the year but I hope that you get some time to enjoy your family &/or friends, great food, and some quilting and resting time.

What I learned
  • I don't think that I could have expected to be sick when I got back but this year my family decided to keep everything really simple for Christmas. I hope that we do that each year. BTW, I cleaned (sort of) and decorated the house yesterday with my daughter. The guys had put up the Christmas tree before we got back, so that was a wonderful surprise! I am almost ready.😊
  • I still have a few posts to write before the end of the year, including some exciting news, so look for them soon. 
Related links
Linking parties
I will be linking to a lot of link-ups, so check them out! Monday Making, What I Made Monday, To-Do Tuesday, Linky Tuesday, Tuesday Colour Linky Party, Let's Bee Social, Midweek Makers, Oh Scrap!, Silly Mama Quilts - WIPs, ScrapHappy SaturdaysFriday Foto FunCan I Get A Whoop Whoop?,
I've also linked this post to Sandra's Throwback Thursday since these are almost all older, non-posted projects!


Wednesday, December 19, 2018

A finished birthday bear mini

Birthday season in our family is mostly in the fall. This year I decided that I didn't want to keep buying birthday cards and that I would make each person a mini quilt. In theory it's a wonderful idea (and many of you agreed with me!), however.... it's much quicker to go buy a card than make a mini! So if you decide to do the same, you might want to add some "making" time to your mimi 😊.

Birthday bear mini

If you've been following the birthday card saga, I made a Loon mini as the first birthday card for my brother. I got wise and gave my other brother a free motion quilting practice piece that he had admired a while back and then gave my niece another mini that was already made (three down, two more to go!).

I started the bear mini but ended up giving the poor thing a broken leg (by using the wrong fabric on the front leg instead of the back one), so I used it as a practice piece for my Extended-border binding tutorial. I finally finished my husband's mini yesterday, only a little more than a month after his birthday. 😊

Finished birthday bear for hubby
Forest green is his favourite colour but I didn't have enough of it to finish the mini using the Extended-border binding technique. Since I've been working with batiks lately, I found the perfect brown for the binding.

Isn't that label terrific? This is one of the foundation paper piecing patterns that I get each month in Quilting on the Square's newsletter. This 4" beauty is called Square Stop, from Collection 5, Month #1. You may also notice my printed Ikaprint label on the right side. You can get a 5% discount if you go through Sew Fresh Quilts' website (see Related links)
Foundation paper pieced label


Here are the minis I've made so far with the Made by Marney patterns.


First mini - a loon
First try at the bear - oops!


My next birthday mini, for my Danish sister-in-law, is Olaf the Viking Penguin. The pattern is by Whims and Fancies.
Olaf the Viking Penguin
my next birthday mini
What I learned

  • I still think that making a mini is better than buying a birthday card but next year I'm going to have to give myself more time to get them done. I still have a few forest animal patterns that I'm looking forward to making!
  • Since there are a few birthdays at other times of the year, I'll see if I can plan these out, or make a few when I feel like it (or have the time).
  • I really enjoy trying out new patterns, especially when they're so small. 
  • It would have been nice to make a few Christmas minis but that didn't happen this year. The only Christmas preparation I've done so far is decorate my office since I did it with a colleague, before I left for holidays. I'll be writing a post about this since I have a couple of woven Christmas pieces to showoff share.

Related links
Linking parties
I'll be linking this post to many link-ups. Let's go see what's going on in the quilting world this week!
Midweek MakersLet's Bee SocialTuesday Colour Linky PartyLinky Tuesday, Moving It Forward, What I Made Monday, Needle & Thread Thursday, Design Wall Monday, Monday Making, Oh Scrap!,

Project details


Birthday bear, pattern by Made By Marney
8½" X 8½"
Materials: commercial and hand-dyed cotton, embroidery floss
Techniques: foundation paper piecing and free motion quilting


Sunday, December 16, 2018

Burano Lace

The lovely island of Burano
The highlight of my trip, as it relates to textiles, was the Island of Burano, in the Venetian Lagoon. Burano is renown for its lace and its colourful houses. It's a lovely island to visit, and small enough that you don't have to plan your trip.

Burano

I got to Burano on a vaporetto (water bus) from Venice. I thought of my dad all the way - he would have loved the boat trip! 😊

When I got to Burano, I walked around the island, visiting the more residential areas first. It really was wonderful.
Great door!


I made my way to the more commercial area of the island and visited a few lace shops. Many were having sales since they were getting ready to close for a couple of weeks and would reopen just before Christmas. It sounds like their flood season, the Acqua Alta (see Related links) is often around that time.

Commercial lace - perfect for art quilts 😊


I bought a few small pieces of lace to incorporate in art quilts. These are the more commercial pieces that are apparently still hand made but on commercial looms.

Lace Museum

The lace at the museum was really stunning. I must admit though that the more modern lace were my favourites.

Here are a few pieces that were done in the 19th and 20th century.

This is my favourite piece - so delicate and intricate.
Hand-made lace from Burano
Delicate lace made in Burano
Hand-made lace from Burano
Burano lace on a table runner

Lace doily


Hand-made lace and pattern from Burano
Lace with pattern
Hand-made lace from Burano
Burano lace - isn't it stunning?
I just love this painting by Venetian artist Antonio Rotta (1828-1903). Many of his painting are scenes of every-day life.
Antonio Rotta (1828-1903)
Portrait of Lacemaker at Lace Pillow
Lace-making demonstration
The lace I bought in Burano

After visiting the museum, I walked by a very high-end lace shop, Emilia Burano, that offered lace-making demonstrations. I couldn't resist.

The most exclusive lace made in Burano has 7 different stitches. To make the best lace possible, each lace-maker masters one stitch. Once the pattern is set up and ready, each lace-maker works on the piece doing her one stitch. It can take months to make a piece.

The Emilia Burano shop has been there for 4 generations of lace-makers. Upstairs they have an area of some of the lace that has been made in their family, including an amazing wedding dress.

If you want to learn more about lace-making in Burano, see the videos listed in the Related links section below.

What I learned
  • Spending the day leisurely walking around Burano, talking with artists and having a great pasta lunch is my kind of travelling heaven!
  • There are many kinds of lace-making. I really admire the work but will leave it to others to make.
  • I have been wanting to make a whole-cloth quilt incorporating lace and handkerchiefs ever since I took one of my first Craftsy classes with Cindy Needham. Her work is stunning. See Related links for her courses on Craftsy and a great video on YouTube of her work in Houston
Walking along the canals of Burano
Related links
Linking parties
I will be linking this post to many linky parties. Why not check them out? Slow Sunday Stitching, Monday Making, Design Wall Monday, What I Made Monday, Moving it Forward, Silly Mama Quilts WIP, Midweek Makers, Let's Bee Social, Tuesday Colour Linky Party, Linky Tuesday,

I am linking this post up to Free Motion Maverick's 300th linking party! Thanks for taking part in the fun!

Thursday, December 06, 2018

Throwback Thursday - my very first quilt

Welcome to Throwback Thursday!
I'm hosting the linky party this month for Sandra at mmm! Quilts while she's busy with family and a wedding :-) I hope that you will link up with me below for this final Throwback Thursday of the year.

My very first quilt!
My mother started quilting after she retired. She loved to sew and quilt but I was very intimidated by all of the rules involved - if you haven't figured it out yet, I'm a bit of a rebel😊 So while I appreciated my mother's quilting, I didn't really think that quilting was for me.
My very first quilt - totally hand-sewn and hand-quilted.

When I moved to Ottawa, one of my brothers gave me a clipping of an upcoming workshop to make a healing quilt. It was a weekend workshop and very affordable, so I escaped for two days to make a healing quilt. It was an incredible weekend!

The centre star of the Lone Star quilt
The two ladies who ran the workshop were First Nations. One was an elder and both were healers. A Lone Star quilt was to be sewn and quilted by-hand by the group of about 20 women attending. All of the fabric, scissors, thread and needles were provided. We were shown how to cut the diamonds using templates and then how to sew them together.

What made this quilt so special was the healing aspect of it. While we were working, we were encouraged to think positive healing thoughts for the recipient of the quilt. As you can imagine, it was a very powerful weekend. We managed to finish the quilt top and most of us were able to return a few weeks later to quilt it. There was no quilting frame, just the women around the table quilting on our laps or the table.

When I told my mother how we were making this quilt, she couldn't believe it - but it turned out to be lovely. When I got home, I decided that I would make a quilt like this.

It took a lot longer than a couple of weekends to make it, more like a year. My daughter used it for several years. I also filled it with healing and loving thoughts.

I can't take a photo of a quilt without Chevy wanting in!
Must be all the love in the quilt :-)
What I learned
  • I learned that there was another way to quilt and that following the rules was optional.
  • It turns out that hand quilting without a frame still gives good results. I sometimes do the same with my embroidery.
  • For a first quilt, it was pretty good but not very square. However, a lot of the quilts that I've made, using rulers and a sewing machine, are still not all that square or even!
  • I used scraps to make the Lone Star quilt, and some of it obviously had polyester in it. I quickly learned the difference between sewing and quilting by hand using 100% cotton and cotton-polyester blends. Let's just say that sewing with cotton is like cutting into butter while polyester is more like cardboard.
  • I've only quilted a handful of quilts by hand. It's very relaxing, meditative and a great opportunity to fill the quilt with healing or loving thoughts. It's just too bad that it's so darn slow 😊.
  • I still infuse my quilts with love and positive energy, but it's not the same when I use a machine to quilt it.
  • I love Lone Star quilts but now that I know what I'm doing, I find them way too intimidating to make!
Linking parties
I'll be linking this post to many linking parties as well as the link-up here - so check out what everyone is doing! Tuesday Colour Linky Party, Let's Bee Social, Midweek Maker, Needle & Thread Thursday, Finished or Not Friday, Can I Get A Whoop Whoop?, Friday Foto Fun, Slow Sunday Stitching, Monday Making, What I Made Monday, Linky Tuesday, Moving it Forward, Design Wall Monday,

Great News! The Lone Star quilt was featured on the Tuesday Colour Linky Party - Thanks Dione  😊.
I'm also linking up this post to Sarah Goer's Show Me Something With Stars linking party. 

Throwback Thursday Link-up for December

Saturday, December 01, 2018

EPP or English Paper Piecing Fun

100 hexies 100 days 2018
The 100 hexies in 100 days event on Instagram (#100hexies100days2018) was such fun that I found myself wondering what to do after it was all over!

For those of you who don't follow Instagram, here are my last few weeks of posts.

Week 12 - Something Sweet
I don't have tons of novelty fabric and by week 12, I had used most of them. That means that I had to get innovative. I went for the colour of chocolate with the props to go with the hexies. It was the brown fabric with caramel coloured dots that gave me the idea for this. Doesn't it look good enough to eat?

Purdy's single origin chocolate is not so sweet but awesome :-)
The chocolate and hexies are on one of my mother's first quilted placemat.
There's nothing quite like chocolate!
Week 13 - Halloween
Again I didn't really have Halloween fabric, so pumpkins and fall colours are featured this week. Patches comes out every fall. He's one of the first foundation paper pieced project I ever made, and certainly the largest to date.
Black and orange hexies keep Patches company
Week 14 - You're a Gem
I have been collecting Alison Glass' fabrics for a little while. If these are not gem-like, I don't know what is!
Amazing Alison Glass fabrics
I used my rock and petrified wood collection to show off the gem hexies. I love rocks. I don't know much about them and I certainly don't know their names, but I'm a Northern Ontario mining town girl and it's in my blood.
All kinds of rocks and some petrified wood to go with the hexies
 Some day these fabrics (and a few others) are going to make an amazing quilt!
Even the background looks like sand!
So Far...
This is the result of my 100 hexies in 100 days event. There are probably a few more, but not many. I'm going to keep making them, but definitely at a slower pace.
Putting them all together...so far
What next?
It's probably a good thing that the 100 hexies in 100 days event is over since I still have lots of work to do on the Kingfisher Stitch-Along. It's officially over but there are still some great finished quilts being posted on Instagram (see the link in Related links below).
More batik hexies, pinned and ready to be stitched
This weekend I'm getting ready to go away to Italy to pick up my daughter. I'm meeting her in Venice and then we are spending a few days in Florence. I've decided to pack these up with some cut fabric to make more hexies. I don't sew on the plane since there just isn't enough room but I'm sure that I'll have some quiet time to stitch a little during the trip.

One Monthly Goal (OMG) for December
I called it November Madness and that's exactly what it was. I'm going to keep Charlotte's t-shirt/dress quilt as my OMG for December since I got lots done in November, but not my OMG. I did work on it, but there is still a lot of free motion quilting left to be done. At this point I have to consult my FMQ journal to see what FMQ designs to use on the borders.
t-shrt and border quilted
One t-shirt and border done - many more borders to go!

What I learned

  • Starting the month with a post that includes Madness in it's title was probably asking for trouble! It was a mad but productive month. 😊
  • I had a blast playing with hexies every week. Sometimes it was a bit of a pain, but mostly I loved it. I'm happy to say that my posts were a bit late only a couple of times.
  • It may take a long time to get a lap quilt out of my small hexies, but there's no hurry. It's very much a WIP (work in progress)!
  • I'm looking forward to getting back to my larger 1" hexies from the Kingfisher Stitch Along. I even bought a few batiks since I last worked on these, so I'll be cutting these up today to bring with me.
  • I knew that trying to get Charlotte's quilt done by the end of November was being very ambitious but that's ok. I did work on it a little and will keep at it when I get back.

Related links
I will be hosting Throwback Thursday this week for Sandra of mmm! Quilts, so please come and post something so that Sandra keeps working with me 😊

Linking parties
I'll be linking this post to the December OMG goal setting link-up as well as many others. Let's see what's happening! Free Motion Mavericks, Finished or Not Friday, Friday Foto Fun, Can I Get A Whoop Whoop?, Slow Sunday Stitching, Oh Scrap!, Monday Making, Main Crush Monday, Design Wall Monday, Moving It Forward, What I Made Monday, Linky Tuesday, To-Do Tuesday,


Sunday, November 25, 2018

A loon, a bear and a binding tutorial

Finished loon

Finished loon quilt mini
The loon mini is quilted in-the-ditch.
I found some fabulous foundation paper pieced patterns for making woodland animals blocks. Here's how it started.

My October DrEAMi! (something that catches your fancy and you just have to Drop Everything And Make It!) was a foundation paper pieced block that I gave my brother for his birthday instead of a card. Since he loves the outdoors, I made him a loon.

This is the first of several minis that I'll be making using Made by Marney's patterns. The finishing of the loon mini and the making of the bear mini are my November DrEAMi!

A bear mini

My next mini was a bear - well actually two bears because I'm making a second one for my husband. The first one I made has a pretty obvious mistake so I'm keeping it for myself and using it in the binding tutorial below.

Extended-border binding technique

These minis are perfect for trying out new techniques. I tried this binding technique on the loon block and then took pictures of the process using the first bear mini for this short tutorial.

Challenge: I didn't want to add a binding to this block. I've tried binding the quilt from the back but didn't really like the results since my corners are not always very good. So I essentially made a wider border and used it to bind the quilt. Here is the tutorial.

Measurement: Decide how wide you want your border, then add ¼" for your seam allowance and add 1" for the binding.
In this case, the border fabric was made from 2¼" strips. (¼" seam allowance + 1" border + 1" binding.) * You can adjust how wide you want your border as well as how much fabric you want to use for your binding.

Attach the border
Attach the border fabric to the top and bottom of the block.
Adding the top and bottom border
 Attached the side borders to the block.
Adding the side borders
Sandwich the quilt with the batting and backing fabric and quilt the piece except for the border.

Quilting in-the-ditch with the "Shorty" ruler
Cut the batting and backing
Once the quilting is finished, flip over the border fabric away from the edge. Then, one side at a time, trim the excess batting and backing. 
(In this case, I cut the batting and backing 1" from the edge of the border.)

Trimming the batting and backing

Trimming the batting and backing from all sides

The front border extends past the backing once each side has been trimmed.
The front border extends past the backing
Finish Quilting 
If you want to quilt your border, this is the time to do it!

Press the border
Fold the extended part of the border in half and press
Pressing the extended fabric in half
Flip the pressed extended border over the back of the quilt. (I use small metal paper clips to keep my border in place.) Stitch the extended border to the back.

Using paper clips to keep the border in place while stitching
This is what the back of the pieces looks like with the border used as the binding.

The back of the bear min when the border is used as binding


The back of the loon mini 


Label
I made a label using some great retro duck fabric and used neutral fabric to write on. As I learned previously, I ironed freezer paper to the back to ensure that the fabric wouldn't shifting around when I wrote on it.
Making a label for the quilt
Using freezer paper to stabilise the fabric to create a label
Happy Thanksgiving to all those who are celebrating today!

What I learned
  • Minis are great to try different techniques. There isn't the investment of time, material and effort that you might have with a larger or more complex quilt.
  • One of the tricky things about foundation paper piecing is that the finished product is the reverse of the pattern. Since I didn't print up the pattern in colour, I mixed up one of the pieces. You can see that the bear block looks like it has a broken leg with a cast instead of the shadow of the leg. I haven't finished quilting the second bear, but it doesn't have a broken leg! 
  • Making the bear pattern a second time was much easier since I knew what to do - and not do! I rarely make something twice but it is a good learning experience. The second time it usually is easier and faster and probably better. I think that I sometimes miss out on the learning aspect of that type of repetition. Since I was so intent on getting the second bear mini right, I wasn't bored 😊
  • I used Angela Walter's "Shorty" ruler to quilt in-the-ditch. This is the second time I use it and I'm very impressed.
  • I've never come across this method of binding a quilt, but if it's out there somewhere under another name, please let me know.
  • I hope you were able to follow the tutorial (it's my first one). If you have any questions or suggestions, please leave me a message in the comment section, or email me at quiltingandlearning (at) gmail.com
Related links
Linking Parties
I'll be linking this post to Sandra's DrEAMi! party as well as other linkies. Check them out and see what others are doing! Free Motion Mavericks, TGIFF!, Slow Sunday Stitching, Oh Scrap!, Monday Making, Main Crush Monday, Design Wall Monday, Moving It Forward, What I Made Monday, Linky Tuesday, Tuesday Colour Linky Party, Let's Bee Social, Midweek Makers, Needle & Thread ThursdayWondering Camera, Finished or Not Friday, Friday Foto Fun, Can I Get A Whoop Whoop?, TGIFF,

Project Details


Loon Mini, pattern by Made By Marney
8½" X 8¾"
Materials: commercial and hand-dyed cotton, embroidery floss
Techniques: foundation paper piecing and free motion quilting, embroidery