Wednesday, December 30, 2020

2021 - My Stitching Resolution

 My first resolution is to try to keep up with the dates in my calendar - sorry I'm late to the party Carla 😔

2021 Stitching Resolutions and Plans

Last year was incredibly hectic learning and stitching wise. If I resolve to keep it easier, will that really happen? I'm not convinced but here goes!

Long Promised Quilts

There were on my PHD list of UFOs to finish for 2020. This year only 2 long awaited quilts are on my list. First is my son's version 2.0 of the quilt that my mother made him, while the other is my daughter's Paddington Bear quilt.

Version 2.0 of Loved-To-Death quilt

Version 1.0 to be remade


I haven't done anything to my daughter's Paddington Bear quilt other than think about it. It's going to be modern but otherwise, it's still a pretty blank slate.

One Paddington Bear quilt
coming up this year!
Paddington Bear mini


Slow Stitching, Art Quilts, Dyeing and Surface Design

I suspect that I will be spending most of my time learning new things and practicing my slow stitching and making more mini art quilts and samplers. I have a few projects that I started this year that I would like to finish, such as my Traveller's Blanket which is made up of hexies and meditation stitching blocks. I've even been practicing some new embroidery and Sashiko stitching on it. I've been adding Sashiko stitches to my new Stitcher's Journal. I'm sure that I will get caught up in all of this and more with the TextileArtist.org's Stitch Club.

Traveller's Blanket - lots of progress
made since this image was taken

Practicing my Sashiko stitching


Free Motion Quilting and Free Motion Mavericks

I'm hoping to keep it simple this year. I have a Pinwheels & Star baby quilt to finish FMQ. 

An out-of-this-world FMQ centre for the baby quilt

A big space to fill!


I'm also hoping to FMQ both my son's and eventually my daughter's quilts in 2021. I'll be sharing these projects every fortnight during Free Motion Mavericks' linking parties.

What I learned
  • I was too ambitious last year. I suppose if I had not added the 12 UFOs to the PHD in 2020 it might at least have looked more reasonable!
  • You may have noticed that I didn't add any blog hops and other events on my list. I will try to participate in Project Quilting again this year but only on the weeks that excite me. I'm not committing to anything right now!
Related links
  • Since this post is already late, I'll come back later today to add my links.
  • You can also read about What I learned in 2020, December 31, 2020

#2021 Planning Party with Quilting Jetgirl
 
I am linking up to Quilting Jetgirl's #2021 Planning Party. I've been so much more reasonable this year. Let's see where that takes us!


2021 - My Stitching Resolution blog hop participants

With Carla from Creatin' in the Sticks
Here are the other participants. Hope you'll get a chance to check them out! Thanks so much Carla for organising this.

Thursday, December 24, 2020

Free Motion Mavericks & the Holiday Season

Merry Christmas and Happy Holiday Season for everyone joining us this snowy Christmas eve. Welcome to Free Motion Mavericks week 312. 

Merry Christmas and Happy Holiday Season

I'm keeping it light on content today. Just have a look at some pretty Christmas and holiday season quilts. If a picture is worth a thousand words, then here is my very long post! 😊


Chevy and I wish you a happy, happy holiday
🎄🎅


Linking Parties
I will be linking up to some fun linking parties. Let's see what's going on! Remember to link up your FMQ or holiday post below!

Free Motion Mavericks

Thank you for linking up last time. I always love looking at your ongoing projects. Did you get to see Cheryl of Gone Stitchin's  Wonky Hexie Quilt? It includes two of my favourite things in one quilt....wonky and hexie! How cool is that? If you didn't see it, have a peak!

Wonky Hexie Quilt by
Cheryl of Gone Stitchin'

It's now your turn. If you have FMQ a project this week, please link up. However, if you just want to link up a Christmas or holiday related post that is recent or of years ago, please feel free to do so.


You are invited to the Inlinkz link party!

Click here to enter

Monday, December 21, 2020

A Studio Tour

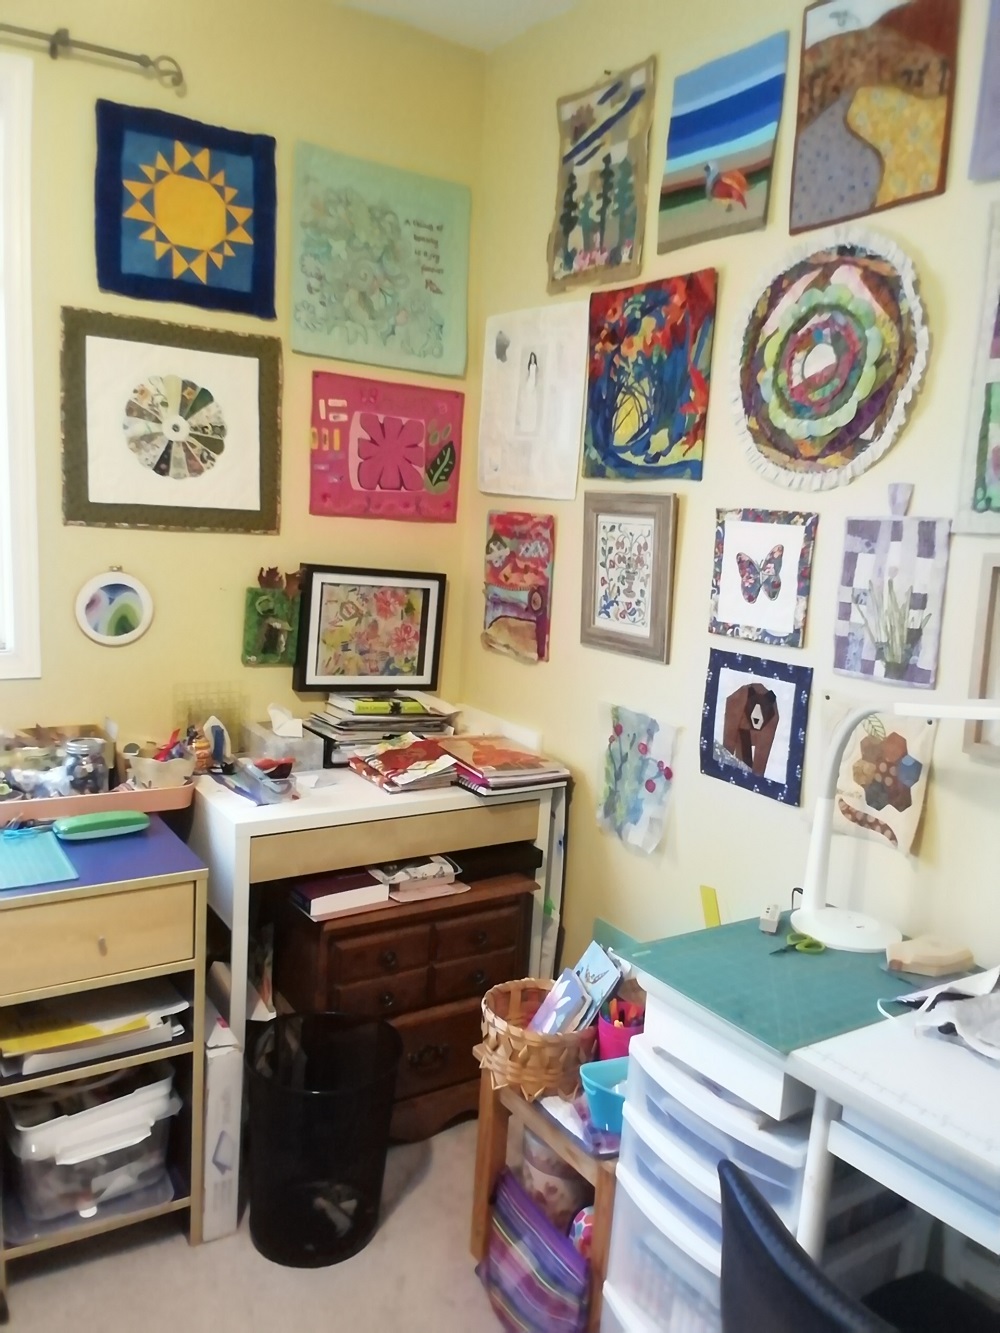
I've been working on my art, sewing and working space for almost a year - the first few months in my dreams and since June, on the real thing. I hope that you'll join me on the grand tour!😊

Celebrating my art studio

In June, my son moved into his own apartment. I have to admit that it was pretty tough to see him leave - but, the art studio that I had been dreaming about has now become reality. Since my son is doing wonderfully well and comes home every couple of weeks, I don't feel that guilty about taking his room. The only guilt that is left is the quilt that I owe him! Hopefully the hardest part of that project will be done by the end of December, as part of my One Monthly Goal (OMG).

Welcome!

My seasonal door hanging quilts are much
safer from the weather inside the house :-)

Being the smallest bedroom in the house, it's not a large area. The previous owners had painted it bright yellow, and it hasn't changed. I was afraid that the yellow might not play well with my creations, but I shouldn't have worried!

Sewing space

As you come in, I have my sewing space which is about the same layout as it was in my bedroom. My trusty Jag is surrounded by all that I need to sew. When I need more support for sewing a very large piece, like my king-size bed quilt, I can easily bring my extra table and chair to help.

My sewing centre with my trusty Jag

Support for quilting large projects


I have a lot of things in my studio. It would be nice if it was large and airy but I've made it cozy, which is really my preference. If it was large, it would just be filled with more stuff 😀


Cutting and ironing area

One of my favourite piece of furniture in my space is this IKEA change table that I bought years ago. It served as a music centre when CDs and stereos were a thing. It has now made the transition to a cutting and ironing table, while still functioning as a small library. 

For most of the cutting that I do, it's more than adequate. If I need to cut something big, I can always go to my kitchen table. I also converted a small hand-made shelf into an ironing space. I created a quilted mat this is slightly larger than the shelf and attached it with elastic. I love that it is the right height for cutting and ironing. When I don't need the ironing shelf, I just place it behind the unit. It's also great for cutting because I can get to three sides of the table (well sometimes Chevy has to move). 

Cutting and ironing space
Portable table and design wall


The cutting table with the
ironing shelf against the wall


Fabric Storage Space

I though before I moved into the studio that I would have enough space in the closet - boy was I wrong! It's amazing how many things I had squirreled around the house 😊

I've had a great time finding baskets for my fabric. My latest purchases are my favourite - they are children's baskets for toys, again from Ikea. I bought the ones on the top-right shelf this spring and they contain most of my cotton scraps. Now Ikea have even better ones that are perfect for fat quarters. They are the three yellow stacked baskets on the second shelf of the unit on the left. I still have some fabric left in the bottom of my husband's closet (that's where most of it was hiding!). I should be able to bring them in soon.

Two units of Ikea shelving for my fabric

Sitting & Stitching Corner

I hadn't planed for a sitting area in my studio but sitting on my computer chair for more than a couple of hours is not comfortable. This fall, we got a beautiful new chair for our bedroom as part of our plans to create a reading area. I had this older chair that has great sentimental value (another Ikea purchase over 30 years ago). I tucked it in the corner, in front of my closet. It's a little in the way but I love sitting there for my zoom calls and for some slow stitching.


Sitting area for slow stitching

Art & Computer Space

This is probably where I spend most of my time - at my desk. My laptop and my embroidery supplies are all easily accessible from there. I have placed many things on large serving trays that I can easily move around, depending on what I'm working on. I had originally placed my sewing machine in front of the window but it turns out that I spend a lot more time at my desk, so I moved them around. 

In the corner I have an older desk that I use for my current projects. Since I use it as a table, I have placed my mother's nightstand underneath it. There really is no wasted space in this room!

Corner table and nightstand
My desk - where I write this post, plan
my projects, watch tutorials, etc.


What I learned

  • I did a lot of research in the months before moving into this space (when my son started seriously thinking about moving out). He drew me a chart on graph paper of the space. I have to admit that none of it turned out as I planned. 
  • Although the closet had been fitted with a wonderful storage system, it was way too small to fit all of my supplies and my fabric. Once I started filling the space it quickly became obvious that a trip to Ikea for shelving would be needed. 
  • To make a long story short, almost everything in the room was moved around a few times before it got to this point. I can now say with confidence that at this time, it's the best use of the space for me. I love it!
Related links
Linking parties

I will be linking up to many fun linking parties. If you get a chance, go check them out! Patchwork & Quilts, Design Wall Monday, Monday Making, To-Do Tuesday, Colour & Inspiration Tuesday, Peacock Party, Off The Wall Friday, 


Sunday, December 20, 2020

Christmas decorating fun

I love seeing our Christmas tree full of ornaments bought, inherited, received and made over the years. It's also the time when those Christmas runners, placemats and wall hangings get to come out and shine.

Adding to our Christmas decorations

Each year I try to make a little something for the tree or the house. I found the tutorial for the Christmas bell - the bell was supposed to be made of "sheer paper cloth" but I used organza backed with light stabilizer instead. The stabilizer gave the organza a crispness without removing the translucence. For the three-sided bell I used organza with dots and hearts on two of the sides and then embroidered the third side with a star. I hand-stitched the sides together and added the bell through it. If you're interested, the link to the tutorial is in Related links below.

Three sided Christmas bell
The embroidered side of
 the Christmas bell


I also made a snow frame. I started with a meditation stitched piece that I made last year, added an extra piece of fabric to make it wide enough and then added a couched snowman, snow and extra stars.

Snow frame with Christmas tree and snowman

For the Out of the Box Fibre Artist group, I made a Christmas postcard. It was dropped off on November 30 and should have arrived to it's new home by now.

The postcard was 4" x 6". The background is a fluffy fabric that I hand dyed in very light green. I used a pink cheese cloth to outline the tree and then couched some green chenille yarn. I used a Murano star bead for the top. Behind it I attached a small piece of yellow silk to add a little pop of colour. There are also many seed beads within the tree.

In the background, I used a white silk thread to embroider the snowflakes. I like the subtleness, like an impression of flakes. Instead of cardstock, I attached interfacing and then added a white backing.

Stylized Christmas tree postcard

Christmas postcard

Decorating the workplace

It's so different from previous years. This was my office in 2018. My colleague and I had a great time decorating with things that I had brought from home.

Adding colour to our 
workspace (2018)


Decorating the office plant (2018)


This is my present workplace - our dining room.

Working from home, in my dining room (2020)

It certainly is a lot cozier and the commute is very short 😊 I also love that Chevy is always near by!

What I learned
    Chevy in my studio.
  • I loved the idea of making the bell decorations but once I was done, although I liked it, I didn't feel the need to make more - which is a good thing because I still have way too many projects on the go!
  • The snow frame is on my window ledge in my studio. It's so lovely to look at while I'm writing this post. The couched yarn and backing makes it just a little too thick for the frame so I had to tape around it. Since it's for my office, I don't mind but I'll have to remember this if I ever make more as gifts.
  • I'm really not missing my physical workplace. It's so much easier to concentrate in my quiet dining room. You can see that I'm not trying to work in my studio - that would be a recipe for disaster...just too many distractions there 😊. 
  • Today I took pictures of my studio - it's pretty much finished. I'm hoping to write the post this week. Here's a teaser....
Related links

Linking parties

I'll be linking up to many fun linking parties, including with Muv for Free Motion Mavericks until Tuesday. On Thursday, please join me for the next Free Motion Mavericks. Your project doesn't have to be free-motion quilted to link up! Put Your Foot Down, Off The Wall Friday Beauties Pageant, Peacock Party, Patchwork & Quilts, Oh Scrap!, Slow Sunday Stitching, 15 Minutes to Stitch 2020, Monday Making, 

Monday, December 14, 2020

Hand-stitched Mile of Gold

This fortnight we had a workshop with Richard McVetis in the Stitch Club 2020 by TextileArtist.org. The project was to make a hand-stitched abstract collage. 

Hand-stitched Mile of Gold

Here is my  finished piece. As you can see, it meets all of the criteria except for the abstract part. 😊

My interpretation of Toburn Mine
on the Mile of Gold

Here's how it started. I found this picture in my computer. This is what's left of the Toburn Mine in Kirkland Lake, Northern Ontario. It was once at one end of the Mile of Gold. Government Road runs through the town and the mine was at the eastern end while a few others were at the western end of the road.

Toburn Mine on the Mile of Gold

We had to simplify the photo and then make a collage of it. From this sketch, I created a copy on tracing paper. I then cut up the sketch in 8 pieces, cut squares of fusible web to fit each piece and attached these to the fabric that I wanted to use. 
Sketch

Copy of the sketch on tracing paper

I hand-dyed all of the fabric used in this piece. The background, rooves and ore cars are cotton while the pinks are linen. After assembling the puzzle, I started stitching. I wasn't going to add much stitching but it was going so well that I kept on going.

Stitching details

I outlined the rooves, the dark pink pieces and the cables with a stem stich while the rest was embroidered using a running stich.

Finished - for now

First piece of Glimpses of Childhood Places?

You might wonder why I picked this image to interpret, other than its simplicity. Five years ago I took a writing course, Memories into Story: Life Writing I,  through the University of Toronto's School of Continuing Studies. It was a good course, although not one that I would have chosen myself (it's a long story). It took me way too long to realise that writing memoirs is as much about the facts and memories as it is pure fiction. You get an idea of some of the things that happened, do some research by talking to those who were around and then you recreate it, which is the fiction part. 

My final project was called Glimpses of Childhood Places. As a memoir, it wasn't great, but as a stepping stone to creating a whole visual textile series about the places in Kirkland Lake that shaped me, it was a real treasure. When I first wrote it, I envisioned a whole multi-media presentation with the written stories and the art. Five years later, most of my ideas and pictures are in a project box waiting to be explored. I think that this might be the first piece.

What I learned

  • I don't have many pictures of buildings in my photos, at least not the ones that I take for making art. I didn't think about looking in our travel pictures - there would have been a lot more there!
  • I don't usually work with a fusible web but it did make the fabric more stable to stitch on. 
  • I put the fusible web on the right side of the low roof but it turned out fine.
  • It feels weird to leave the piece unfinished but I think that it would be best since I have no idea what the other pieces will look like....when they are eventually made. This way, if I want to, I could add more background or even foreground, although I sort of like the minimalist grey.

Related links

Linking parties

I will be linking up to many fun linking parties. Let's see what's happening out there! Patchwork & Quilts, Monday Making, Design Wall Monday, 15 Minutes to Stitch 2020, Put Your Foot Down,  Colour & Inspiration Tuesday To-Do Tuesday, Midweek Makers, Needle & Thread Thursday, Off The Wall Friday, Peacock Party