Showing posts with label fabric flower. Show all posts

Thursday, April 11, 2024

Spring Tulips is coming along on Free Motion Mavericks

Hi and welcome. Spring is finally here after our last snow storm. The snow really encouraged the Spring bulbs to appear! What a wonderful sight! I've been appliquéing, quilting and making my 3D Spring Tulips piece. There sure is lots of learning going on here!😊

Spring Tulips - the background quilt


Although I was itching to start playing with the 3D part of this piece - I had to start with the background, which was to make quilted tulips. I make a sketch of some of the tulips because I find it hard to place tulips in front of each other (or anything else for that matter). 

My first sketch - at least they look like tulips😁

Second sketch simplified to make templates

Tulips modeling for the sketch!

Tulip templates

I didn't take any process pictures but I cut my hand-dyed pink fabric roughly based on the templates and then appliquéd them to my gray background fabric. I cut the leaves from dark green hand-dyed fabric.

Appliquéd tulips with a rough pattern of the vase

Free Motion Quilting (FMQ) the tulips and leaves


I FMQ the tulips and leaves before attaching the vase to the background. The vase in this picture is attached with pins and is too narrow. That's why I decided to add side panels to it.

Trying out the vase before FMQ the tulips and leaves

To make the vase, I used a piece of hand-dyed organza as the base, added some Solvy water soluble stabilizer, snippets of fabric and organza, some thread and finally a second layer of Solvy. The organza gives it a lovely translucent quality.

Vase made from organza, Solvy water soluble stabilizer,
thread and snippets

The vase wasn't quite wide enough to get the depth that I wanted, so I stitched up a side panel and then cut it in two vertically to apply to each side of the vase. While I was making the side panel, I seemed to be playing chicken - to see which of my thread, bobbin or spool, would run out first. The bobbin ran out first😉

Side panel with thread used

Side panels cut

Before attaching the vase, I FMQ the tulips in the background. 

FMQ tulips and vase attached to background

At this point, I've attached the sides of the vase to the background, but not the bottom. I'm hoping to make it straight but also tapered. That will be one of the last things that I'll do after making the tulips and FMQ the whole background.

Making Fabric Tulips


I've been experimenting with making tulips with fabric. The first one was a bust, but I had to make it to figure out what I wanted or didn't want. It was just a flat but quilted version of the background tulips. Nice try but not round enough.
First tulip - too flat!

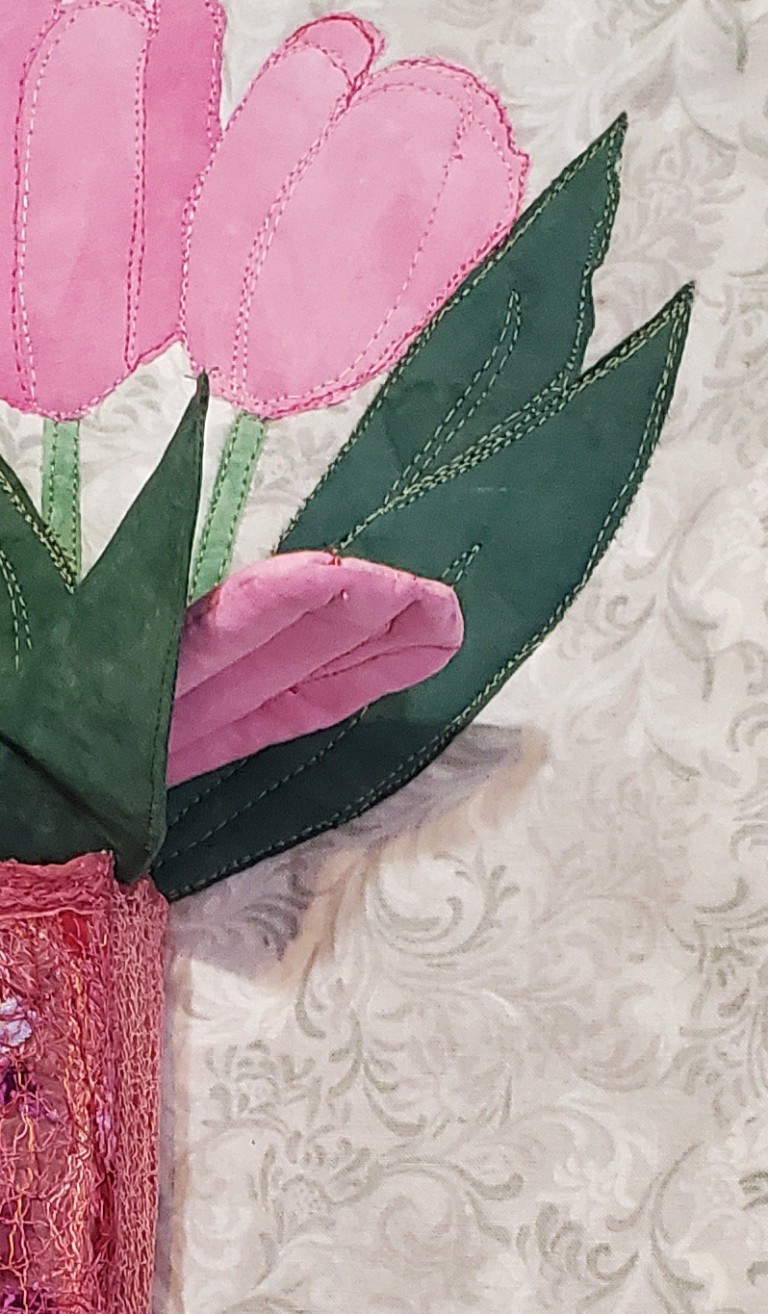
I then made 3 thread tulip petals the same way that I made the vase. Much better 😊. I used a flat tulip as the centre and sewed it together to make it cylindrical. After that I attached the 3 thread petals by hand-stitching them around the centre. Once that's done, it's a matter of attaching the tulip to the stem and then add the leaf.

Second tulip - much better

Close-up of the second tulip
Here is a photo of the tulip making operation. It's very fiddly and time-consuming but I love the results 😍 The petal below is different from the thread petals above because I used the same pink hand-dyed fabric as a background, instead of the pink organza. The longest part of making the tulip is inverting the stems and then stuffing them with batting. The leaves are easy to sew together and invert. It's just a matter of making them wide enough so that they go around the stem.

Tools and process for making the fabric tulips

I did Google how to make fabric tulips. It's not really the look that I wanted but I have used the idea of the stem and the leaf from the tutorial. If you're interested in making easier fabric tulips, you may want to check out the tutorial in the Related links section.

What I learned
  • I learned that with a little bit of practice and patience, I can draw a rough sketch of tulips. When you only want an idea of it as opposed to a great picture, sketching is doable.
  • A photo is useful, but sketching makes you think about what comes first (in front vs. behind) and the shapes.
  • Printing a bigger version of the second sketch helped me make those templates.
  • For the first tulip that I created for the background, I cut up each individual pieces of the tulip. It was difficult to remember where to add an allowance so that pieces would overlap, and it didn't turn out any better than just cutting out the whole shape and FMQ the details. Thank goodness!
  • As always, I enjoyed FMQ the tulips, the stems and leaves onto the background. I'll have to finish FMQ the rest of the background when this is mostly finished.
  • I don't know if or how I should finish the vase - should I place a table under it or just make the piece end at the bottom of the vase? I know that a vase shouldn't just float in the background...but I'm not use how to handle that. Any suggestions would be appreciated.
  • I really enjoyed using the pink organza as a background to the Solvy water soluble stabilizer. It gave it stability and make it translucent instead of partially transparent. I don't really want the stems and leaves to show up too much through the vase. I may have to stuff it a little to get some depth.
  • I'll be making a batch of petals with the pink hand-dyed fabric since I don't really want to tulips to look too much like the vase. I'm not sure if that will make a difference but I'll know after I've finished one.
  • I also need to remember that the thread could be visible on both sides, so I'll have to use darker thread (I used very pale pink thread in the bobbin and it looks white ).
  • I was using a production line for making the stems - they are such a pain, but I am slowly getting the hang of it. 
  • Little bits of batting is great for stuffing the stems, so I'm glad that I kept some.
  • For the first time, I sewed my batting pieces together with a zig-zag stitch instead of using the iron-on tape. It worked really well and is less expensive.
  • Spring Tulips is my April One Monthly Goal (OMG). It's for Fibre Fling 2024.
  • In Related links, I'm including 2 links for making different types of fabric tulips, in case you're interested.
Related links
  • March Table Scraps Challenge finish and April's OMG, March 30, 2024
  • How to Make Fabric Tulips | a Shabby Fabrics Craft, YouTube
  • DIY Fabric tulips, YouTube
Linking parties

Great news! I was featured on Needle & Thread Thursday 😁 Thanks Kelly!

Free Motion Mavericks


Welcome to week 477 of Free Motion Mavericks. 

Last week Deb from A Scrappy Quilter was quilting the first of two charity quilts for her guild.

Deb quilted one of two charity quilts

Frédérique, of Quilting Patchwork Appliqué is FMQ her Jardin de Corail (Coral Garden). It's really coming along 😍

Frédérique is FMQ her Jardin de Corail (Coral Garden).

It's now your turn!

You are invited to the Inlinkz link party!

Click here to enter

Sunday, February 19, 2017

Second in the Series

Two fabric flowers
Two fabric flowers
My second Escape Art Quilt is done! It had to sit and percolate a while before I was ready to finish it.

I knew that there would be 2 fabric flowers that I had made, although I wasn't sure of their placement. I also wanted to add more embellishment, but didn't want to go overboard (something I can easily do!)

I went in my jewelry box and found a lovely chunky red flower - it's perfect!

Details of Escape 2: English Garden Art Quilt
I really wanted to add some rose quartz, but where and how much? I asked my son - he's got a great eye for the geometry of a piece. Sure enough, he did it again. He explained that the piece flowed from right to left, following the points of the two triangles horizontally. I had considered dangling the quartz from the draped fabric, but he said that it would break its horizontal flow.

Escape 2: English Garden Art Quilt
Second in the Escape Series: Escape 2: English Garden

I added the rose quartz with clear beads between them along the triangles. It's like a flower bed bordered by stones. I also added some seed beads within the draped fabric. These only show up if light reflects off them, adding a little twinkle to the garden - maybe the dew?

What I learned:
  • I've really enjoyed making this second art quilt in the series. It's fun to be following a process for more than one quilt. I've started writing down the process and hope to share it as a tutorial eventually. I'm going to test it out with Escape 3: À Paris.
  • It's great to be able to use pieces of jewelry in my art quilts, especially since I love jewelry but never wear it!
  • This piece really needed a lot of percolating time. I attempted to work on it a few times, mostly because I thought that I should. This weekend, I just knew that I was ready to finish it!

Featured Links:
Escape 2: English Garden

Project Details
Escape 2: English Garden
20" x 16"
Materials: Linen, cotton, scarf (probably cotton), fabric from polyester top, embroidery floss, beads and rose quartz.
Techniques: Improvisational piecing, Free Motion Quilting, hand embroidery, beading, fabric flowers.


Linky Parties: Check out what others are making at these link-ups. MOP Monday, Oh Scrap!, Main Crush Monday, Monday Making, Moving it Forward Monday, Linky Tuesday, Midweek Makers, Let's Bee Social, Needle and Thread Thursday, Can I Get a Whoop Whoop? Off the Wall Friday, Finished or Not Friday,


Don't forget to link-up to the Celebrate-Fêtons 150 to show off your Canada and Canada 150 themed posts. The link-up and prizes will be happening every month of 2017!


Friday, February 03, 2017

Working in a Series

Escape 1:  Warmer Climates
I've made progress in the World Quilting Travel Adventure, but just as I love to get sidetracked when I travel, I also seem to take long meandering paths when I quilt!

I have finally finished the souvenir from Hawaii, which was our second destination. The flower on the bottom, designed by JoJo, is a plumeria, which is use to make a Lei.

World Quilting Travel Adventure
with JoJo Hall


Added a beaded butterfly


You can read all about the making of this project in my Catching up on World Quilting Travel Adventure post (see Featured Links at the end of the post).

In that post, I wasn't quite finished hand quilting the project. The butterfly in the picture is new. I just found a butterfly shape on the internet to guide the beading.

Since I like meandering, I am making a second (and hopefully a third) Escape art quilt. I'll be following the same idea for the background - a few pieces of fabric that will be sewn in an improvisational manner and then some quilting and embellishment.

Here is the second Escape art quilt.
Escape 2: English Garden

I found some interesting fabrics in my stash, including these beautiful linen pieces that my brother got me from Paris.

I also had a scarf that I wanted to add to the piece, but unlike the delicate silk scarf in Escape 1, this one was thick and rich. Part of the scarf is being draped at the top like a curtain while the fringe is at the bottom.

I also used fabric from a top whose fabric was too beautiful to get rid of. It's used in the triangles and flower on the right.

Escape 2: English Garden still needs to be embellished
The piece is now quilted. As with Escape 1, I used some beautiful Kimono Silk thread with Bottom Line in the bobbin. I FMQ following the fabric. For the red linen, I FMQ some vines in a matching thread. Sometimes I could barely see where I had been, but I really love the effect.

I had a great time learning to make fabric flowers with Melanie Ham on YouTube. The stiffer linen flower is very different from the flower made with the fabric from the top. I'm still not sure how I'm going to embellish this piece. I'll finish it when I'm inspired. I also have some pink quartz pieces that should go well.

Canada

I've been working on the hexis to make the Canada souvenir - the northern lights or aurora borealis. Since I got into hexis and wanted to make more, I now have quite a few to choose from. Again, I want to incorporate these into a fibre art piece.

Original placement for hexies
I found a postcard and a calendar picture to help me place the hexies. I also want to use some of the amazing dyed cheesecloth in the piece as well this black background.

Hexies to represent Northern Lights
New placement for hexies
My son kept looking at my design of hexies and didn't like it. So I challenged him to come up with something else. This is his placement. I really like it and am going to use it.

Linking the hexies together using JoJo Hall's Technique

I'm now linking the hexies together, using JoJo Hall's technique. Check out her tutorial video. The thread is invisible and she shows us how to even out the hexies. It truly is amazing, especially for someone like me, whose hexies are never the same size.

Finally, here are my goals for February that I will be posting on "One Monthy Goal".

  1. To FMQ this colourful batik lap quilt for my brother (the one who got me fabric in Paris) - this is my OMG!
  2. To finish embellishing Escape 2: English Garden,
  3. To finish the Northern Lights hexies art quilt.
  4. To make the next block for the Growing Up QAL


Batik Lap Quilt Top


What I learned:

  • I've been enjoying doing handwork. It`s nice to be able to work quietly outside of my quilting room.
  • I am also enjoying working in a series - to use some of the same basic steps but in different ways.
  • It was great doing FMQ on Escape 2 - it had been too long since the last time. I need to do more of this - I guess that's where the Batik Lap Quilt comes in!
  • I'm really trying to keep the expectations to a minimum. Since none of these projects have any deadlines, the One Quilting Goal is just for fun! 

Featured Links:


Project Details:
Escape 1: Warmer Climates
11" x 16½"
Materials: cotton, silk scarf and thread, embroidery floss, beads.
Techniques: painted, FMQ, hand embroidered, beaded, hand quilted.