Showing posts with label perle cotton. Show all posts

Wednesday, December 04, 2024

It's that time of the year again!

Hi and welcome! Ottawa has finally gotten some snow. Is it here to stay? Who knows, but it should last at least a few days. Just enough to get us thinking about snow tires, shovels and winter boots!⛄❄ 

Seasonal Stuff!


I'm not sure what's happening to my brain, but I seem to be on Squirrel alert! I think about something and oops, there I go! All that to say that I have new projects to share with you.

More embroidery on metal

After making the flower last week, I thought that it would be fun to make a little Christmas tree ornament. I made a template of a Christmas tree and embossed the pattern on two pieces of metal. I made the holes around the tree using what I had learned previously 😊. 

First tree - my favourite

Second tree

Both embroidered trees, ready to be stitched together

The next step will be to add a star at the top of the first tree so that its shape will match the second one. I'll then very carefully cut about a ¼" from the embroidery. I was considering adding lace between the layers on the edges. I'm not sure if that will work. Eventually I have to stitch each treer, wrong sides together and add a little something to hang them.

Kawandi style stitching

I've been wanting to make another Kawandi style piece for a while. I got an attack of the Squirrel today and thought that I could make one for Christmas for my son and his fiancé. There is not way that I can do it all by hand before Christmas, so I've attached all of the pieces with the sewing machine. This made it so much easier. Now I'll start stitching it with various colours of perle cotton. There is nothing as relaxing as embroidering a running stitch. 

A lovely Christmas Kawandi style mat ready to stitch

Back of the piece

An assortment of perle cotton for stitching 

This is also my November Table Scraps Challenge. The colours were anything goes and the theme was a tree. There are some trees in there.

What I learned
  • I have to stop playing with squirrels! It's becoming almost obsessive!
  • I have so many projects that I want to work on. I thought that being retired would give me all this extra time, but somehow it's never enough.
  • I'm going to keep this short since I want lo link up to the November Table Scraps Challenge and I only have minutes to link up! It's OK, I came back to finish the post.
  • I did learn a few things while making the Christmas tree on metal. It turns out that fancy embroidery thread doesn't appreciate going through holes in metal! I wanted to use a red mouliné thread to decorate the tree. There was no way to get them through the holes! Instead, I used a red metallic rayon thread. I ended up putting the thread through the hole at the beginning, then going around the back stitches of the embroidered tree instead of the holes in the metal. It did let me go through the hole at the end to be secured! 
Related links
  • Finished embroidering on metal, November 29, 2024
  • Embroidering on metal and Free Motion Mavericks, November 28, 2024
  • Kawandi style quilting
    • Stitching and FMQ on Free Motion Mavericks, July 25, 2024
    • Alaska and a Quilt Show on Free Motion Mavericks, June 14, 2024
Linking parties

Free Motion Mavericks


Welcome to week 509 of Free Motion Mavericks. Thanks so much for linking up. Here are the projects from last week that included FMQ, ruler work or walking foot quilting. 

Gail had two wonderful finishes this month. Here is her Jelly Roll Mystery Quilt, done with a strip set and background fabrics from Island Batik. 

Gail's Jelly Roll Mystery Quilt

Gail quilted it on her domestic machine and used Silly Moon's Rocket and Beanie rulers. 
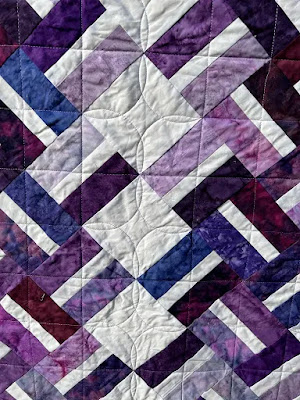
Close-up of Gail's quilted Jelly Roll Mystery Quilt

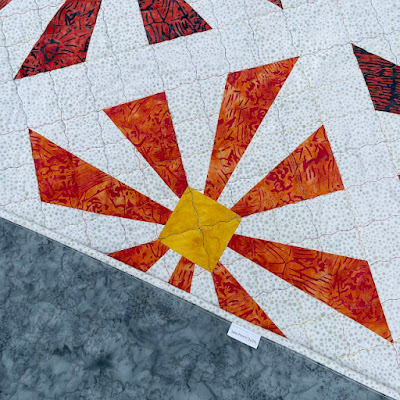
Preeti, of Sew Preeti Quilts published a new pattern, Fireworks. It really is lovely!

Preeti's Fireworks pattern is now available

Close up of Preeti's Fireworks quilt

Kat from Scrapbox Quilts finished quilting her Calico Gold 3 Yd quilt. What lovely colours. Kat quilted it using free motion / ruler quilting with overlapping circles. 

Kat's Calico Gold 3 Yd quilt

Close-up of the quilting of Calico Gold 3 Yd quilt

It's your turn!


You are invited to the Inlinkz link party!

Click here to enter

Sunday, November 24, 2024

Attack of the Squirrels :-)

Hi and welcome! I have lots of artsy, stitchy things to do but I got a full attach of the squirrels 😁 I have a wonderful, comfortable pair of jeans with holes in them - on purpose. I don't mind the style but my whole knee is poking out...so the hole is a little too big. I've been wanting to do something but I know that a patch won't be comfortable, so I wove a band across the hole, over the knee.

Weaving a band


I used a small embroidery hoop and #8 perle cotton to weave the band between the two edges of the hole.

Band woven between the two edges of the hole in my jeans

This is how it started.
For the warp, I stitched a few strands of 4 different colours of #8 perle cotton at both end of the hole. They were pretty taut and I figured that if I had to, I could make adjustments to the tension once the band was finished.

Weaving within the embroidery frame

I had an audio book and it took about 6 hours to finish the woven band.

Finished woven band

At the beginning of the project, I took a picture and sent it to one of the weavers in our Fibre 15 group. She suggested that I stabilize the ends and possibly use interfacing to make sure that it stays put.

The next morning, I put a piece of heavy duty Steam-A-Seam at the ends of the band, overlapping the band and the jeans. I attached a scrap piece of cotton and then sewed over the edge of the jeans to about ¼" of the band. I think that it'll hold.

Finishing the back of the band

Here is the finished project....so far.

The woven band across the hole

Squirrel!!!


What I learned
  • I haven't woven anything in years, but it did come right back. 😊
  • It was so relaxing and perfect to do while listening to an audio book.
  • I used the Weaver's knot to attach a new colour when my thread ran out.
  • I googled it and used two different techniques. Every once in a while I was able to make the weaver's knot without following the instructions but then it just wouldn't work. I'm not sure what I was doing wrong but I kept at it until I it worked. 
  • I'm linking up the two techniques that worked best for me....most of the time!
  • I'm going to wash my jeans in a large garment bag so that the band doesn't get pulled off.
  • I also figure that if the band does come off, that it's been secured enough that I'll be able to use it somewhere else.
  • I feel like the jeans could use a little something more - maybe just embroidery around the hole? I'm not sure that I want to spend another 6 hours making a second band to go with it 😁
Related links
Linking parties
I'll be linking up to many fun linking parties. You may want to check some out! Slow Sunday Stitching

Thursday, December 07, 2023

Able to thread a needle!

Welcome to week 459 of Free Motion Mavericks. I don't have any FMQ, although I've been thinking about it and practicing my designs on paper. The results of that effort will be for next week's post. This week I'm so grateful to be able to thread a needle and do some embroidery. It's going to keep getting better from here 😊 

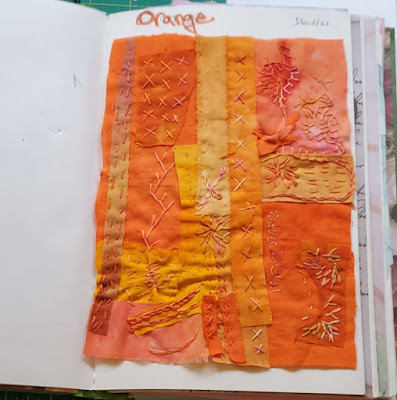
Adding orange stitches


I haven't been able to thread a needle in over a month. Surprisingly enough, threading my sewing machine (my Jag) was not a problem. I think it's because the sewing needle hole is straight on. So before my eye operation, I was able to work on my niece's t-shirt quilt. The weekend after my operation, I tried to thread a needle. At first I used a small needle threader but eventually I didn't need it! Yeah!!!

This piece was already about half done and I got it finished this week.

Playing with orange fabric and thread

This is the green fabric and thread play from March. I believe that this exercise was part of the 2023 Sketchbook Summit. We were supposed to play with paint, but frankly, I'd rather play with fabric. I used a variety of hand-dyed fabric and different embroidery thread combination to see how they look on the various colours. I also mixed different colours of embroidery thread together to see what that would give. I learned this in the TextileArtist.org workshop with Katherine Diuguid (see link in Related links below). It can be quite effective, but you have to look pretty closely at the stitching.

Playing with green fabric and thread

These samplers are attached to my Upcycled Traveller's Journal. I hope to make a few more colour studies. 

Upcycled Traveller's Journal


Learning Hardanger


I saw a lovely tree ornament from Epida Studios and just needed to make it (and learn Hardanger embroidery). I've been following the tutorials and am sort of getting the hang of it. It's far from perfect but it's very cool. I don't think that I'm using the correct size of fabric but that's what I had, so there! 

Future Hardanger tree ornament

I'm using a large #5 perle cotton in dark red and then a #8 thinner green. I used a FriXion pen to help me keep lines straight. That will just iron off once I'm done.

Learning Hardanger embroidery


What I learned
  • I'll be making more colour studies eventually. They are easy to make and stitch. Very meditative😊
  • Once I finish the sampler, I'm hoping to make a small tree ornament in Hardanger.
  • Hardanger is traditionally made all in white but that would be even harder to see, so I'm going modern at this time!
  • I have figured out that doing Hardanger during the day really helps me see the stitches and fabric better.
  • My eye is getting better and every day I can see a little more. It sure made me grateful for sight, colours and life!
Related links
Linking parties


Free Motion Mavericks


We have a couple of cool quilts from Sandra at mmm quilts. The first is a baby quilt version of Sunset Strip. Sandra just released her new pattern. It's really gorgeous and very versatile. Look at all of the FMQ on this baby!😍

Baby quilt version of Sunset Strip

This next quilt is from another of Sandra's designs - Grace. The quilting is straight lines in the half heart, and feathers in the background. I'm sure that it will bring comfort to the new owner.

Grace pattern design by Sandra 

It's now your turn!

You are invited to the Inlinkz link party!

Click here to enter