Showing posts with label basket. Show all posts

Thursday, July 20, 2023

A Gorgeous Red Basket on Free Motion Mavericks

Welcome to week 440 of Free Motion Mavericks. I hope that you've had a good week. I haven't done much until yesterday but I now have a pretty red basket to share with you.

Making A Gorgeous Red Basket


When I made the microwave fabric bowls in March for the Table Scraps Challenge, I promised one to a friend who said that they were so pretty that she wouldn't use it in the microwave because they might get dirty. Rather, she would use it as a bowl or holder. So, remembering this, I decided to make a red basket for July's challenge. Since this month's letters are A and G, I'm going for A Gorgeous Red Basket 😊

A Gorgeous Red Basket

I've made these types of baskets before, following Christina Cameli's Free-Motion Quilted Gifts course on Craftsy. It's also the course that I follow to make the agenda covers.

I started off with a red piece of hand-dyed fabric from my friend Elaine's scraps. I quilted it with triangles and match stick FMQ. It got pretty tedious by the end, but I did it! I tried to do this in a meditative manner but eventually gave up on that and just listened to music!

FMQ alternate triangles with match stick stitches

Of course I managed to cut the fabric for the quilted piece too small, so I made the lining just slightly smaller than the outside. While I was FMQ, I remembered that the project was supposed to be red and scrappy, so I made this very scrappy lining.

A scrappy red lining

Putting the basket together went fairly well. I'm happy to say that my stitch ripper was not overused!

Here are a few pictures from last night.

You can peek in and see the lining!

Here's another peek!

How appropriate - Mr. Coffee Bean is getting a medium roast in the sun!

Here are some garden pictures from this morning 😎

Hen and a basket!

A Gorgeous Red Basket and White Roses!


Same flowers and basket from two different angles!


What I learned
  • I was trying to be so careful about cutting things the right size but somehow, I cut the outside fabric too small. At least it wasn't difficult to adjust the lining to fit.
  • The basket is more square than it should be, but that's ok!
  • I used a lovely variegated pink and yellow thread to do the match stick FMQ. I think that it looks great.
  • The red scraps had been pulled for another project but there are enough for both projects! It was nice that they had been sorted already. Most of my scraps are by colour, but in batches - so that red is with yellow, orange and pink. I don't have enough scraps of each colour for their own basket (except for blue!). 
  • The outside strip is from some great coffee bean fabric that I bought a while back. I have it in peach and blue. It's soooo cute!
  • I didn't make a strap for this basket since it was so small, but I just re-read my posts and discovered that I had used a lanyard under the fabric to make the handles. What a great idea. 
Related links
Linking parties
I'll be linking up to many fun linking parties. Why not check them out? Also, remember to link up below! I'll be linking up to the ABC Table Scraps Challenge as soon as the link opens up. Design Wall Monday, Sew & Tell, Midweek Makers, Put your foot down, Needle & Thread Thursday, Off The Wall Friday, Finished (or Not) Friday, Peacock Party, TGIFFPatchwork & Quilts, Oh Scrap!, 15 minutes to stitch 2023


Free Motion Mavericks

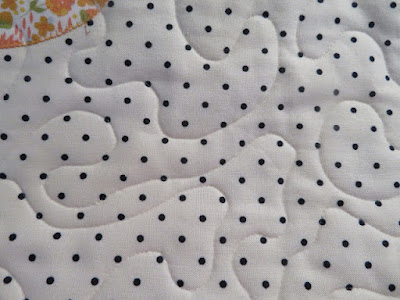
Last week Donnalee did some meandering FMQ with invisible thread. It worked out really well. Way to go Donnalee!

Check out Donnalee's meandering FMQ with invisible thread!


Gail has made another gorgeous Hugs and Kisses quilt - this one for charity. She used her 3″ and 4″ Cupid rulers to quilt it. It's so full of loving hearts!

Gail's Hugs and Kisses quilt for charity

Anja or Anja Quilts made a lovely mini to swap with one of her guild mates. Isn't it cute with that fussy cut tiger? She made it specifically to practice her FMQ skills. Way to go!

Anja's Mini quilt to practice FMQ

It's now your turn.

You are invited to the Inlinkz link party!

Click here to enter

Thursday, December 26, 2019

More quilted gifts, an OMG and a Christmas runner

I can't believe that I've got so many posts this month! I've been busy finishing up my two Christmas gifts. Actually there was supposed to be one, but a squirrel came for a visit!

More quilted gifts

My December One Monthly Goal (OMG) was another free motion quilted (FMQ) fabric basket. I used some incredibly lovely Japanese fabric for the FMQ.

The light was at its best outside on the snow :-)

I took an indoor shot the next day
I also created another journal cover. Unfortunately I misread my notes and didn't cut the fabric big enough to fit the journals I had bought. So I ran out at the last possible second for a smaller journal. It was a little smaller than I would have liked but it did fit 😊

I really love this fabric for the journal cover.
I FMQ the fabric following the outline of the leaves and the flowers. I used a darker brown thread to outline the flowers. I left the leaves empty (and therefore puffy) and then just echoed all of the leaves and around the flowers.

I added an elastic but I really don't like it. It's just too jarring. I'll have to find some finer elastics in other colours, or just leave it out.

Another Throwback Thursday Christmas runner

At my brother and sister-in-law's, home I took a photo of another Throwback Thursday Christmas runner that I've never included in my blog. Sandra and I may not be hosting Throwback Thursday next year, but I'm sure that older quilts will show up occasionally.

A Christmas runner made BBE (before blogging era)  😊
What I learned
  • I'm glad to report that this basket is the intended size, since I followed the instructions! 
  • I also used a regular cotton batting, so it was a little stiffer. 
  • That's two things that I learned from making that first basket!
  • The grid that I followed to FMQ was only one inch but it came out fine. I did FMQ a half square triangle that I wasn't supposed to. I thought that it would be underneath the basket. But following the instructions properly meant that it was on one side of the basket. It's not really noticeable, unless you're looking for it. 
  • I was pretty upset about making the journal cover too small. I made the side seams smaller but it just wasn't enough. Finally, I went to the store and bought a smaller journal, but it wasn't as great as it could have been. I'll be re-writing my notes before I make the next one.
Related posts
Linking parties
I'm linking this post to the December OMG post since my fabric basket got done! It may be unusual, but I will also be linking up to my Free Motion Mavericks link up since it's still open for a week. Finally there are lots of great linky parties around. Let's see what's going on and support these great bloggers! Off the Wall Friday, Finished or Not Finished Friday, Friday Foto Fun, Can I Get A Whoop Whoop?, Brag About Your Beauties, Peacock Party, Oh Scrap!,
I've also linked the image of the Star Runner in this post to Sarah Goer's Show Me Something With Stars link-up.  

Project details
FMQ neutral fabric basket
Pattern and instructions by Christina Cameli
8" x 5" x 6"
Techniques: FMQ, sewing
Material: lanyard, cotton


Tuesday, December 17, 2019

Making a few gifts

I'm really trying to avoid deadlines and I didn't decide to make a few gifts for Christmas lightly since I don't want these to be IOU gifts!

Christmas gift exchange

I am going to a potluck with my colleagues and of course there is a gift exchange. You know....unisex and under $20 (not including taxes). Personally I usually go for something edible but this year, I had a Christmas mug rug that's been hanging around my sewing room for the last year since I made it after Christmas. That seemed like a good way to start off my gift for the exchange.

Christmas mug rug and quilted mug sleeve

To that, I added a quilted mug sleeve. I made some in November but I had some great coffee fabric that wasn't big enough for a whole sleeve. I decided to experiment with an appliqué on some neutral fabric.

This one is wider than my usual mug sleeves but it worked out really well. I also remembered to make it slightly longer so that the Velcro could easily go around the cup. See, I sometimes remember what I learned.😊

The fabric before being appliquéd. 

Close-up of the quilted cup sleeve and the foundation pieced mug rug.
Progress on the second quilted basket

After making this first basket, I was so excited that I decided to make one for my sister-in-law and brother for Christmas. Since they love neutrals, I wanted to make it using two of the Japanese fabrics that I bought from Kallisti Quilts. 

My first basket - and inside, on the right are two of the
Japanese fabrics that I'm using to make the second basket.
To keep learning (and not get bored!), I decided to view Christina Cameli's Quilting the Grid: Structured Free Motion Quilting on BluPrint (Craftsy) for some inspiration. You can read a little more about that adventure in the What I learned section 😊.

FMQ matchsticks within the half-square triangles
What I learned
  • The appliqué went well on the cup sleeve and it was fun to free motion quilt it since it's not really reversible.
  • I decided that I needed a take-out cup for the photo shoot of my cup sleeve so I went to our local Tim Horton's. It did make a great prop for the cup sleeve and I ended up buying some of their really cute mugs - one of them to include in the gift exchange. So now I'm all ready!
  • I should have watched more of the Quilting the Grid course BEFORE I started marking and sewing the grid on the fabric. It turns out that the grids are usually 1½" and larger. I made mine 1", which really is small.
  • With one inch grids, it was best to keep the FMQ design very simple - so it's going to be another basket with triangles - but these will be half-square triangles.
  • The fabric that I'm using has a very light plaid - and I'm not sure how that will turn out or if it was the best idea. A couple of evenings ago, I couldn't see the stitching, even with my reading glasses on. 😕
  • I also had a really hard time with my top thread. It may have been too old since it kept breaking, although the bobbin thread was fine. Anyway, I found a thread that was close enough in colour and used the rest of the original thread in the bobbin.
Related links
Linking parties

Remember to come back on Thursday for the last Free Motion Mavericks link-up of 2019. It will be open for 2 weeks during the holidays.

Tuesday, November 26, 2019

Learning to make a fabric basket

I took some time to play this week. Since I've signed up to Bluprint (Craftsy) for the next year, I thought that I should actually make something. So here is my experience making a basket from Christina Cameli's Free-Motion Quilted Gifts course.

My first FMQ fabric basket
This is what Christina's basket looks like. Isn't it gorgeous?

Christina Cameli's Free-Motion Quilted basket
As you can see, my basket is shorter and not as firm. I learned a lot though and had fun making it 😊

My finished basket
Free Motion Quilting the fabric
I made a sandwich with batting (more on this later), marked some lines for a grid, FMQ the triangles and then quilted inside alternate triangles. I really like the look of the quilted fabric.

Here's a close-up of the free motion quilted fabric for the basket.
Quilted fabric
The bottom of the basket


Making handles

I made my own handles using an old lanyard since I didn't have any pretty webbing. I cut the lanyard the same length that the web would have been. I then cut the fabric 2 inches wide and slightly longer than the lanyard (I'd rather trim it than not have enough). I pressed both long sides of the fabric ¼", placed the lanyard inside one of the pressed sides and then covered the rest of the lanyard. I sewed the fabric over the lanyard and then trimmed both handles. It really worked out well.
Making matching handles using an old lanyard.
What I learned
  • If you want a stiff basket, you need to use stiff batting!!!!! That really should have been obvious and I did think about it but I'm lazy and the silk batting was right there, waiting to be used. 
  • It quilted up beautifully.😊
  • I'm very happy with the handles - re-purposing lanyards is a great way to make the handles. It's not like the contents in the basket will weigh that much!
  • I wrote most of this last post last night, and it only came to me this morning that I hadn't followed the instructions properly. I'm quite sure that I didn't fold the quilted fabric properly, and therefore my basket is shorter and wider than Christina's.
  • Now that I've made this first basket, I think that I would like to make a couple more as Christmas gifts. I'm going to have to experiment with batting though and figure out if I want the basket higher, as it was intended.
  • I've taken a couple of FMQ courses with Christina Cameli on Craftsy. I really enjoy her courses, including this one.
My basket is full of beautiful Japanese and New Zealand
fabrics from Kallisti Quilts of Waterloo Ontario
Related links
Linking parties
Remember to link up
with Muv this week!

I'll be linking up to some great linky parties. Let's go see what's happening! It's also the end of the month, so there will be lovely parties, including New to Me 2019 with Celtic Thistle Stitches and DrEAMi with mmm! quilts. What I Made Monday, Colour and Inspiration Tuesday, Midweek Makers, Put your foot down, TGIFF, Free Motion Mavericks with Muv, To-Do Tuesday,

Project details


FMQ fabric basket
Pattern and instructions by Christina Cameli
8½: x 6" x 4¼"
Techniques: FMQ, sewing
Material: lanyard, cotton