Thursday, July 28, 2022

Paper is a fibre too at Free Motion Mavericks

Hi! Welcome to Free Motion Mavericks, Week 392. The title of this post might indicate that I didn't get any free motion quilting (FMQ) done this week. It's the correct assumption to make. I guess that my overseas partner (Muv) and I have that in common - except that she's having a great time on holidays while I'm still in my studio 😊. I did however, play with paper and paint. Wow, what an adventure!

Making Accordion Books

I found another course/challenge to follow. I know....yet another one but I've been having so much fun 😍 Did you know that paper is a fibre? As a fibre artist, this is all part of learning to make and play....ok I'm really trying to justify my taking yet another course, but I've had a wonderful time making these accordion books.

Day 1 - Accordion book with 8 pockets

The 5-Day Accordion Books Challenge is organised by Vintage Page Designs through The Handmade Book Club (you will find the links in Related links below).

I had to go to my local art supplier to find the correct paper. I was a little nervous because I generally work with printing paper - so it was a new experience for me. The organisers gave us enough information that I was able to find the 2 sheets of 22" x 30" paper of the correct weight. I did buy 3 sheets of the paper and I'm glad since I have ideas on how to use these books...but more on that later 😊

Day 1 Accordion book with 8 pockets

Day 1 had us cutting all of the paper so that we would be ready for all of the challenges. I love working with this paper. It's a good weight but not too stiff. It's really perfect for these projects. We cut each sheet in four so we ended up with 8 strips of about 7½" x 22". 

For our first book, we also cut up some paper for tags to put into the pockets. 

For each day we have a series of short videos to watch. They are really well made and I found them very simple to watch and follow. The organisers also have a Facebook group for the challenge as well as Zoom calls twice a day to answer questions. 

Tags or bookmarks in the pockets

Each day also includes a video from a guest artist who demonstrates techniques for decorating the accordion book. The guest artist for Day 1 was a collage artist, Kat Kirby. I will put all of the week's guest artists' links in Related links.

I don't remember the last time that I played with water colour paint. I picked up a set a while back but never used it. I also found some spray ink in my box of "paint supplies" that I never use. That's what I used for the front and back of the accordion book.

Book with pockets filled with tags

Back of the accordion book with 8 pockets

My husband was quite impressed with this accordion book. Since he's always running out of bookmarks, I'll make him one and included a couple of bookmarks with it. He said that he'll fill up the other pockets with the bookmarks he has.

Day 2 Accordion book with 4 panels and flap

I made this accordion book but haven't had time to embellish it. It has 4 pages, a flap and a closure. 

Day 2, a 4 panel accordion book with flap

Here's how to close the flap

Accordion book ready to be embellished and used

Day 3 Layered Accordion Book

I made this accordion book but adjusted it to have more pages instead of an inside layer. The inside layer was like a band inside the book. It's pretty but I really want to be able to use these books.

Stitched fabric on the front of the book

I just had to add fabric to one of the books. I cut the fabric and then sewed it onto the paper using the walking foot that was still on my machine. I did increase the length of the thread so that it wouldn't just puncture the paper.

Instead of keeping the layer in, I cut the middle to make extra pages

The book also had a belly band to keep it closed. I stitched fabric to the outside of the band.

Accordion book with belly band

Here are the three accordion books posing in front of my Jag 😊

Three accordion books posing in front of the Jag!

Day 4 is a spinning accordion book while day 5 is a flag accordion book. Both look very intriguing. I'll have to write another post when I've made possibly embellished them. 

What I learned

  • I can see how people who don't want to paint, could have fun using water colours. I just might try more of this one day.
  • I found that water colours are a lot like painting on fabric in that it doesn't really matter what you paint, you can always add stencils and stamps (or FMQ to fabric) to make it look good....and that's exactly what I did! 
  • I love making these accordion books and I love it when they can actually be useful (to me or others!)
  • I had to re-attach the button on the accordion book with 8 pockets. Paper is not as strong as fabric so I ended up placing a piece of scrap fabric on both sides of the paper and then stitching the button through these scraps. It should be pretty secure now.
  • I have a few ideas for using these books. I was thinking that I could use two of them to illustrate or explain Stéphane's Version 2.0 quilt as well as Jeannine's Paddington quilt. I'm sure that I could play and make a variation of these with some pockets to hold things as well as space to draw or write. It would make a great souvenir of the making of their quilts. My mother made a book for the original Stéphane quilt and it's been really useful to the making of Version 2.0.

Related links
Linking parties
I'll be linking up to many fun parties. Let's see what's going on. Remember to link up your project below! Put your foot down, Needle & Thread Thursday, TGIFF, Beauty Pageant, Peacock Party, Finished or Not Finished Friday, Off The Wall Friday, Patchwork & Quilts, Monday Making, Design Wall Monday, Midweek Makers, 

Free Motion Mavericks

Welcome to Free Motion Mavericks. If you didn't get any FMQ done, you're not the only one, so don't let that stop you from linking up to this party!

Last time Dawn, of Quilting by Dawn, showed us her Sweet Summer Strawberries Quilt. This is my favourite photo of the quilt. What a beauty. If you didn't see it last time, go check it out!

Sweet Summer Strawberries by Quilting by Dawn

It's now your turn.


You are invited to the Inlinkz link party!

Click here to enter

Monday, July 25, 2022

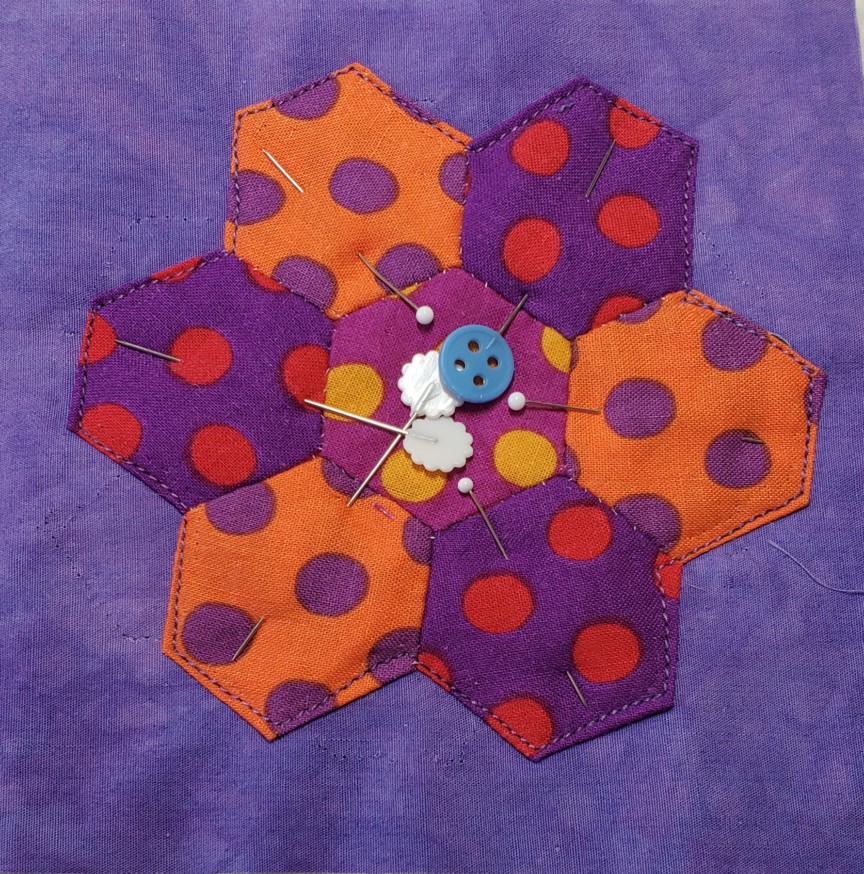
Happy hexie flower mug rugs

Hi! It would seem that hexies are back into my life. They are very meditative to prepare and to stitch together (i.e. relatively mindless but enjoyable for a short time). 

Happy Purple & Spots

July's colour for the 2022 Table Scraps challenge is purple and the theme is circles, spots and dots. Until last year I had very few fabrics with spots but because of a wonderful gift of scraps, I now have tons.😊

Two English paper pieced, appliquéd, purple & spots mug rugs

As soon as I saw the July theme of spots, I knew that I had the perfect scraps to English paper piece (EPP) some hexies. I also had some gorgeous purple hand-dyed fabrics in my scrap bin. This project was meant to be!

Making the Mug Rug

My first try at stitching the hexies onto the background and batting was a dud since I used free motion quilting (FMQ). It was a mess. I don't often take things apart, but I did this time. I then took my time, pinned down my hexies and very carefully used the walking foot to stitch on the outside of the hexie flower. If you enlarge the picture below you can see puncture marks of very crooked stitch lines around the edges of the flower, 

Second attempt at appliquéing the hexie flower

Using a walking foot

Hexie flower stitched down

The next step was to make the mug rug. I had actually planned ahead a little bit and knew that I wanted an envelope or pillowcase type finish. The background piece was twice the length of the mug rug so that it could be used for the background. Below you see that the edges are stitched on two sides of the fabric and the one side is the fold. I left one side open so that I could flip the front out.

Leaving one side open
I learned a couple of lessons during the making of the first mug rug that I was able to apply to the second one (see below). 

Stitching the envelope of the second mug rug

Stitched on two sides, ready to be turned inside-out.


Flipped over through the open side

I found that the trickiest part was closing up the open side. Again, I learned a couple of things with the first one that I was able to put into practice on the second.

Over-stitching around the four edges of the background

Two Finished Mug Rugs


First happy hexie flower mug rug


Second happy hexie flower mug rug

Mug rugs in the clover

Mug rugs on a very large Hosta :-)

More Mug Rugs in progress


A third mug rug appliquéd and stitched by hand (WIP)
 

Last hexie mug rug (WIP)

What I learned
  • My most important lesson learned is to attach a hexie flower to the background using a walking foot, not FMQ. Lines need to be straight. With all of the layers of fabric, it's a perfect job for the walking foot.
  • It was very useful to make one mug rug at a time. I was able to use a couple of tricks that I learned from my first try:
    • It was easier to make the batting a ¼" smaller than the background, and then use the outside of the batting as a guide to stitch around the edges.
    • When leaving an opening to turn the mug rug over, it's best if the opening is a smaller opening than a full side. It was very easy once right-side out, to stitch up the open portion when a side had been partially stitched on both ends.
  • You may have noticed that none of my hexie flower mug rugs are centered. I was hoping that I would get better at that as I made more but I seem to have regressed, so my advice is to make it obviously not centered so that it looks like a design feature. 😊

Related links
Linking parties
I'll be linking up to many fun linking parties, including Muv's Free Motion Mavericks which is still on until tomorrow; as well as Joyful Quilter's 2022 Table Scraps Challenge, as soon as the party opens. Off The Wall Friday, Monday Making, Design Wall Monday, Patchwork & Quilts, Slow Sunday Stitching, Beauty Pageant, Oh Scrap!, Put Your Foot Down, Needle & Thread Thursday, Midweek Maker, 

Project details


Happy hexie flower mug rugs 
4¾" x 4½" and 4½" x 4½"
Materials: commercial scraps, hand-dyed background fabric, ¾" English paper pieced hexies
Techniques: English paper piecing, appliqué, quilting with walking foot.


Thursday, July 14, 2022

Books everywhere on Free Motion Mavericks

My favourite summer pastime is reading. In this post, we are celebrating all kinds of books - the free motion quilted (FMQ) and the paper pieced kind 😊 

FMQ books of the Version 2.0 kind

I wanted to FMQ something on my son's quilt but it had to be simple and relatively mindless. As I looked at the PowerPoint map of the Version 2.0 quilt, I realised that I could quilt a whole bunch of books onto one of the maroon stripes. Yeah!

FMQ books following the patterns copied
 onto Golden Thread quilting paper 

I started by tracing 5 or 6 images of books from the internet. From the first tracing, I made a second copy and then pinned them onto the stripe.

All of the traced images are pinned on the stripe

Eventually I had to remove some of the traced images since they were getting in the way of the FMQ. It was easy to pin them back when I was ready to quilt them. 

I wish I could say that it was easy and mindless to quilt but that would not be true! Since the quilt is queen size, it's awkward to quilt to begin with. I figured out that I had to start at a top corner of an image so that I could work my way forward and actually see the tracing. I also quilted all of the books sideways since it was the easiest way to place the quilt within the machine.

Here are a couple more pictures!

All kinds of different books -
 some even have a feather pen!

Many books as well as the night sky


Update on the Summer Book Club

I'm quite behind on the making of my Tall Tales blocks but I did manage to make ten so far.

Here are my ten lovely book blocks


What I learned
  • I'm glad that I ended up doing some FMQ on my son's Version 2.0. It's so lovely to see the different areas slowly being filled! It's very encouraging.
  • Next time, I think that I'll use a thin marker to trace the images so that they'll be easier to see.
  • There is a blue stripe next to the maroon one that I may tackle next. I'm going to FMQ some herbs since it's something that Stéphane is growing. I hope that he has better luck than me! I hope to practice drawing these and then quilt them without tracing paper. 
  • I'm not going to predict how my Summer Book Club will go but I think that if I make the blocks in an assembly-line fashion, that I'll have better luck with them. I did make a huge effort to concentrate on the last block and it did go well, but I still used the seam ripper a little bit.
Related links
Linking parties
I'll be linking up to many fun linking parties. Let's see what's going on out there...and remember to link up your project below - it doesn't have to be FMQ related! Midweek Makers, Design Wall Monday, Off The Wall Friday, Finished or Not Finished Friday, Peacock Party, Patchwork & Quilts, Monday Making, Design Wall Monday, 

Free Motion Mavericks


Welcome to week 388 of Free Motion Mavericks. I hope that you're enjoying your summer so far!
Gail, of Quilting Gail, finished her Pop Star Quilt using mmm quilts' pattern during the QAL. If you didn't see it, here it is.

Gail's beautifully quilted Pop Star quilt

It's your turn 😊


You are invited to the Inlinkz link party!

Click here to enter

Thursday, June 30, 2022

Coneflowers and books on Free Motion Mavericks

Welcome to Week 388 of Free Motion Mavericks! I hope that this pre-holiday weekend finds you well 😎. I've got a squirrel and a Summer Book Club update to share with you.

Blue Stripes for a Table Scraps Challenge

This week I was very restless so I grabbed my box of strips, picked out the blue ones (mostly) and started sewing. This is my favourite kinds of piecing! I made it all up as I went along with stripes on the horizontal and vertical while adding some other colours in the mix. As you can guess, this month's Table Scraps theme was stripes and the colours were bright or dark blue. 

Playing with blue stripes

I started with the stripes but knew that I wanted to add more to it. What would happen if I added something on top of the stripes? Would it make a good background?

Blue stripes...now what?

I started jotting down ideas. 
  • Use hand-dyed scraps for the appliqué.
  • Add complimentary colours - orange with blue.
  • Look for flowers that would fit.
Looking through my collection of Vesey Bulbs garden catalogues, I found the perfect flower - it's a Marcella Butterfly Rainbow Coneflower (I'll try to get some for next year 😊)

I have the most amazing pink orange scrap, so I backed it with a fusible web adhesive. I also did the same with a green piece. Based on my rough drawing, I cut up petal pieces, leaves and the centre cone.

Preparing a drawing and then cutting out fabric

Once I finished the appliqué, it was time to free motion quilt (FMQ). I had a blast stitching the flowers and leaves. I used some newly purchased Gutermann Recycled Polyester Thread. This thread is made of 100% recycled plastic bottles. I bought them from Bridget O'Flaherty when she spoke to our guild about sustainable quilting. The thread stitched really well.

Since my garden is finally presentable (it was so wet and then hot that it was impossible to mow the lawn!), I went out first thing this morning, to take pictures in the dew. It's too bad that it's too early to take a photo with my own coneflowers!

In front of my thriving pink campion

Pretty purple flowers that are related to geranium

My flox are lovey

I think that this runner has found it's new home in my living room 😊

A new table runner for my living room

Summer Book Club QAL 2022

At the beginning of June, I started getting ready for the Summer Book Club QAL. For some crazy reason, my One Monthly Goal (OMG) for June was to make 10 blocks. I don't know what I was thinking but I did come close. If I hadn't make the table runner, I might have reached my goal but since it's the book blocks that made me so restless, I probably wouldn't be in any shape to post about it! 😊 

Don't get me wrong, the Tall Tale book blocks are great to paper piece but for some reason, my distracted brain just couldn't focus! Every block that I made had at least one, and usually many more oops! moments. Unfortunately my new seam ripper has gotten well used.


Here are my first four blocks.

My first 4 lovely book blocks

The first 8 Tall Tale book blocks


What I learned

Squirrel!!!

  • It was really weird how each of my blocks had several things that I had to redo. I just couldn't seem to focus on the piecing - my mind was all over the place.
  • Finally, when I just started piecing together some blue stripes, all was well! The FMQ of the flower went well, although by the time that I had finished the rest of the FMQ, I was getting sloppy. I should have stopped but I wanted to get this ready for this post.
  • It's like the foundation paper piecing wasn't mindless enough but not difficult enough to require my full attention. I'm going to have to work on that if I want to get past 8 blocks!
  • I want to mention Bridget O'Flaherty, our guild's guest speaker for June. I realised through her presentation that I knew her work! In 2008 I got a calendar, Quilts: Canada The land we love. It was all of Bridget's work! This is when I discovered art quilting. Bridget still quilts but with an emphasis on sustainability.
  • I have to apologize to my son for not working on his Version 2.0 quilt but I was too restless. I did start drawing some geology images from his towel though 😊  
  • Happy Canada Day and Fourth of July!

Related links

Linking parties

I'll be linking up to many fun linking parties, including the June Table Scraps 2022 linking party! I managed to miss the DrEAMi Squirrel linkup again but you may as well check it out! Midweek Makers, Needle & Thread Thursday, Finished or Not Finished Friday, Off the Wall Friday, Beauty Pageant, Peacock Party, Patchwork & Quilts, Oh Scrap!, Monday Making, Design Wall Monday, 

Great news! Susan of Quilt Fabrications featured my runner in her Midweek Makers post! Thanks Susan 😊

Project Details


Flower Power runner
17" x 13"
Materials: commercial and hand-dyed fabric scraps, Gutermann Recycled Polyester Thread 
Techniques: improv piecing, appliqué, and free motion quilting


Free Motion Mavericks

I hope that you've had a chance to work on some free motion quilting (FMQ) this week. Did you see the quilt that Gail from Quilting Gail had in the Fons & Porter's Love of Quilting magazine? If you didn't, then check it out!

Quilting Gail's Summer Sailing

It's now your turn to link up!


You are invited to the Inlinkz link party!

Click here to enter

Saturday, June 25, 2022

Learning from the exhibition

Fibre 15's exhibition, Conversation, ends Sunday. It's been a very busy month with lots of learning. Here's a peak at some of it.

Getting ready

I've been to openings of exhibitions before, but it's a lot more exciting when you're part of a smaller group of artists. The vernissage was very well attended with roughly 100 people showing up. It was also the opening of a new shop as well as the first event of the year for the Stone School Gallery.

Journey of many paths at the exhibition

The vernissage was on the Friday but all of the art had to be delivered to the team that was hanging the exhibition on Wednesday. Since my pieces are not fragile, there was minimal packing but I did have to put labels on all of them as well as wires and dowels for hanging.

Adding the wire on the back of the canvas


Soaking in the stiffener

Letting it dry
For the concertina book, I needed to stiffen the first and last pages so that it would stand properly for display. I used Golden's GAC400 stiffener. It worked quite well.


I also had to add labels. Since creating labels is not something I enjoy doing, I did it as easily as possible. I backed a piece of pale batik with iron-on adhesive and then used a permanent fine marker to write. I also remembered to add in my small fabric label.😊

You'll notice that I wrote a lot more on the Let Them Flourish label in case it was sold (so far, it looks like I get to take it home...I'm very happy about that!)

Label for Let Them Flourish

I kept the label very short on the Please let me play because I knew that it would come home with me. I just added the link to the post since the post explains everything much better than a few words on a label.
The Please let me play label only has my name and ULR to the post.

At the Gallery


The gallery really looked wonderful with all of our art there. Here are some of the photos that I took, which represents a small part of the show.

A lovely corner with art

Let Them Flourish on a pedestal 


The concertina book standing more or less straight 😊


Some of my favourite pieces by Elaine Quehl

Teaching a Meditation Stitching class


Although I have a lot of experience teaching, this was the first time that I taught any kind of art or stitching course. I'm really glad that I chose Meditation Stitching since there is really very little to bring, and no sewing machine to lug around!

Bilingual poster at the Stone School Gallery

Since the gallery is run by volunteers, as exhibitors, we had to volunteer some time to sit at the gallery during visiting hours. I chose to be there last Saturday and Sunday since I was teaching on the Monday. This gave me lots of time to work on my meditative stitching samples for the class.

Sample made of extra flying geese blocks

Sample made with the first English Paper Piecing
that I ever did (a total dud that worked out well for this)

This sampler was created to remember the weekend. It includes a shell and a washer that I found on the beach at my brother's trailer. I haven't finished it since I didn't have all of my thread with me.

Sampler to remember the weekend.

During the class


It's not usually a good sign when a class is very quiet, but in this case, it was excellent! After an introduction, everyone was hard at work stitching. They found that the time flew by very quickly! Here are some of the results of the class.

A lovely blue block from an experience stitcher


Great blocks from a student who had never embroidered!


Lovely blocks on denim by an experienced stitcher


A fun block with lots of stitching by another experience stitcher

During the class I also did some meditation stitching. Instead of the usual 4" block, I made a bookmark. I hope to make more of these.

Lots of stitching on the bookmark
Making a fun bookmark


What I learned
  • It took a lot of effort on everyone's part to get this show done and it looked great!
  • Creating the art work takes time but getting ready to show it is also very time consuming, and includes many of my not-so-favourite tasks!
  • I was so impressed with how the show looked - I really felt like an artist 😊
  • Volunteering for 2 days and then teaching a class the next day was a lot! It took me days to recuperate and that's with everything going well.
  • While I was volunteering at the show, I'm so glad that I brought a variety of work to keep me busy. I love embroidery but I can't do it for 6 hours at a time. Thank goodness I had some English paper piecing (EPP) - hexies - to play with!
  • I'm looking forward to having some fun playtime for the next while. I really need it!
Related links
Linking parties
I'll be linking up to many fun linking parties. Remember to drop by Muv's to link up to Free Motion Mavericks this week! Off The Wall Friday, Peacock Party, Tips and Tutorials on the 22nd, Patchwork & Quilts, Oh Scrap!, Slow Sunday Stitching,