Showing posts with label Canuck Quilter Designs. Show all posts

Thursday, April 18, 2024

Mystery Quilt so far on Free Motion Mavericks

Hi and welcome to week 478 of Free Motion Mavericks. I'm trying to catch up in my 2 Colour Mystery Quilt with Joanne of Canuck Quilter Designs. I keep trying to get caught up, but then every Thursday we get another clue....😉 

2 Colour Mystery Quilt


Today we'll be getting the Week 8 clue. Here is what I've done so far.


Week 1 was about cutting the fabric. Since that's my least favourite part of quilt making, I only cut what I have to, as I need them. So I actually started cutting Week 2, when I knew what I needed!

Week 1 - cutting for week 2

Week 2 blocks

I had quite the challenge putting the Week 2 blocks together but I did it! 😊

Week 3 was making a whole bunch of half-square triangles. That went better.

Week 3, large and small half-square triangles

In Week 4, I sewed some of the half-square triangles together. That's when things start getting a little bit wonky, but generally not too bad.

Week 4, making a block with some of the half-square triangles

Weeks 2 to 4 with a couple of Week 5 pieces

In Week 5, I used some of those extra half-square triangles to make these blocks. I also chain pieced some of these. It sewed up really well.

Chain piecing the flip and stitch pieces

Week 5 blocks

Week 5 blocks in the other colour

For Week 6, I've cut up most of my fabric and started putting them together. I have 2 blocks of each colour done - only 22 more to go!

Week 6 in first colour

Week 6 in second colour

These are my cut pieces for Week 6.
I haven't counted them yet 😃, I just kept cutting!
What I learned
  • I wasn't doing too badly until I started sewing the different parts together. That's when things tend to get pretty wonky!
  • I trimmed up what I could of my Week 4 half-square triangles, but only a couple were too large. Most of them of OK or at least an ⅛" too small. That means that things are going to get wonky quickly!
  • I'll be trimming the Week 5 and 6 blocks - I know that the Week 6 blocks are pretty wonky, so I'm going to be more careful when I make the 22 others (of each colour). Hopefully I'll figure it out before I'm done!
  • As you saw, I used chain piecing as much as I could. I hope that the accuracy is OK.
  • In Week 7, we start putting the different blocks together. It looks very cool 😎
  • I think that my best bet is to use a very scant ¼" to stitch things together.
  • If you haven't read it yet, for the first time ever I participated in the First Quarter Check-in with Yvonne of Quilting Jetgirl. I'm glad I did because I've been all over the place, so it was good to look at what I've done so far. Thanks Yvonne!

Related links
Linking parties
I'll be linking up to many fun linking parties. You may want to check them out, after you've linked up below! Put your foot down, Midweek MakerFinished (Or Not) Friday, Patchwork & Quilts, 15 Minutes to Stitch 2024Design Wall Monday, Sew & Tell, Needle & Thread Thursday


Free Motion Mavericks


We've had a busy week! Thanks to everyone who linked up. Let's see what our quilters were up to!

Kat from Scrapbox Quilts linked up her very cute Dino Dinosaur quilt. She used a number of FMQ designs, from diamond crosshatch, stars, stippling to following the elements making up the dinosaurs blocks. If you want to see more, check out the picture of the back of the quilt on her blog post.

Kat's very cute Dino Dinosaur quilt

I saw this wonderful quilt on Frédérique's linking party and asked the author to link up 😊. It's a two-sided quilt made by the blogger of "des tulipes et des coeurs" (tulips and hearts). To read her post, you can use Google Translate which is located in the table of contents at the top right corner of the blog. 

She made this quilt for 18 month old Romy. She FMQ from the back of the quilt, after stitching-in-the-ditch the bands of colour and the name. Check out the post to see close-ups of the different FMQ designs that she used - it's worth it! 

The back of Romy's quilt by blogger "des tulipes et des coeurs"

The front of Romy's quilt - mostly Kaffe Fasset fabrics

Frédérique of Quilting Patchwork Appliqué finished her Jardin de corail (Coral Garden) quilt. It was made as part of a QAL and required 16 animals in the piece! She mostly quilted around each tropical fish that can be found in a lagoon. It really is wonderful. It was finished using the facing method so that it looks like they are in the lagoon, as opposed to an aquarium.

Frédérique's Jardin de corail (Coral Garden) quilt

Frédérique also made 2 stained glass mini quilts. Although she didn't quilt them, I want to share with you her poinsettia mini because it was attached to the backing and batting by using sequins and beads in the centre. How cool is that! 

Frédérique's Poinsettia stained glass mini quilt,
attached with sequins and beads!

It's now your turn!

You are invited to the Inlinkz link party!

Click here to enter

Monday, March 11, 2024

2-Colour Mystery Quilt

Hi and welcome 😊 I've been trying to stay away from challenges and quilt-alongs because they are my number 1 creators of UFOs. Also, I'm accuracy challenged, so traditional quilts are not my favourites....but this is a mystery quilt with only 2 colours and it's designed by Joanne at Canuck Quilting Designs. I was a tester for one of her quilts (before I dived into art quilts). I love her designs and her instructions are exactly how I like reading my patterns. So....I just had to participate.

2 Colours Mystery Quilt 


I thought that I had the dark fabric for the mystery quilt but I couldn't find anything I liked in my stash for the lighter colour. I figured that if I had to buy fabric, that I might as well get both fabrics. I got lucky and found some fabric on sale at my local quilt shop. The dark green was the end of the bolt and the lighter fabric was in the reduced basement.

Fabric for week 2


Week 1 - cutting fabric


Here is my fabric cut for week 2. I really don't like cutting fabric and I'd rather do it in chunks than to cut it all at once. Besides, some days I'm more accurate than others - so it's good to spread out the task.

Choosing, washing and cutting fabric

Fabric all cut for week 2 plus an extra block for later

Before cutting anything, I figure out on paper, what I need to cut as a first step. As you can see, I arrange my fabric using large paper clips. The clips have numbers because I created them when I learned to do foundation paper piecing.

The written strips with the sizes of each block are selvage edges from the fabric that I've just cut. I find this a great way to keep myself organised.

Accuracy Challenged


I was very careful when I cut my strips but I still managed to mess up my 5" strips. Since I have more than enough green fabric, I cut as much as possible from the non-wonky part, and then sub-cut it to 3" width and then 5" long. 

I was working on a green cutting mat and had difficulty seeing the green fabric underneath my ruler, so I flipped it over and cut it that way. It worked!

Cutting fabric from the back - it's easier to see!

Now I try to quilt a couple of blocks to make sure that I have everything correct, before I do chain piecing. That's because if there's more than one way to stitch the pieces together, you can guarantee that I'll find it!
The wrong way of sewing the blocks together!
The block on the right is the correct way.

I even placed a block in front of me to make sure that I got it right....and I managed to get it wrong once more before it came out ok!
A block on the wall to ensure
that I get it right...

After getting it wrong a second time, I called it quits. Today I was hoping that it would go better....well, I did get quicker at pulling the stitches out! I now have 6 blocks done of each colour combination. Six more and the first week will be done!

Blocks for week 2 done! 😊

What I learned
  • Is knowing that I'm accuracy challenged a good thing or is it a self-fulfilling prophecy? 
  • I just figured out that I was using the wrong cutting chart - so I have more fabric to cut! 
  • I really do try to be careful, but it's when I think that I finally have it under control that I stop checking 3 times before doing anything, and then get it wrong.
  • Don't let me deter you from making this quilt. I'm sure that you would be fine 😁
  • Now you know why I prefer improv blocks and art quilts - but I don't want this to stop me from making quilts with regular blocks. It's nice to have a variety of projects on the go, and I do consider myself a quilter....just not a great piecer 😊
Related links
Linking parties
I'll be linking up to many linking parties. Why not check them out? 


Sunday, July 30, 2017

Final Celebrate - Fêtons 150 post

The adventure started February 13th, 2017 with the first of six linking parties to Celebrate - Fêtons 150. There are still many celebrations happening across Canada but my big party is over.

It's been a real learning experience for me to host these link-ups. Not only did I have to learn the whole linking up system (thank goodness it was relatively painless!) but I also researched, found and shared all kinds of quilting projects and events to celebrate our 150th.

"Canada On the Go" pattern
I didn't think that there would be much to say in this post, but a quick look on Pinterest led me to all kinds of great quilts and projects.

This first pattern is from a Row By Row 2017 - "Canada On The Go." It was designed by Sew Karen-ly Created for Mrs Pugsley's Emporium, in Amherst, Nova Scotia. You can read about Karen's design process and photo shoot on her blog. (See Related Links below)

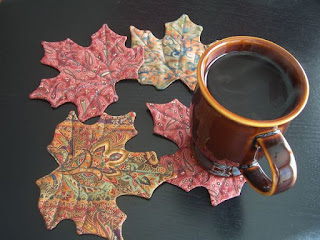
This next project is not specifically for Canada 150 but it's so cute, I couldn't resist. These are Maple Leaf Mug Rugs. You can find the tutorial and pattern on the Quilting Board, posted by BuzzinBumble. If you don't make it for the 150th, you can make it to celebrate the upcoming, but hopefully not too soon, fall!
Maple Leaf Mug Rug - posted by BuzzinBumble


As far as Canadian icons go, the Hudson Bay is pretty high on the list. Here is a pattern based on the colours of the original Hudson Bay trading blankets. The Bay Blanket Table Collection includes patterns for a placemat, mug rug and table runner. It's really lovely. The pattern is by Indygo Junction.

I'm really sorry that I missed the Canada 150 Quilt Along this winter. It was hosted by Lorna Costantini and featured her quilt, Canada 150 A Modern Quilt. The Quilt Along is over, but you can check out her posts and pattern.

Canada 150 A Modern Quilt


Here's a free Canada Maple Leaf block pattern by Monica Curry Quilt Designs.

Block pattern by Monica Curry Quilt Designs
 Here is a cute Canadian Flag (Maple Leaf) Mug Rug by The Patchsmith's Pattern Store.

Canadian Flag (Maple Leaf) Mug Rug
Spirit of Canada was Spruce It Up Quilting's 2016 Block of the Month to celebrate Canada's Sesquicentennial. The pattern was designed by Madelaine Higgins, pieced by Lorette Cole and machine quilted by Agathe Klingenberg (Sussex). Look for the pattern - it's to be published soon.

Spirit of Canada - Spruce It Up Quilting's2016 Block of the Month
Canada Eh?
Mystery Table Runner

In the Quilter's Connection magazine this winter, there was a Mystery Table Runner contest. The Summer issue has released many wonderful pictures of these runners. Here's what the finished runner looks like.

Quilter's Connection magazine mystery table runner


The Summer edition of the Quilter's Connection magazine is full of interesting articles and quilting projects celebrating Canada's 150th. If you get a chance, it's worth reading!

Northcott's Sesquicentennial
Celebration fabric collection
I couldn't end Celebrate - Fêtons 150 without mentioning Northcott Fabrics. By now, we're all familiar with their Canadian Sesquicentennial Celebration fabric collection as well as the Stonehenge OH CANADA Our Home and Native Land collection. These fabrics have played an important part of our celebratory quilts this past year.

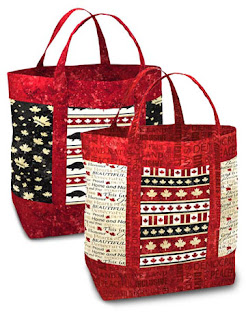
Oh Canada bag by Northcott


If you check out their patterns pages, there are many free patterns using their various Canadian collections. There are also many patterns available at your local quilt store. Here is one of the many projects in case you're still in the mood for making Canada 150 projects!

Finally, here's a recap of my finished Canada 150 projects.
Canada 150 - Beaver block designed by Sew Fresh Quilts


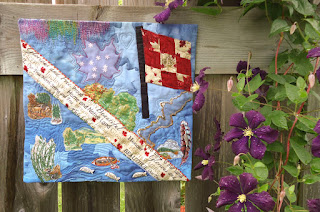
Canada 150 Art Quilt


Sergeant Sesquicentennial


Canada 150: 1867-2017


What I learned
  • I don't think I would have made these Canada 150 projects if I hadn't been hosting this party. What a benefit and great souvenirs!
  • Thank you so much for cheering me on, reading and participating with me in this party. It's been a great adventure.
  • In fact, it was such a good experience that I want to continue it (sort of). As you may have read in my July 20th post, I will be hosting a Learning Quilt-A-Long starting Tuesday, August 1st. It's going to be a lot of fun - so I hope you'll join me.

Prize!

Lastly, here is the prize for this final link-up. I've chosen it because it fits two themes. First, it's a Canada 150 project, but it's also a technique that Kathy calls the “Peek-a-boo Appliqué“.  The maple leaf block is made with reverse appliqué, satin-stitched over a strip-pieced patchwork block. It's great for the Canada 150 project, but can also be used in other ways, like this gorgeous maple leaf.

Using Kathy's
Peek-a-boo Appliqué technique
This technique may even be something that the winner will learn this month!
Canada 150 quilt by
Kathy K. Wylie Quilts


Our winner in this final Celebrate - Fêtons 150 is Joanne, of Canuck Quilter Designs. Thanks so much Joanne for sharing your quilt and pattern with us.


Related Links

Linking Parties I will be linking up to lots of link-ups. Why don't you join me and see what everyone is doing this summer! Finished or Not Friday, Oh Scrap!, Off the Wall Friday, Slow Sunday Stitching, Monday Making, Main Crush Monday, MOP Monday, Linky TuesdayMidweek MakerLet's Bee Social, Needle & Thread Thursday,

Remember to come back August 1st to join in the Learning QAL fun!


Monday, December 19, 2016

Pattern Testing a Baby Quilt

I was thrilled when Joanne of Canuck Quilter Designs asked for volunteers to test the pattern for her new Tic Tac Who? Baby Quilts. I've always wanted to do this, so I volunteered and she accepted.

Tic Tac Who? baby quilts by Canuck Quilter Designs
I was contemplating what colours to us when I talked to my friend and colleague, Kathy, about this latest project. Since I didn't know who I was going to make the quilt for, and Kathy needed a baby quilt for her nephew's new baby, we agreed that Kathy would pick and buy the fabric and that I would make the quilt. I would make the Tic Tac Hoot baby quilt, the one with the owl.

I received the pattern and had roughly a month to make either some of the panels or the whole quilt. When I agreed to make this quilt, I didn't know that I would be travelling to the American South-West. It was actually great timing since it gave Kathy time to shop and then wash the fabric. When I got back, everything was ready for me!

Tic Tac Hoot quilt top
It took me roughly two weekends to make the quilt. The pattern comes with three options - a duck (easiest), a puppy (easy), and the owl (more challenging). It took me a while to piece together the owl. The instructions were clear but I needed to un-stitch quite a few pieces, mostly because I kept forgetting that the yellow was not Kona fabric and therefor wasn't the same on both sides!
Tic Tac Hoot - all finished!

Quilting pattern
drawn on tracing paper
For the quilting, I stitched-in-the-ditch around the sashing. My stitching isn't great, so I wanted something different for the "X"s. I ended up quilting in the yellow space, outside of the "X", about a 1/4". I then did the same inside each "X". I also quilted 4 circles inside the coloured blocks, to go with the tic-tac-toe theme.

To determine how to quilt the owl, I traced the owl on a sheet of tracing paper and then tried out some feather patterns in two directions. I decided to quilt the feather in the same direction as the owl. As I look at the quilting pattern now, I think I like the upside down feather better - oh well... He's still a handsome fellow!

The FMQ owl
The FMQ owl

Testing the quilt was a great experience. Joanne did a wonderful job on the pattern. I really liked the way she laid it out with simple illustrations. I was even able to contribute with some suggestions!

What I learned:
  • When I first started the project, I kept having to remind myself to read the instructions! I guess when we're familiar with some of the process, it's easy to skim over the instructions and just go ahead. For Joanne's sake, I did read everything carefully.
  • I didn't realise how visual I am. As I mentioned, I really liked the illustrations and was drawn to them right away. Again, I had to remind myself to read the instructions that went with them :-)
  • I need to invest in one of the many circle templates available - I used some plastic lids. They worked well but I only found a few sizes. Maybe that needs to go on my Christmas list!
  • I really enjoyed making the pattern. I was, however, reminded of why I love creating art quilts without patterns - the accuracy of my piecing is really not great, even when I pay attention!
Thank you so much Joanne for this opportunity! Also a very special thank you to Kathy, who chose and bought the fabric. I really hope that her nephew will love the quilt :-)

If you like this project, check out Canuck Quilter Designs's website. The Tic Tac Who pattern will be available soon.
I've also linked up to Sarah Goer's Show Me Something Orange linking party.