Thursday, December 19, 2024

Another Squirrel on Free Motion Mavericks

Hi and welcome 😎 It's a bright sunny day here and there's just enough snow on the ground to make my backyard look lovely with all kinds of tracks made by my nocturnal friends. Today I'm sharing with you a literal and figurative squirrel project!

Narrative Textile Bookmaking


I did it again - for the last month I've been attending an online course with the Minnesota Center for Book Arts. The course was taught by Teté Montero. It's been interesting but I didn't spend as much time on it as I would have liked. Among other things, it took me a while to figure out what I wanted to do and how. It's now slowly coming together, after the course is finished!

Here are the first two pages that I've made for the book. They probably won't be the first two pages of the book but they are the foundation on which the book will be made.

My first page, still a work in progress

I've used free motion quilting (FMQ) to make both of these. I'll eventually be adding hand stitching and embroidery. Both of these are on hand-dyed fabric. The pink one was a corner of an old tablecloth that was gifted to me. I didn't use any fusible web - I just wanted to stitch! 

For the squirrels, I'm using some upholstery fabric that I received this fall from an artist friend. It's all polyester but feels like velour. I was able to remove the backing from them, so it's not as thick.

The second page still needs the second squirrel 

I don't know the squirrels' names yet but they'll let me know when they're ready! The story is a version of Aesop's (ancient Greek) and Jean de La Fontaine's (17th century) tale about the ant and the grasshopper. In French, La cigale et la fourmi is the only poem that I know by heart. I've always thought it rather mean so I've created a kinder version. The original versions are about planning while my version will be about cooperation.

Close-up of the playful squirrel

My story is about two squirrels who live in the same neighbourhood. The playful squirrel loves colour and has a beautiful treasure of pretty things in their nest while the busy squirrel works hard to amass what is needed for the winter.

There's not much else to share with you right now except for my first squirrel template and pictures of the two squirrels that visit my backyard😊

Template of a squirrel in three pieces

I realised last night that I didn't have a picture of a squirrel on a fence (i.e. not eating!) so I took this one this morning. Now I'm ready to trace and then add the squirrel to my second page.

Squirrel on a fence posing for me!

I'll leave you with more squirrel photos.

Eating Squirrel 😋

Perched, eating squirrel 😋

Another eating squirrel? 😉

What I learned
  • I really need to be more realistic when I decide to take another class. I knew that a course in December would be pushing it and I was right. It was still a good class and I'm not sorry that I took it since it's encouraged me to start my first narrative book.
  • I guess that's where the value in taking a class for me lies. At this time, I'm comfortable with many techniques and sometimes what I need is the encouragement to believe that I can do it. 
  • Courses often help me figure out how or where to start and then force help me to focus on the project.
  • Most of my best pieces where created based on a class that I took - and many are from TextileArtist.org.
  • When I take a class, the teachers often want us to make samples but I know that if I only make a sample, that I'll probably never make a real piece from the class. That's why I usually just jump in and make a more elaborate piece than what is requested.
  • It also takes me longer and they're usually finished long after the class is done!
  • I've decided that my next step in this project is to write out the narrative for the story. It might not be what will be in the book, but I want the whole story before I figure out how to add text to my pages.
  • I've also realised that there are many ways of creating a narrative textile book. So once I have my story, I'll know how to continue. 
Related links
Linking parties
I'll be linking up to many fun linking parties. Why not check some out, after you've link up below? Monday Musings, Design Wall Monday, Sew & Tell, Midweek Makers, Put your foot downOff The Wall Friday, Finished (Or Not) Friday, Patchwork & Quilts,

Free Motion Mavericks


Welcome to week 511 of Free Motion Mavericks! It was another productive week! Thank you so much for linking up😊. Here are the projects from last week that included FMQ, ruler work or walking foot quilting. 

This week Gail of Quilting Gail used her leftovers of Peppermint Sprinkles to make a Fractured Paint Box quilt. What a happy, festive quilt! She quilted it using her rulers as well as some lovely FMQ feathers!

Gail's lovely Fractured Paint Box quilt

The back of Gail's Fractured Paintbox Quilt!

Preeti of Sew Preeti Quilts used some lovely scraps to make her latest quilt, "Signal Sam".  She used her walking foot to quilt squiggly lines 2" apart.

"Signal Sam" by Preeti

Donnalee has been very busy making table runners for her guild's upcoming quilt show boutique. From her scraps, she also make some zipper pouches.

Donnalee's Table Runners

Donnalee's zipper pouches

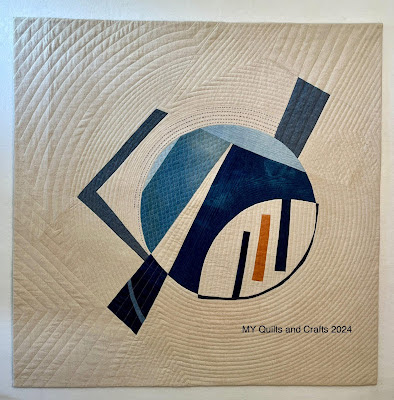
Margo Young of MY Quilts and Crafts had her "Off Kilter" quilt accepted to QuiltCon. Congrats!

Margo Young's "Off Kilter" quilt

It's now your turn 😊

You are invited to the Inlinkz link party!

Click here to enter

Thursday, December 12, 2024

A FM stitched portrait finish on Free Motion Mavericks

Hi and welcome 😊. I'm so happy that you can join me today. We are experiencing snow, drizzle, rain and freezing rain. It's quite the combination but since I bought some salt and a new shovel, we are prepared! Today I am sharing a project that I seem to have forgotten to post about. Now that it's finished, it's time. 

Free Motion Stitched Portrait


It all began in August with a TextileArtist.org class with artist Rosie James. Her work is wonderfully illustrative and done with FM stitching. Since many of her portraits are of the back of people, it feels doable if you're not comfortable drawing or stitching faces (like me!). They also incorporate colour as she uses fabric for the clothing. 

Hubby photographing scenery

It took me a while to choose the photo. I have many images like this one since we are often waiting for Hubby, off somewhere taking pictures.

Original photo taken this Spring in Alaska

After printing up the photo, I drew the important parts on tracing paper. I used coloured Sharpie markers to highlight the sections that would be covered in fabric.

Template on tissue paper of the original photo

From the template, I used the lightbox to trace the patterns of the jacket, backpack and pants and then cut the fabric.

Making the pattern on the lightbox

I used a FriXion pen to draw the entire scene on a white cotton background and then used free motion stitching to outline the scene. The most difficult part was to place the cut fabric patterns onto the piece. To ensure that they were in the correct place, I stitched over the tracing paper. That's why you see me picking out the paper below with tweezers.

Using the tweezers and magnifying glass to clean up the piece

The piece was mostly finished weeks ago but it took me that long to finish mounting it on the canvas. I first used tacks to mount it but didn't really like it. Finally I untacked the piece, added a layer of cotton batting between the canvas and the fabric and then tacked it permanently with staples. That's when I used my amazing new light with the magnifying glass to remove the paper and extra thread.

Finished piece, mounted on a canvas

What I learned
  • Making this project brought many learning opportunities. The first one is to check that you don't reverse the image between tracing the pattern and sewing it!
  • I tried to add free motion stitched grass beside the pants but it was horrible. Thank goodness that I was able to remove the stitching without damaging the piece.
  • I also learned that if you're going to mount the piece, that it would be best to be more accurate about the free motion stitched edges.
  • I'm very happy with the piece, now that it has batting underneath it. Without the batting where were a lot of puckering of the fabric. This smoothed out most of it.
  • I'm going to be doing a smaller piece incorporating this technique as part of a wedding present for my brother and sister-in-law. My SIL is an amazing seamstress and she kept me a piece of fabric from her wedding dress. The picture has the bride and groom from the side, so hopefully I'll be able to stitch their faces properly.
  • If you check out Rosie James' work, you will see that she loves to keep dangling threads on her work. I didn't keep them because that's not the look that I was going for in this piece, but one day I will try it!
  • BTW, I love my new desk lamp. It's very bright and as you can see, the magnifying glass came in handy.
  • I was really worried last week as I was using the new lamp and still couldn't see my FMQ properly. It turned out that I was wearing my regular glasses and not my reading glasses! The proper glasses solved the problem!😲
Related links
Linking parties 
I'll be linking up to many fun linking parties. Why not check some of them out...after you link up below! Monday Musings, Design Wall Monday, Sew & Tell, Midweek Makers, Put your foot down, Off The Wall Friday, Finished (Or Not) Friday, Beauties Pageant, TGIFFPatchwork & Quilts, 15 Minutes to Stitch 2024,


Free Motion Mavericks


Welcome to week 510 of Free Motion Mavericks! It was a productive week! Thanks for linking up. Here are the projects from last week that included FMQ, ruler work or walking foot quilting. 

Melva has two quilts that she's been FMQ. Her first is a finish of Sticks and Stones 2. Check out her post to see how she decided to quilt it.

Melva's Sticks and Stones 2

Melva has finished her Pieces of my Life, a quilt-as-you-go quilt

Melva's finished Pieces of My Life

One of the section of Melva's quilt-as-you-go quilt

Here is Brenda, of Songbird Design's quilt from the Virtual Christmas Cookie Exchange. This year it's a gorgeous table topper.

Brenda's gorgeous Christmas table topper

It's now your turn.

You are invited to the Inlinkz link party!

Click here to enter

Wednesday, December 04, 2024

It's that time of the year again!

Hi and welcome! Ottawa has finally gotten some snow. Is it here to stay? Who knows, but it should last at least a few days. Just enough to get us thinking about snow tires, shovels and winter boots!⛄❄ 

Seasonal Stuff!


I'm not sure what's happening to my brain, but I seem to be on Squirrel alert! I think about something and oops, there I go! All that to say that I have new projects to share with you.

More embroidery on metal

After making the flower last week, I thought that it would be fun to make a little Christmas tree ornament. I made a template of a Christmas tree and embossed the pattern on two pieces of metal. I made the holes around the tree using what I had learned previously 😊. 

First tree - my favourite

Second tree

Both embroidered trees, ready to be stitched together

The next step will be to add a star at the top of the first tree so that its shape will match the second one. I'll then very carefully cut about a ¼" from the embroidery. I was considering adding lace between the layers on the edges. I'm not sure if that will work. Eventually I have to stitch each treer, wrong sides together and add a little something to hang them.

Kawandi style stitching

I've been wanting to make another Kawandi style piece for a while. I got an attack of the Squirrel today and thought that I could make one for Christmas for my son and his fiancé. There is not way that I can do it all by hand before Christmas, so I've attached all of the pieces with the sewing machine. This made it so much easier. Now I'll start stitching it with various colours of perle cotton. There is nothing as relaxing as embroidering a running stitch. 

A lovely Christmas Kawandi style mat ready to stitch

Back of the piece

An assortment of perle cotton for stitching 

This is also my November Table Scraps Challenge. The colours were anything goes and the theme was a tree. There are some trees in there.

What I learned
  • I have to stop playing with squirrels! It's becoming almost obsessive!
  • I have so many projects that I want to work on. I thought that being retired would give me all this extra time, but somehow it's never enough.
  • I'm going to keep this short since I want lo link up to the November Table Scraps Challenge and I only have minutes to link up! It's OK, I came back to finish the post.
  • I did learn a few things while making the Christmas tree on metal. It turns out that fancy embroidery thread doesn't appreciate going through holes in metal! I wanted to use a red mouliné thread to decorate the tree. There was no way to get them through the holes! Instead, I used a red metallic rayon thread. I ended up putting the thread through the hole at the beginning, then going around the back stitches of the embroidered tree instead of the holes in the metal. It did let me go through the hole at the end to be secured! 
Related links
  • Finished embroidering on metal, November 29, 2024
  • Embroidering on metal and Free Motion Mavericks, November 28, 2024
  • Kawandi style quilting
    • Stitching and FMQ on Free Motion Mavericks, July 25, 2024
    • Alaska and a Quilt Show on Free Motion Mavericks, June 14, 2024
Linking parties

Free Motion Mavericks


Welcome to week 509 of Free Motion Mavericks. Thanks so much for linking up. Here are the projects from last week that included FMQ, ruler work or walking foot quilting. 

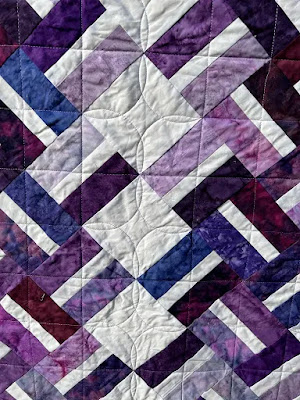
Gail had two wonderful finishes this month. Here is her Jelly Roll Mystery Quilt, done with a strip set and background fabrics from Island Batik. 

Gail's Jelly Roll Mystery Quilt

Gail quilted it on her domestic machine and used Silly Moon's Rocket and Beanie rulers. 

Close-up of Gail's quilted Jelly Roll Mystery Quilt

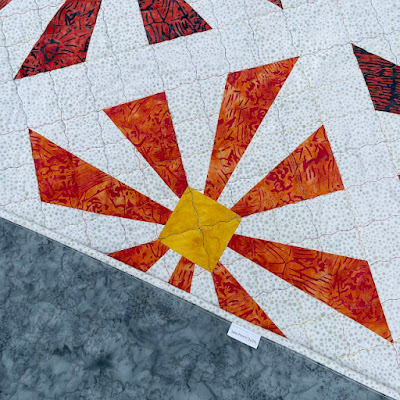
Preeti, of Sew Preeti Quilts published a new pattern, Fireworks. It really is lovely!

Preeti's Fireworks pattern is now available

Close up of Preeti's Fireworks quilt

Kat from Scrapbox Quilts finished quilting her Calico Gold 3 Yd quilt. What lovely colours. Kat quilted it using free motion / ruler quilting with overlapping circles. 

Kat's Calico Gold 3 Yd quilt

Close-up of the quilting of Calico Gold 3 Yd quilt

It's your turn!


You are invited to the Inlinkz link party!

Click here to enter

Friday, November 29, 2024

Finished embroidering on metal

Hi and welcome - just a quick post to share my finish. It was a great workshop by Emma Pannell. You can read more about it in my previous post.

Finished Flower 


I wanted to share this finish before next Thursday. Here is the finished project.

Flower embroidered on metal is finished

As you can see, once I finished embroidering, I embossed the rest of the metal to give it a little something special. A few of the other students from the workshop had done some amazing embossing on their pieces. As usual, I just went for it. I used my free motion quilting (FMQ) designs but embossing wasn't like drawing or FMQ. The curves were much more difficult to make. 

Close-up of the embroidered flower

I used a compass to emboss on the metal. The square end might have affected the smoothness of the embossing. I'll have to experiment with just using an old pen - which is how I originally embossed the flower. However, the end of the compass did make nice additional holes when I was stitching the leaves.

Using the end of the compass

Here is a progress photo of stitching the leaves. It was more difficult that stitching the petals since there was so much floss to deal with as well as the extra holes that I added. You can see those extra holes on the first leaf that I stitched.

Progress photo of the first leaf

What I learned
  • To make the densely embroidered leaves, I should have arranged the holes more closely and evenly. You can do that when you plan your project 😁
  • The compass worked really well to make the holes but wasn't great for embossing.
  • For some reason, I outlined the second leaf with a backstitch before embroidering it. I knew that I shouldn't but did it anyway. I guess if my stubbornness needs to come out, it may as well be on something as innocuous as embroidery! 
  • I realised that I didn't add any more French Knots in the centre of the flower. I guess that I just wanted it done.
  • I hope to use this in my needle punch project. That would mean trimming the metal around the flower. Until I use it, I have a pretty piece to look at. 😊
Related links
Linking parties
I'll be linking up to Free Motion Mavericks and November's Favourite Finish as well as many other fun linking parties. Why not check them out? Off The Wall FridayNeedle & Thread ThursdayPut your foot downBeauties PageantTGIFFPatchwork & Quilts, Slow Sunday Stitching

My finished flower was featured on Put your foot down. Thanks Denise!

Project details
Flower embroidered on metal 
made in a workshop with Emma Pannell

Size: 8" x 3"
Flower size: 2½" x 3"
Materials: aluminum can, embroidery floss
Techniques: embossing, embroidery


Thursday, November 28, 2024

Embroidering on metal and Free Motion Mavericks

Hi and welcome! For my American readers - Happy Thanksgiving! I hope that you get some time to stitch after all of that eating and visiting family 😋. I didn't have much to share (remember those very SLOW stitching projects!) so yesterday I worked on a little project so that I would have something to show.

Embroidering on metal


Yes, you read it right.... my background for this piece is the inside of an aluminum can! Years ago I played a little bit with burnished aluminum in an art quilt after a workshop with Hillary Rice, but I haven't since (see Related links). Aluminum is very pliable and easy to cut and pierce. Our latest Textileartist.org course is with Emma Pannell. She does some amazing embroidery on metal.

Embroidering on metal - so far

I wanted to make something very simple and small that I can eventually add to my punch needle piece. I settled on a flower, something that I can draw without tracing. Here is my template. 

Drawing of the flower with leaves

I cut the can open with my old scissors and then cut the edges to make sure that they were smooth. The scissors do a great job on aluminum. I taped the template onto the can and embossed it by tracing the image with an old pen. I then used my journal making awl to pierce the holes, following the embossed line. 

At first, the metal was directly on the mat when I made holes with the awl. That made holes in the mat, so I placed the piece of craft foam board between the metal and the mat. It may have made larger holes than I wanted, so I'll have to experiment with that. Our instructor uses a pottery needle to make the holes - these might be a little smaller.

Tools used to cut and pierce the metal

I used three strands of embroidery floss for the base of the petals, using a variation of the cross stitch. After all the petals were stitched, I added a lighter coloured thread of two strands to add some dimension.

Embroidering the petals with 3 strands of cotton.

Petals all embroidered using a variation on the cross stitch

Stitching with 2 strands of lighter cotton

It was only after finishing the first petal with the lighter cotton that I realised that I probably should have stitched them from the centre of the flower. I didn't want to start over, so I stitched three alternating petals in that direction, then I had the next three going the other way.

Finishing the petals and outlining them

I finished the petals by outlining them with a back stitch. After outlining the centre of the flower using 4 strands of embroidery floss, I added a hole in the centre and stitched the area. Over the middle hole, I added a French Knot.

Metal in an art piece

As I mentioned, I used metal in my Canada 150 art piece in 2017. Here is the piece and you can see below the burnished metal that has been stitched by machine and embossed. 

Canada 150 art piece

Cut, embossed and stitched burnished metal


What I learned
  • It's easy to cut the aluminum can but not so easy to keep it flat. I thought that I could place it under heavy books to flatten it (like my journal pages) but that didn't really help. 
  • Keeping the aluminum flat is important if you want to frame your piece. I'm hoping that it won't make a big difference when I trim the flower and stitch it onto my punch needle piece.
  • Stitching on the metal is very much like stitching on cardboard or paper. The holes need to be punched from the front to get the best effect.
  • My holes may be a little big, so I'll experiment with that next time. I think that using more strands of thread to outline each section might also help fill in those holes.
  • It got pretty difficult to find the holes when there was a lot of stitching. Instead of trying to find the hole from the back, I placed my needle in the hole from the front, without going right through. I could then see the needle sticking out of the back and knew where to stitch from the back. 
  • I like the French Knot in the middle of the centre and I think that adding many more would be very effective - hopefully I'll feel like it!😁
  • I'm going to use another stitching technique on the leaves - in theory they will be and look denser. 
  • In my workshop with Hillary Rice, we had used a big propane torch to burnish the aluminum. That created lovely colours, including gold. Apparently you can also use copper which already had a lovely gold colour. 
  • I don't think that I'm going to work with metal a lot but it is fun to discover new techniques and material.
Related links
Linking parties
I'll be linking up to many fun linking parties. Why not check some out, after you've linked up below? Monday Musings, Sew & Tell, Midweek Makers, Off The Wall Friday


Free Motion Mavericks


Welcome to week 508 of Free Motion Mavericks! It was a very productive week - thanks for linking up! Here are the projects from last week that included FMQ, ruler work or walking foot quilting. 

Sandra from mmm quilts made this very lovely Goose Dance quilt. She FMQ it with her favourite fat flowers design with loops and added swirls with hooks as well. She also quilted in 3 ghost geese. It looks great! 

Sandra's FMQ Goose Dance quilt.

Preeti from Sew Preeti Quilts finished her LION quilt for the Island Batik Dresden Challenge and Blog Hop. Doesn't her signature wavy stitch quilting look great on her Grandmother's Fans quilt?

Preeti's lovely LION quilt with Grandmother's Fans

It's now your turn 😉

You are invited to the Inlinkz link party!

Click here to enter