
I may have been relatively quiet on the social media front, but this time it's because I've been busy quilting 😊 I love being able to say that! Here's the latest class that I've taken.
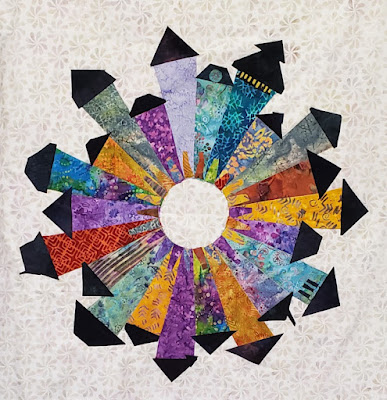
Dresden Neighborhood Quilt Class
I've loved the Dresden Neighborhood Quilt since the first time that I saw it...but I also saw the word "Dresden" in there and figure that since I would rather not do needle-turn appliqué again, that this wasn't for me. However, after seeing a class offered through my local guild, I thought that it would be easier if I was sharing the pain with a virtual class. I was so thrilled when I learned that all of it was sewn by machine! 😊
 |
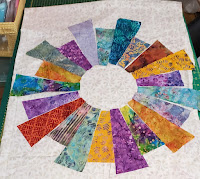
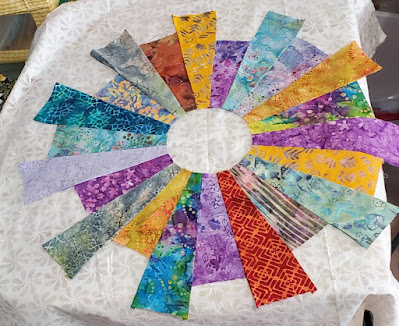
| My Dresden Neighborhood quilt so far |
Since I wasn't sure what fabrics to use, I googled "Dresden Neighborhood quilt" and looked at tons of pictures of these finished quilts. All of them are great, but I was drawn to a couple of them that I uploaded onto my phone to study them. The ones that I liked had strong colours with a light background.
Since, of course, I wanted something funky, I used bright batiks that have a small range of colours on them. I used the very orange-on-orange and the gray-on-yellow batiks as my starting point. From there I added other colourful batiks. Many have purple and colours that are complimentary to orange and yellow.
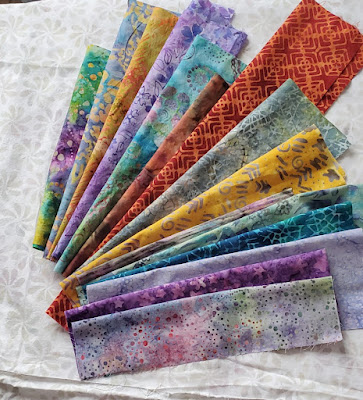 |
| Fabric choices |
During the class, I cut out my house fabrics with a template. I'm not sure what happened but the template was not the size it should have been so I ended up needing 21 houses instead of the 20 from the pattern. When I sewed them together (I was so nervous!), I thought that I would have to do some major fudging to make it work, but finally I just added one more house (that's 22) to create a perfect circle....no fudging required 😊
 |
| Houses cut to different heights - still 21 of them |
 |
| Houses before cutting and sewing |
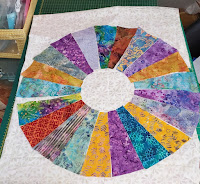
After sewing them together and adding one more house, it was ready to be tacked onto the background.
 |
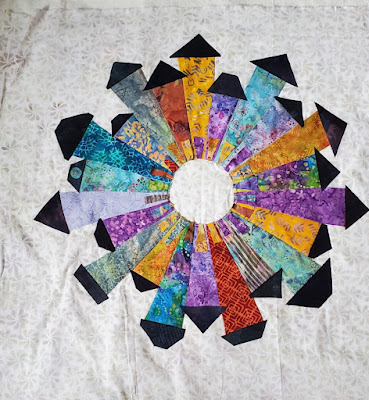
| 22 houses sewn together |
At this point, the class members had a discussion with our teacher, Michelle Banton of Little Pups Designs about whether to sew the pieces on or to quilt them on, that is to add the batting and backing right away before doing more than tacking the houses to the background. I opted to add the batting right away, so I sandwiched it and started quilting as I sewed things on.
 |
| Adding roofs and doors to the 22 houses |
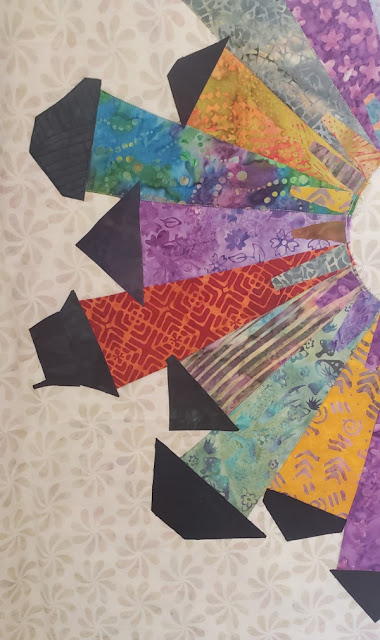
I made some slightly more elaborate rooves and started adding things such as awnings and windows.
 |
| More elaborate rooves with other fun features |
 |
| FMQ around the houses and some of the rooves |
 |
| Adding adhesive bonding web to the fabric scraps |
What I learned
- If I left the FMQ to the end, I know that I have too many other projects right now and would only finish it in a few months.
Another incentive to get this mostly done is that our teacher holds a quick show and tell two or three weeks after the class so that we can share our progress. Since it's on Zoom, I will be receiving all of the participant's pictures of their project and arranging them in PowerPoint. It really is the best and easiest way to see them virtually.My other Dresden needle-turn
appliqué project- I've made this project larger than I usually do so that I can hang it up in our entrance. I can't wait to see it up there all finished!
- FYI, the quilt here is my first (and last?) Dresden needle-turn appliqué project.
- It just occurred to me that there must be a way to make the Dresden shape using a technique like English Paper Piecing. I think that it would make it easier to stitch down....I'll have to check that out!

Related links
- Kim Lapacek's Dresden Neighborhood mini quilt pattern
- Michelle Banton of Little Pups Designs
- Learning Needle Turn Appliqué from an Expert, October 16, 2013
Hi,
ReplyDeleteI really like this Dresden block. So colorful! Can I as what size is the background block? Have a great day!
Hi Sherrie, the Dresden block is 20"x20" and my background is 30" x 30" I'm hoping to add something in the background, maybe birds or something, or just a lot of FMQ. It'll be big enough for my entrance. Have a great week!
DeleteI have always loved this design too. All of your different roofs really add to the charm. Thanks for sharing with Oh Scrap!
ReplyDeleteThanks so much Cynthia. It's been a fun project. Thanks for the linking party - have a great week.
DeleteI love it! Everything looks better done in Batiks. LOL
ReplyDeleteThanks Loulee, I agree that anything in batiks looks great :-)
DeleteUn dresden à la machine, je m'inscris aussi ;) Magnifique choix de tissus, ton village est très réussi, bravo !
ReplyDeleteMerci Frédérique. J'ai beaucoup dee plaisir à ajouter des fenêtres etc. - peut-être un peu trop! Je crois que Gaudi m'inspirais :-) Bonne semaine. Bisou
DeleteLove your Dresden Village. Somewhere in the stash is a kit I won from the designer, maybe I will resurrect it!
ReplyDeleteHi Kathleen, I think that you should, at least eventually. It's a lot of fun!
DeleteAndree, your Dresden neighbourhood is fabulous! Love the fabrics you chose. All those sweet houses, with the funky rooves, doors and windows 'built' around a circle are such fun!
ReplyDeleteThanks so much Kim. The houses have become funkier as I add details - I may have been inspired by Gaudi :-)
DeleteThis is a fun block and it looks really good in those fabrics :)
ReplyDeleteThanks Janine, I'm really enjoy this project!
DeleteI love your Dresden Neighborhood. Saw you link this on The Peacock Party Linky.
ReplyDeleteThanks Daryl, Glad you could drop by. It's been a fun class and project!
DeleteWow! I really love your Dresden neighborhood. Thanks for sharing your process of color selection. I just saw one with solids from Cherrywood fabrics and bought their background. ( I have a scrapbag from them. ) But your colors are really great and I like your personal additions.
ReplyDeleteThanks Debbie, it's becoming wilder as I add details. I can't wait to FMQ it.
DeleteHow fun, Andree!!! I have a kit for the Dresden Neighborhood. It's the ONLY quilt kit I've ever purchased. I've had it for several years, but still have taken it out of the package!
ReplyDeleteHi Joy, that seems to be a running theme here! I don't buy many kits but I think that I've only made one. I now stay away, but I do encourage you to start it. It's much easier than I expected :-)
DeleteYour 'neighborhood' is very cute!
ReplyDeleteThanks so much Susan. I'm looking forward to working on it again. Thanks for your linking parties :-)
DeleteI bought this same ruler and kit, but I haven’t tried it yet. Yours is looking fabulous!
ReplyDeleteHi Michelle, I hope that you get a chance to make it. It is slower going with the details but so much fun. I'm looking forward to having time to work on it again.
DeleteHello Andrée, Those are gorgeous batiks! All the different colours work so well together, and the golden doors look like open doors at night time.
ReplyDeleteThank you for linking up!
Love, Muv
Thanks Muv, I hadn't noticed that, but the golden doors look very inviting. I'm looking forward to working on it again...one day!
Delete